
You know what people always ask me about small bathrooms? They pull up a picture on their phone of some Pinterest-perfect shelfie and ask, “Where can I buy that?” And I have to be the one to tell them that buying more stuff is the absolute last step. The real magic isn’t in the product; it’s in the process. Because your bathroom isn’t just a utility closet for your face. It’s the first space you see in the morning and the last one at night. It sets the emotional tone for your entire day. And when it’s a chaotic mess of half-empty bottles and jumbled drawers, it starts your day with a tiny, unnecessary spike of stress.
The big lie everyone believes is that you need more space. You don’t. You need less stuff and a smarter plan for what’s left. Most of what clogs up a small bathroom doesn’t even belong there. So before we talk about buying a single cute basket, let’s talk about the real work. The stuff that actually matters. This isn’t just about organizing; it’s about creating a space that genuinely supports your wellbeing.
strategic decluttering & Space Assessment
Okay, deep breath. This is the part everyone wants to skip, but it’s the most important. You cannot organize clutter. It’s like trying to file a trash can. We have to be ruthless here, but I promise the feeling of clarity on the other side is worth it. This isn’t just tidying up; it’s a psychological reset.
1. Audit All Contents: Discover Unused Clutter Hotspots
First thing’s first: you have to pull everything out. And I mean everything. Every drawer, every cabinet, every dusty corner of the shower. Pile it all up on a towel on the floor. I know, it’s horrifying. But you have to see the beast to slay it. This is your “clutter inventory,” and seeing it all in one place forces you to confront the reality of what you’ve been hoarding. It’s a powerful moment that flips a switch in your brain from “I need more space” to “Why do I own six half-used bottles of lotion?”
Once you’re staring at Mount Sunscreen-and-Sample-Sizes, get three bags: Toss, Donate/Recycle, and Keep. Toss anything expired, broken, or crusty. Don’t think about it, just do it. For the “Keep” pile, get real with yourself. Have you used it in the last six months? Do you have three others just like it? The goal isn’t just to make things fit; it’s to create a space filled only with things that serve you and make your daily routine feel good. This one step will likely free up 25% of your space instantly, no tools required.
Once you’ve whittled it down to only the essentials you actually use and love, you’ve set the stage for a system that actually lasts.
2. Implement the “One In, One Out” Rule for Lasting Order
Now that you’ve done the hard work, here’s how you keep from ever having to do a purge that dramatic again. The “One In, One Out” rule. It sounds simple, but it’s a powerful psychological barrier against future clutter. For every new item you bring into the bathroom—a new face wash, a new tube of toothpaste—its predecessor has to leave. Completely gone. Finished, recycled, tossed. No exceptions.
This rule short-circuits that impulse to buy the fancy new serum when you still have one at home. It forces you to be mindful of what you’re consuming and turns shopping into a conscious replacement activity, not a hoarding one. I had a client who was drowning in clutter, and this single rule changed everything for her. She stopped mindlessly adding to the pile and started consciously curating her space. It’s a bit of tough love you give yourself, and it’s the only way to maintain that hard-won zen.
Now you have a system for what comes in and out, but what about the stuff that just… doesn’t belong?
3. Declutter with a Ruthless “Keep, Toss, Relocate” System
This builds on your initial audit but adds a crucial third category: “Relocate.” Bathrooms become the junk drawer of the entire house. Bulk toilet paper, extra light bulbs, the first-aid kit for a zombie apocalypse… none of it needs to live in prime real estate next to your toothbrush. The “Relocate” pile is for anything you need to keep, but that doesn’t need to be in the bathroom right now.
Go through your “Keep” pile one more time with this lens. Bulk supplies can live in a hall closet. That fancy curling iron you use twice a year can go in a bin in your bedroom. This isn’t about getting rid of things; it’s about giving items a proper home based on their function and frequency of use. A client of mine cleared out half her under-sink cabinet simply by moving a giant pack of paper towels and a box of old medications to the linen closet down the hall. Suddenly, she had a ton of space for her daily essentials. It’s a game-changer.
With your inventory ruthlessly culled, now we can finally start putting things back in a way that makes sense for your brain.
4. Categorize Essentials for Quicker Access & Smarter Grouping
Okay, now for the fun part. Look at your final, beautifully curated pile of “Keep” items. Now, group them like a little family. All the dental stuff together. All the hair stuff together. Morning skincare, evening skincare, first-aid, etc. This is called “point-of-use” organizing. It’s an organizational psychology trick: your brain is hardwired to look for things in logical groups, so setting up your space this way eliminates “search time” and the low-grade stress that comes with it.
Store items where you use them. Dental floss next to the toothbrush. Face wash next to the sink. By assigning a “home” to each category, you’re not just organizing; you’re building a physical map for your daily rituals. This dramatically speeds up your routine and stops that frantic morning rummaging. I use small, clear bins to create these zones inside my drawers and cabinets. It feels so calming to open a drawer and see exactly where everything is, instead of a jumbled mess.
Now that you know what you’re storing, you can figure out where you’re storing it, which starts with a tape measure.
5. Measure Every Nook: Maximize Awkward Gaps for Storage
This is my secret weapon, and it’s where you start to feel like a design genius. Grab a tape measure and look at your bathroom with new eyes. That four-inch gap between the toilet and the vanity? That weird empty space above the door frame? That’s not dead space; that’s a storage opportunity waiting to happen. You need to measure every single one of these awkward, forgotten gaps.
Write down the dimensions. Width, depth, and height. This step is critical because it moves you from wishful thinking to strategic action. Instead of buying a cute cart and hoping it fits, you’re now hunting for a solution for a specific, 7-inch-wide problem. This precision is what separates a truly optimized small space from one that just has a lot of mismatched organizers crammed into it. It’s how you find those slim-fit solutions that make a space feel custom-built and incredibly efficient.
With your measurements in hand, it’s time to defy gravity and start thinking vertically.
Unlocking Vertical & Wall Potential
When you can’t build out, you have to build up. Your walls are a massive, untapped resource. Thinking vertically is the number one psychological trick to making a small room feel larger because it draws the eye upward and keeps the floor clear, which creates a feeling of spaciousness.
6. Install Over-the-Door Organizers for Instant Storage Boost
This is the easiest, most immediate win you can get. An over-the-door organizer is pure, unadulterated storage magic. You’re taking a completely useless surface—the back of your door—and turning it into a floor-to-ceiling powerhouse. This isn’t just for shoes! The ones with clear pockets are amazing for corralling all those little things that clutter up drawers and counters.
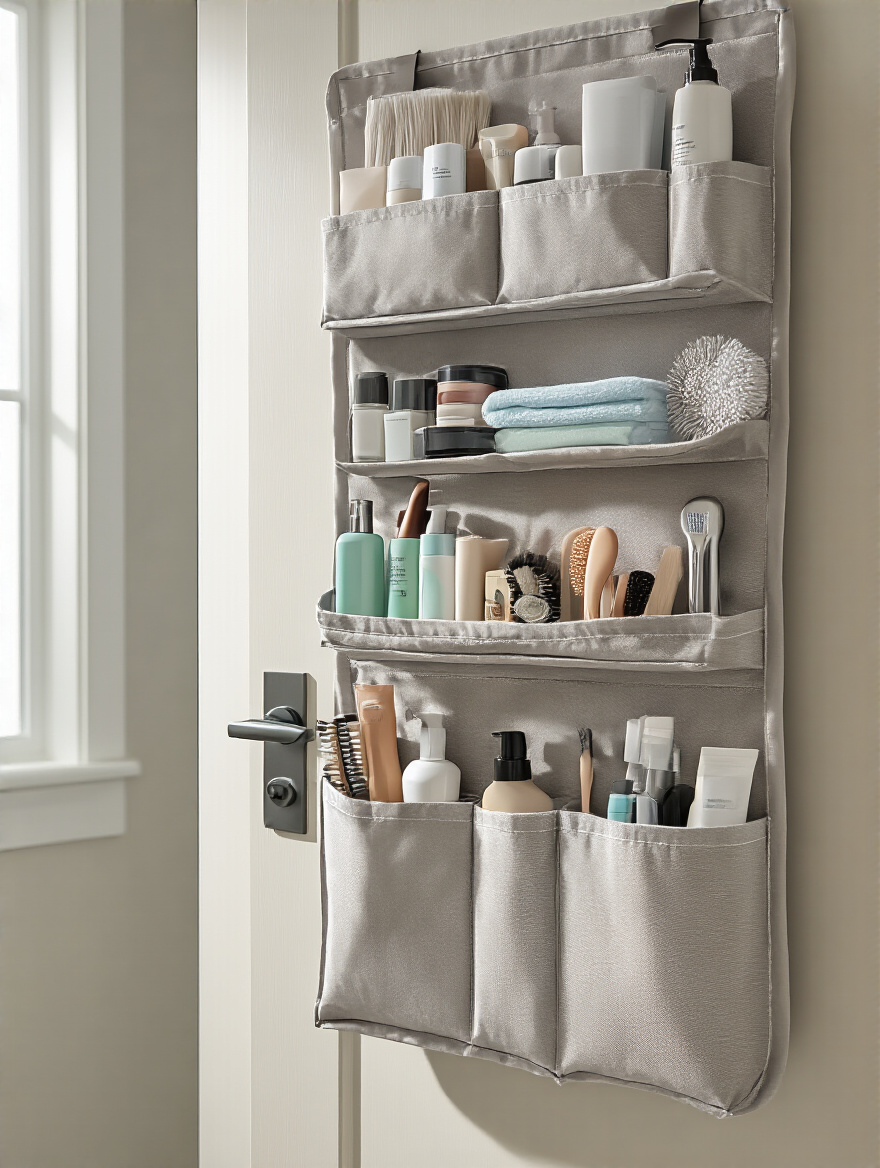
Think hair sprays, lotions, travel-sized toiletries, even cleaning supplies. Getting all of that stuff off your precious horizontal surfaces and into designated pockets is a game-changer. I especially love using these on the inside of a vanity or closet door. It keeps everything hidden and orderly but still instantly accessible. This is a renter’s dream because it adds a ton of storage without a single nail hole.
Once you realize your doors are basically just lazy walls, you’ll start seeing potential everywhere, especially with the smaller stuff.
7. Utilize Adhesive Wall Hooks for Lightweight, Accessible Items
Adhesive hooks are the unsung heroes of small bathroom organization. They are so much more than just a place to hang your towel. I use them for everything. A hook on the side of the vanity to hang my hairdryer. A small, clear hook on the inside of the medicine cabinet to hang my electric toothbrush charger. A hook on the wall next to the shower for my loofah.
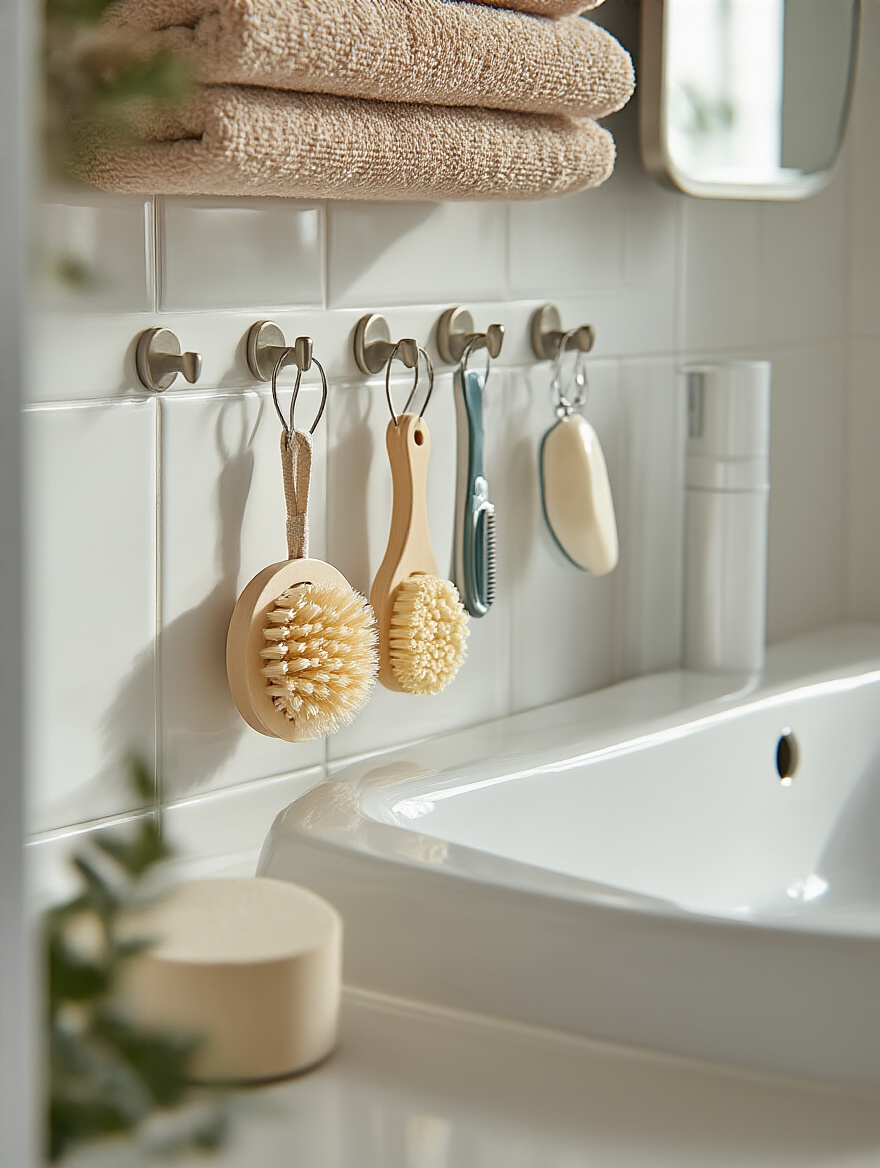
The trick is to think about your routine. What do you reach for every single day? Give that item its own dedicated, easy-to-reach home on a hook. This little hack does something amazing for your mental state: it removes a micro-decision from your day. You never have to think about where your razor is; it’s just there. Using these damage-free hooks to get small things off your counter is one of the fastest ways to make a bathroom feel cleaner and more serene.
Now that we’ve hung the small things, let’s give the bigger items a place of honor on the wall.
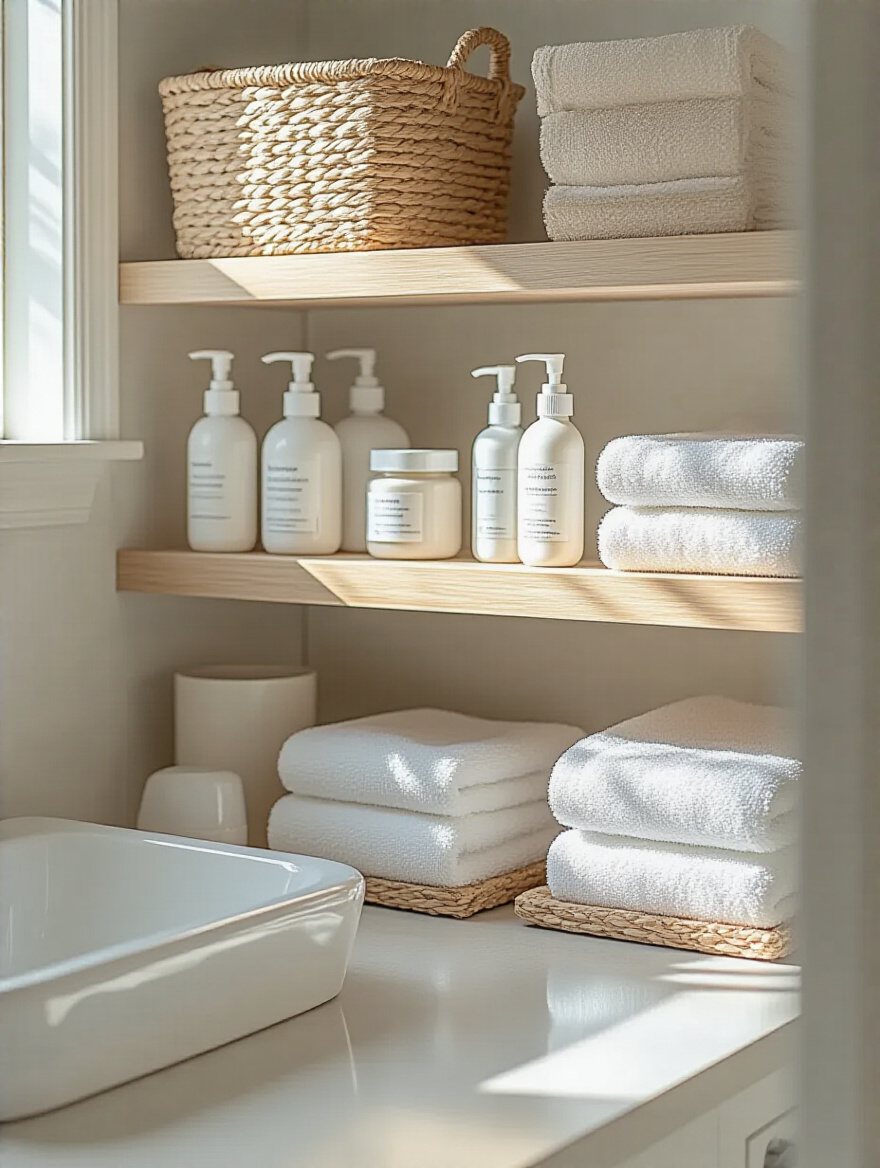
8. Mount Floating Shelves to Transform Empty Walls into Displays
Floating shelves are brilliant because they provide storage while feeling visually light. Unlike a bulky cabinet, they don’t take up any floor space and have a clean, minimalist look that tricks your brain into seeing more open area. The wall space above a toilet is the most common spot, and it’s a goldmine. You can store rolled-up towels, a basket of extra toilet paper, or even a few beautiful-looking products and a small plant.
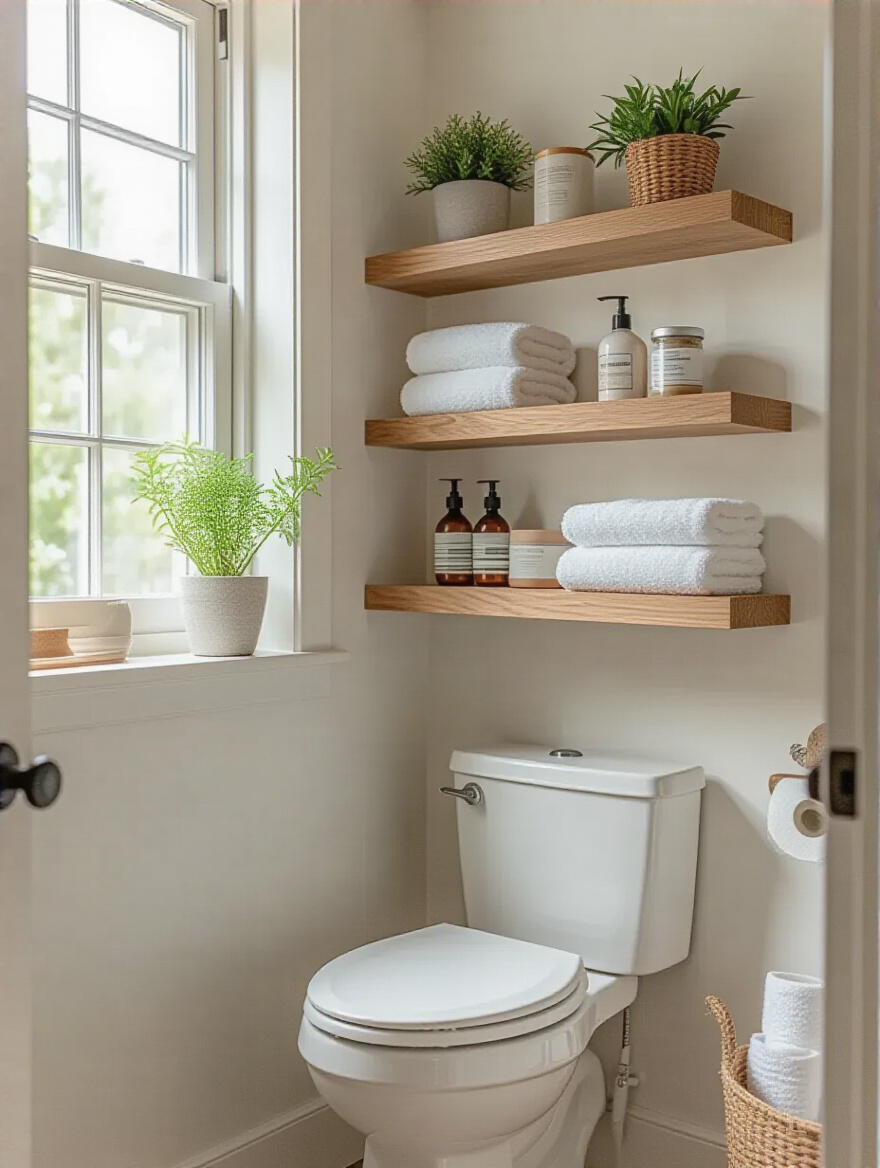
The key to making them look great is to resist the urge to cram them full. Curate them. This is where your design eye comes in. Use them for a mix of functional items (like soaps in a beautiful glass dispenser) and decorative touches. This elevates the storage from purely utilitarian to a genuine design feature that adds personality and style to your space. It makes the room feel intentionally designed, not just stuffed with things.
But what if you need more flexible, mobile storage? That’s where a rolling cart comes in.
9. Opt for Slim Rolling Carts to Fit Into Narrow, Underused Gaps
Remember those awkward gaps you measured? This is their moment to shine. Slim rolling carts are designed specifically to slide into those narrow, forgotten spaces—next to the toilet, beside the tub, at the end of a vanity. They are the perfect solution for adding layers of storage that can be pulled out when you need it and tucked away when you don’t.
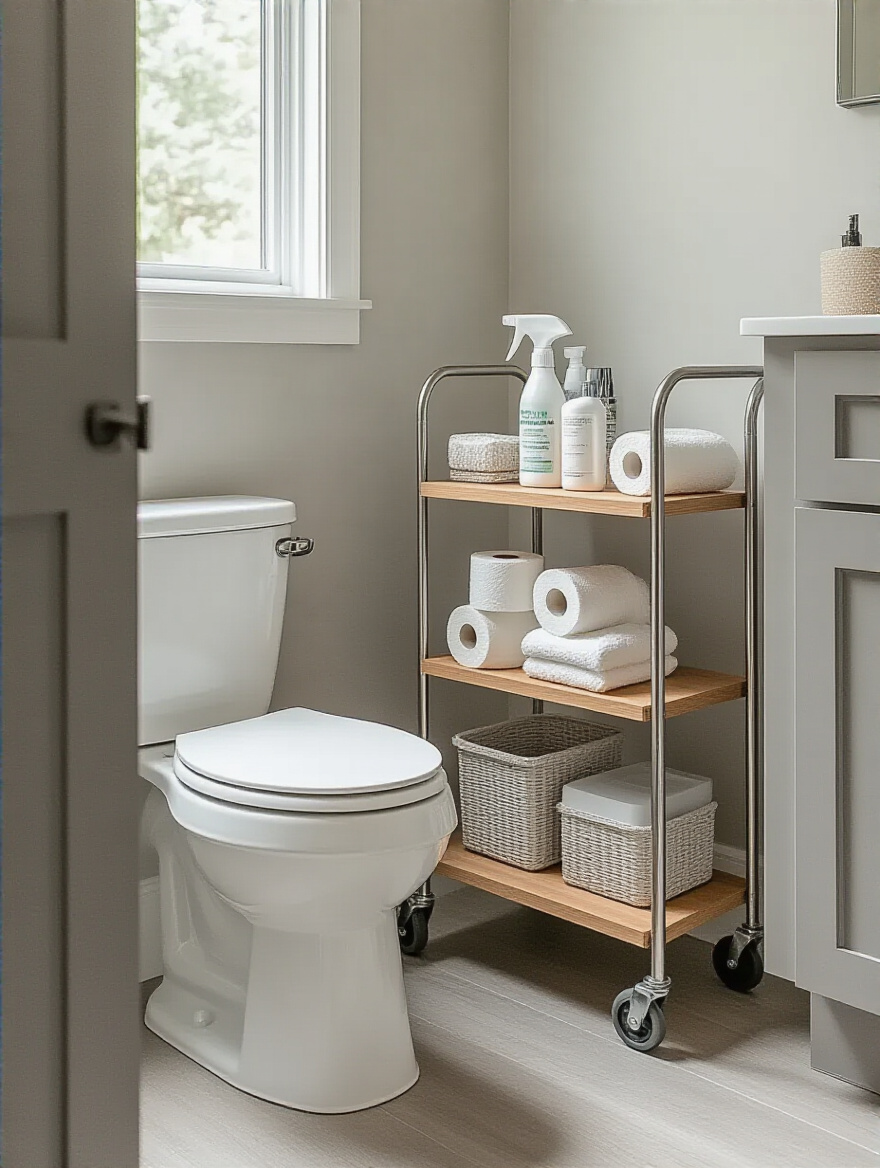
I love these because they are so incredibly versatile. The top tier can be for your daily skincare, the middle for hair tools, and the bottom for cleaning supplies. It’s like having a portable mini-closet. Because they’re mobile, they’re perfect for renters or for people who like to change things up. This is a perfect example of finding a product to solve a specific problem you identified, not the other way around.
Now let’s tackle the wettest part of the room: the shower itself.
10. Employ Suction Cup Caddies in Showers for Draining Product Storage
The floor of the tub and the corner ledges are not storage shelves. Let’s just agree on that. It looks messy, and it’s a nightmare to clean around. Good suction cup caddies are the answer. They use that vertical wall space inside the shower to keep all your bottles organized and, most importantly, allow them to drain properly. This is crucial for preventing that gross soap scum and mildew buildup.

My shortcut? Spend the extra few dollars on the ones with a “power-lock” or lever mechanism. The cheap, basic ones will inevitably slide down the wall at 3 AM and give you a heart attack. The good ones, however, will stay put. It’s a small investment that pays huge dividends in both organization and hygiene, making your shower feel cleaner and more spa-like.
We’ve conquered the shower, so let’s turn our attention back to that prime real estate above the toilet.
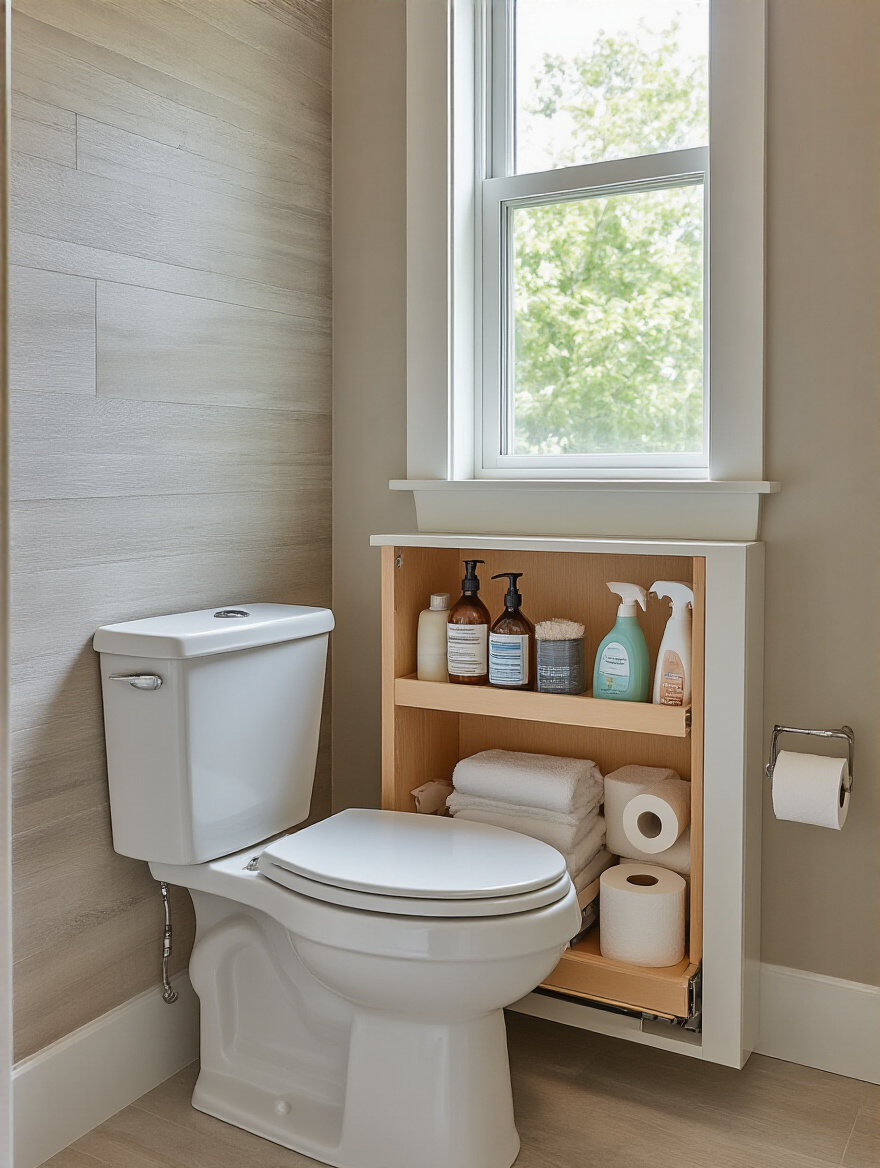
11. Add a Toilet-Topper Unit to Leverage Often-Missed Vertical Space
If a few floating shelves aren’t enough, an over-the-toilet storage unit (sometimes called an etagere) is the next level up. This is like adding a freestanding closet without taking up any new floor space. It’s the perfect spot for things you need accessible but not necessarily on display—think extra towels, backup supplies, and baskets of less-sightly items.

I personally love the ones that have a mix of open shelving and closed cabinets. You can display pretty things on the open shelves and hide the practical stuff behind the doors. The key here is to make sure you anchor it to the wall. Seriously. Most come with an anti-tip kit for a reason. An unstable, top-heavy piece of furniture is the last thing you want in a small, tight space.
Now that we’ve maxed out the walls, let’s go micro and hack the insides of your existing furniture.
Smart Organizers & Hidden Storage Hacks
This is where we get into the nitty-gritty. The real transformation happens when you organize the inside of your space as beautifully as the outside. It’s that feeling of opening a drawer and seeing perfect, calming order instead of chaos.
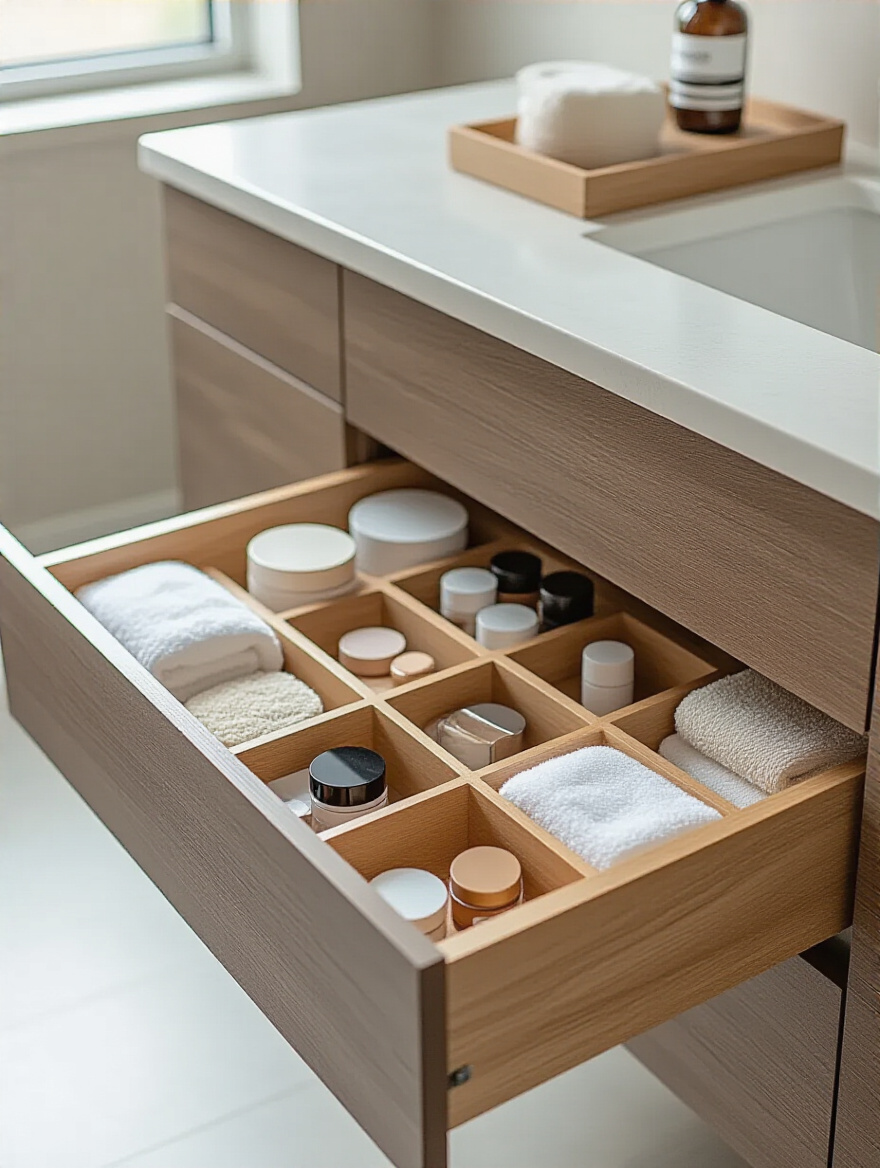
12. Integrate Drawer Dividers to Neatly Contain Small Toiletries
Your vanity drawer does not have to be a wasteland of jumbled junk. Drawer dividers are a non-negotiable for me. They create a grid system that gives every single tiny thing—from your floss to your lip balm—its own designated home. This isn’t just about neatness; it’s about efficiency and reducing mental load. You never have to hunt for anything again.
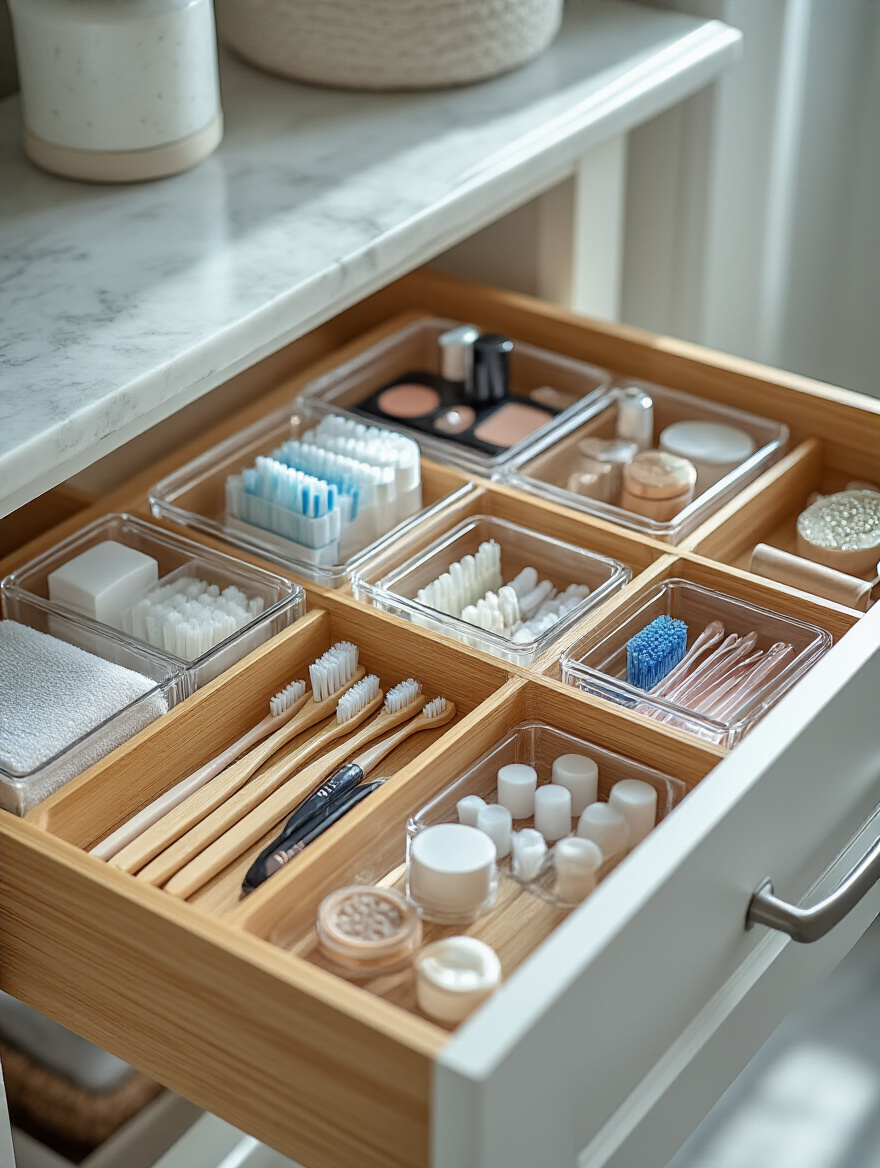
The best ones are the adjustable or modular kinds, usually in clear acrylic or bamboo. This allows you to create a custom layout that perfectly fits your specific items. I once spent 20 minutes with a client just mapping out her single vanity drawer with these little bins. The look of relief on her face when we were done was palpable. She said it was the first time she hadn’t felt a tiny jolt of anxiety when getting ready in the morning. That’s the power of containment.
From shallow drawers, let’s dive deep into your cabinets.
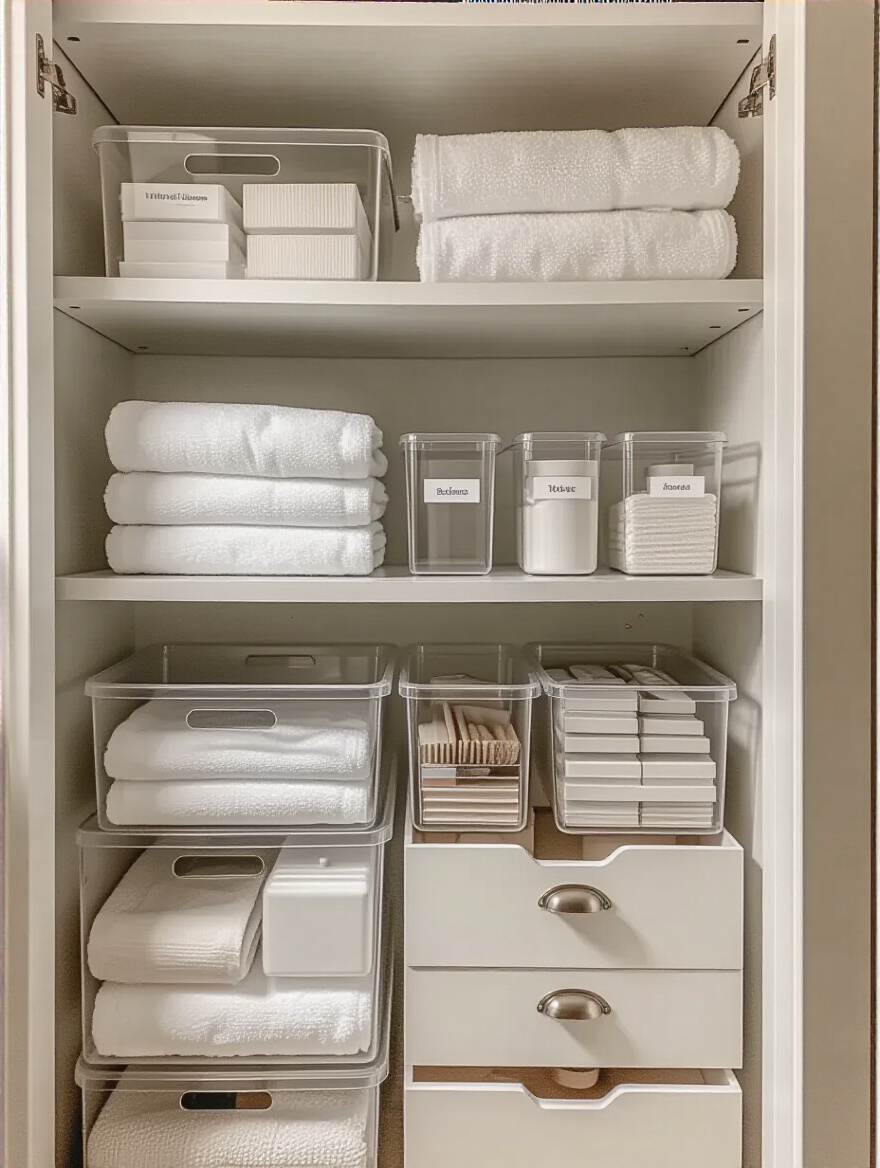
13. Employ Stackable Bins for Efficient Vertical Cabinet Storage
The cabinet under the sink is usually a disaster zone. It’s deep, it’s dark, and it’s full of awkward pipes. The biggest mistake people make is only using the bottom floor of the cabinet. You’re wasting all that vertical air! Stackable bins are the solution. They let you build up, effectively creating a second or even third story of storage.
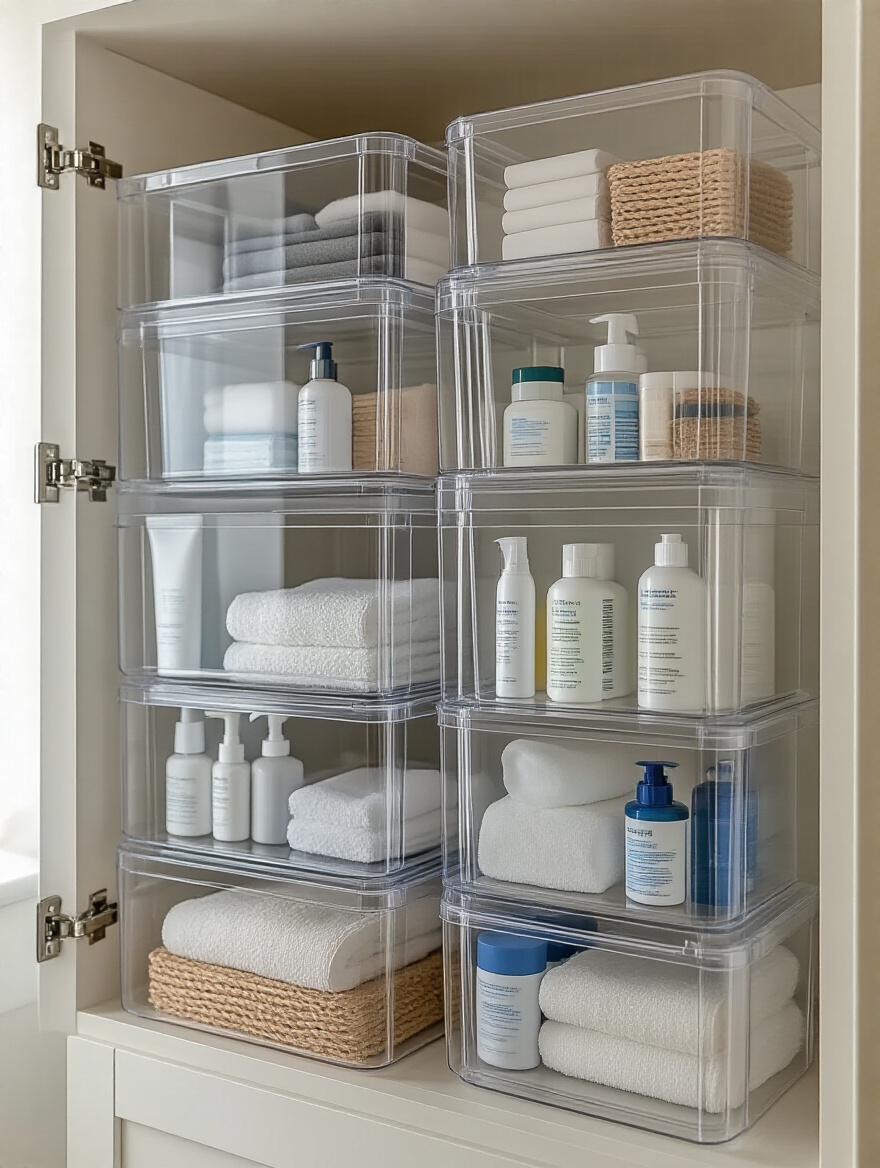
I love using clear, stackable bins with pull-out drawers. This is the pro move. It means you can grab something from the bottom bin without having to unstack everything on top of it. You can categorize them: one for cleaning supplies, one for extra hair products, etc. This single hack can literally double the usable space under your sink and make finding things a breeze.
While we’re inside the cabinet, don’t forget about the door.
14. Use Magnetic Strips Inside Cabinet Doors for Metal Beauty Tools
This is one of my favorite “aha!” moments to give clients. That magnetic strip you use for knives in the kitchen? It’s brilliant on the inside of a medicine cabinet door. It’s the perfect home for all those small metal things that get lost in the bottom of a drawer: tweezers, bobby pins, nail clippers, small scissors.
It keeps them visible, organized, and instantly accessible. You’re using a completely forgotten surface to create incredibly efficient storage. It’s a tiny detail that makes a huge difference in how functional the space feels. It’s that satisfying feeling of everything having its perfect, clever place.
Now let’s find a home for your stuff in those awkward, dusty corners.
15. Transform Dead Corner Space with Triangular Wall Shelf Units
Corners are another classic dead zone in a bathroom. They’re awkward and hard to use. Triangular corner shelves are designed to solve this exact problem. They fit snugly into a 90-degree corner, turning it from a forgotten space into a neat little storage tower. These are especially great in the shower or over the corner of a tub.
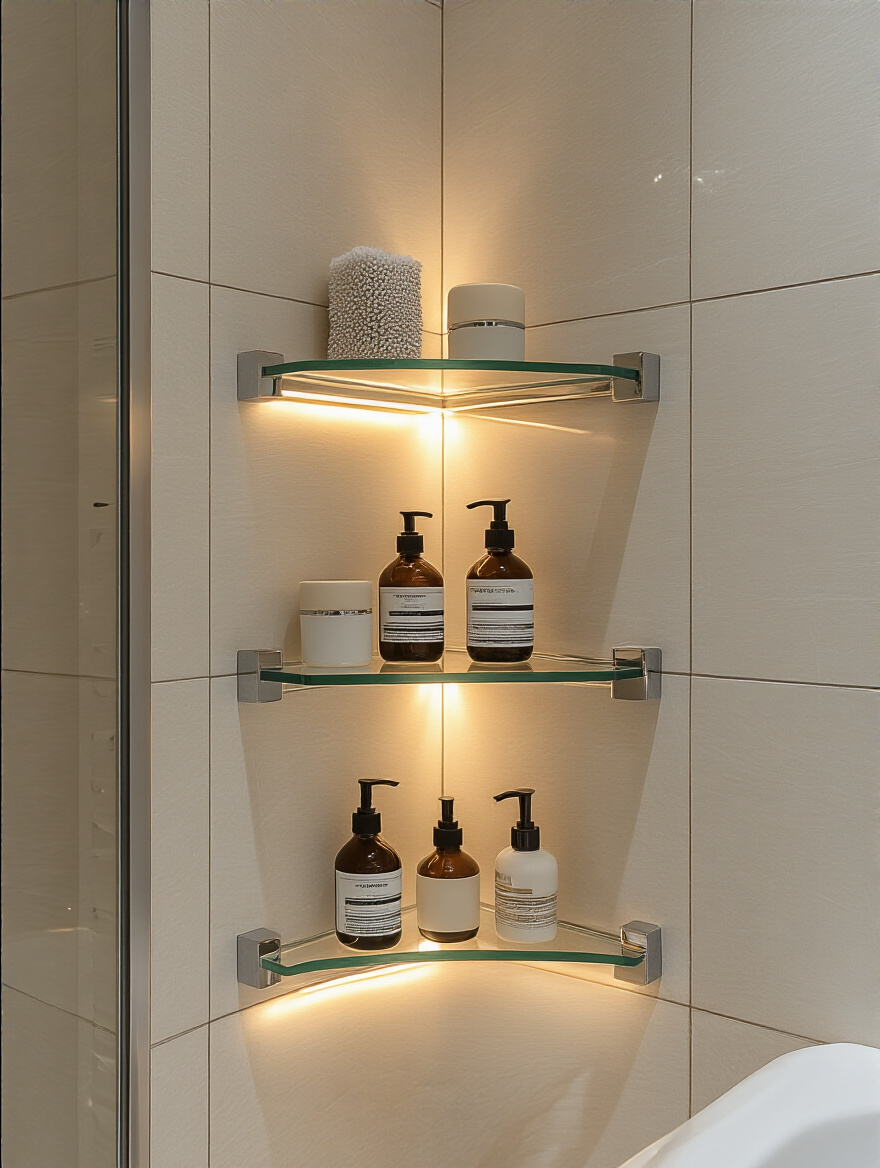
I love using glass or clear acrylic corner shelves because they feel almost invisible, keeping the space feeling open while still providing a home for your soaps and shampoos. You can also stack them up a wall in a dry corner for things like hand towels, a candle, or a small plant. It’s about looking at every single part of your room’s geometry and making it work for you.
And speaking of clever repurposing, let’s revisit an old-school organizer with a new mission.
16. Utilize Door-Back Shoe Organizers for Bottles and Cleaning Supplies
I know we already talked about over-the-door organizers, but the classic, pocketed shoe organizer deserves its own shout-out. It is, hands down, one of the most cost-effective, high-impact storage solutions you can buy for a bathroom. Forget shoes—this is for your full-sized shampoo bottles, your hairspray, your contact solution, and all your cleaning supplies.
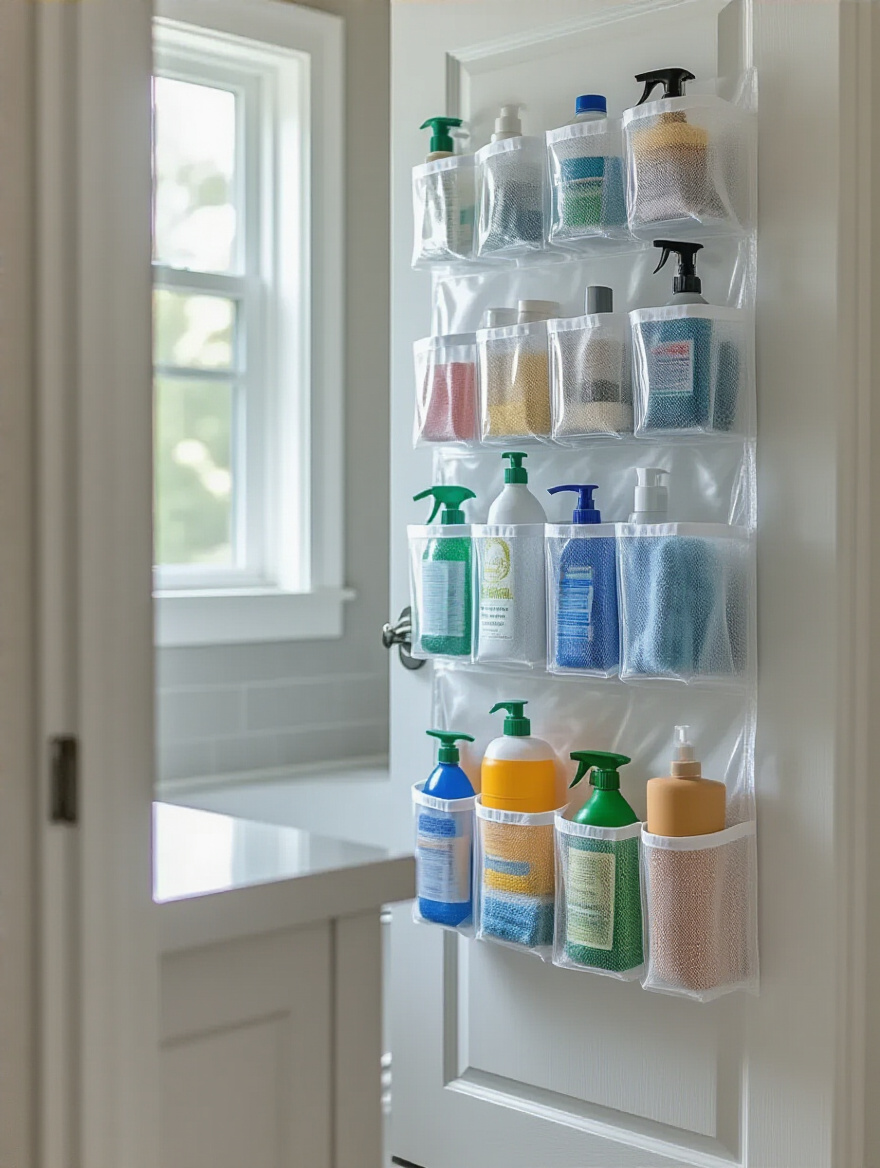
By using a clear plastic one, you can see everything at a glance. It gets all those bulky bottles out of your prime cabinet and shower real estate and moves them to the back of the door. I once had a client in a tiny apartment who used one of these to store all of her toiletries, leaving her one small vanity completely clear. It’s not the fanciest solution, but it is unbelievably effective.
With everything off the floor, let’s find a stylish way to use the space under an open vanity.
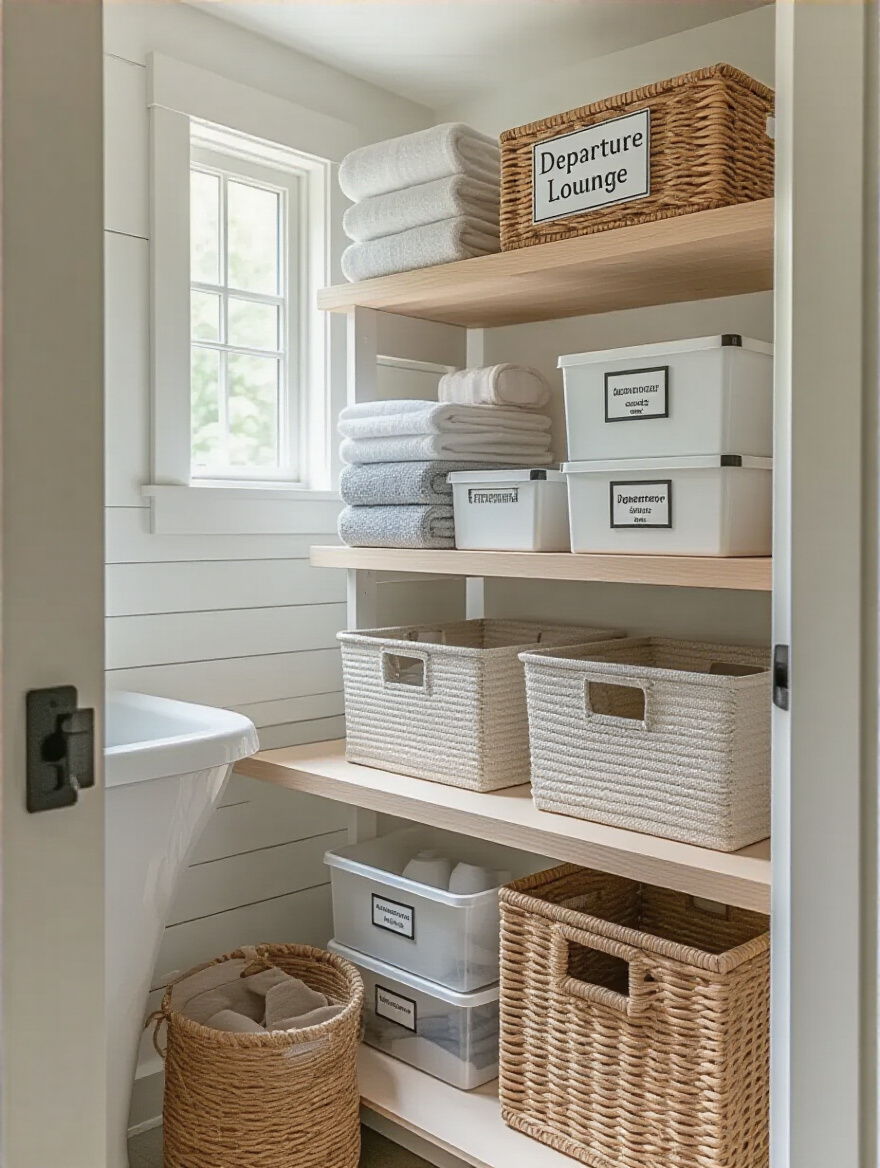
17. Add Decorative Baskets Beneath Open Vanities for Soft Storage
Open or floating vanities are gorgeous and make a small bathroom feel much bigger, but they leave you with a visible storage challenge. The solution? Beautiful baskets. This is where function meets design. You can use woven baskets, wire bins, or fabric containers to hold things like extra towels, toilet paper, or even a hairdryer.
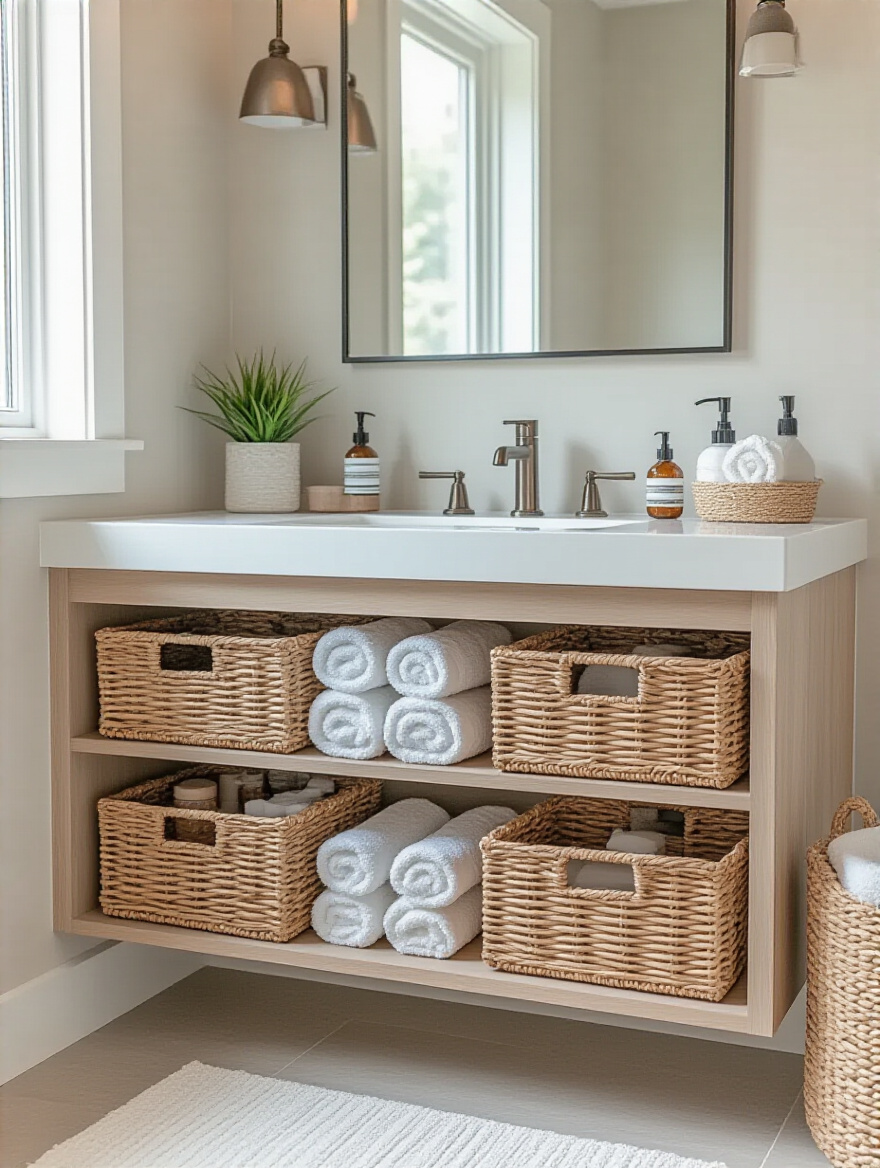
The key is to choose baskets that complement the style of your bathroom. They become part of the decor. This adds texture and warmth to the space while hiding the clutter. It feels intentional and curated, not like you just shoved a bunch of stuff under the sink. It’s the perfect way to get the airy feel of an open vanity without sacrificing practical storage.
Now let’s get back inside the cabinets and make them work even harder.
Maximizing Cabinets & Under-Sink Spaces
Okay, we’re diving back into the deep, dark places. The under-sink cabinet is the final frontier for many, but with the right tools, you can turn that chaotic cave into a model of efficiency.
18. Install Pull-Out Drawers for Easier Under-Sink Access and Visibility
This is the upgrade that will make you feel like you have a luxury custom kitchen, but in your bathroom. Installing a pull-out drawer or a sliding basket system under your sink is truly life-changing. No more getting on your hands and knees and digging past drain pipes to find that one bottle of cleaner you use once a month.
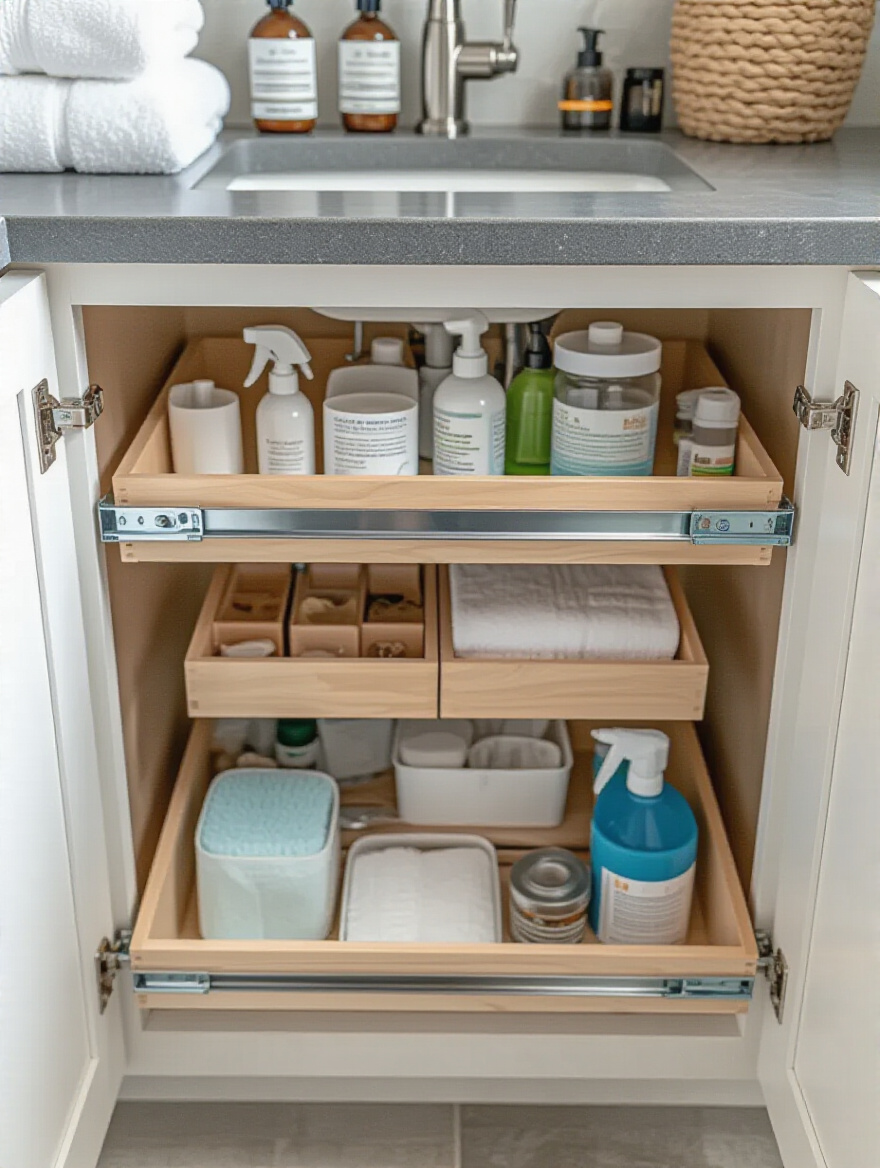
With a pull-out system, the entire contents of your cabinet glide out to meet you. Everything is visible and accessible. These come in all shapes and sizes, including U-shaped ones designed to fit around your plumbing. This is an investment, but the return in daily convenience and reduced frustration is massive. It transforms the most annoying cabinet in your house into the most functional one.
For a more custom (and budget-friendly) approach, you can build around the pipes yourself.
19. Fit Custom U-Shaped Shelves Around Awkward Plumbing
If a full pull-out system isn’t in the cards, you can get a similar effect with some simple DIY. The plumbing under the sink creates a ton of wasted space. You can easily build a custom U-shaped shelf that fits perfectly around the P-trap and supply lines. It’s surprisingly simple—you can even use a sturdy piece of wood or PVC board.
This effectively creates a second level of storage that works with your plumbing instead of against it. You can measure and cut a template from cardboard to get the shape just right before you cut your shelf. It’s a weekend project that will make a permanent difference, allowing you to neatly store items on two levels instead of just piling everything on the bottom.
Let’s double-dip on the cabinet doors with another easy hack.
20. Line Cabinet Doors with Small Bins for Flat or Frequently Used Items
We talked about magnetic strips, but you can also mount small, shallow bins or caddies to the inside of your cabinet doors. This is the perfect spot for all those little things you use daily: toothbrushes, toothpaste, dental floss, your contact lens case, makeup brushes.
Using small, clear stick-on pods or shallow wire baskets keeps these items off your countertop but still right at your fingertips. Again, it’s all about using that overlooked vertical real estate. Getting your daily-use items into these door-mounted caddies can single-handedly clear your entire vanity countertop, making the whole room feel bigger and much easier to clean.
Finally, let’s talk about one of the oldest tricks in the book for a reason.
21. Utilize Turntables (Lazy Susans) for Corner Cabinet Organization
A turntable, or Lazy Susan, is the perfect solution for deep or corner cabinets where things go to die. Instead of having a “back of the cabinet” that you can’t reach, a turntable makes every item front and center with a simple spin. It’s a simple, brilliant piece of engineering that solves the problem of accessibility.
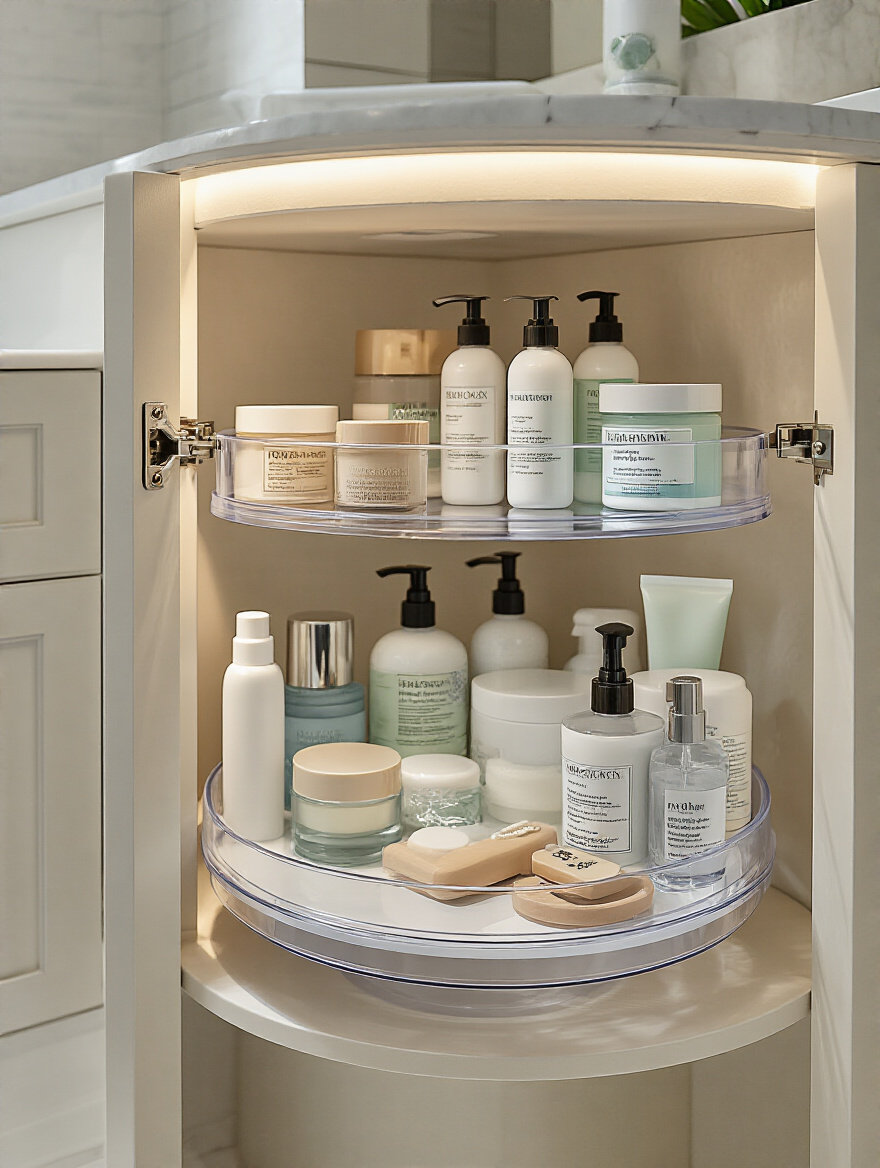
I love using these for collections of bottles—skincare, hair products, nail polish. You can group them by category and see your entire inventory with a flick of the wrist. Just make sure you buy one with a small rim around the edge to prevent things from flying off when you spin it. It’s an old-school solution that has never been beaten for making deep cabinets usable.
Now for the big-gun solutions and the one habit that ties it all together.
Integrated Solutions & Sustained Organization
These are the bigger moves. The solutions that feel built-in and permanent. They require a bit more effort, but the payoff in streamlined style and flawless function is enormous. And once you have your perfect system, there’s one final habit you need to adopt to keep it that way forever.
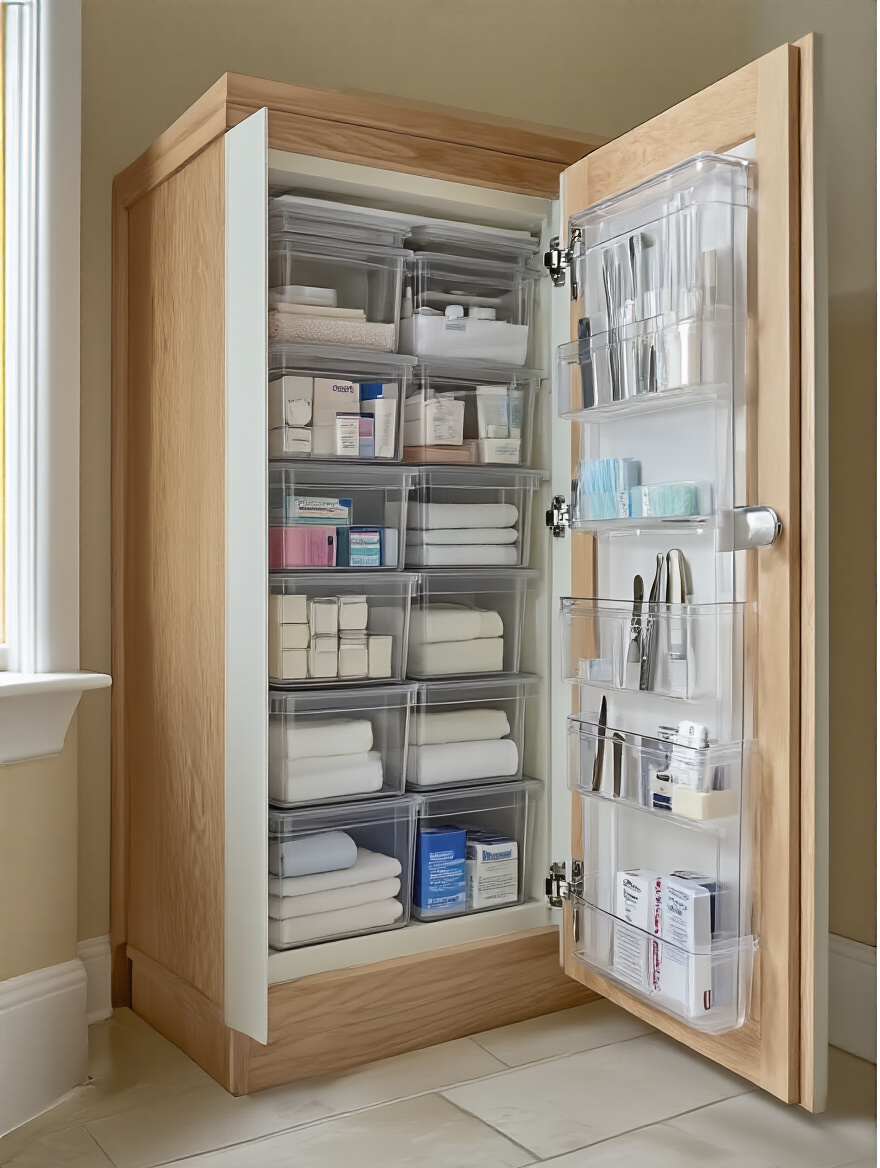
22. Install Recessed Medicine Cabinets for Seamless Wall Storage
If you’re doing any level of remodeling, a recessed medicine cabinet is a non-negotiable in a small bathroom. Unlike a standard cabinet that juts out from the wall, a recessed one is set into the wall between the studs. It offers the same amount of storage, but it sits flush with the wall, taking up zero visual or physical space in the room.
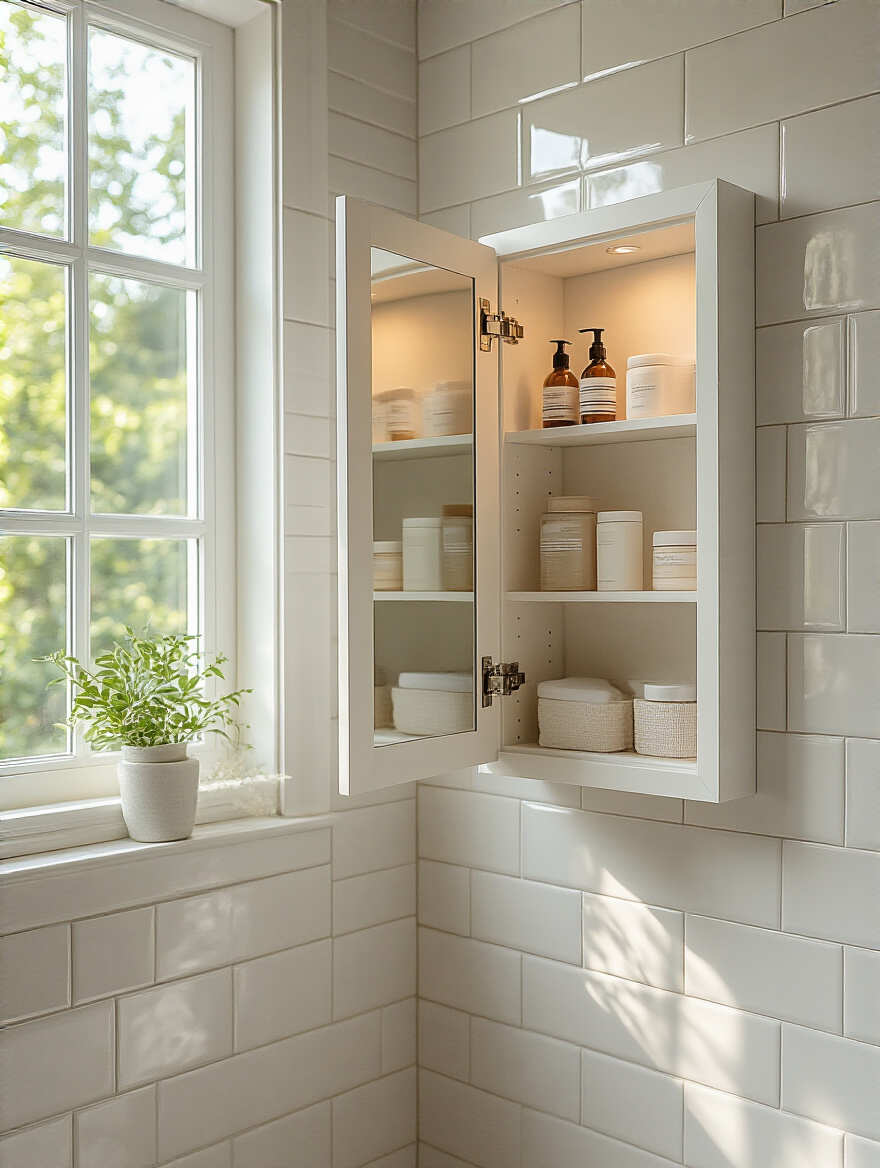
This is the ultimate hack for creating a streamlined, minimalist look. It makes the bathroom feel significantly larger because there’s nothing protruding over the sink. It’s a bit of an undertaking, but the effect is so sleek and seamless. I always recommend models that have outlets inside, so you can charge your toothbrush or shaver out of sight.
Next, when you’re choosing a vanity, look for one that does the work for you.
23. Choose Vanity Units with Built-In Drawer Organizers for Custom Fit
This is the cheat code. Instead of buying a plain vanity and then trying to retrofit it with organizers, buy one that comes with them already built-in. More and more manufacturers are offering vanities with deep drawers that include pre-configured, adjustable dividers for everything from hair tools to makeup.
This ensures a perfect, custom fit and makes organization effortless from day one. You’re buying a complete system, not just a piece of furniture. It’s the ultimate “work smarter, not harder” solution. Look for features like built-in power outlets inside the drawers or special heat-resistant holsters for your styling tools. It’s a higher-level investment that creates a truly flawless and functional space.
And now, for the final, most important hack of all.
24. Adopt Regular Weekly Purges to Maintain Clutter-Free Zones
All these systems are worthless if you don’t maintain them. But maintenance doesn’t have to be a huge chore. I tell my clients to adopt the “5-Minute Weekly Tidy.” Once a week—maybe every Sunday night—spend just five minutes putting things back where they belong, wiping down the counter, and quickly scanning for any clutter that’s crept in.
This tiny, consistent habit prevents the small messes from ever turning into big, overwhelming ones. It keeps your beautiful, organized system running smoothly and reinforces the sense of calm you worked so hard to create. It’s not about being perfect; it’s about being consistent. This small ritual is the key to a space that permanently supports your peace of mind, not your stress levels.
Conclusion
See? It’s not about finding a magic bin. Transforming your small bathroom into a space that feels calm, functional, and even luxurious is about a mindset shift. It’s about being a ruthless editor of your own life, starting with what you allow to take up space in the room where you start and end your day. By being strategic, by thinking vertically, and by using every nook, cranny, and forgotten surface, you can completely change your relationship with your space.
You don’t need a bigger bathroom; you need a smarter one. And now you have the playbook. Start small. Pick one hack this weekend—just one! Maybe it’s clearing out your medicine cabinet or buying a turntable for that messy corner. You’ll be amazed at how one small change creates momentum. You’ll start to feel that sense of control and calm, and that feeling is addictive. You’re not just organizing a bathroom; you’re designing a better start to every single day.


