I still remember the first dinner party I hosted in a truly immersive outdoor kitchen. It wasn’t the menu that captivated my guests, but the atmosphere itself. As the wood-fired pizza oven crackled and the aroma of fresh rosemary drifted from nearby planters, the act of cooking transformed from a chore into a performance. When we step outside, the walls vanish, and the culinary experience intensifies. This is the symphony of alfresco cooking, where the kitchen becomes the heart of the garden.
True alfresco dining engages every sense, turning a simple meal into a grounding ritual. By choosing tactile materials like reclaimed wood and cool natural stone, we bridge the gap between professional workflow and the raw beauty of nature. A central focal point—perhaps a roaring fire pit or an open-flame grill—naturally invites guests to gather close, creating a communal stage that turns the chef into a storyteller and preparation into a shared memory.
This guide outlines the best outdoor kitchen ideas to transform your backyard into a professional-grade culinary sanctuary. Creating this immersive environment demands a layout that prioritizes both efficiency and ambiance. We will explore how to layer elements like soothing water features and soft lighting to curate a tranquil soundtrack for your dining area. We will move beyond basic utility to design a space that works beautifully for Tuesday night dinners and grand celebrations alike. Let’s orchestrate a space that feeds both the body and the soul.
Phase 1: Establishing the Flow – Workflow and Zoning Philosophy for Outdoor Kitchen Design
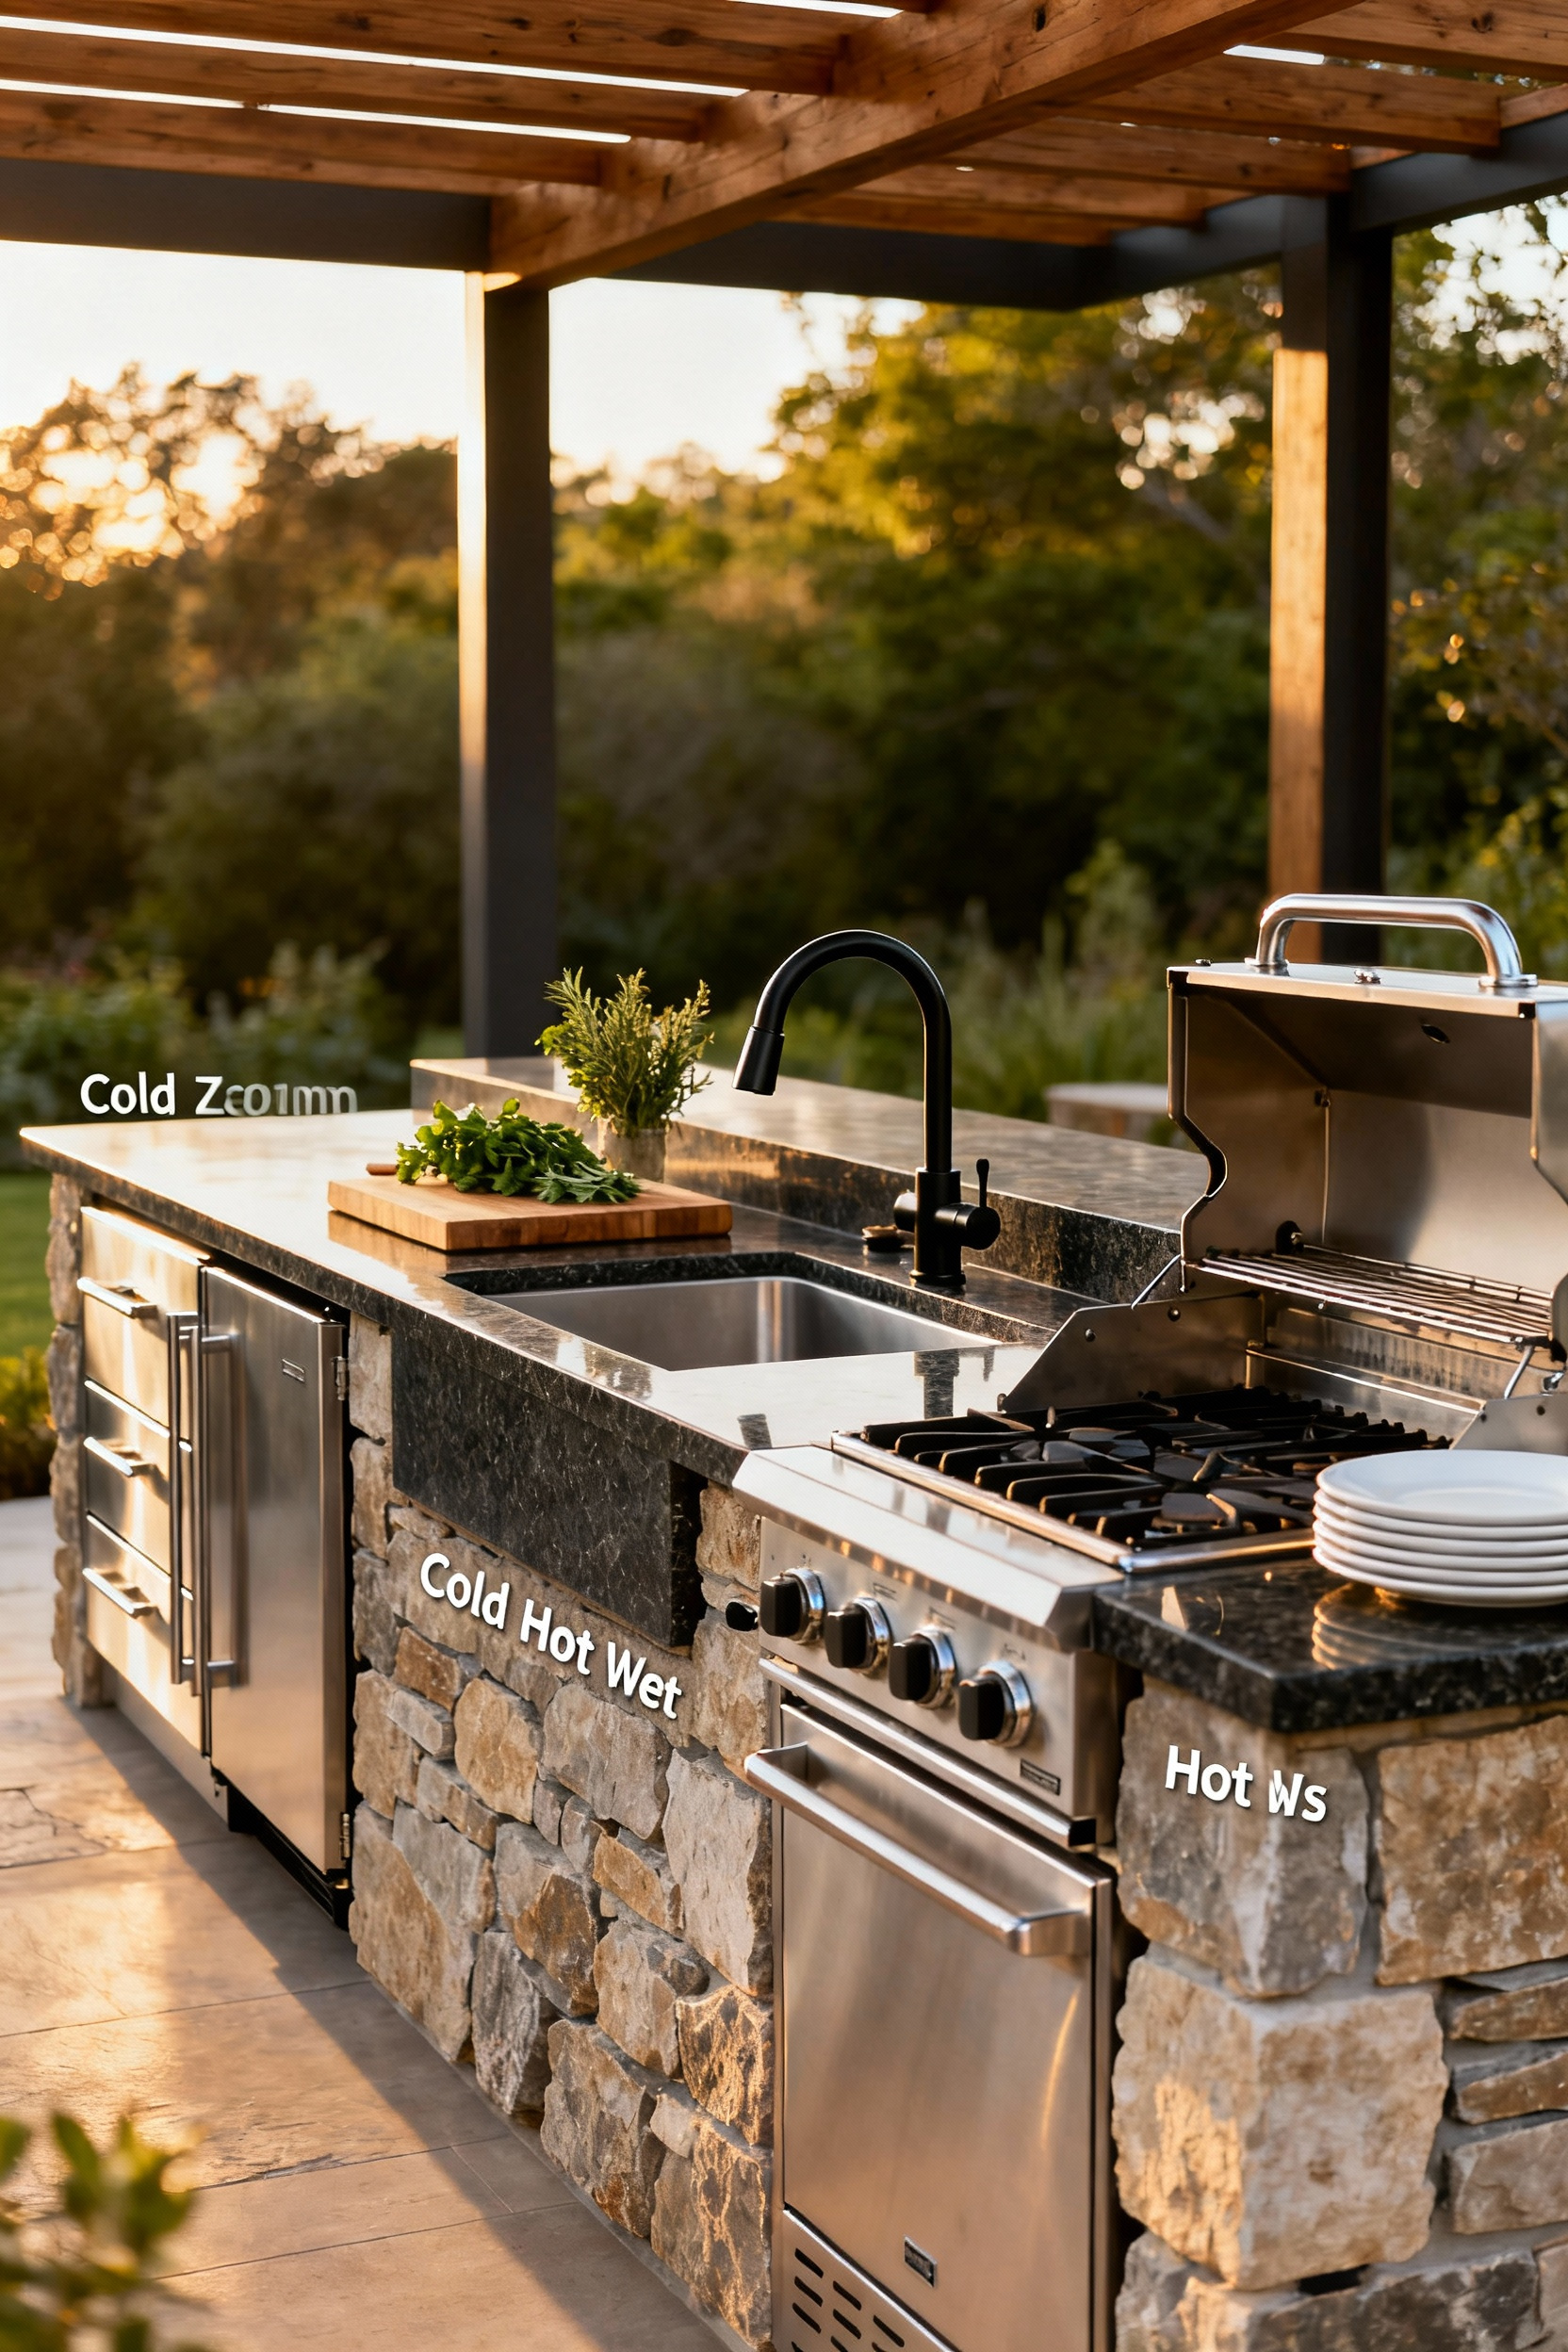
Great meals start with smart logistics. In professional culinary environments, we live by *mise en place*—everything in its place—to prevent chaos during the dinner rush. Your outdoor kitchen requires that same discipline. Build your layout around the classic “work triangle” connecting the grill, sink, and refrigerator to minimize unnecessary steps. To achieve a professional-grade flow, arrange your space into four distinct zones:
- Cold: Position refrigeration here for instant ingredient access.
- Prep: Locate counter space immediately next to the cold zone.
- Hot: Place the grill adjacent to prep for seamless cooking transfers.
- Wet: End with the sink for easy cleanup and trash disposal.
Beyond efficient cooking, you must protect the chef’s domain. Design clear traffic lanes that keep guests comfortably out of the “hot zone” while maintaining 3 to 4 feet of clearance around the grill to prevent accidents with sizzling platters. Furthermore, designate a specific “Plate-and-Serve” station on an island ledge or separate counter. This dedicated spot allows family to grab a burger without crowding your workspace, keeping the experience safe, social, and stress-free.
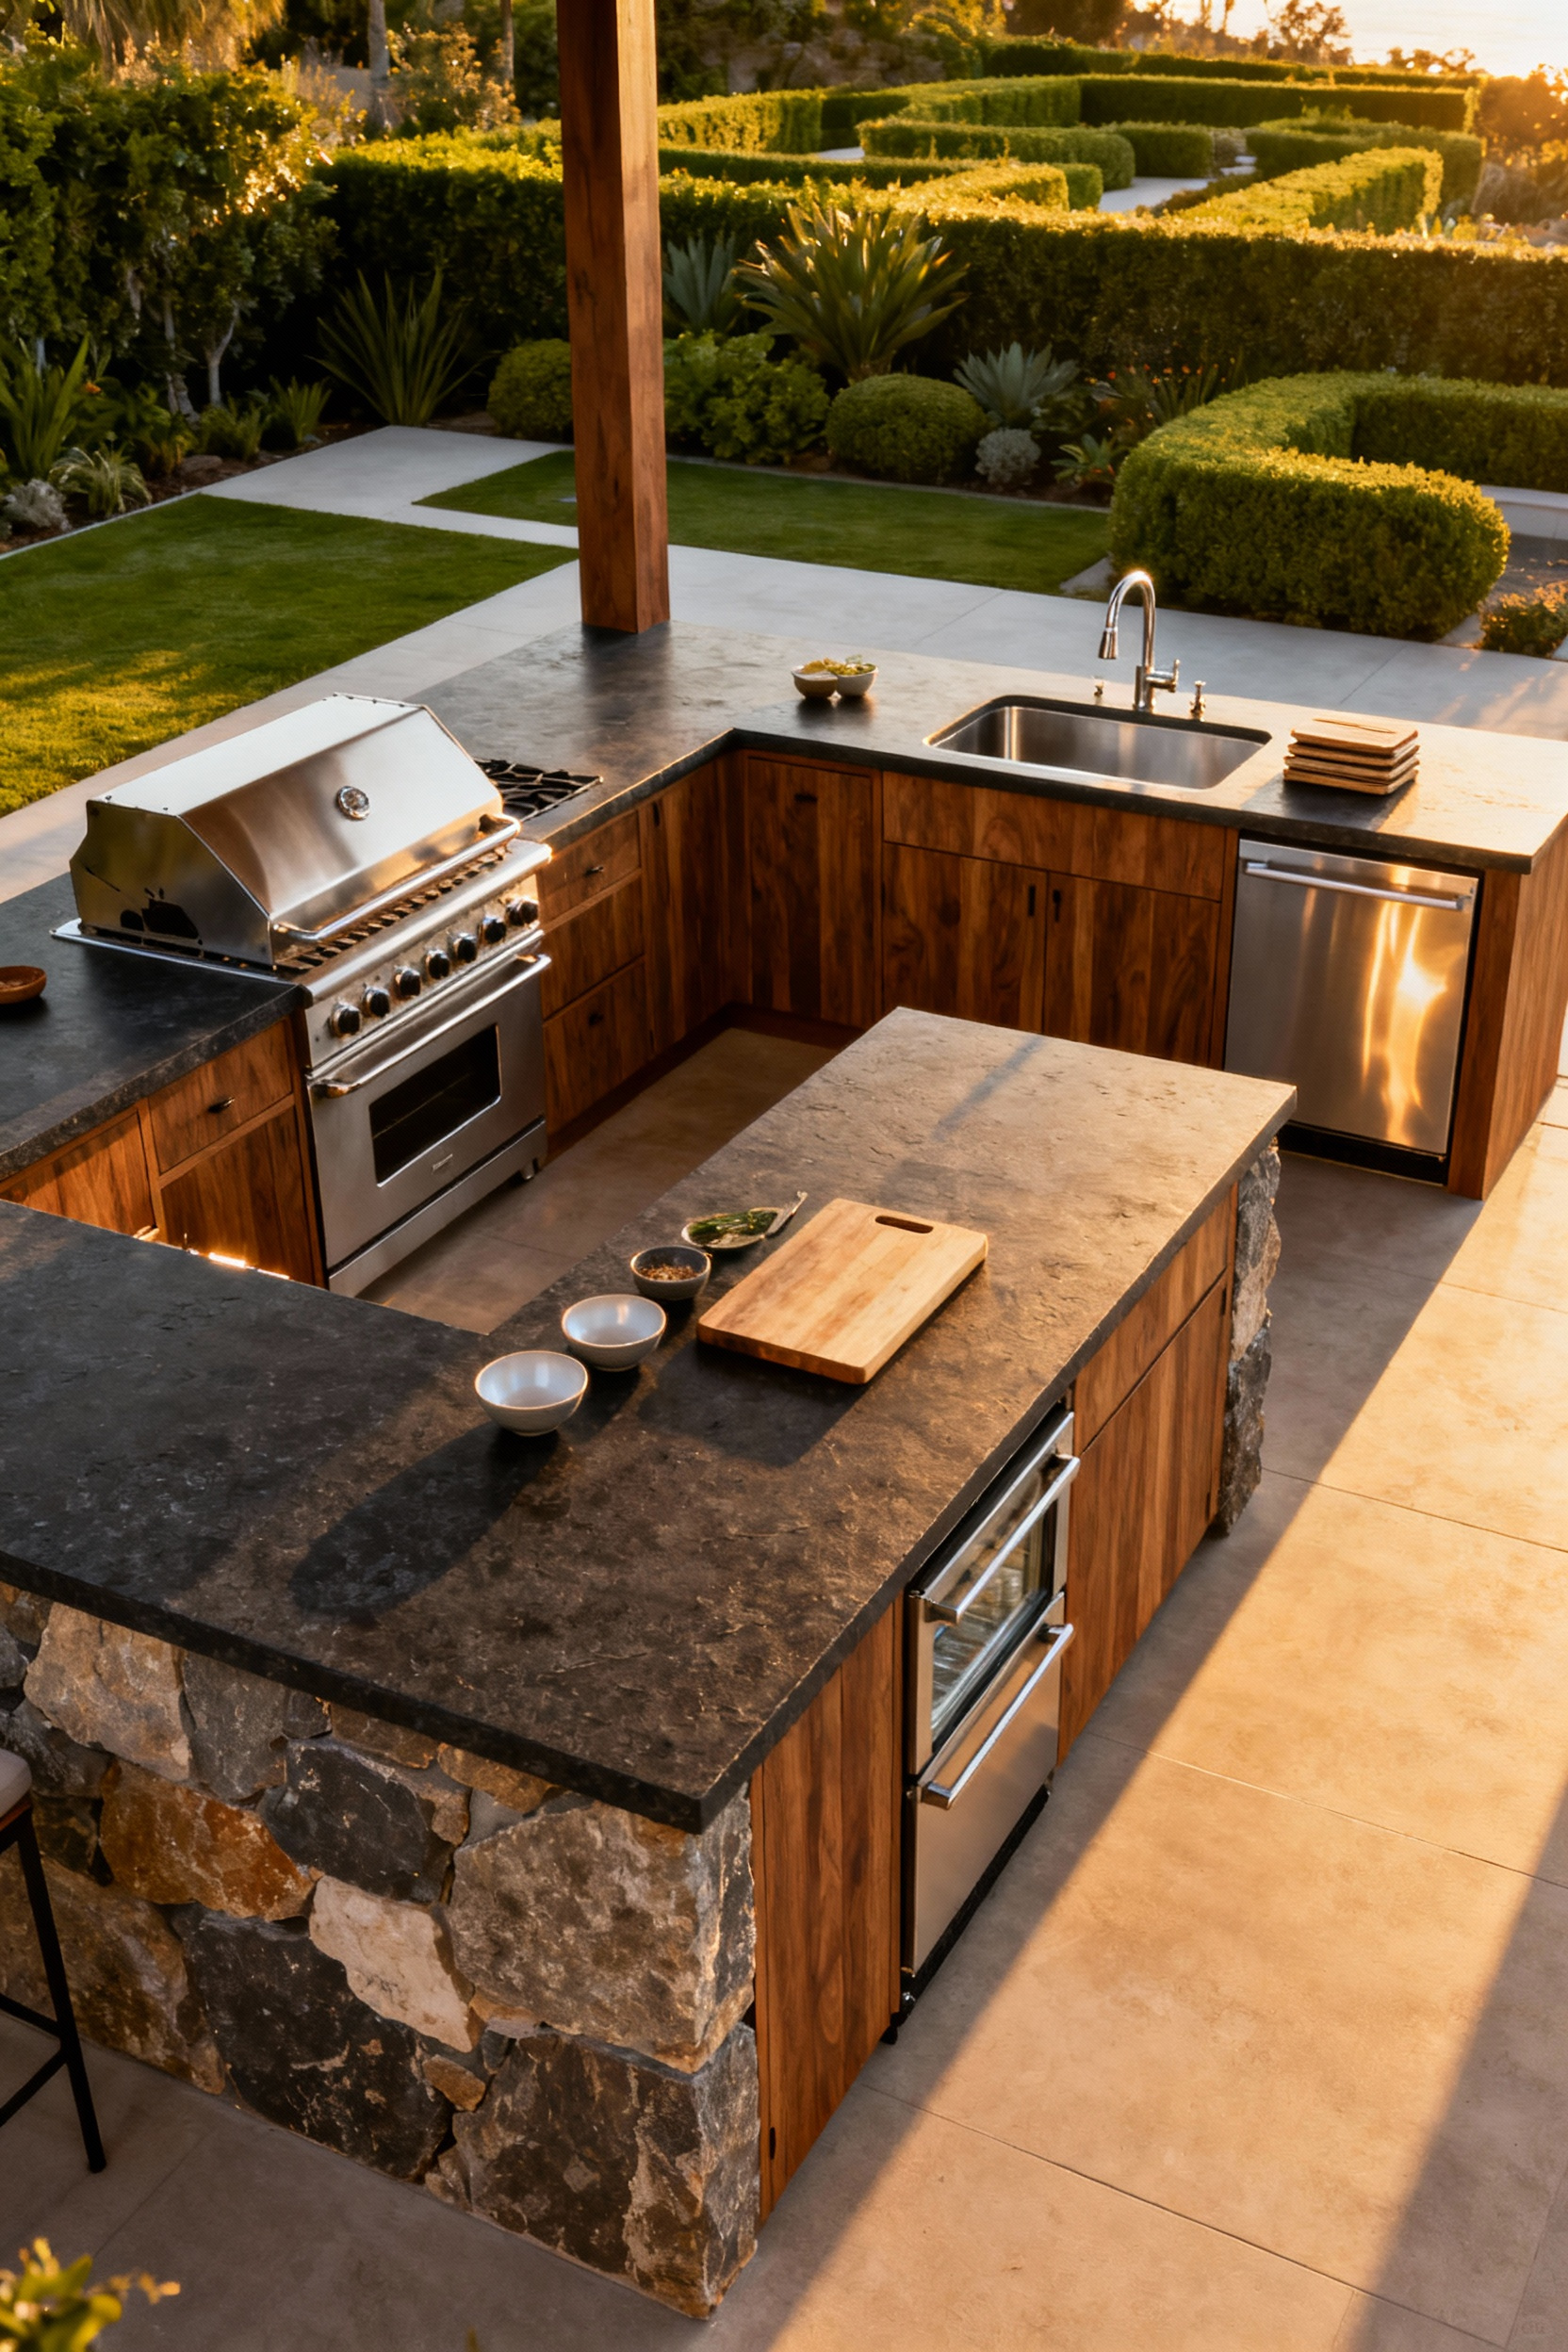
1. The Expanded Work Triangle: Adapting the ‘Cold-Hot-Wet’ Sequence for Open Air
Bring the seasoned efficiency of your indoor kitchen outside by adapting the classic work triangle into a dynamic “Cold-Hot-Wet” sequence. Arrange your refrigerator, sink, and grill in a cohesive loop or linear path to minimize steps during prep. Rhythm is everything; nothing ruins a sear faster than holding a hot platter with nowhere to set it down. Bridge these zones with ample landing space:
- Wet Zone: Allocate two feet of clear counter next to the sink for washing produce.
- Hot Zone: Ensure three feet of space flanking the grill for raw ingredients and finished plates.
Protect your workflow from well-meaning guests by strategically expanding the design. Isolate a portion of the “Cold” zone to create a dedicated self-serve beverage station at the kitchen’s edge. This smart separation grants friends easy access to drinks without crossing the cook’s path between the sink and the grill. You maintain your culinary focus, and the party flows naturally around the work rather than through it.
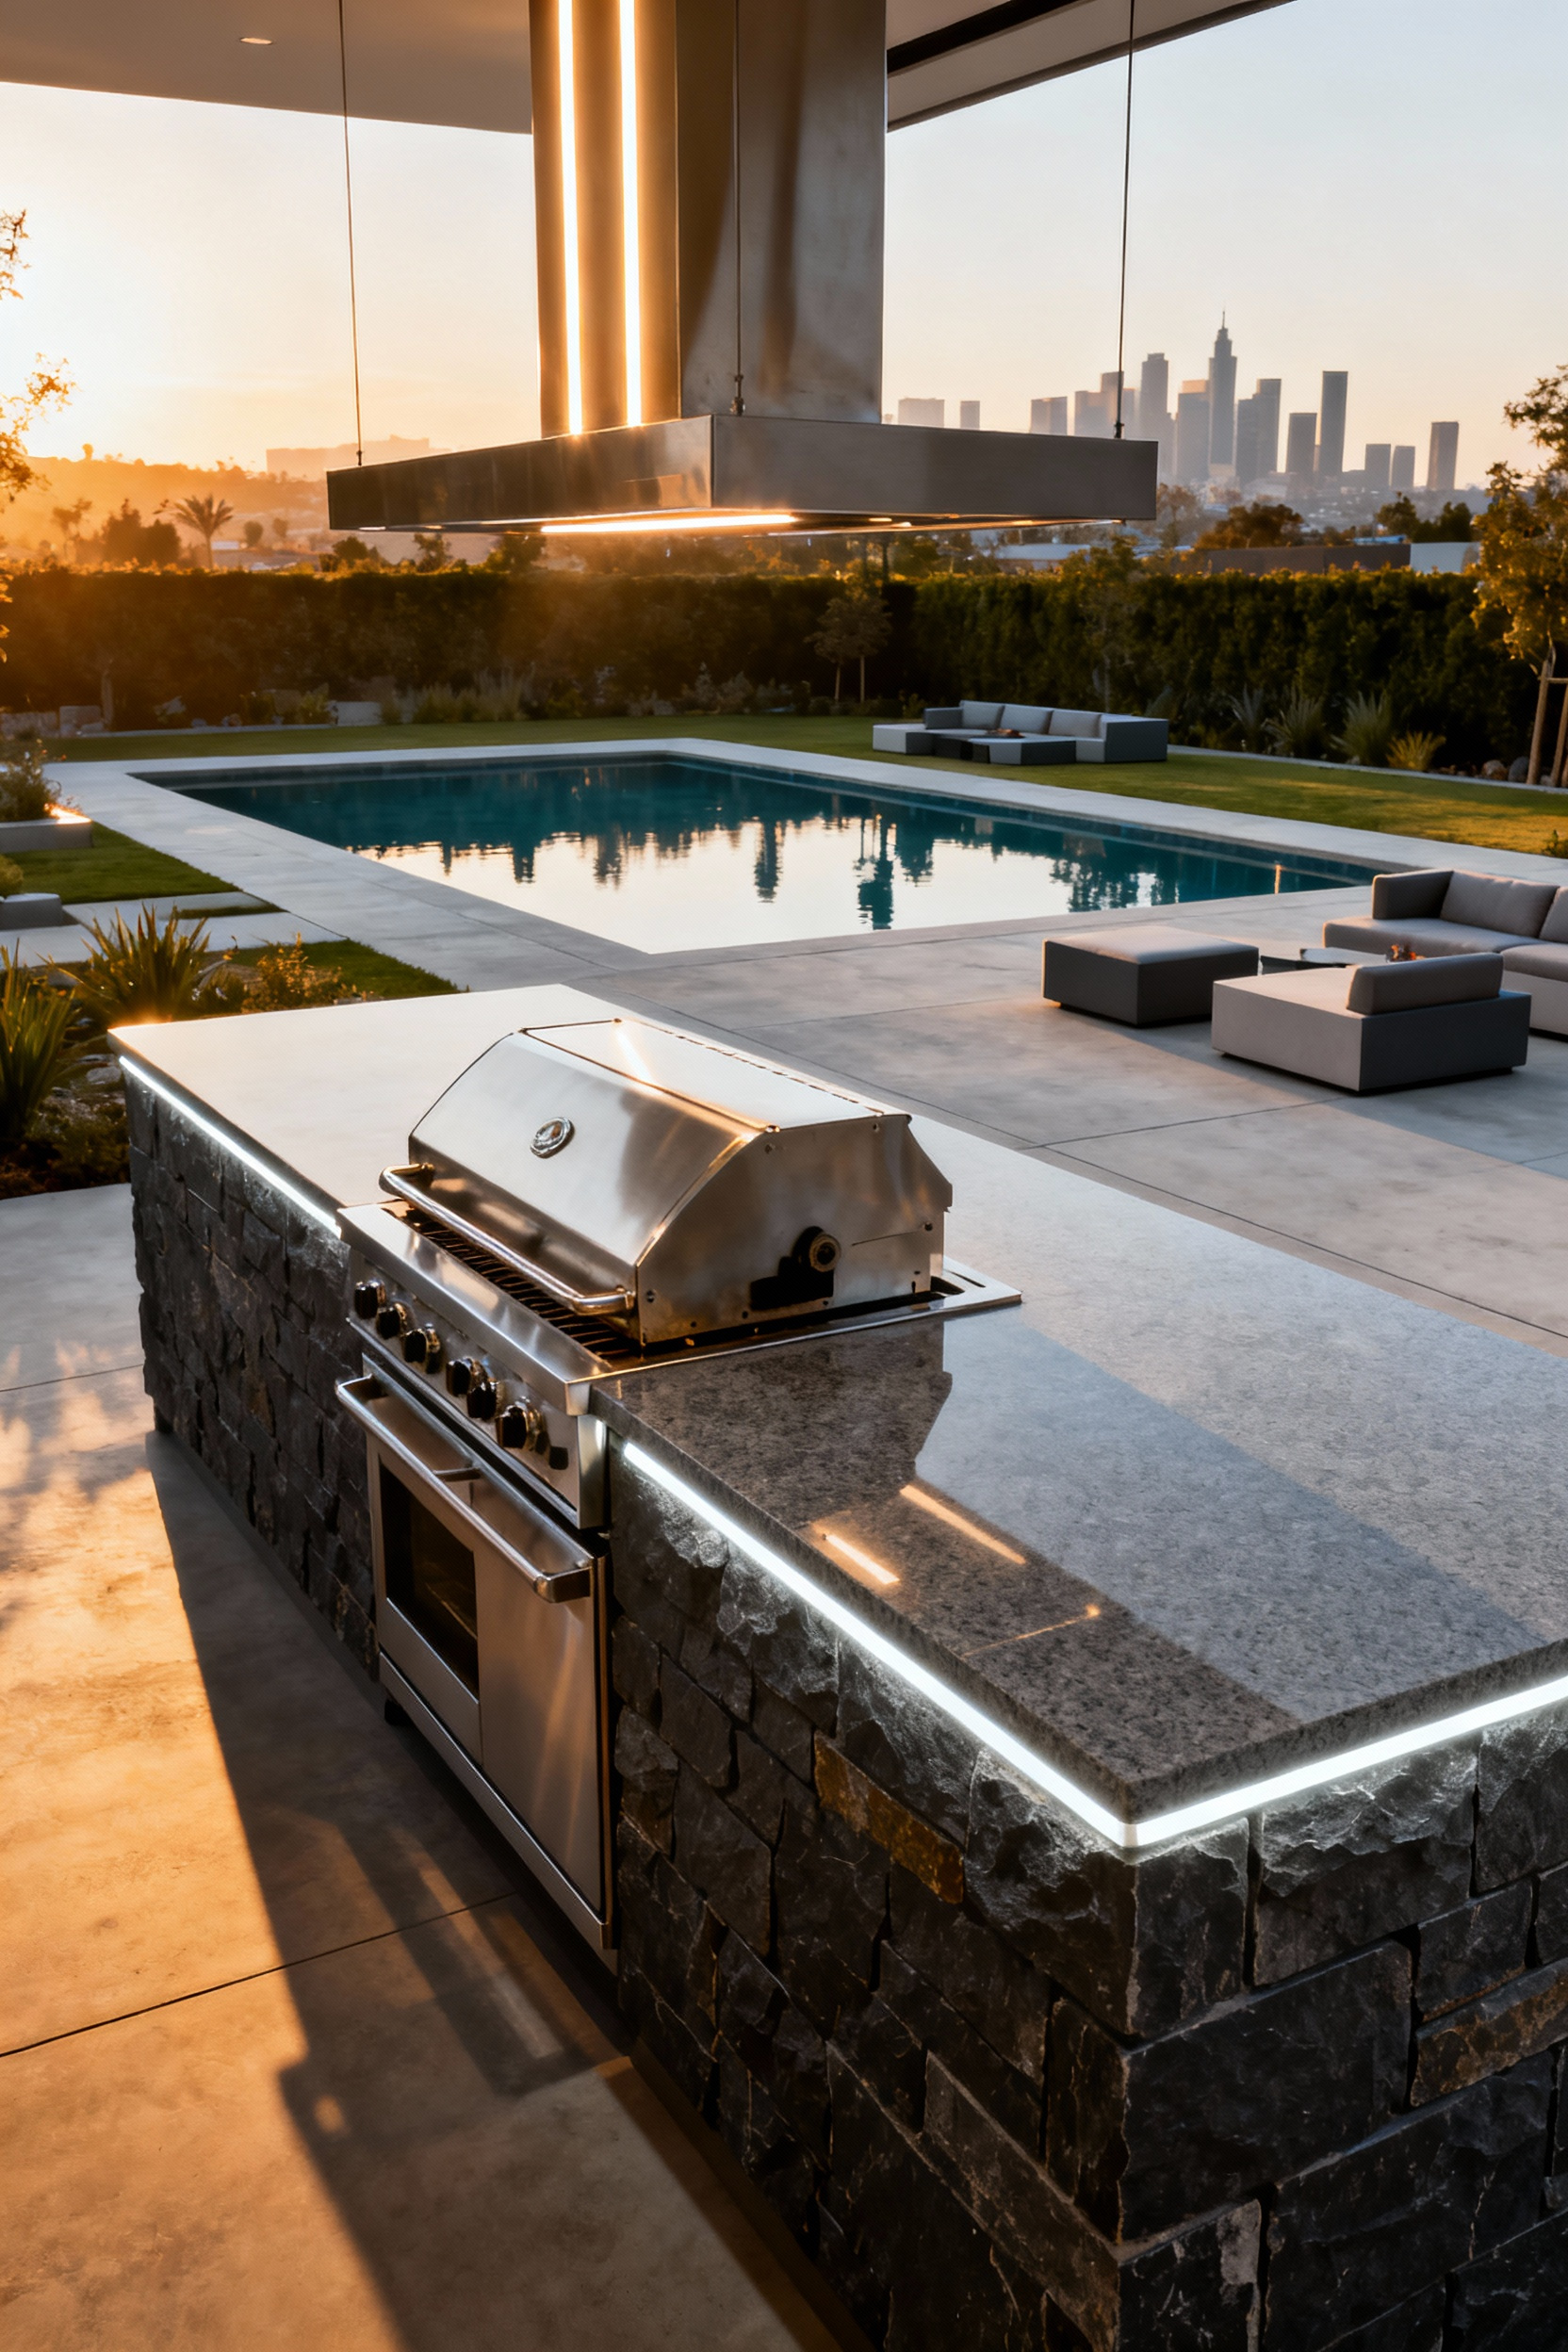
2. The Social-Facing Island: Why the Chef Should Never Face the Wall
Cooking should be a celebration, not solitary confinement. Too many outdoor kitchens force the cook to stare at a fence while the party rages behind them. Instead, position your primary island to face the seating area, pool, or patio. This simple shift transforms meal preparation into performance cooking. The grill works best as a stage; by facing your guests, you remain the heartbeat of the gathering, effortlessly blending culinary work with social connection.
To make this layout functional, integrate smart design elements that support interaction without sacrificing workflow:
- Add bar-height seating to invite conversation while keeping guests safely away from the heat.
- Use split-level countertops to visually shield the inevitable prep mess and lift exhaust fumes above seated diners.
- Cluster amenities like the sink and fridge within the island to maintain a tight work triangle.
This ensures you never have to turn your back on the fun to grab a cold ingredient. Design your space so you can chop, grill, and laugh all at once.
3. Pass-Through Windows: Creating a Seamless Bridge Between Indoor Prep and Outdoor Plating
Nothing kills a party’s momentum like isolating the cook in the indoor kitchen. To bridge this gap, connect your indoor prep zone directly to the patio with a pass-through window. Choose a gas strut or bi-fold style; unlike standard sliders, these open fully to eliminate visual barriers, keeping you in the conversation while you garnish plates. The transition between cooking and serving becomes invisible.
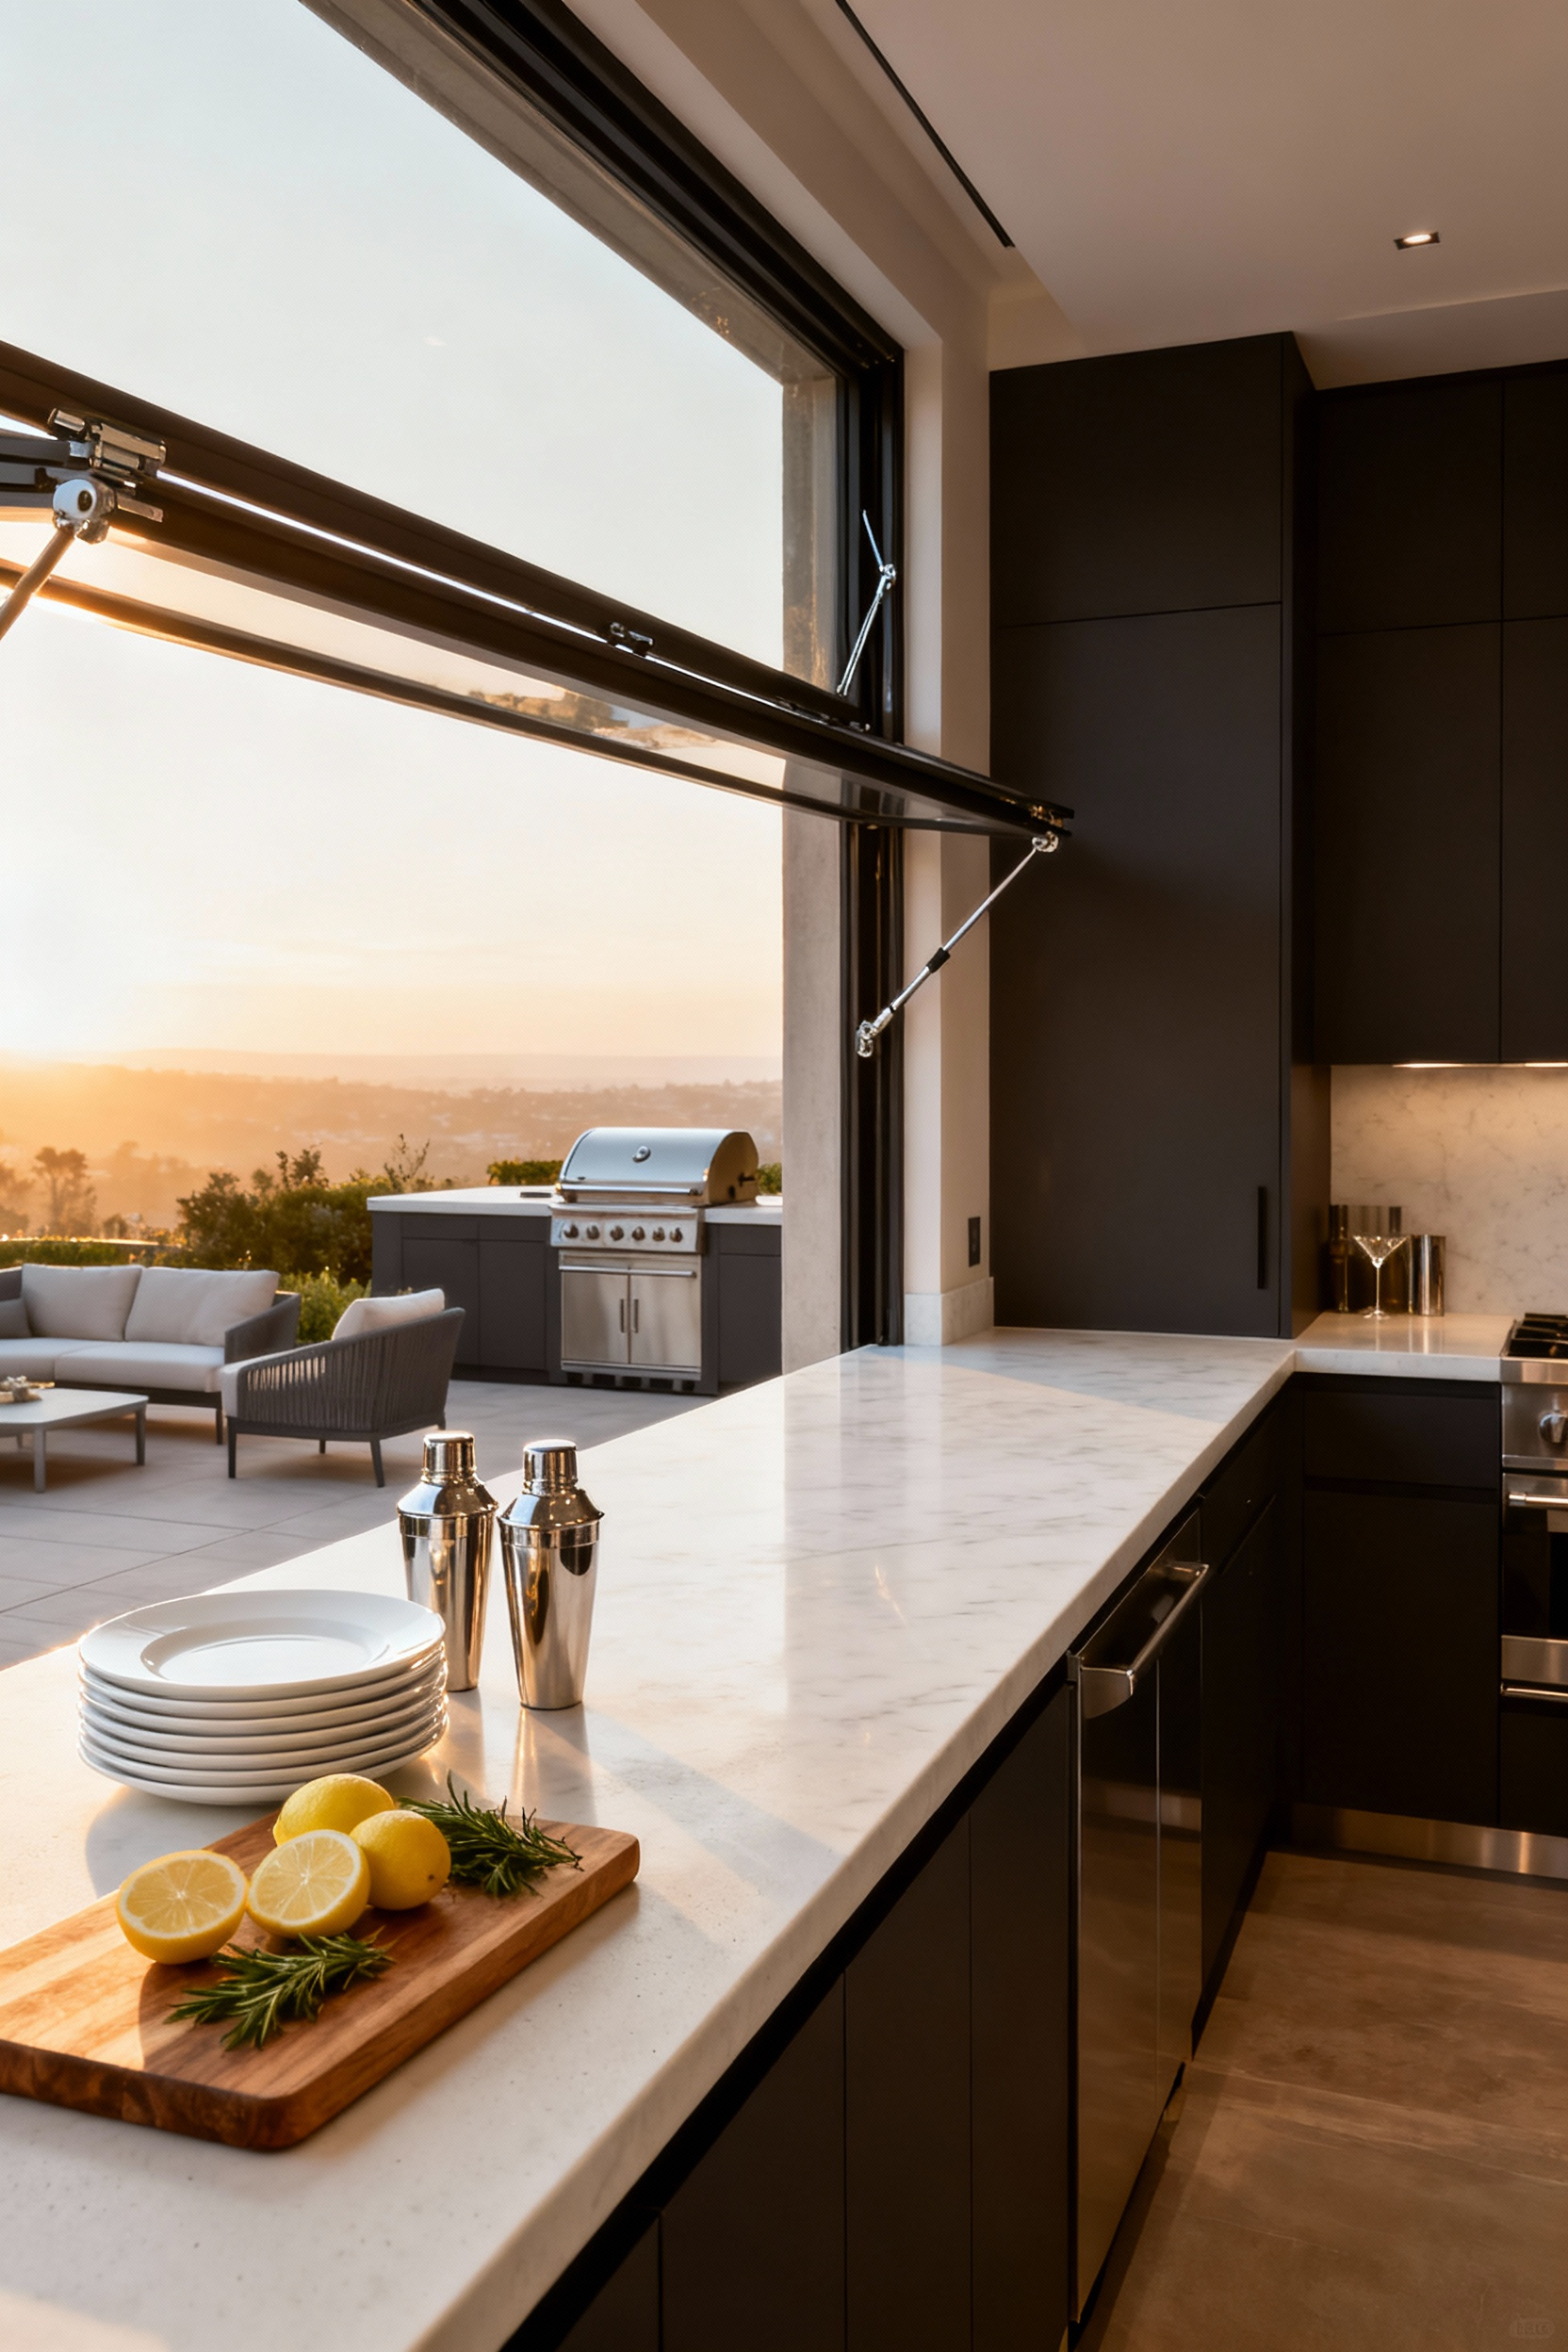
For true culinary efficiency, extend your indoor countertop material directly to the exterior. Insist on a flush sill—this recessed track allows you to slide heavy cutting boards or hot brisket trays straight across without lifting them over a bump. This design creates a versatile service station where you can:
- Utilize the raised glass panel as a natural rain awning.
- Pass drinks effortlessly to guests without spills.
- Add bar stools to establish an interactive “chef’s table” feel.
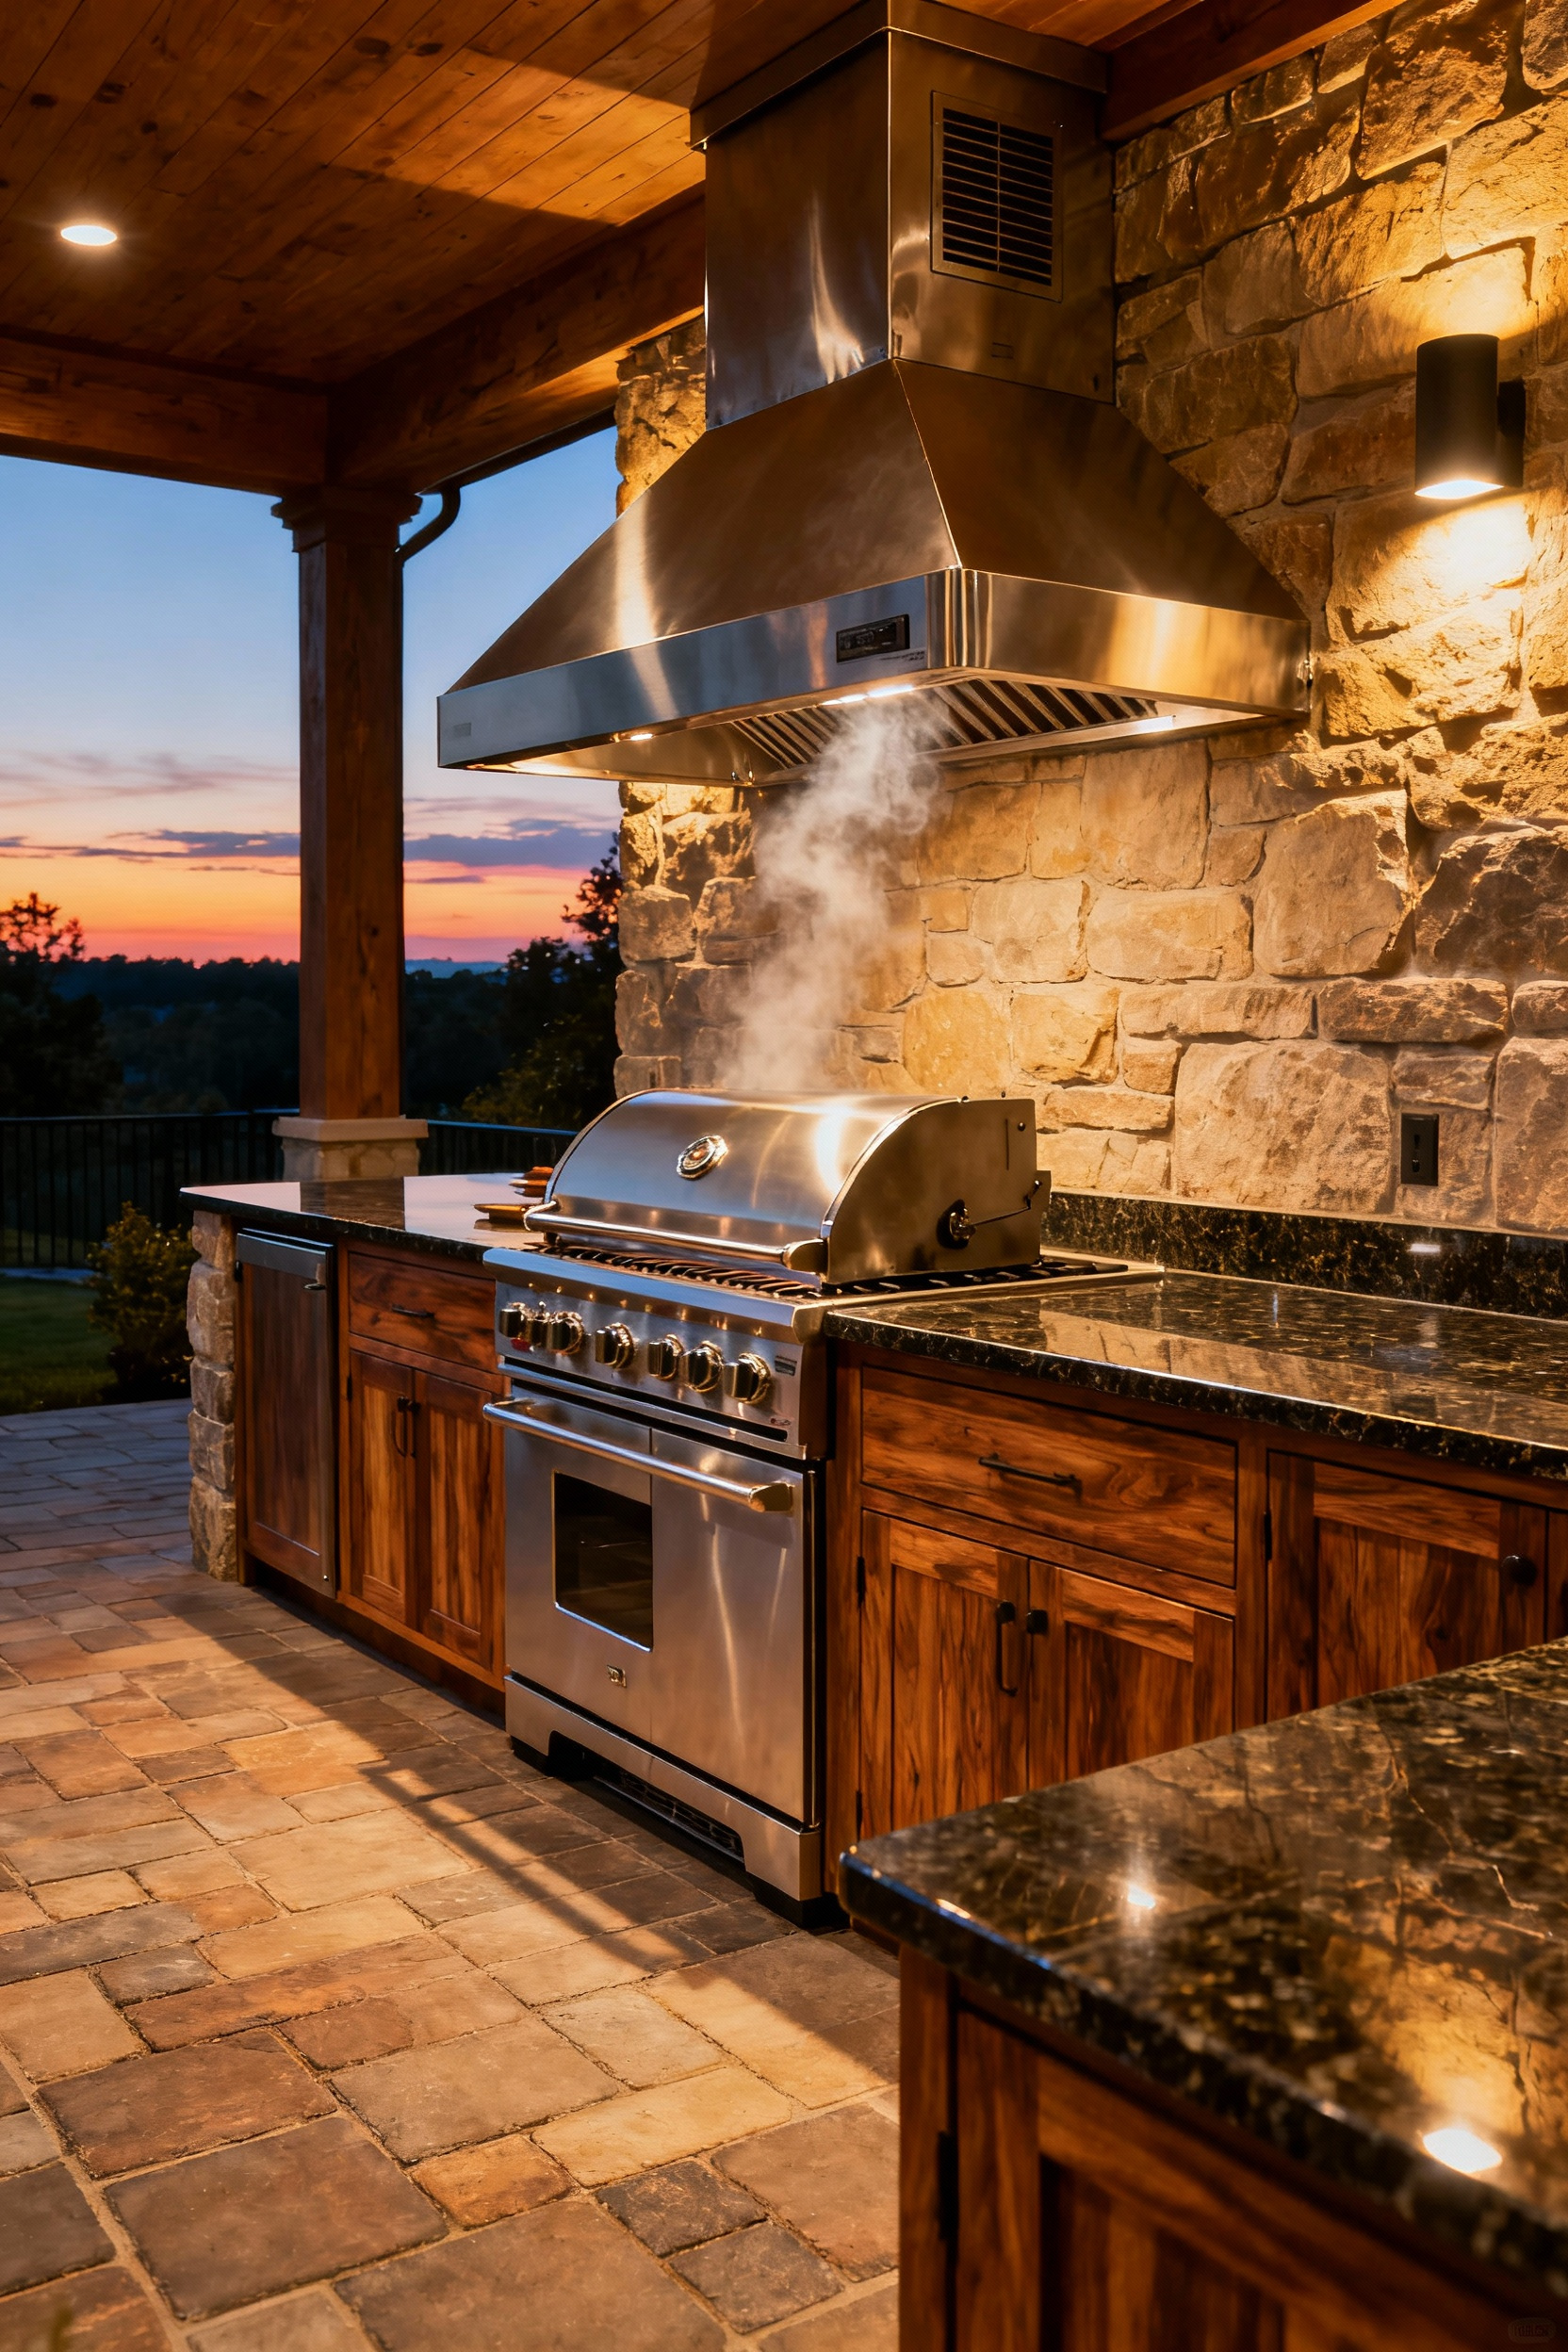
4. Zoned Ventilation: Strategic Placement to Keep Smoke Away from Guests
Few things disrupt a lively dinner party like a cloud of greasy smoke drifting over the dining table. To keep the focus on the food and conversation, maximize your hood’s “capture zone.” Select an outdoor-rated model at least 12 inches wider than your grill to trap rising fumes immediately before they spread. Center the unit precisely over the cooking surface—not the lid—and mount it 36 to 42 inches high. This specific placement ensures smoke travels up the vent rather than into your eyes while you flip burgers.
Beyond the hardware, smart layout choices protect your guests from errant plumes. Design specific “airflow boundaries” to physically direct smoke away from social hubs:
- Block the breeze: Install partial walls or glass barriers to shield the grill from prevailing winds and prevent turbulence.
- Create distance: Separate the high-heat zone from seating, perhaps using tall planters as attractive, organic smoke filters.
- Add backup: For covered patios, install ceiling fans to circulate fresh air and push residual smoke away from gathering spots.
Phase 2: Material Integrity – Selecting Surfaces that Endure
Outdoor kitchens face a relentless barrage of UV rays, moisture, and freezing temperatures. Your material choices must prioritize resilience alongside beauty. A scorching hot countertop ruins the prep flow for a summer dinner party, so steer clear of resin-based quartz, which yellows and cracks under the sun. Instead, select surfaces that champion durability:
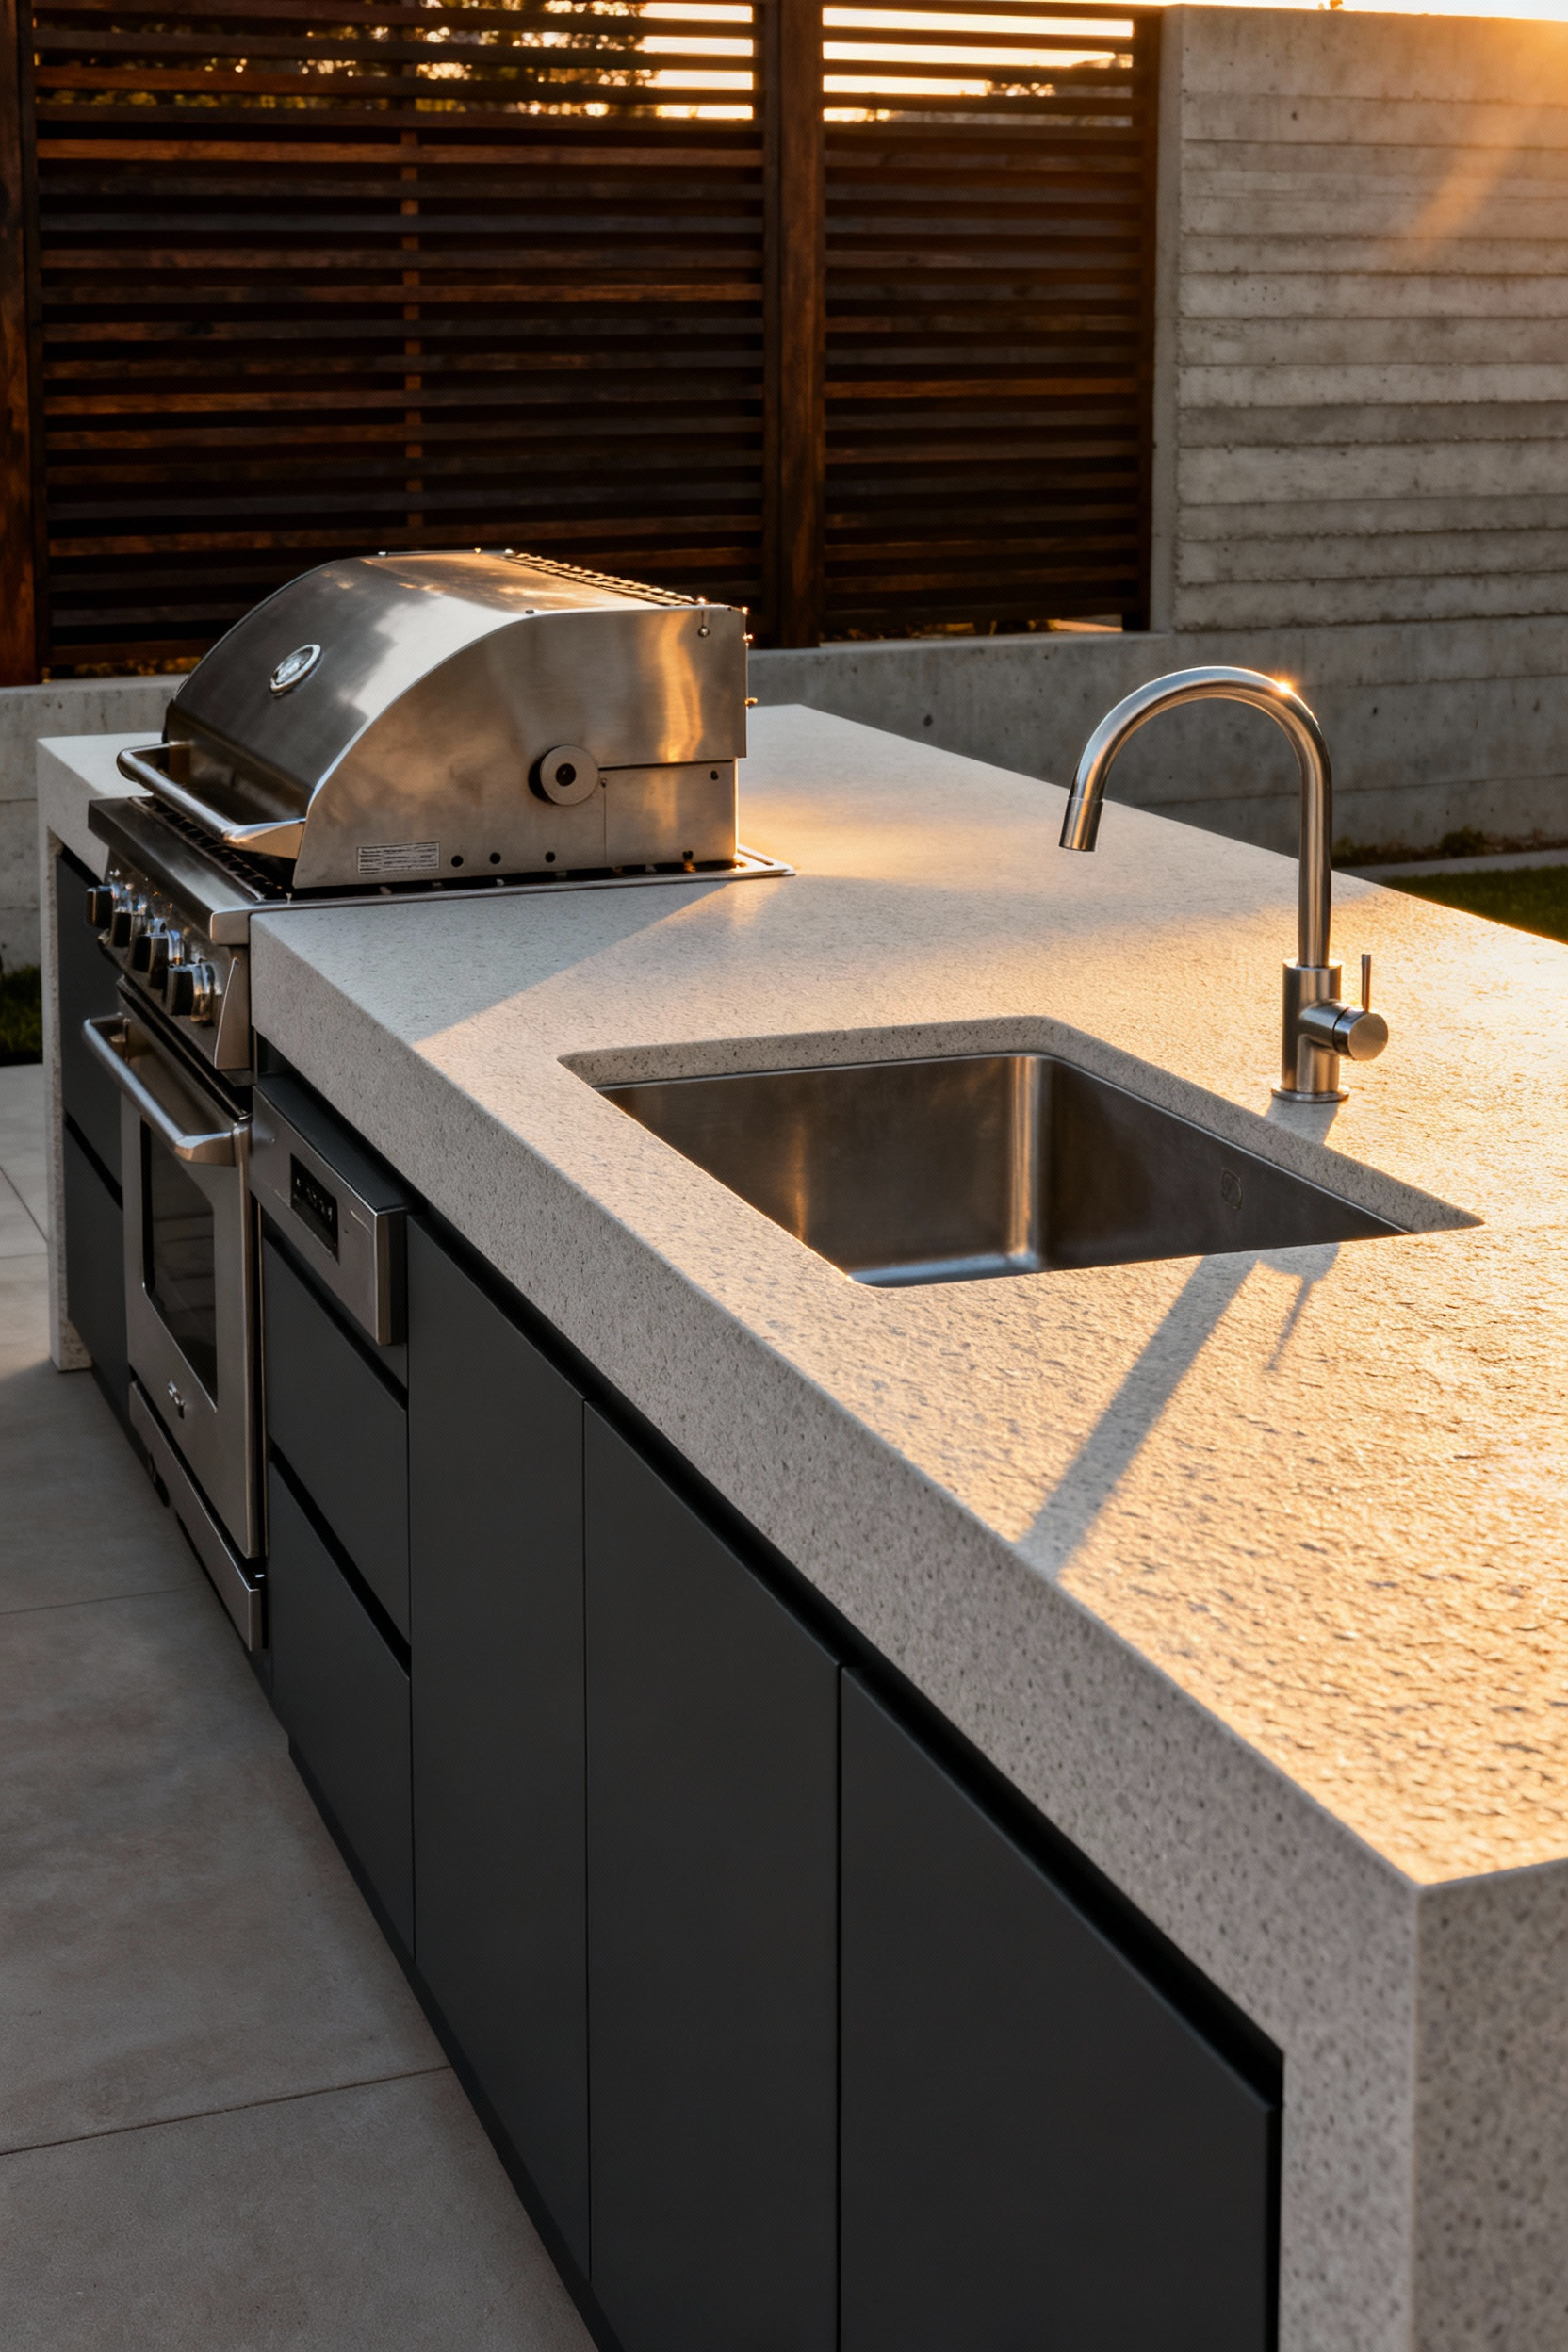
- Sintered Stone or Porcelain: These non-porous options are UV-proof, heat-resistant, and virtually indestructible.
- Light-Colored Granite: Lighter hues stay cool to the touch, though you must seal them annually to repel water.
- Marine-Grade Stainless Steel (304/316): Use this or HDPE for cabinetry to eliminate rust and maintenance.
By selecting these enduring materials, you create a stress-free environment. You can focus on grilling the perfect steak rather than worrying about fading surfaces or weather damage. Smart selections now guarantee your outdoor kitchen remains the beloved hub of family gatherings for years to come.
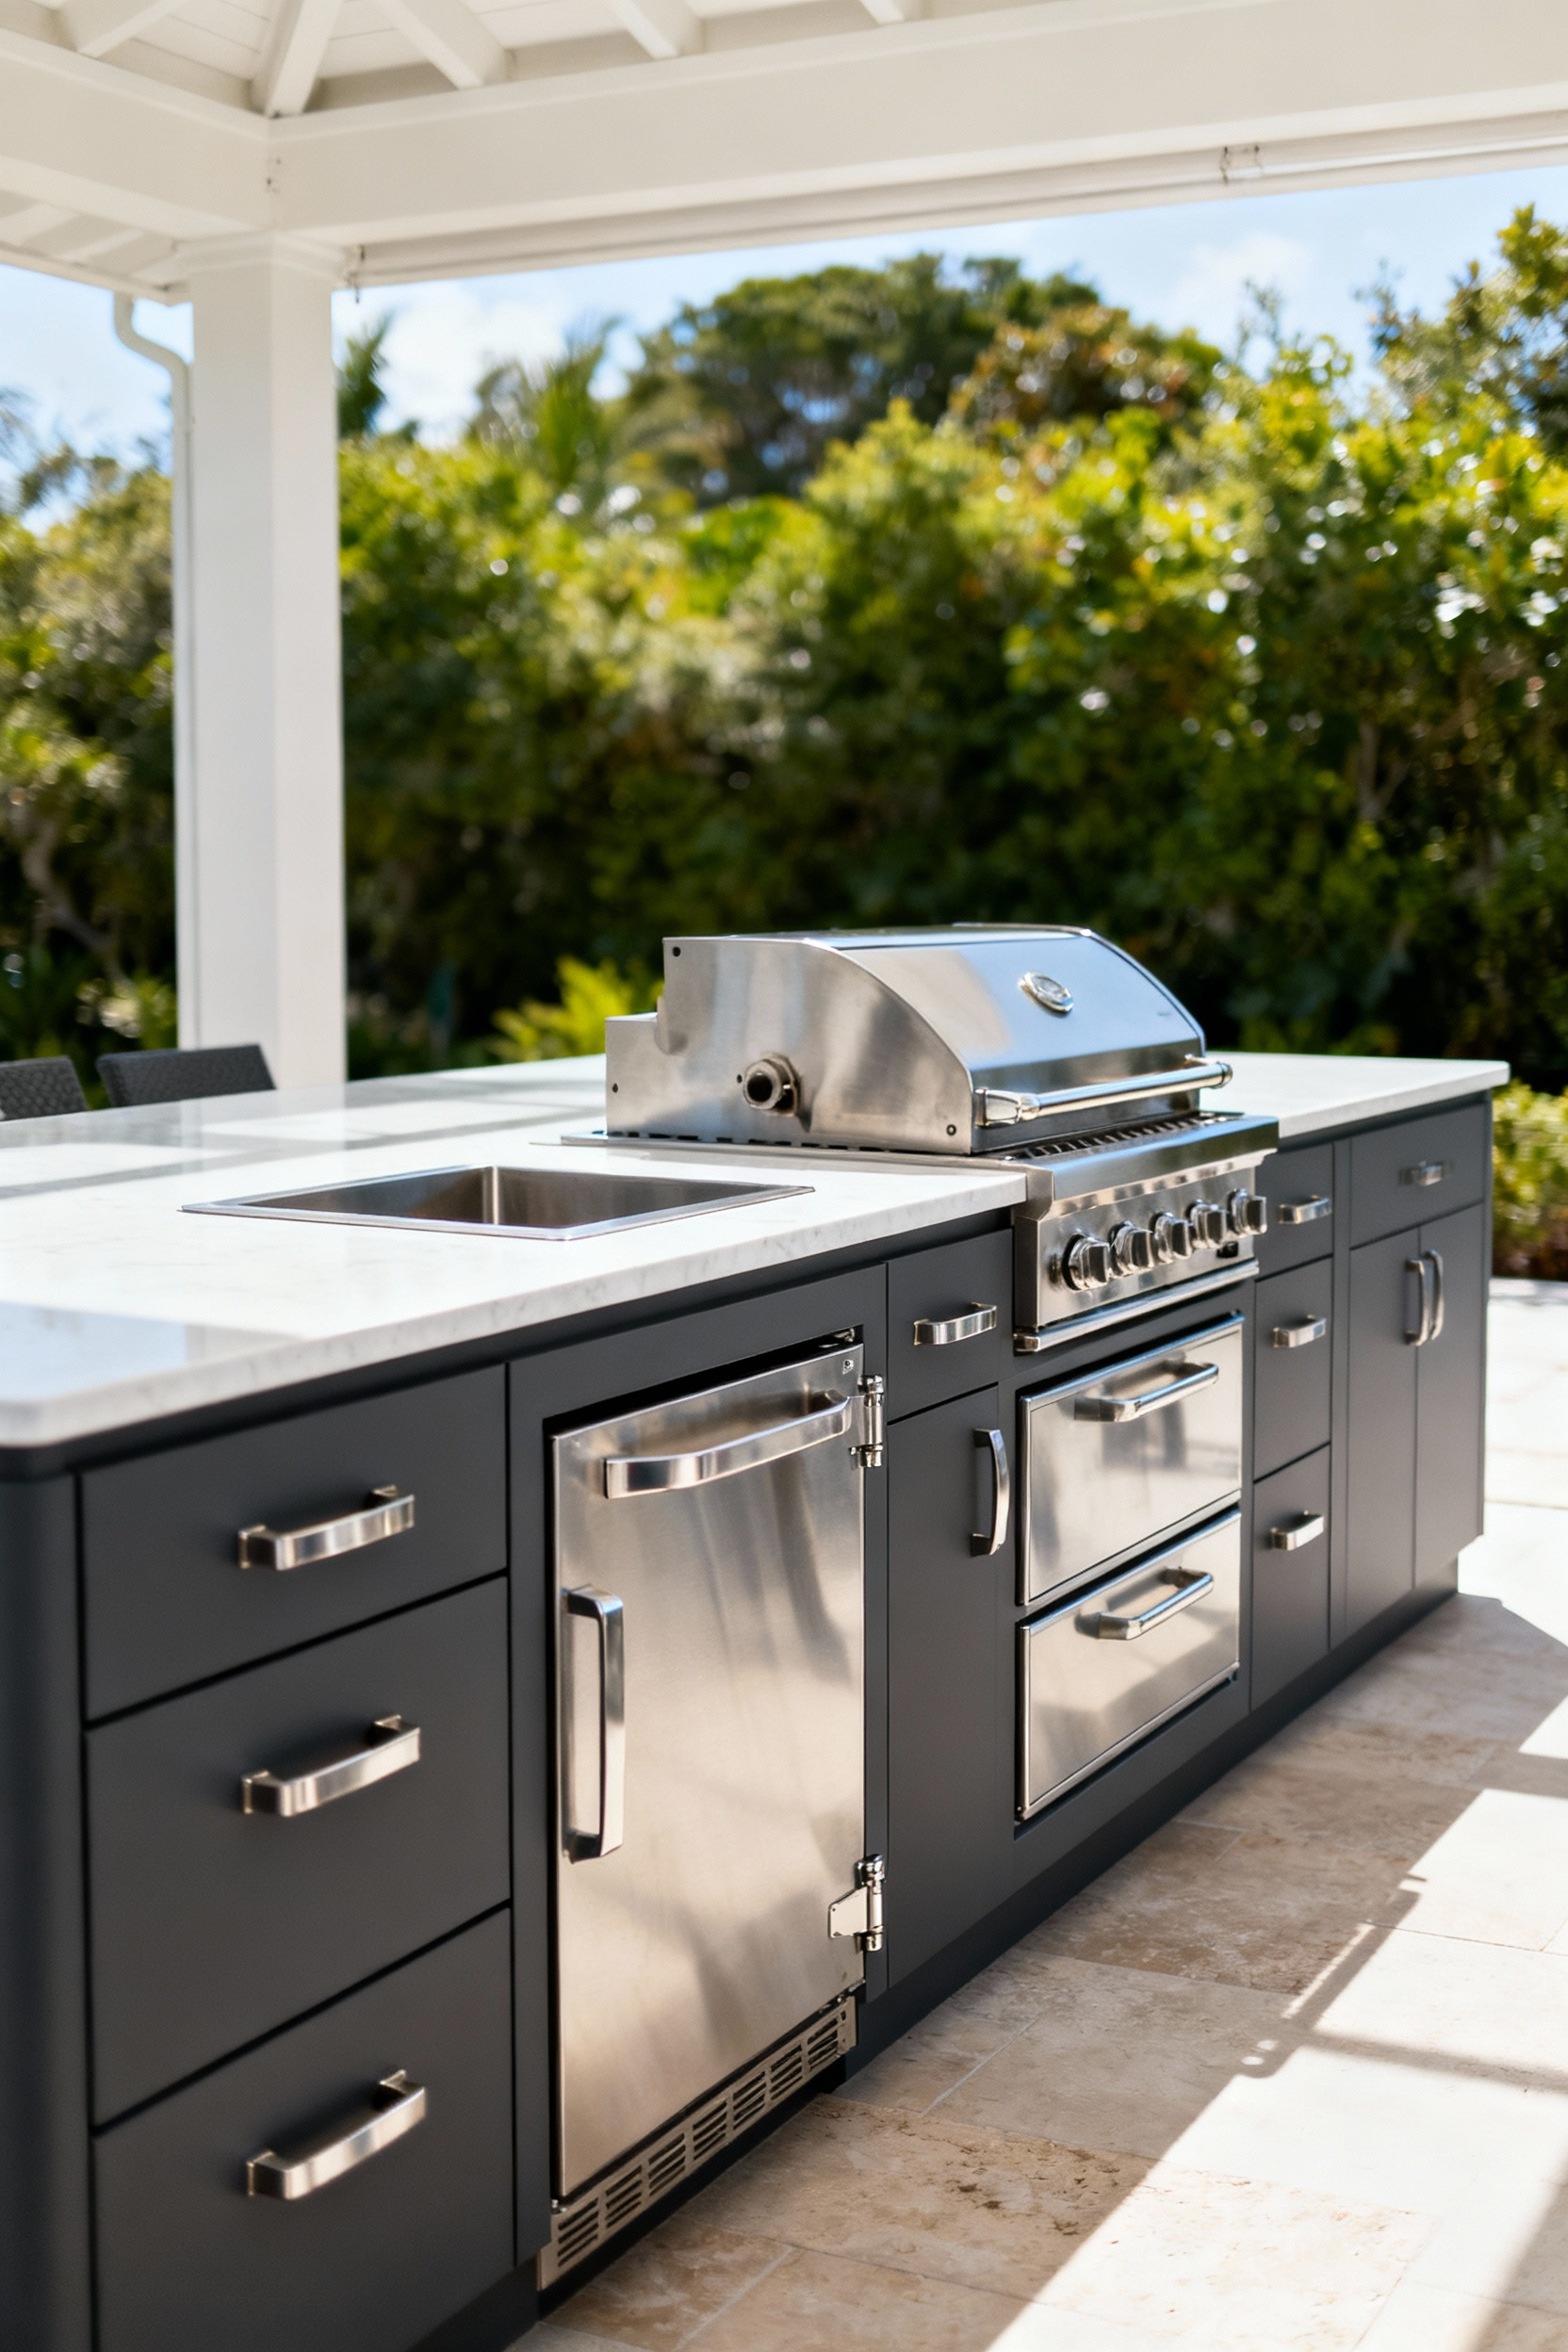
5. Marine-Grade Cabinetry: Investing in HDPE and 304 Stainless Steel for Longevity
Nothing disrupts the flow of a summer barbecue like a rusted hinge or a warped door. Many beautiful outdoor spaces deteriorate quickly, which is why Marine-Grade HDPE (High-Density Polyethylene) cabinetry is a superior choice. This non-porous material withstands rain, snow, and humidity without rotting or swelling, making post-party cleanup effortless. The cabinet box is only half the equation; pair these durable shells with 304 Stainless Steel hardware for smooth operation. If you live near the coast, upgrade to 316 Marine Grade Stainless Steel. The added Molybdenum resists salt corrosion, ensuring your drawers glide smoothly even after years of salty breezes.
To guarantee your kitchen serves as a lasting venue for family milestones, follow these structural guidelines:
- Insulate the Heat: Since HDPE is a thermoplastic, you must wrap grills and side burners in a 304 Stainless Steel firebox or insulating jacket to prevent melting.
- Add Protection: Apply a powder coat finish to stainless steel doors to create a UV-resistant barrier that hides fingerprints and simplifies maintenance.
By combining the structural integrity of HDPE with the heat resistance of steel, you create a safe, stylish workspace that supports your culinary creativity for decades.
6. Monolithic Concrete Countertops: The Intersection of Durability and Modern Aesthetics
Imagine sliding a marinated flank steak across a surface with absolutely no grout lines to trap juices. Monolithic concrete countertops offer this incredible culinary freedom, but you must choose the right material. Specify Glass Fiber Reinforced Concrete (GFRC) for your outdoor workspace. This high-performance mix resists cracking during freeze-thaw cycles and allows you to cast integrated sinks or drainboards directly into the design. This seamless customization creates a streamlined workflow for managing multiple dishes during a busy barbecue.
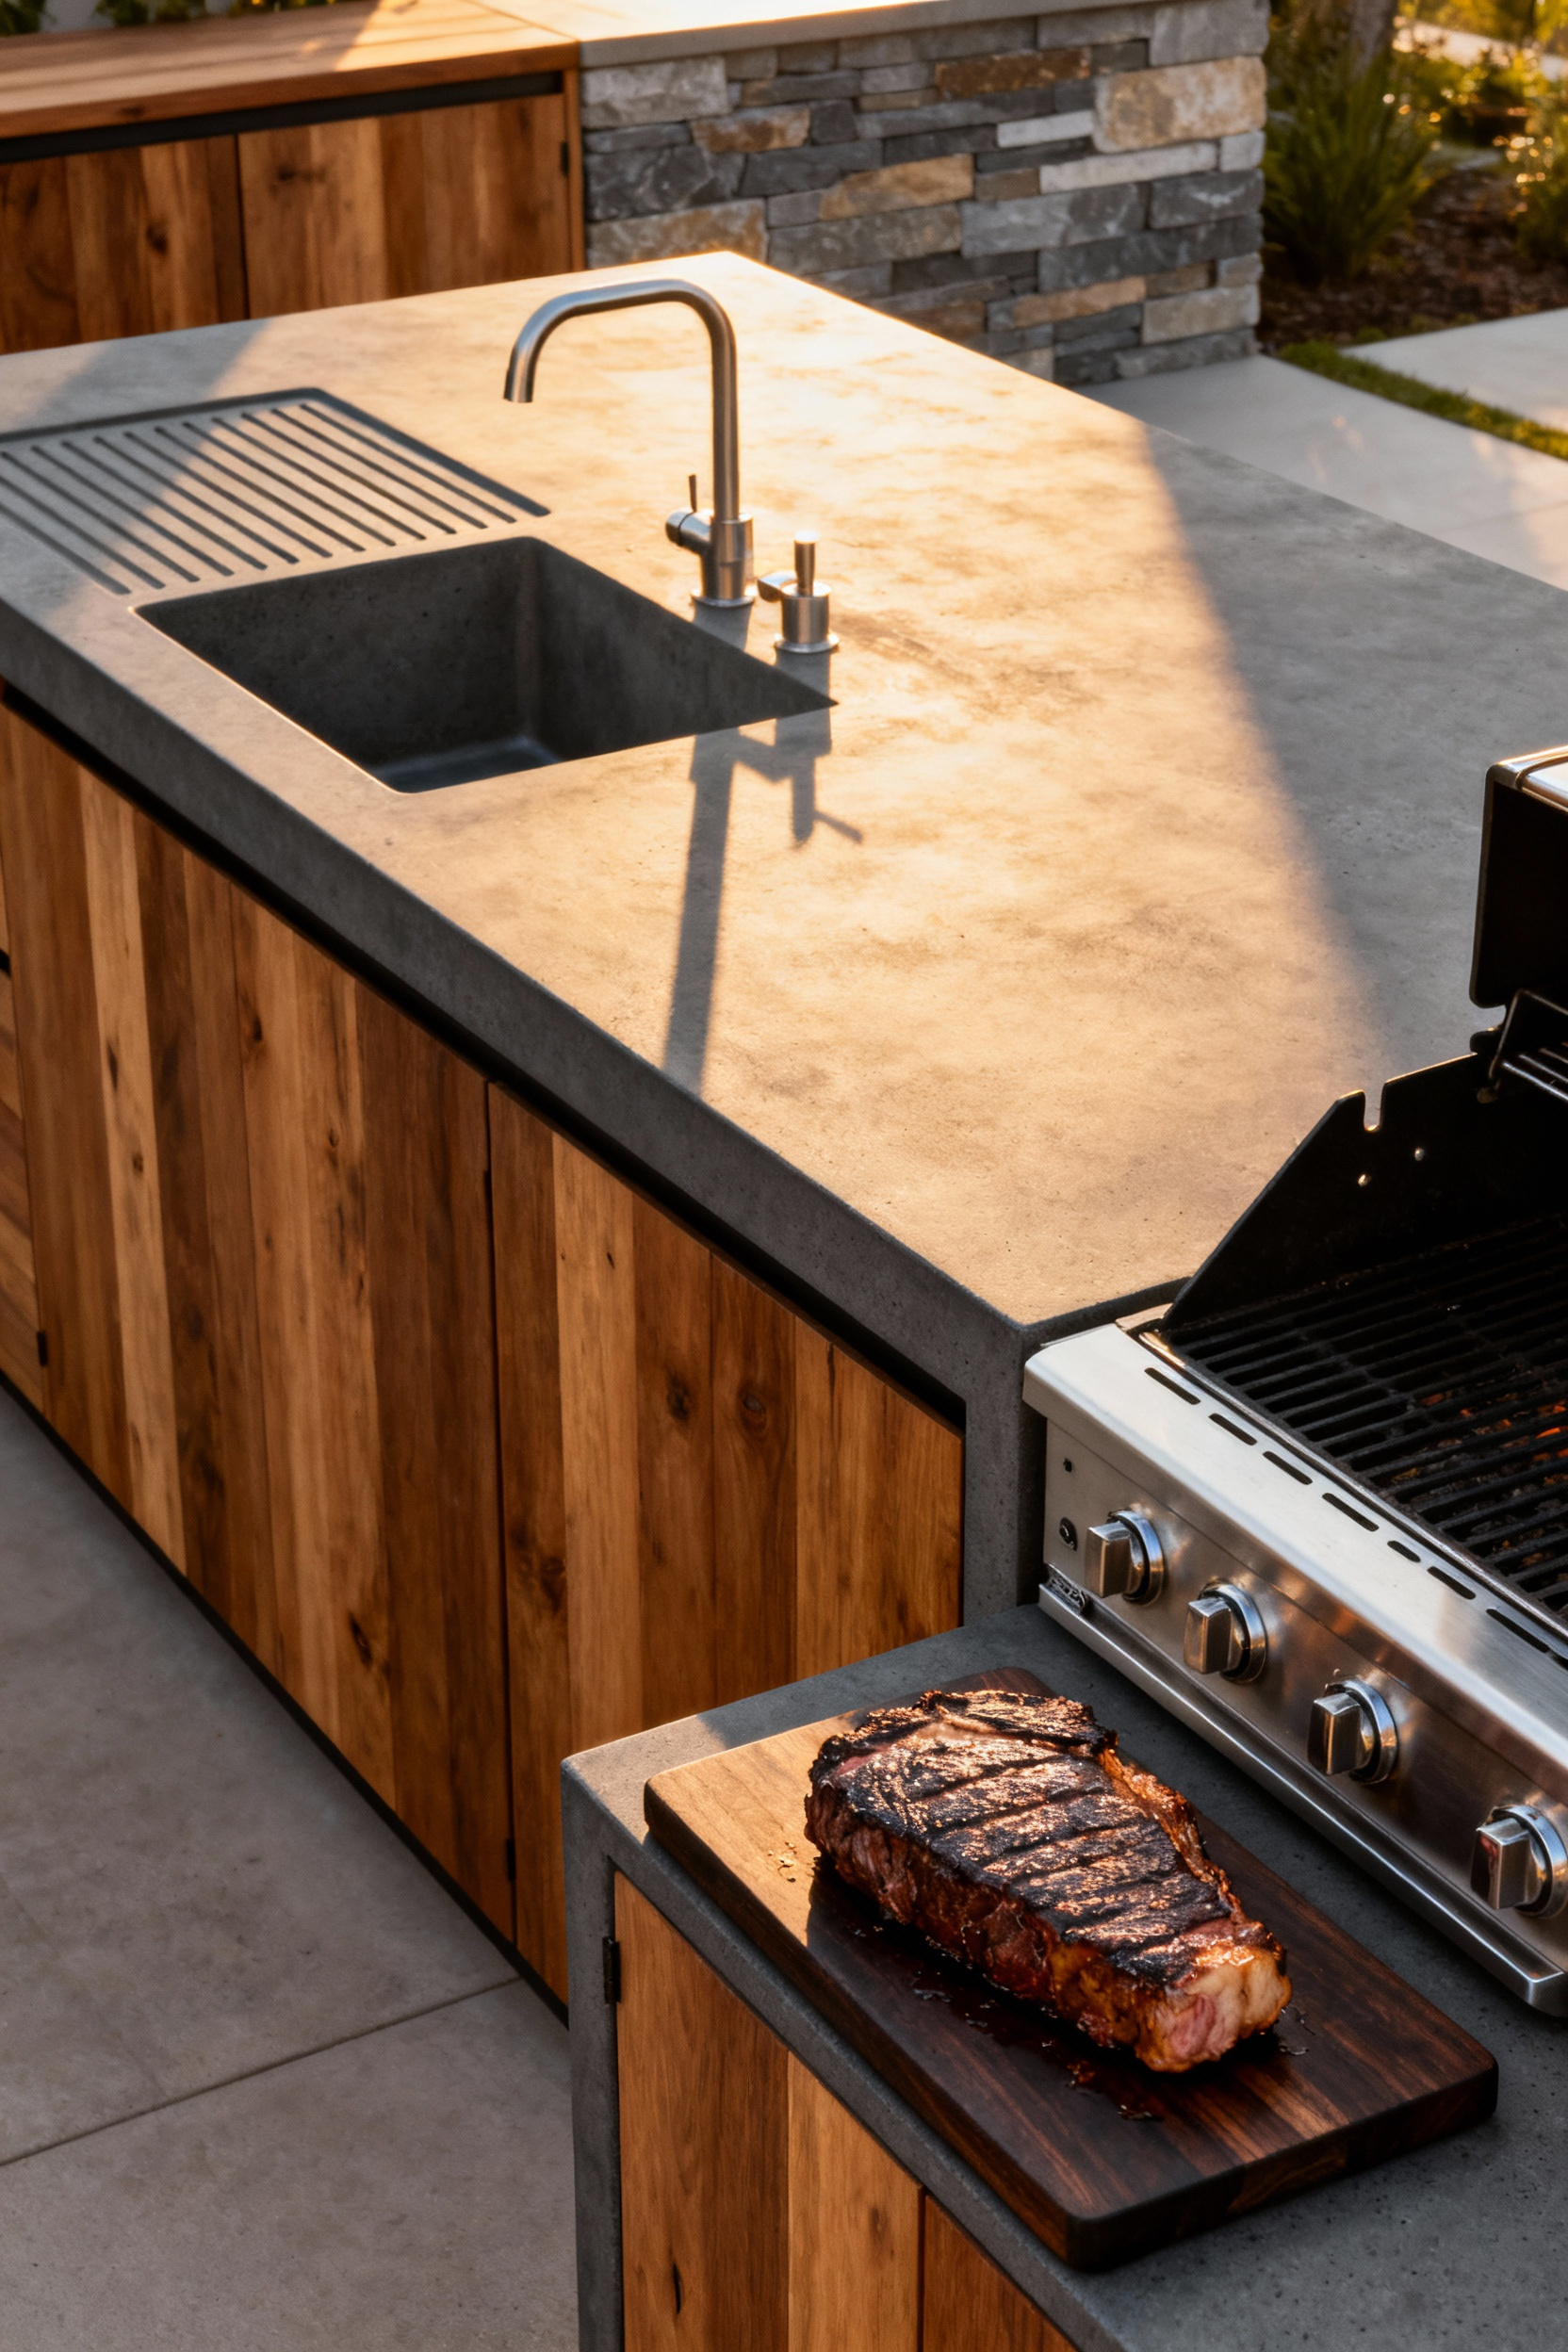
Once installed, treat concrete as a “living” surface that develops a unique patina over time. While these small imperfections add industrial charm, you must apply a commercial-grade, UV-stable sealer annually to prevent deep stains and sun damage. Consider surface temperature carefully; although dark charcoal looks sleek, it becomes scorching hot in direct sunlight. Choose lighter shades to ensure the counter remains comfortable for guests leaning in to grab a fresh appetizer.
7. Seamless Flooring Transitions: Extending Indoor Tile to Outdoor Pavers
Navigating a clumsy step while carrying a hot lasagna disrupts flow and safety. To truly expand your culinary workspace, extend your indoor flooring directly onto the patio. Start by selecting a dual-rated porcelain tile collection. These smart systems provide a sleek finish for your indoor prep zone and a matching, grit-textured version for the outdoors. This achieves total visual harmony while preventing slips near the grill during damp weather.
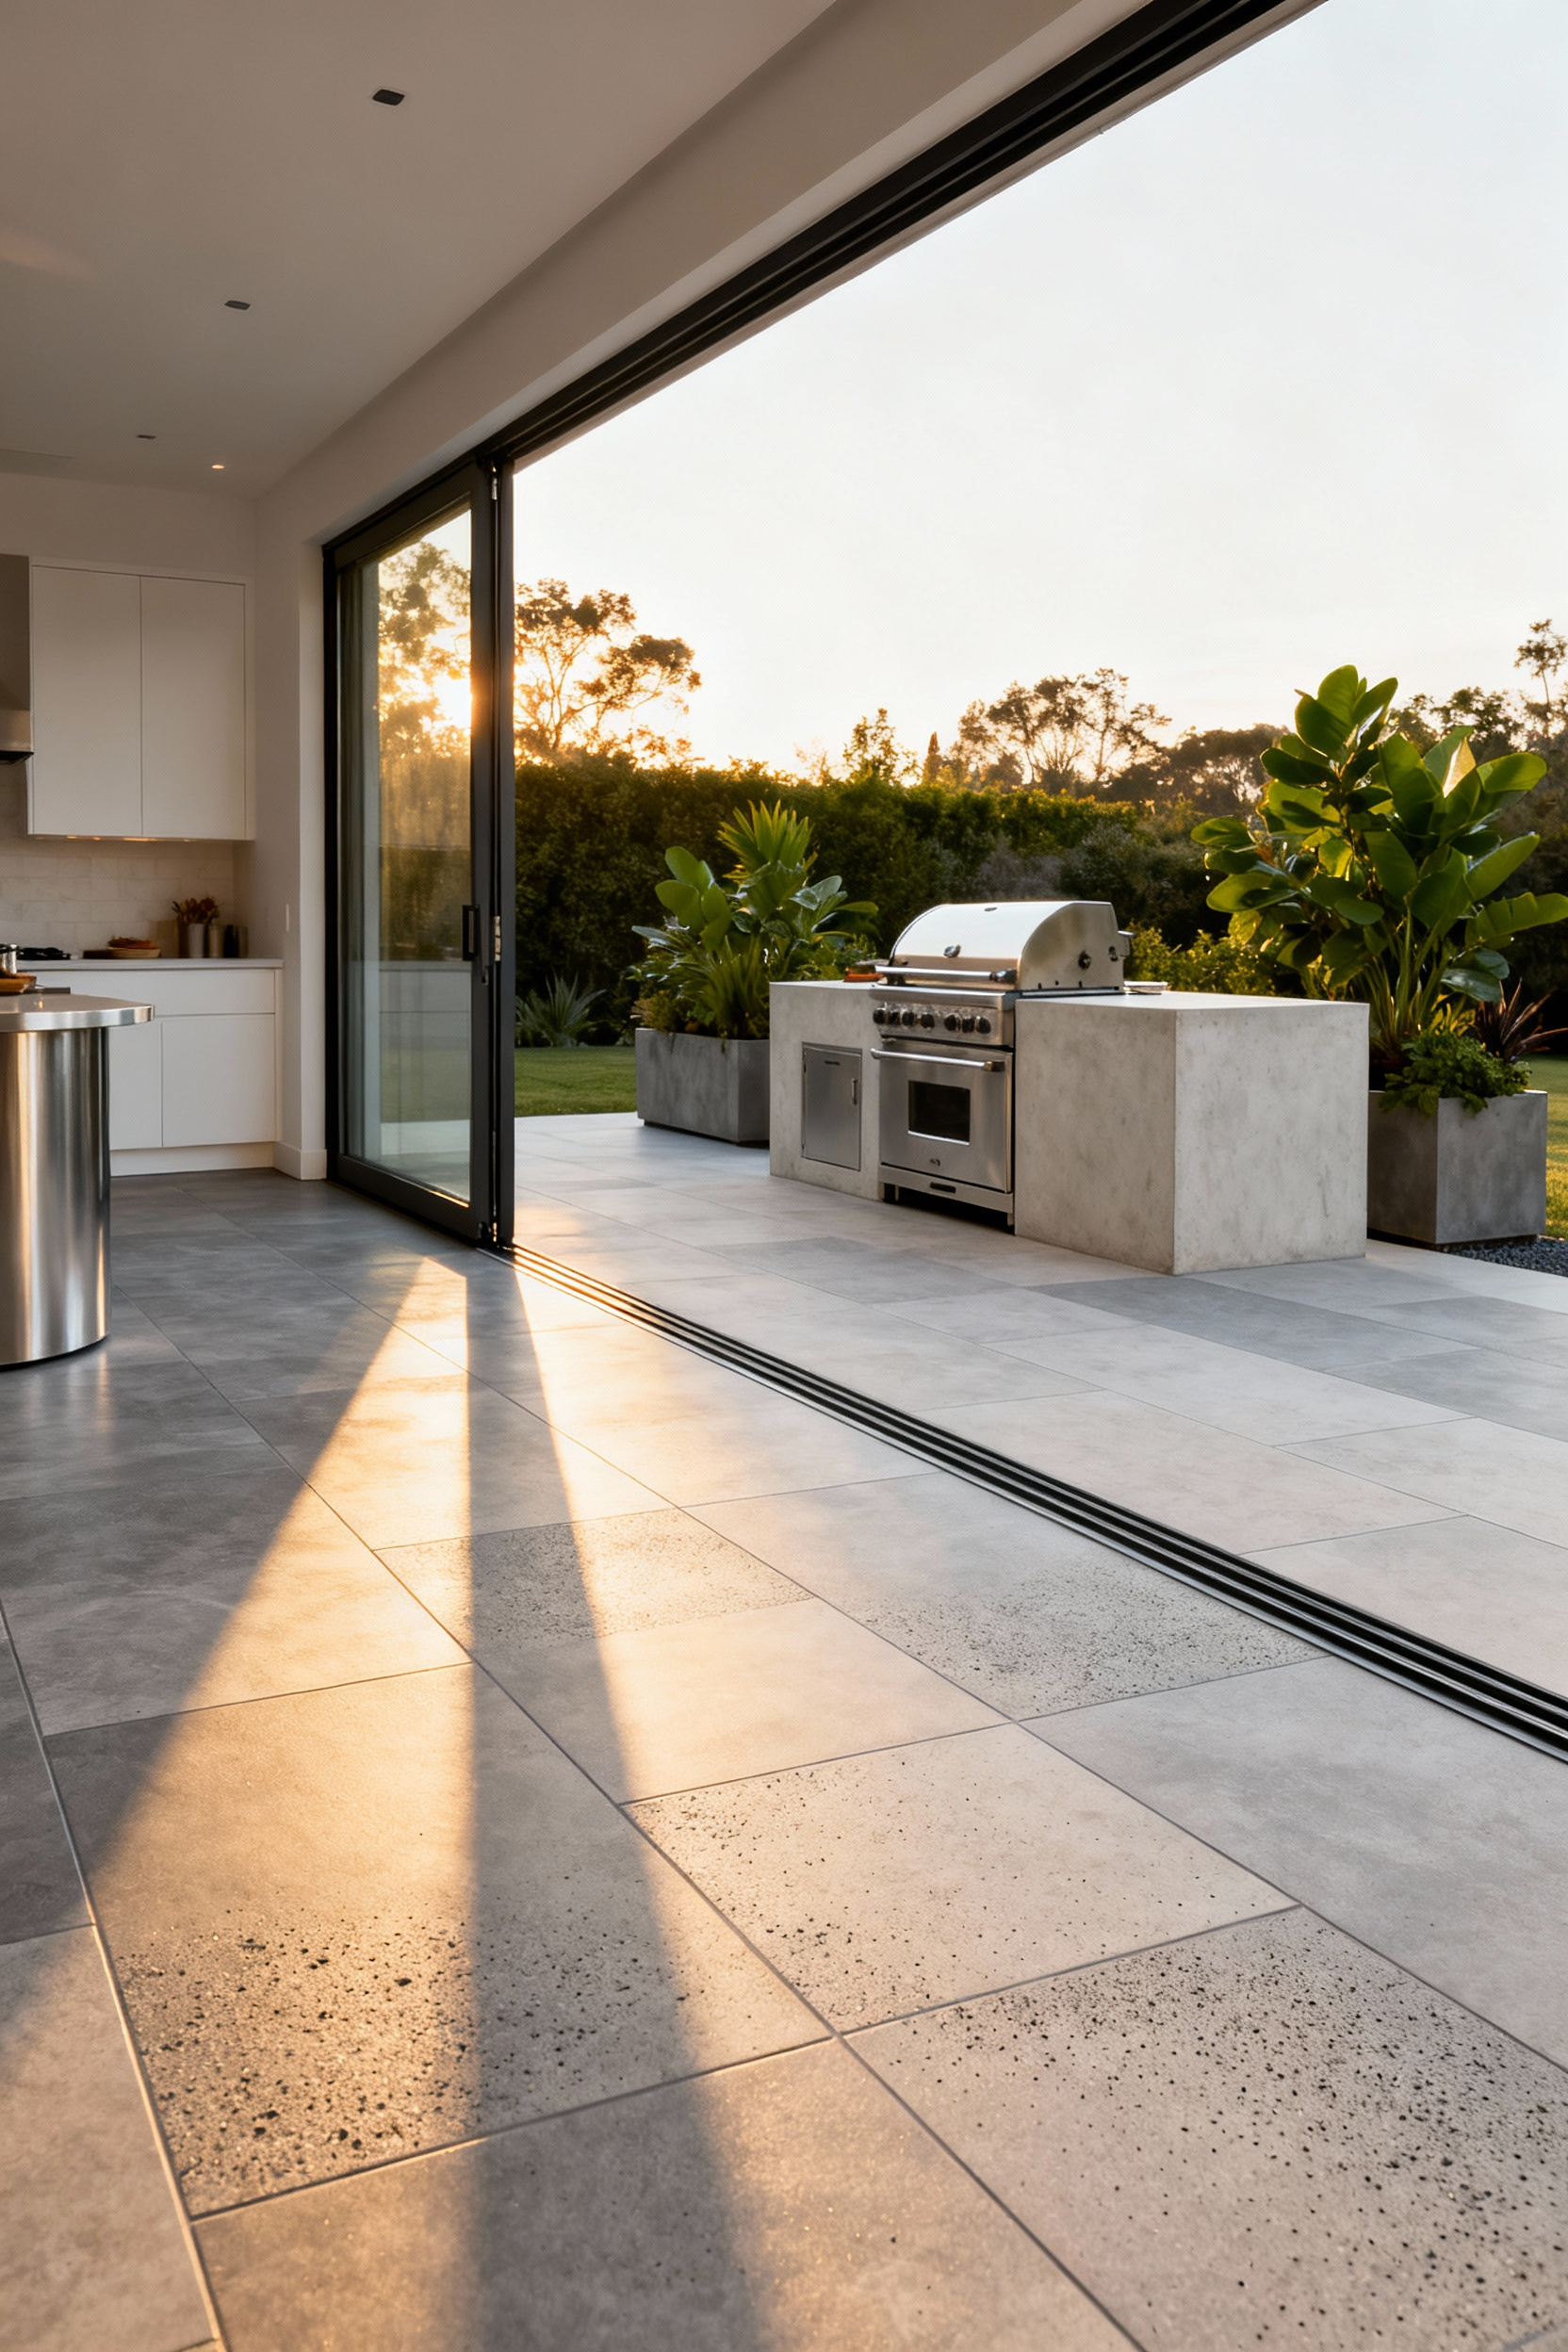
Next, focus on the physical connection. Instruct your contractor to level the subfloors for a “zero-step” threshold and install recessed door tracks. This seamless barrier eliminates tripping hazards and lets guests drift freely between spaces. To finalize the illusion of infinite space, follow these layout rules:
- Use large-format tiles to reduce visual clutter from grout lines.
- Run the pattern continuously in the same direction inside and out.
- Match the grout color exactly on both sides of the threshold.
Your kitchen won’t just look bigger; it will function as one cohesive heart of the home.
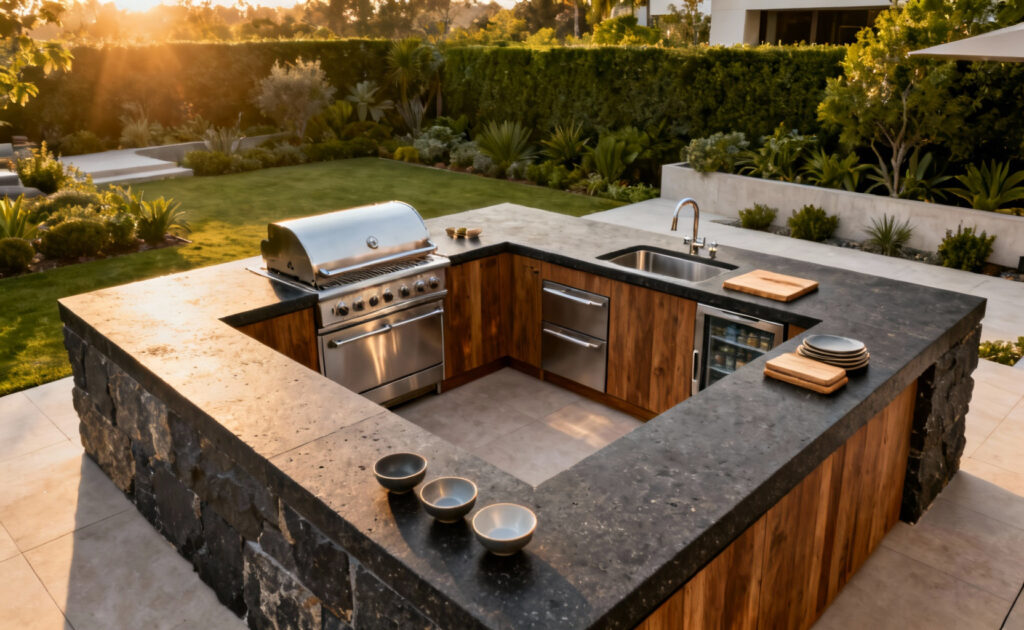
8. Stone Veneer Basing: Grounding the Kitchen Visually within the Landscape
Your outdoor kitchen should feel like a natural extension of your home, not an afterthought. To anchor the space, select a stone veneer that mimics your home’s exterior or the surrounding landscape elements. Pair a rough-hewn Ashlar or Drystack Ledgestone base against the sleek lines of a stainless steel grill; the texture warms the space and invites guests to lean in. Extend this material to nearby planters or column supports to visually tie the culinary zone to the rest of the garden, making the entire patio feel cohesive and intentional.
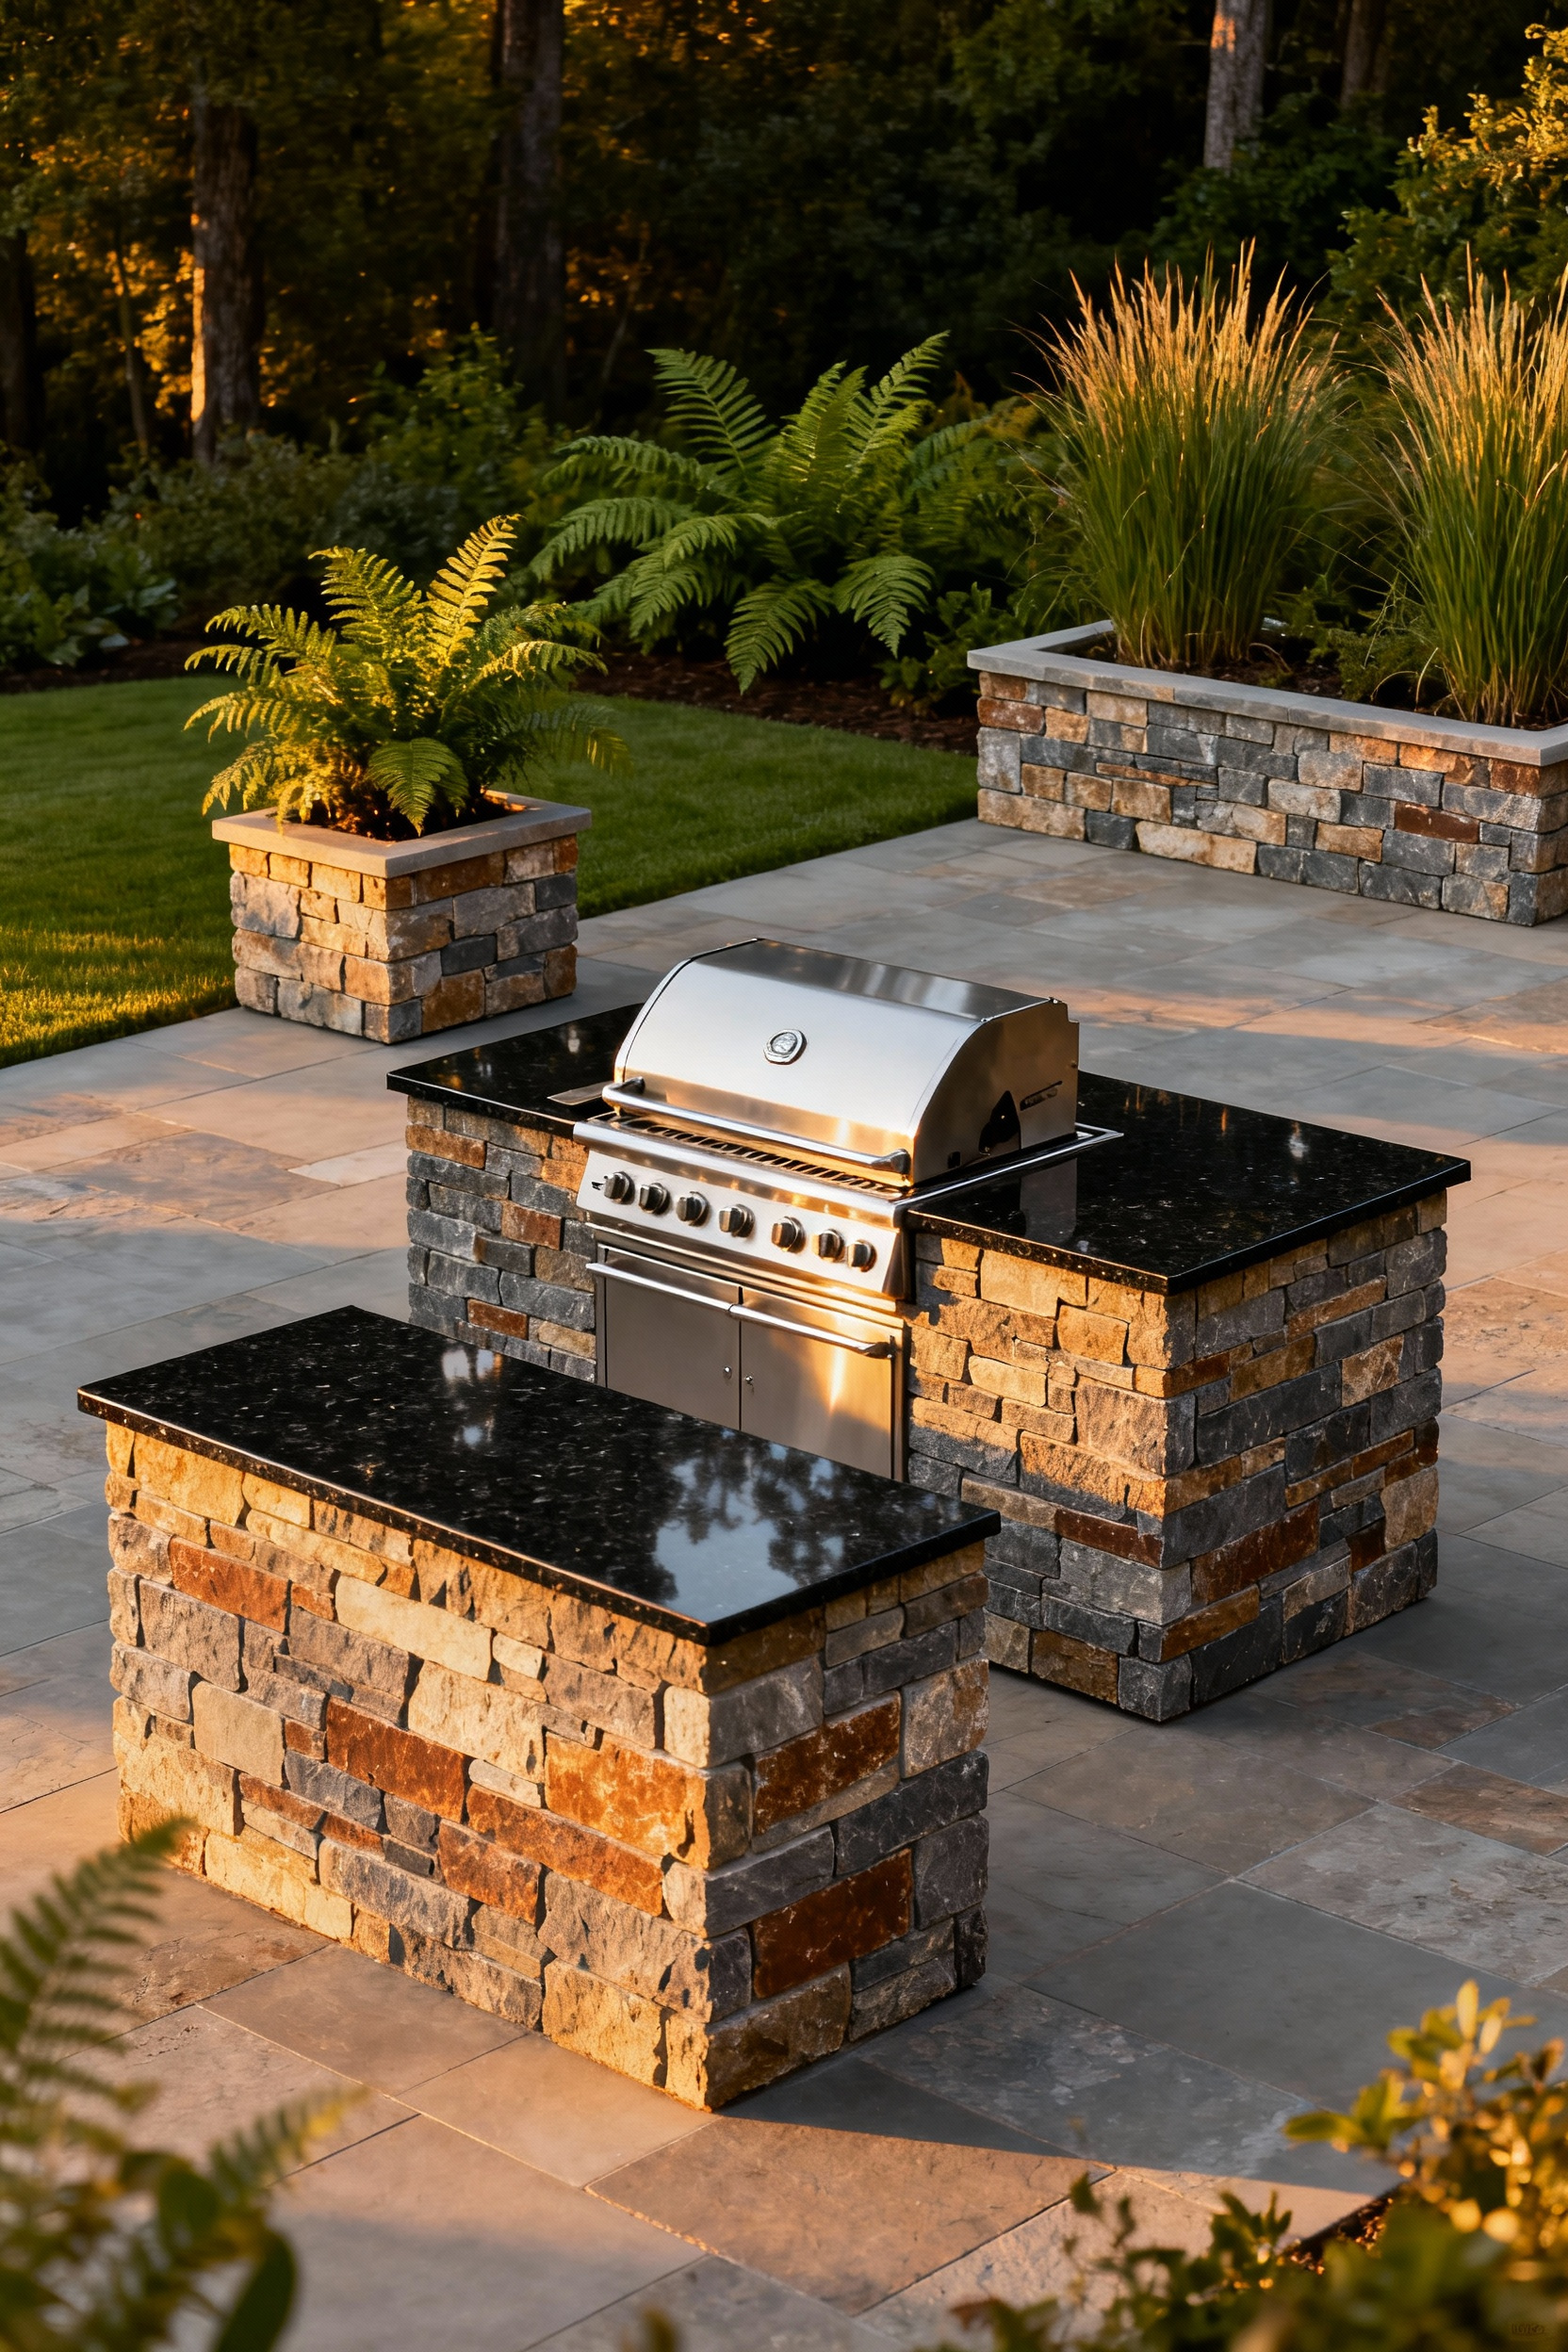
Practical installation ensures this beauty lasts. Protect the stone from ground moisture to avoid unsightly staining or cracking by following these clearance standards:
- Above concrete: Maintain at least a 2-inch gap.
- Above soil or grass: Keep a 4–6 inch clearance.
- Protection: Seal porous stone to block grease splashes and dirt.
Proper spacing prevents water absorption, keeping your kitchen’s foundation solid for years of family feasts.
Phase 3: Culinary Firepower – Equipment for the Serious Chef
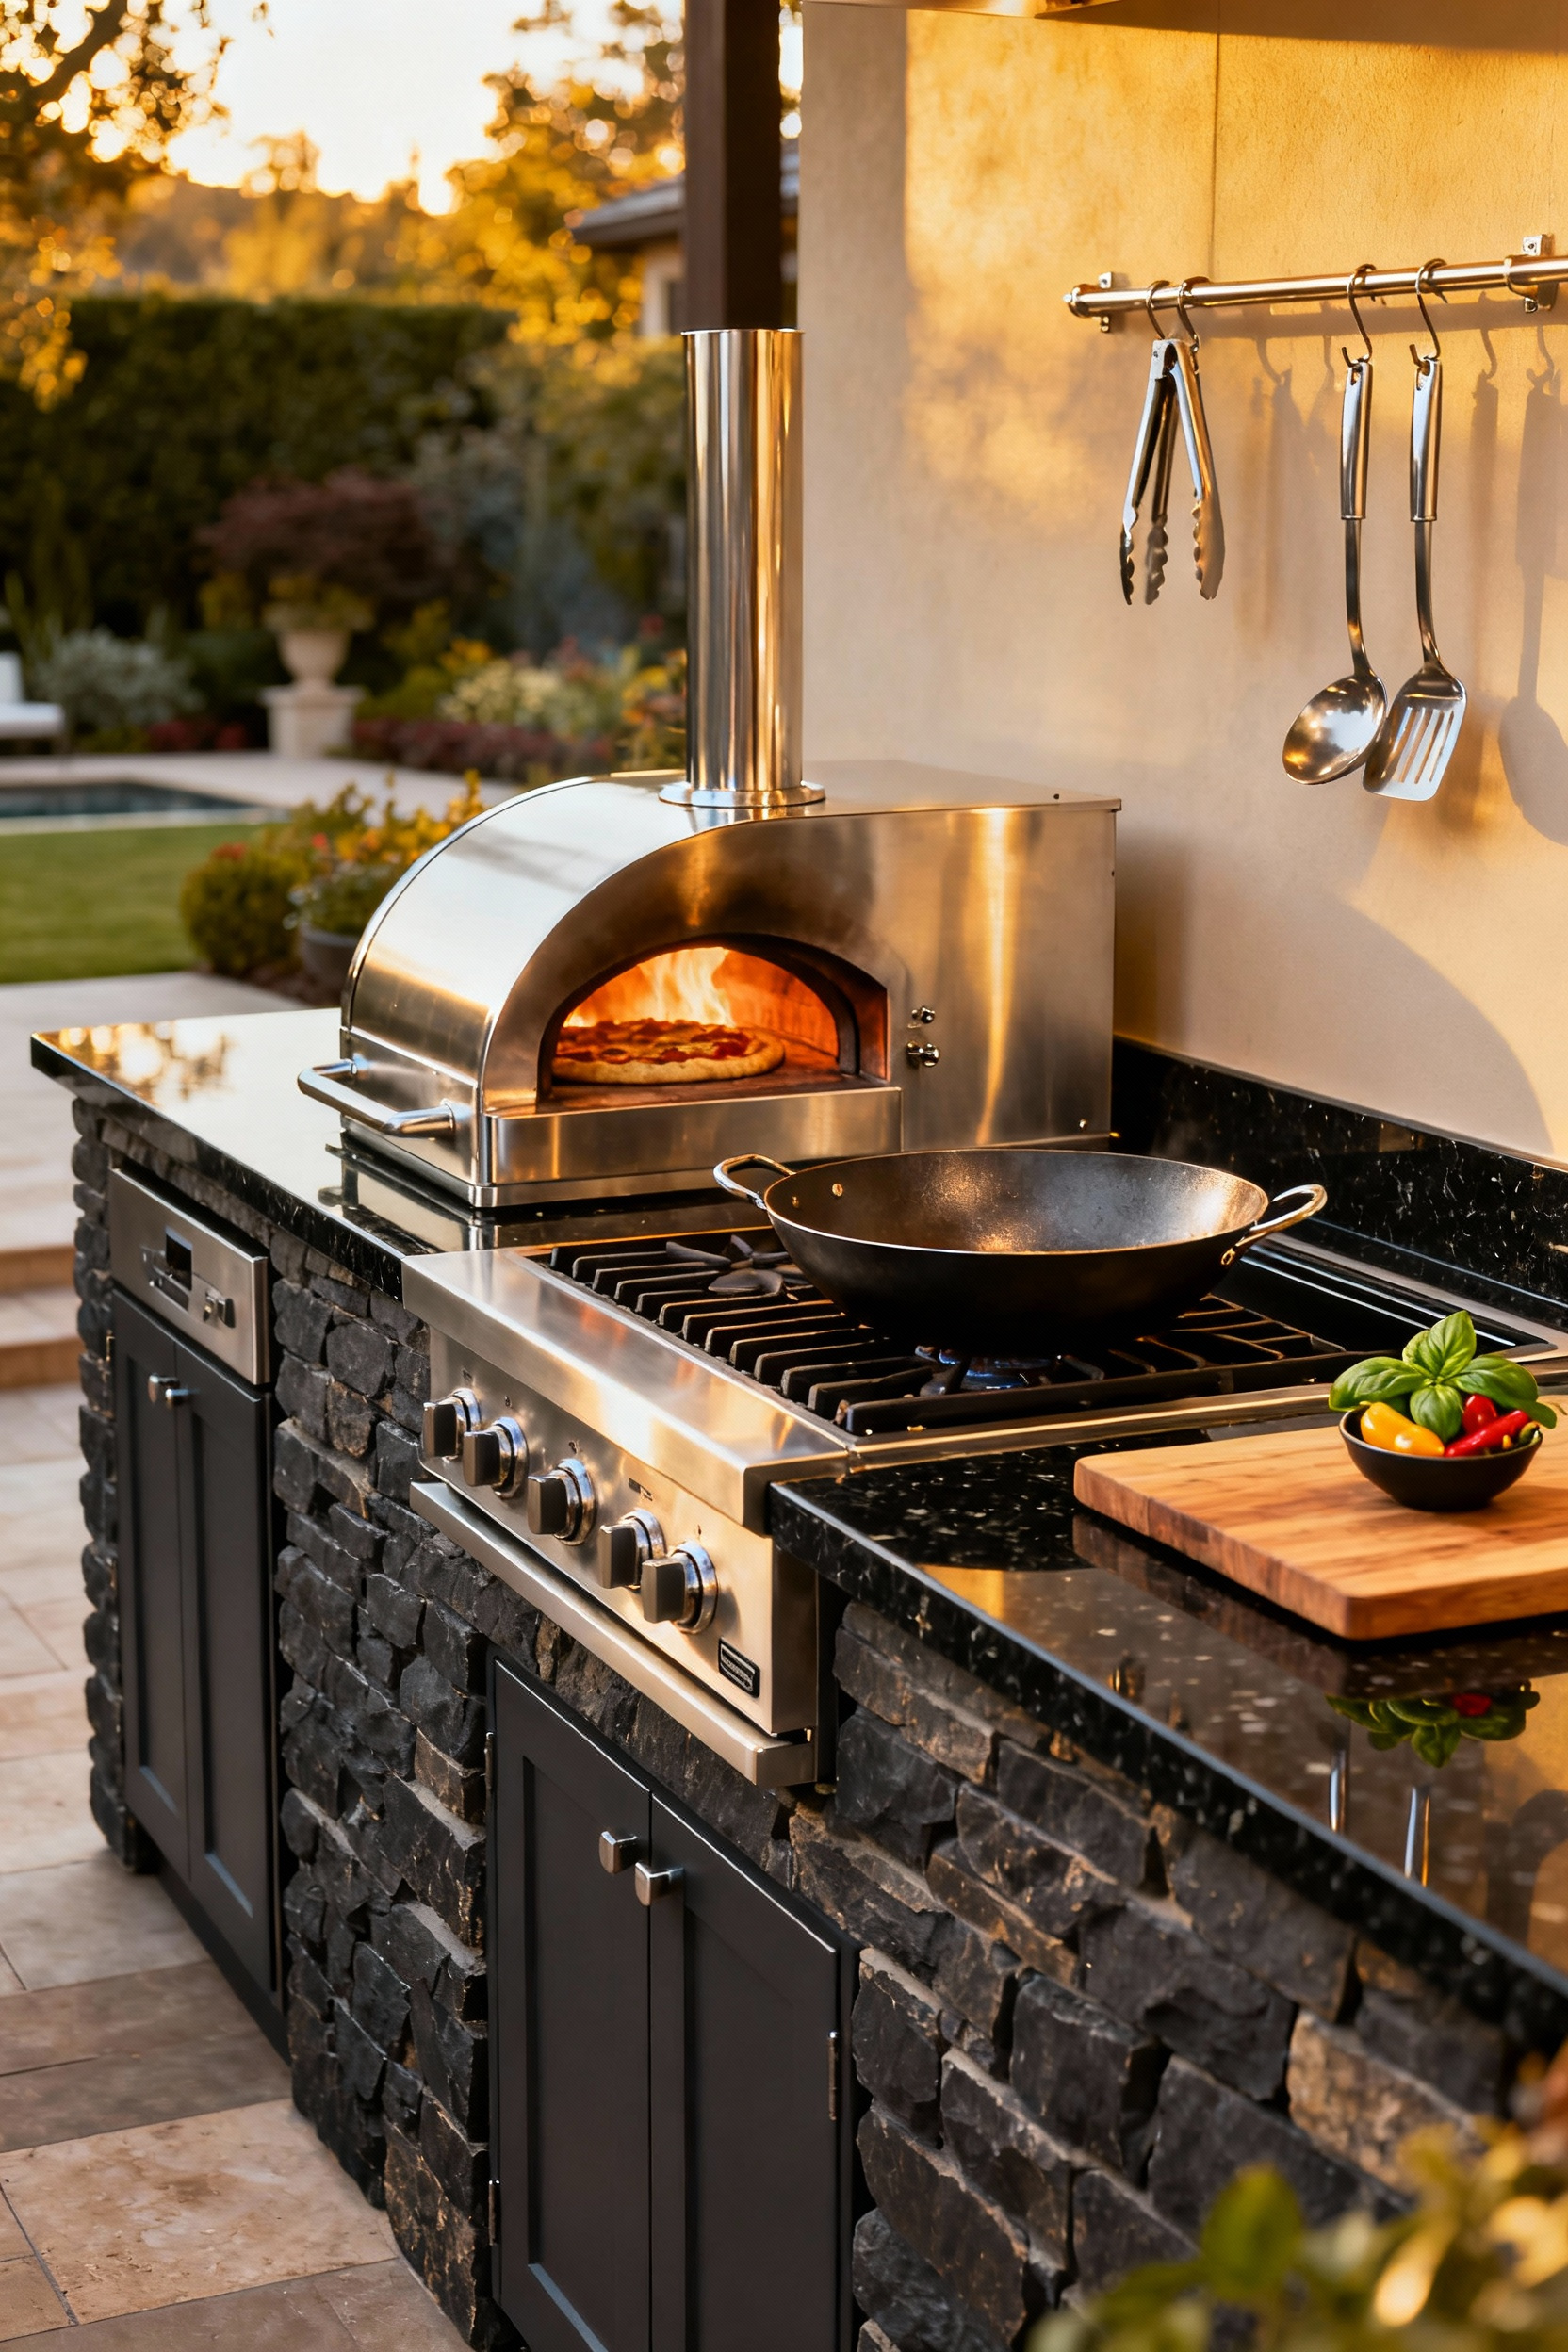
Elevate your outdoor space from a simple grilling station to a professional command center. Professional kitchen workflows dictate that the right tools dictate the menu. Therefore, move beyond the standard grate and build a diverse culinary arsenal. Install a high-heat pizza oven for a fun focal point, or add a 70,000 BTU power burner to handle large stockpots and wok cooking with ease. For true versatility, a flat-top griddle allows you to execute everything from smash burgers to delicate scallops outdoors. Demand hybrid grills or infrared burners that reach 1650°F, ensuring you achieve that perfect steakhouse sear every time.
Seamless entertaining requires more than just fire; it demands flow. Running back inside for ingredients disrupts your rhythm and isolates you from guests. To maintain connection and cooking efficiency, integrate these pro-level amenities directly into your cabinetry:
- Smart Technology: Use Wi-Fi-enabled grills to monitor internal meat temperatures remotely while you socialize.
- Warming Drawers: Keep dinnerware and side dishes hot until the moment of service.
- Outdoor Refrigeration: Store marinades safely and keep beverages chilled within arm’s reach.
Finally, protect this investment by choosing appliances constructed from marine-grade stainless steel. This durable material withstands the elements, ensuring your culinary firepower performs beautifully year-round.
9. The Hybrid Grill Station: Integrating Gas Efficiency with Charcoal Flavor Profiles
Eliminate the choice between weekday convenience and weekend flavor by installing a hybrid grill station. Built-in models maximize your counter space, replacing two bulky units with one sleek powerhouse. This streamlining creates a better workflow, allowing you to move effortlessly from chopping vegetables to flipping burgers, freeing up valuable room for food prep and serving.

These units elevate your culinary game through sheer versatility. Look for models featuring gas-assist ignition to skip the chemical taste of lighter fluid. Once lit, leverage the dual-zone capability for a professional cooking experience:
- Use the gas side for consistent, low-heat control on delicate items like fish.
- Dedicate the charcoal side for high-heat searing and that signature smoky profile on steaks.
Integrated smart technology, such as meat probes and Wi-Fi connectivity, lets you monitor internal temperatures from your phone, ensuring perfect doneness without stepping away from your guests.
10. The Wood-Fired Pizza Oven: Establishing a New Hearth for Gathering
Treat the wood-fired oven as the garden’s new hearth, not just a cooking appliance. Since fire naturally draws a crowd, design the space for interaction by integrating the oven into a broad island with bar-style seating. This transforms meal prep into a social event where guests can customize toppings and chat with the cook. Functionality must support the fun; flank the oven with heat-resistant countertops for staging dough and tuck firewood into hidden storage below to maintain a clean workflow.
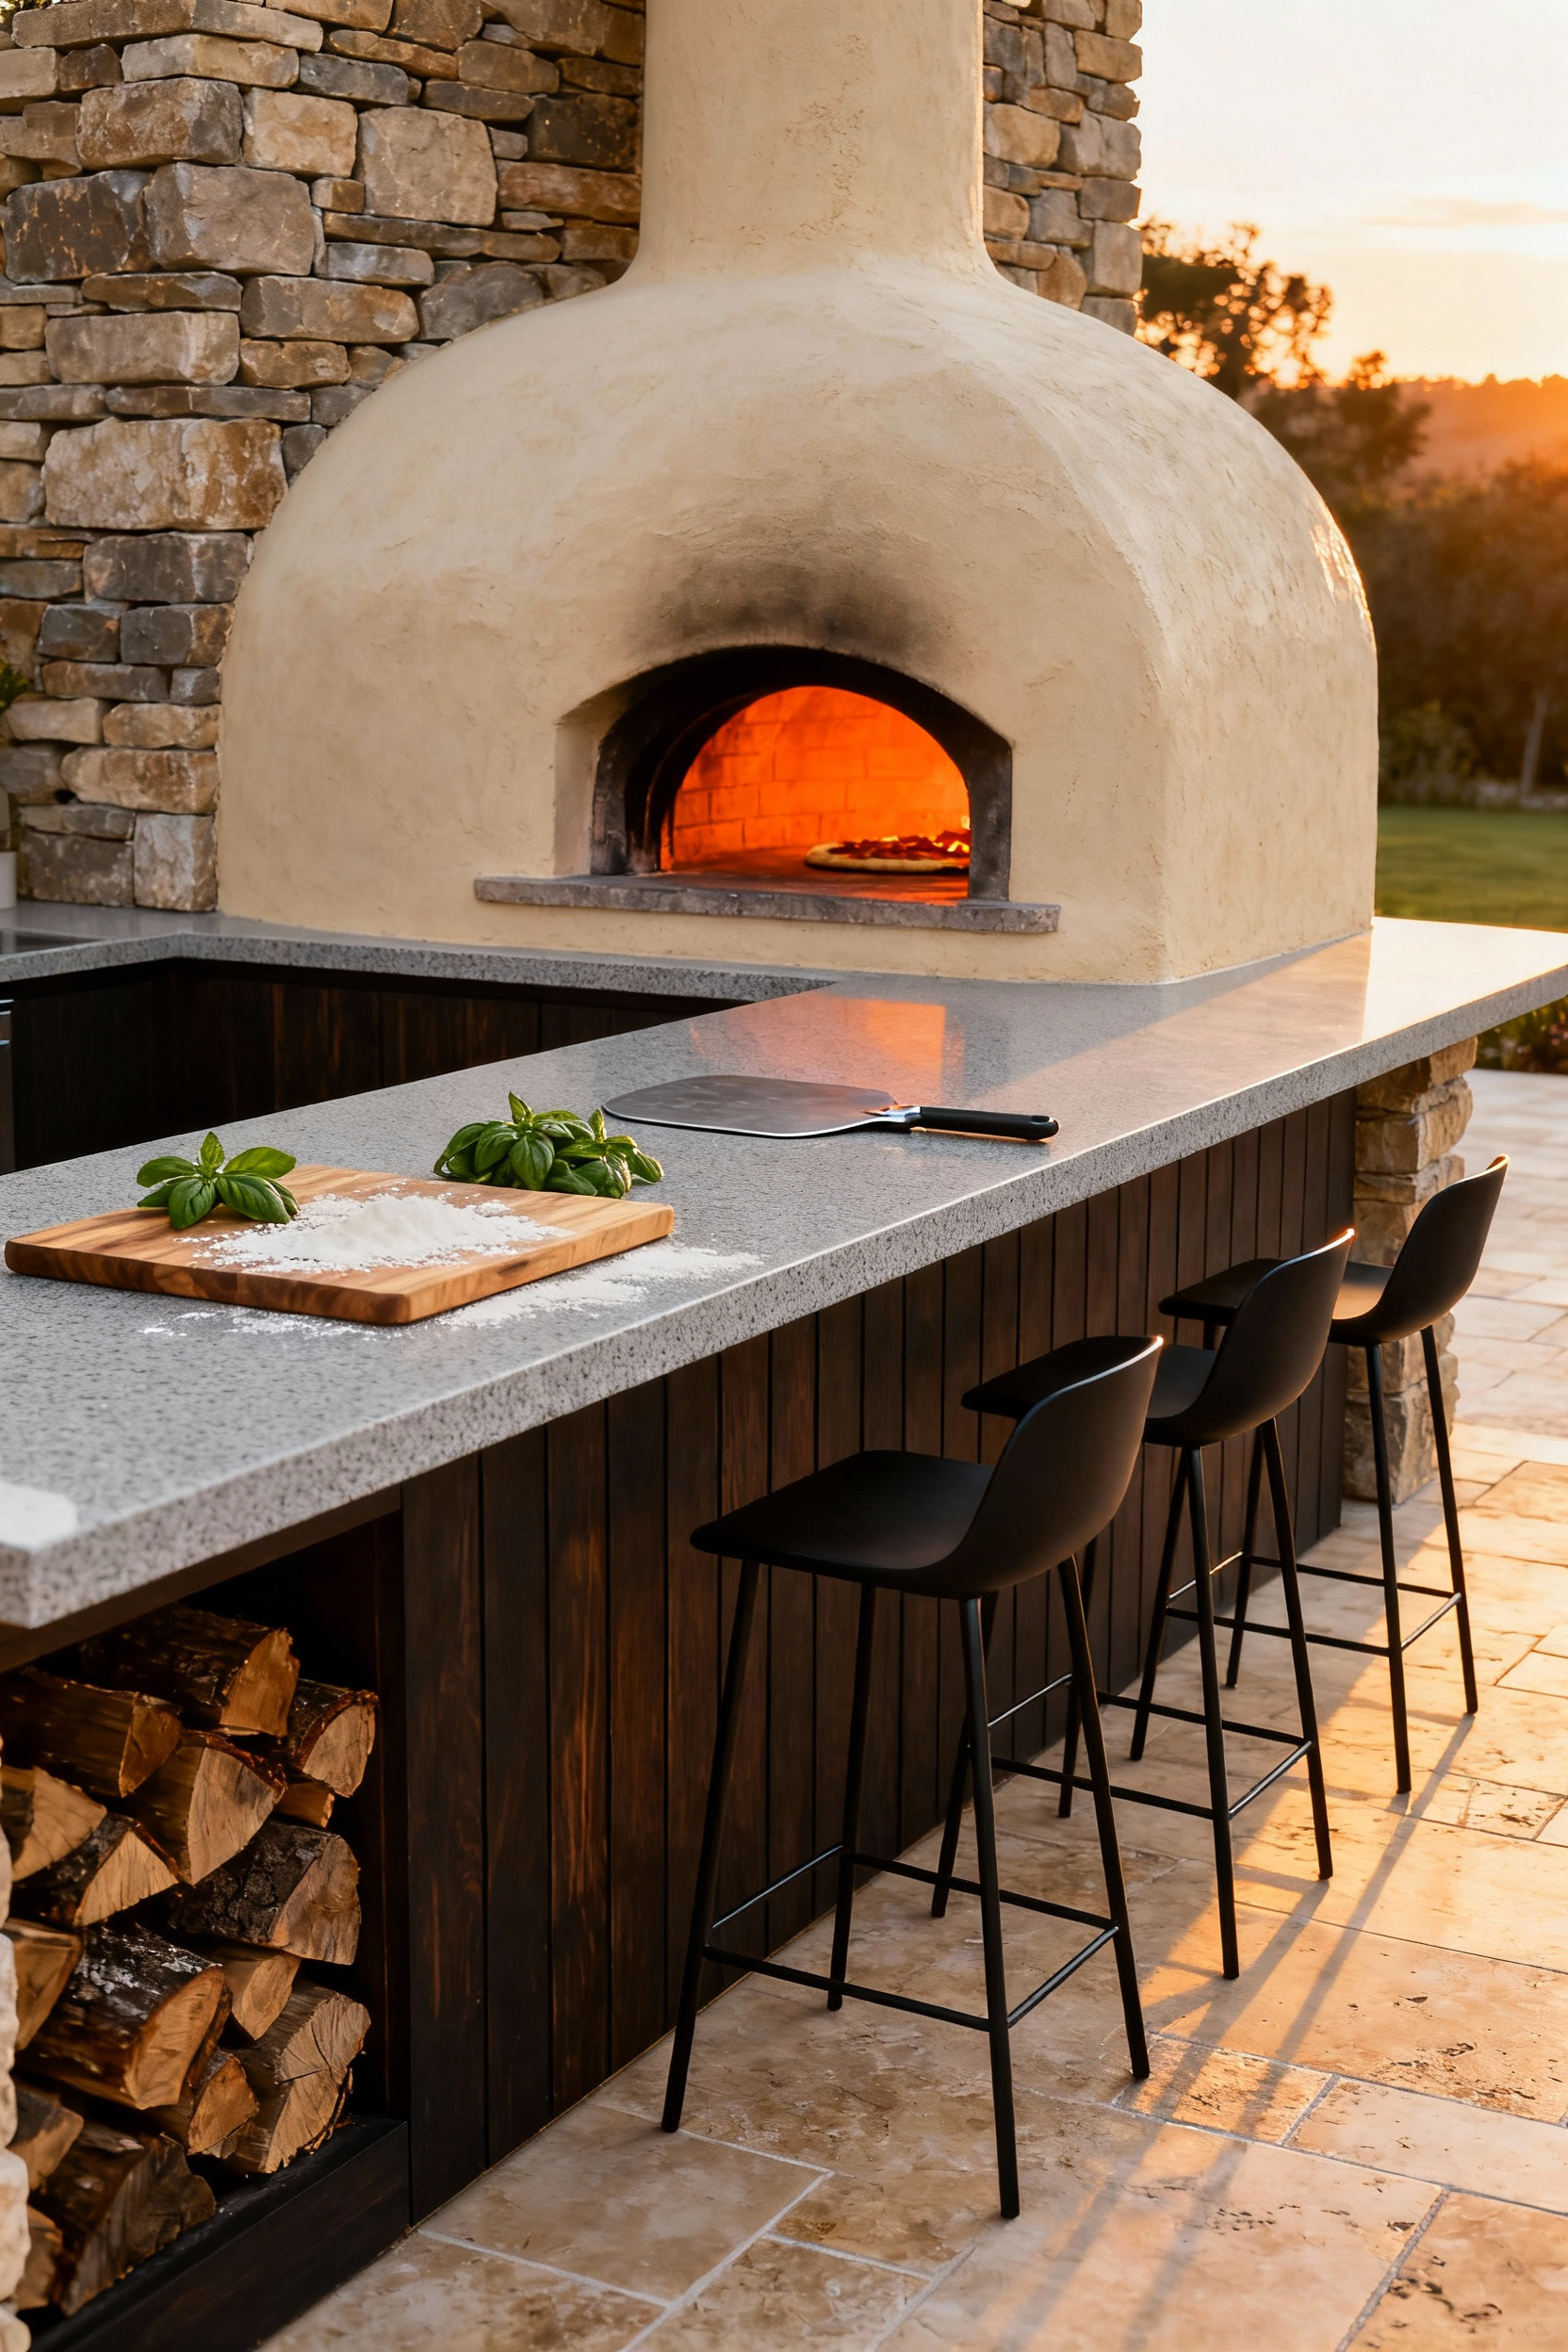
A truly great kitchen tool works hard for its keep, and your outdoor oven should be no exception. Use the intense heat for more than just pizza; roast meats, slow-smoke vegetables, or bake crusty artisan bread. To fully capitalize on this investment, consider these enhancements:
- Master the Residual Heat: Bake breakfast pastries or slow-cook stews as the oven cools down.
- Create a Fire Zone: Pair the oven with a nearby fire pit to transition guests seamlessly from dining to lounging.
This approach ensures the space remains a cozy, communal hub long after the last slice is served.
11. Side Power Burners: The Secret to Handling High-Heat Wok Frying and Boils
Keeping fried food smells out of the indoor drapes is a top priority for any home chef. Standard side burners simply cannot compete with the intense heat required for authentic “wok hei.” Instead, install a dedicated Power Burner pumping out 60,000 BTUs or more. This focused energy creates restaurant-quality sears and boils water instantly, effectively keeping grease, steam, and strong aromas outdoors.
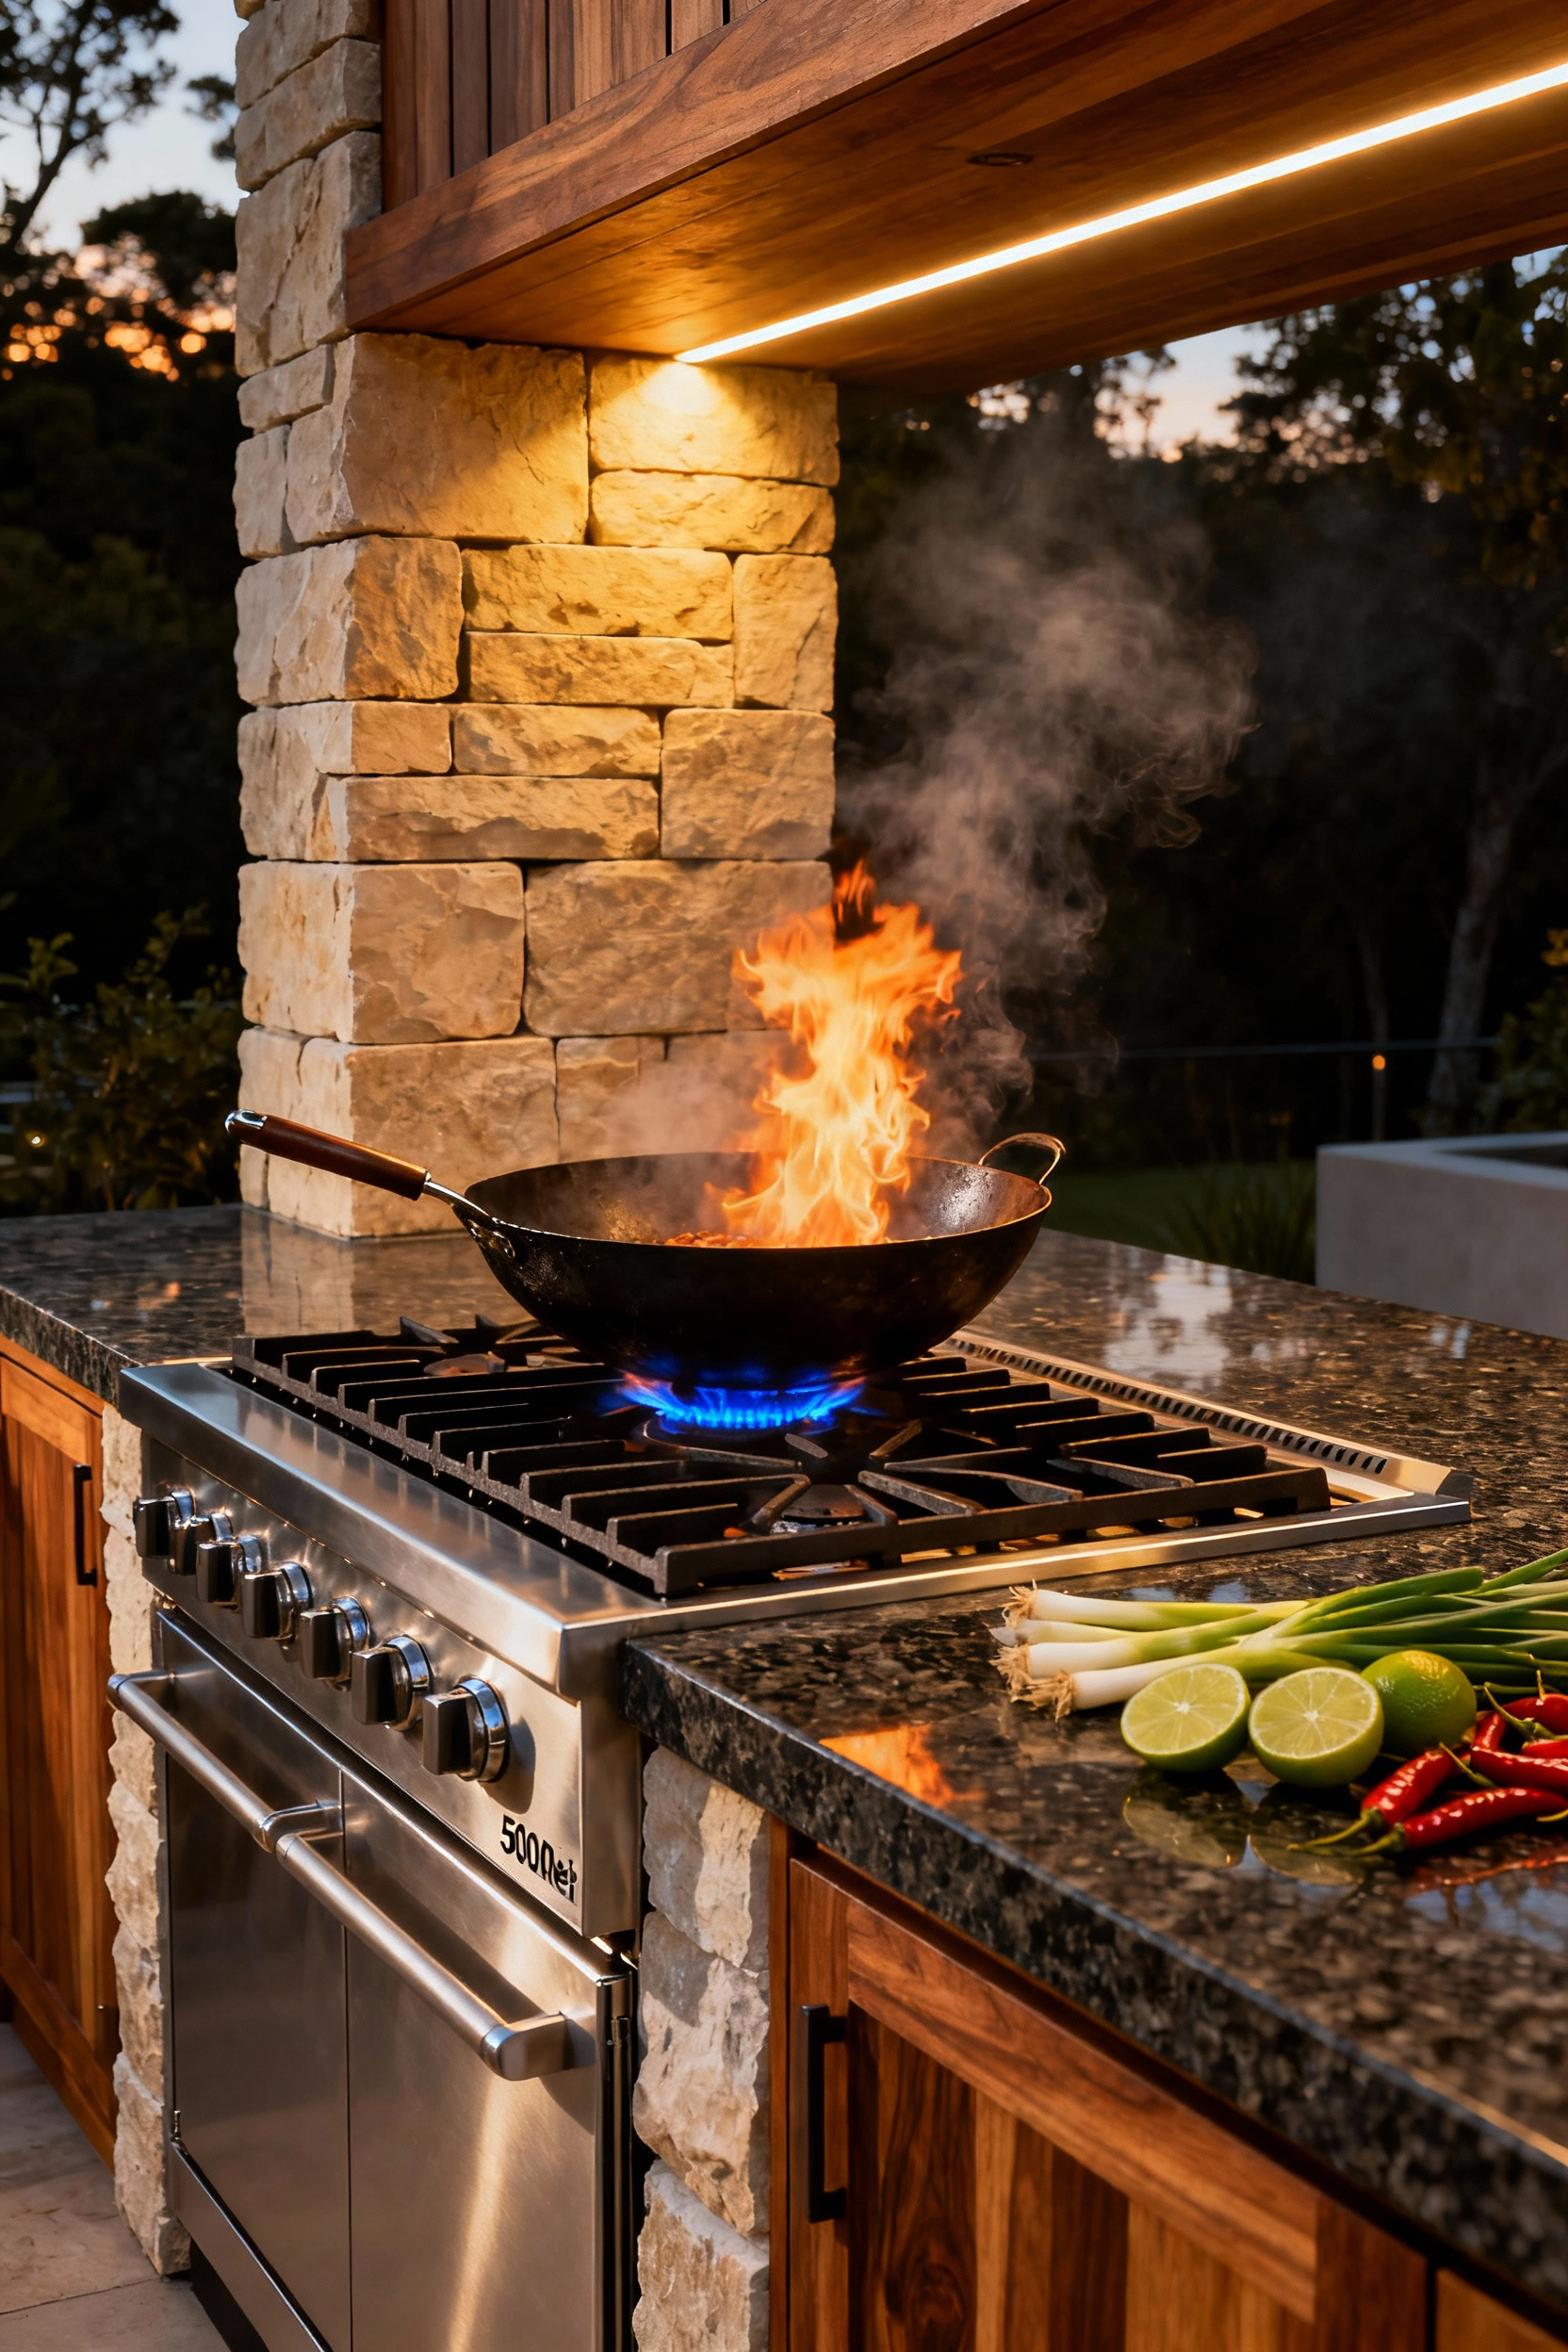
To optimize this station for family feasts, pay close attention to the installation details. Build the enclosure 6–12 inches lower than your main countertop. This ergonomic drop lowers the center of gravity, allowing you to safely peer into tall stockpots or toss a heavy wok without straining your shoulders. Demand a unit with dual-ring burners and a recessed grate to stabilize round-bottomed pans and give you precise control.
12. Dedicated Smoker Nooks: Designing for ‘Low and Slow’ Without Cluttering the Flow
True barbecue is a labor of love, but the “low and slow” process should never monopolize your primary workspace. Position your smoker nook slightly apart from the high-heat grill to establish a distinct rhythm. This separation prevents heat interference and keeps the main traffic flow open for serving guests. However, never isolate the cook completely. Flank the unit with a dedicated 24-36 inch landing zone. This specific counter section is essential for messy tasks like basting ribs or wrapping a brisket, ensuring grease and rubs remain contained rather than spreading across your prep area.
Efficient design also demands smart storage for bulky supplies. Prioritize deep base cabinets specifically configured for these smoker essentials:
- 5-gallon buckets for wood pellets or chunks.
- Oversized tubs for bulk spices and rubs.
- Deep drawers for butcher paper and heavy-duty heat gloves.
If you build under a roof structure, install a targeted exhaust fan. Proper ventilation dissipates lingering smoke quickly, maintaining a comfortable, clear environment for conversation while the smoker works its magic.
Phase 4: The Host’s Domain – Entertainment and Atmosphere
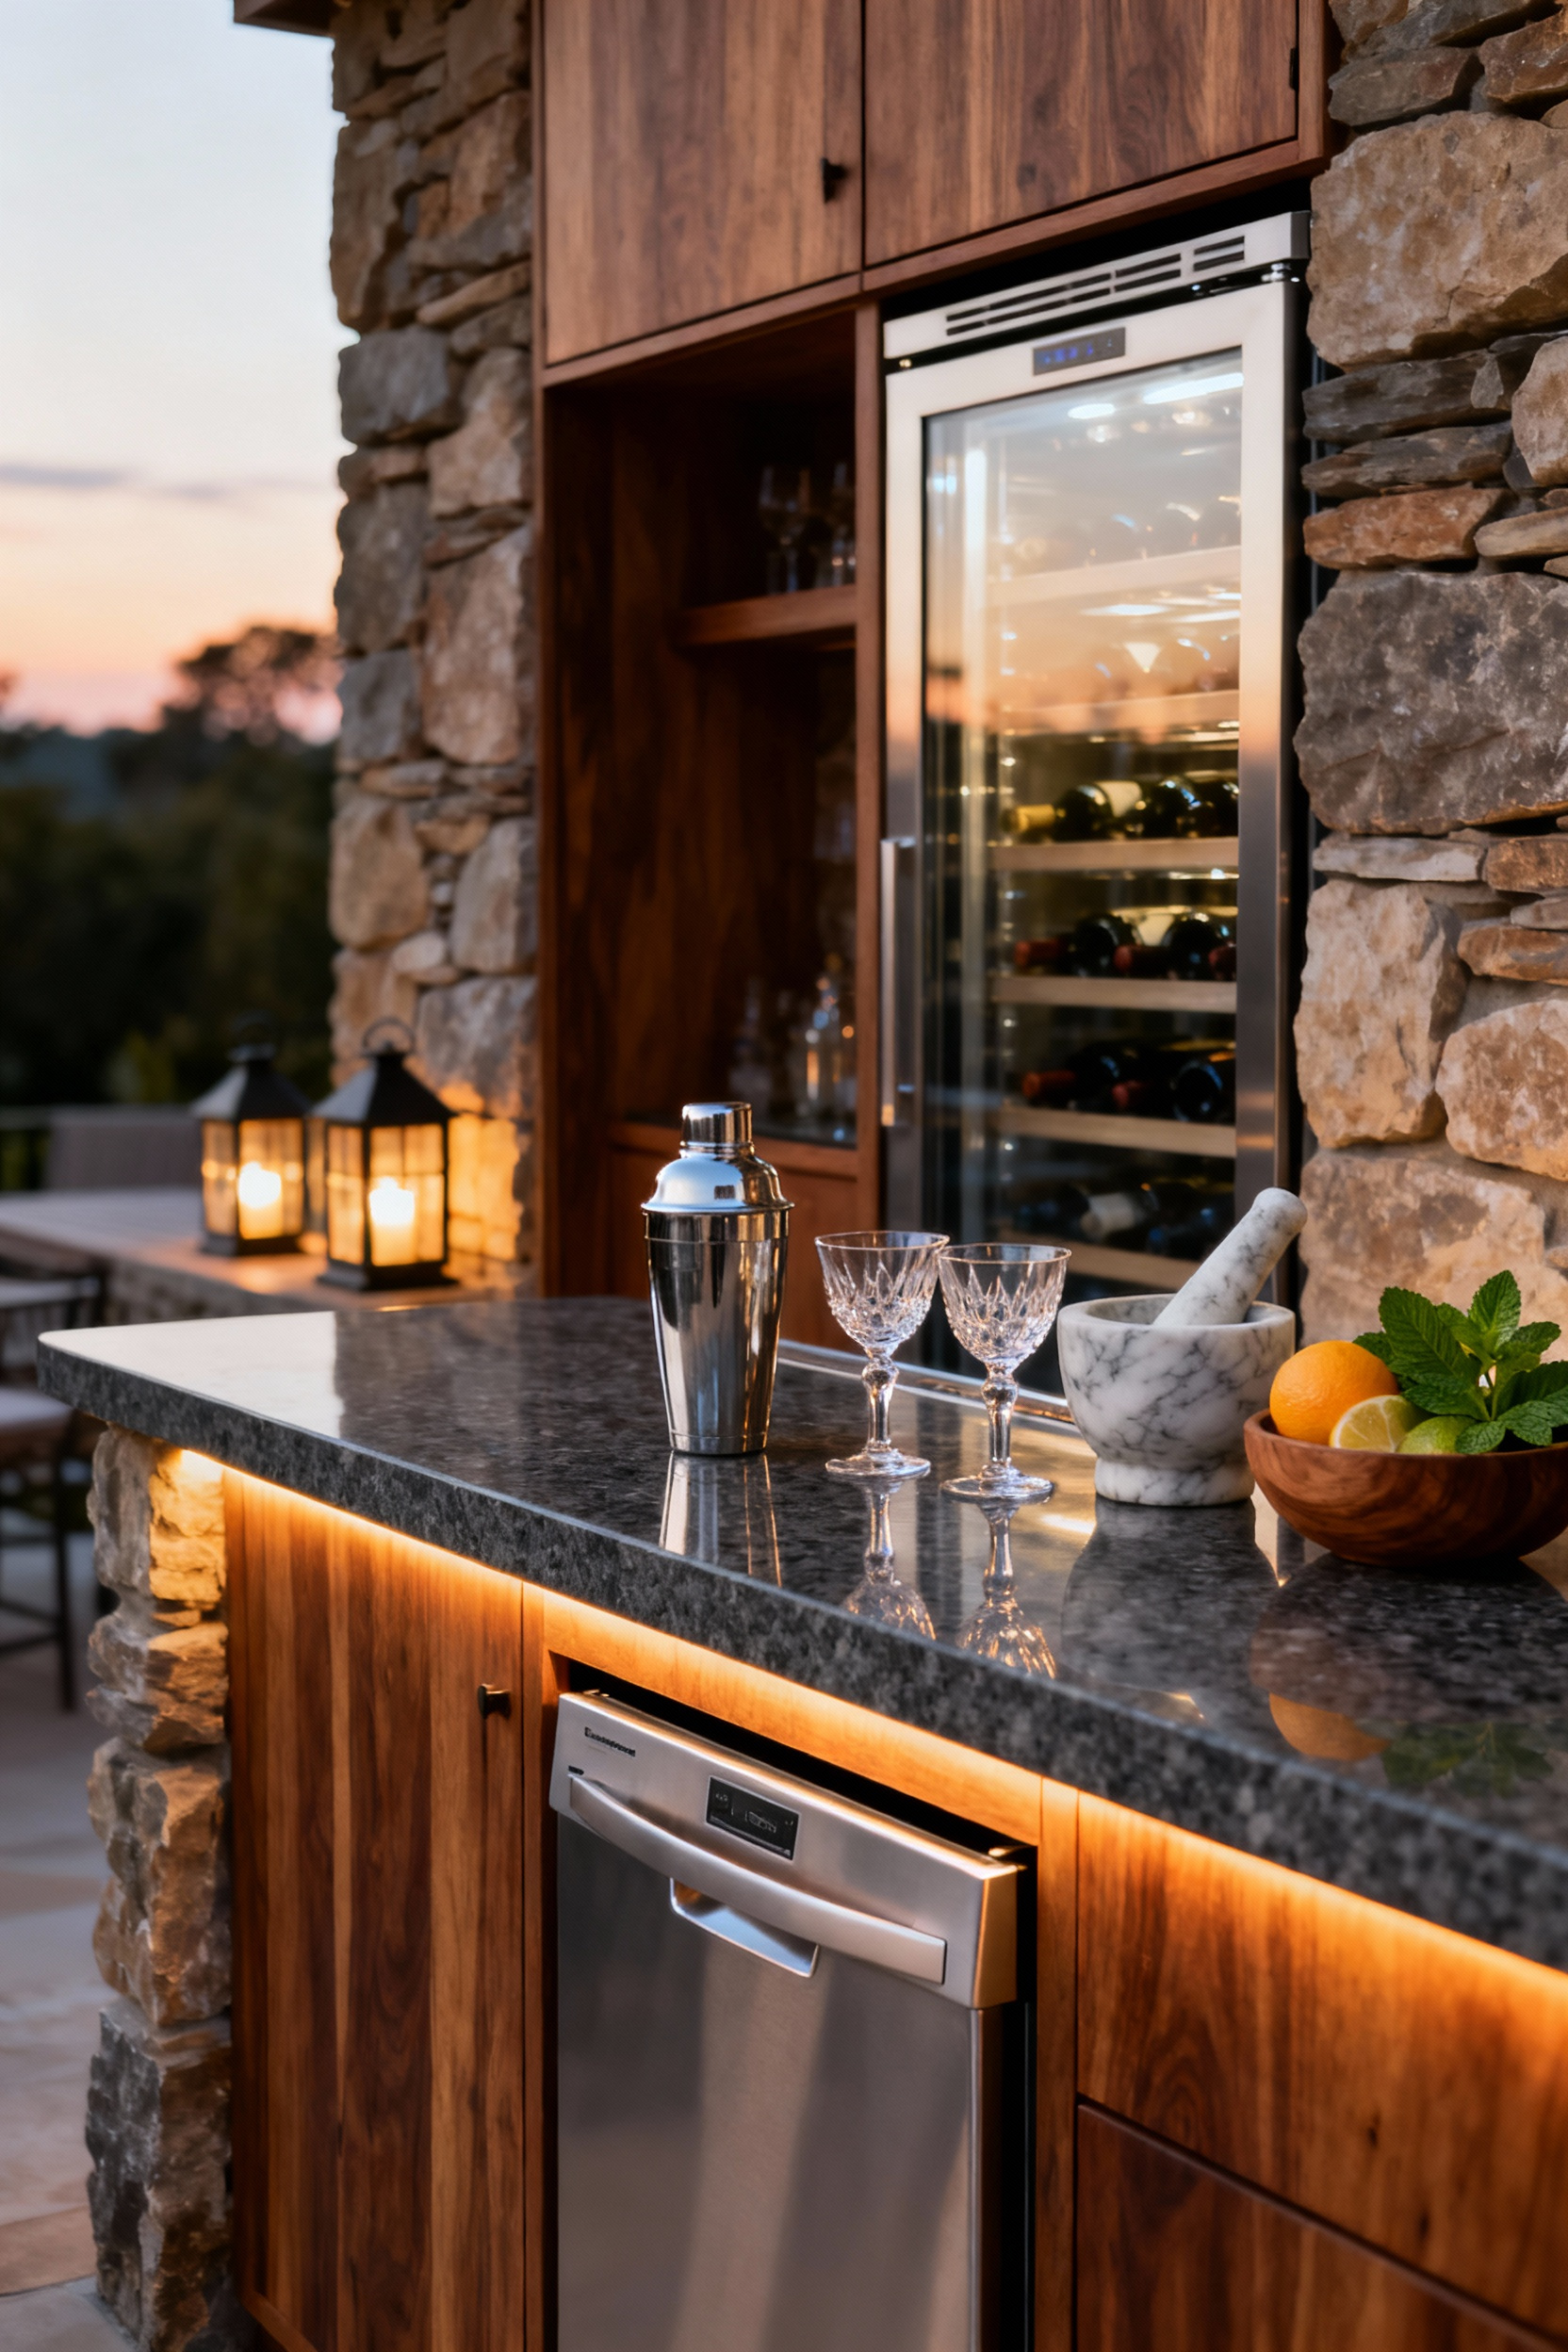
True hospitality blurs the line between cooking and entertaining. Prioritize a dedicated “cocktail station” equipped with an outdoor-rated wine fridge and ice maker. This strategic addition keeps guests hydrated and eliminates frantic trips back inside, allowing you to focus on the food while remaining the heart of the gathering. The cook stays connected to the conversation rather than isolated by the grill.
Beyond the appliances, curate the atmosphere to encourage lingering long after the meal ends. To achieve this resort-style feel, integrate these essential elements:
- Layered Lighting: Combine bright task lights for safe prep work with dimmable ambient strings to soften the mood.
- Distinct Zoning: Separate the hot cooking area from the lounge space using a fire pit or island to manage traffic flow.
- Climate Control: Install infrared heaters or motorized screens to ensure guest comfort during chilly evenings.
By blending smart technology with physical comfort, you create a sanctuary that supports both the sizzle of the grill and the warmth of family connection.
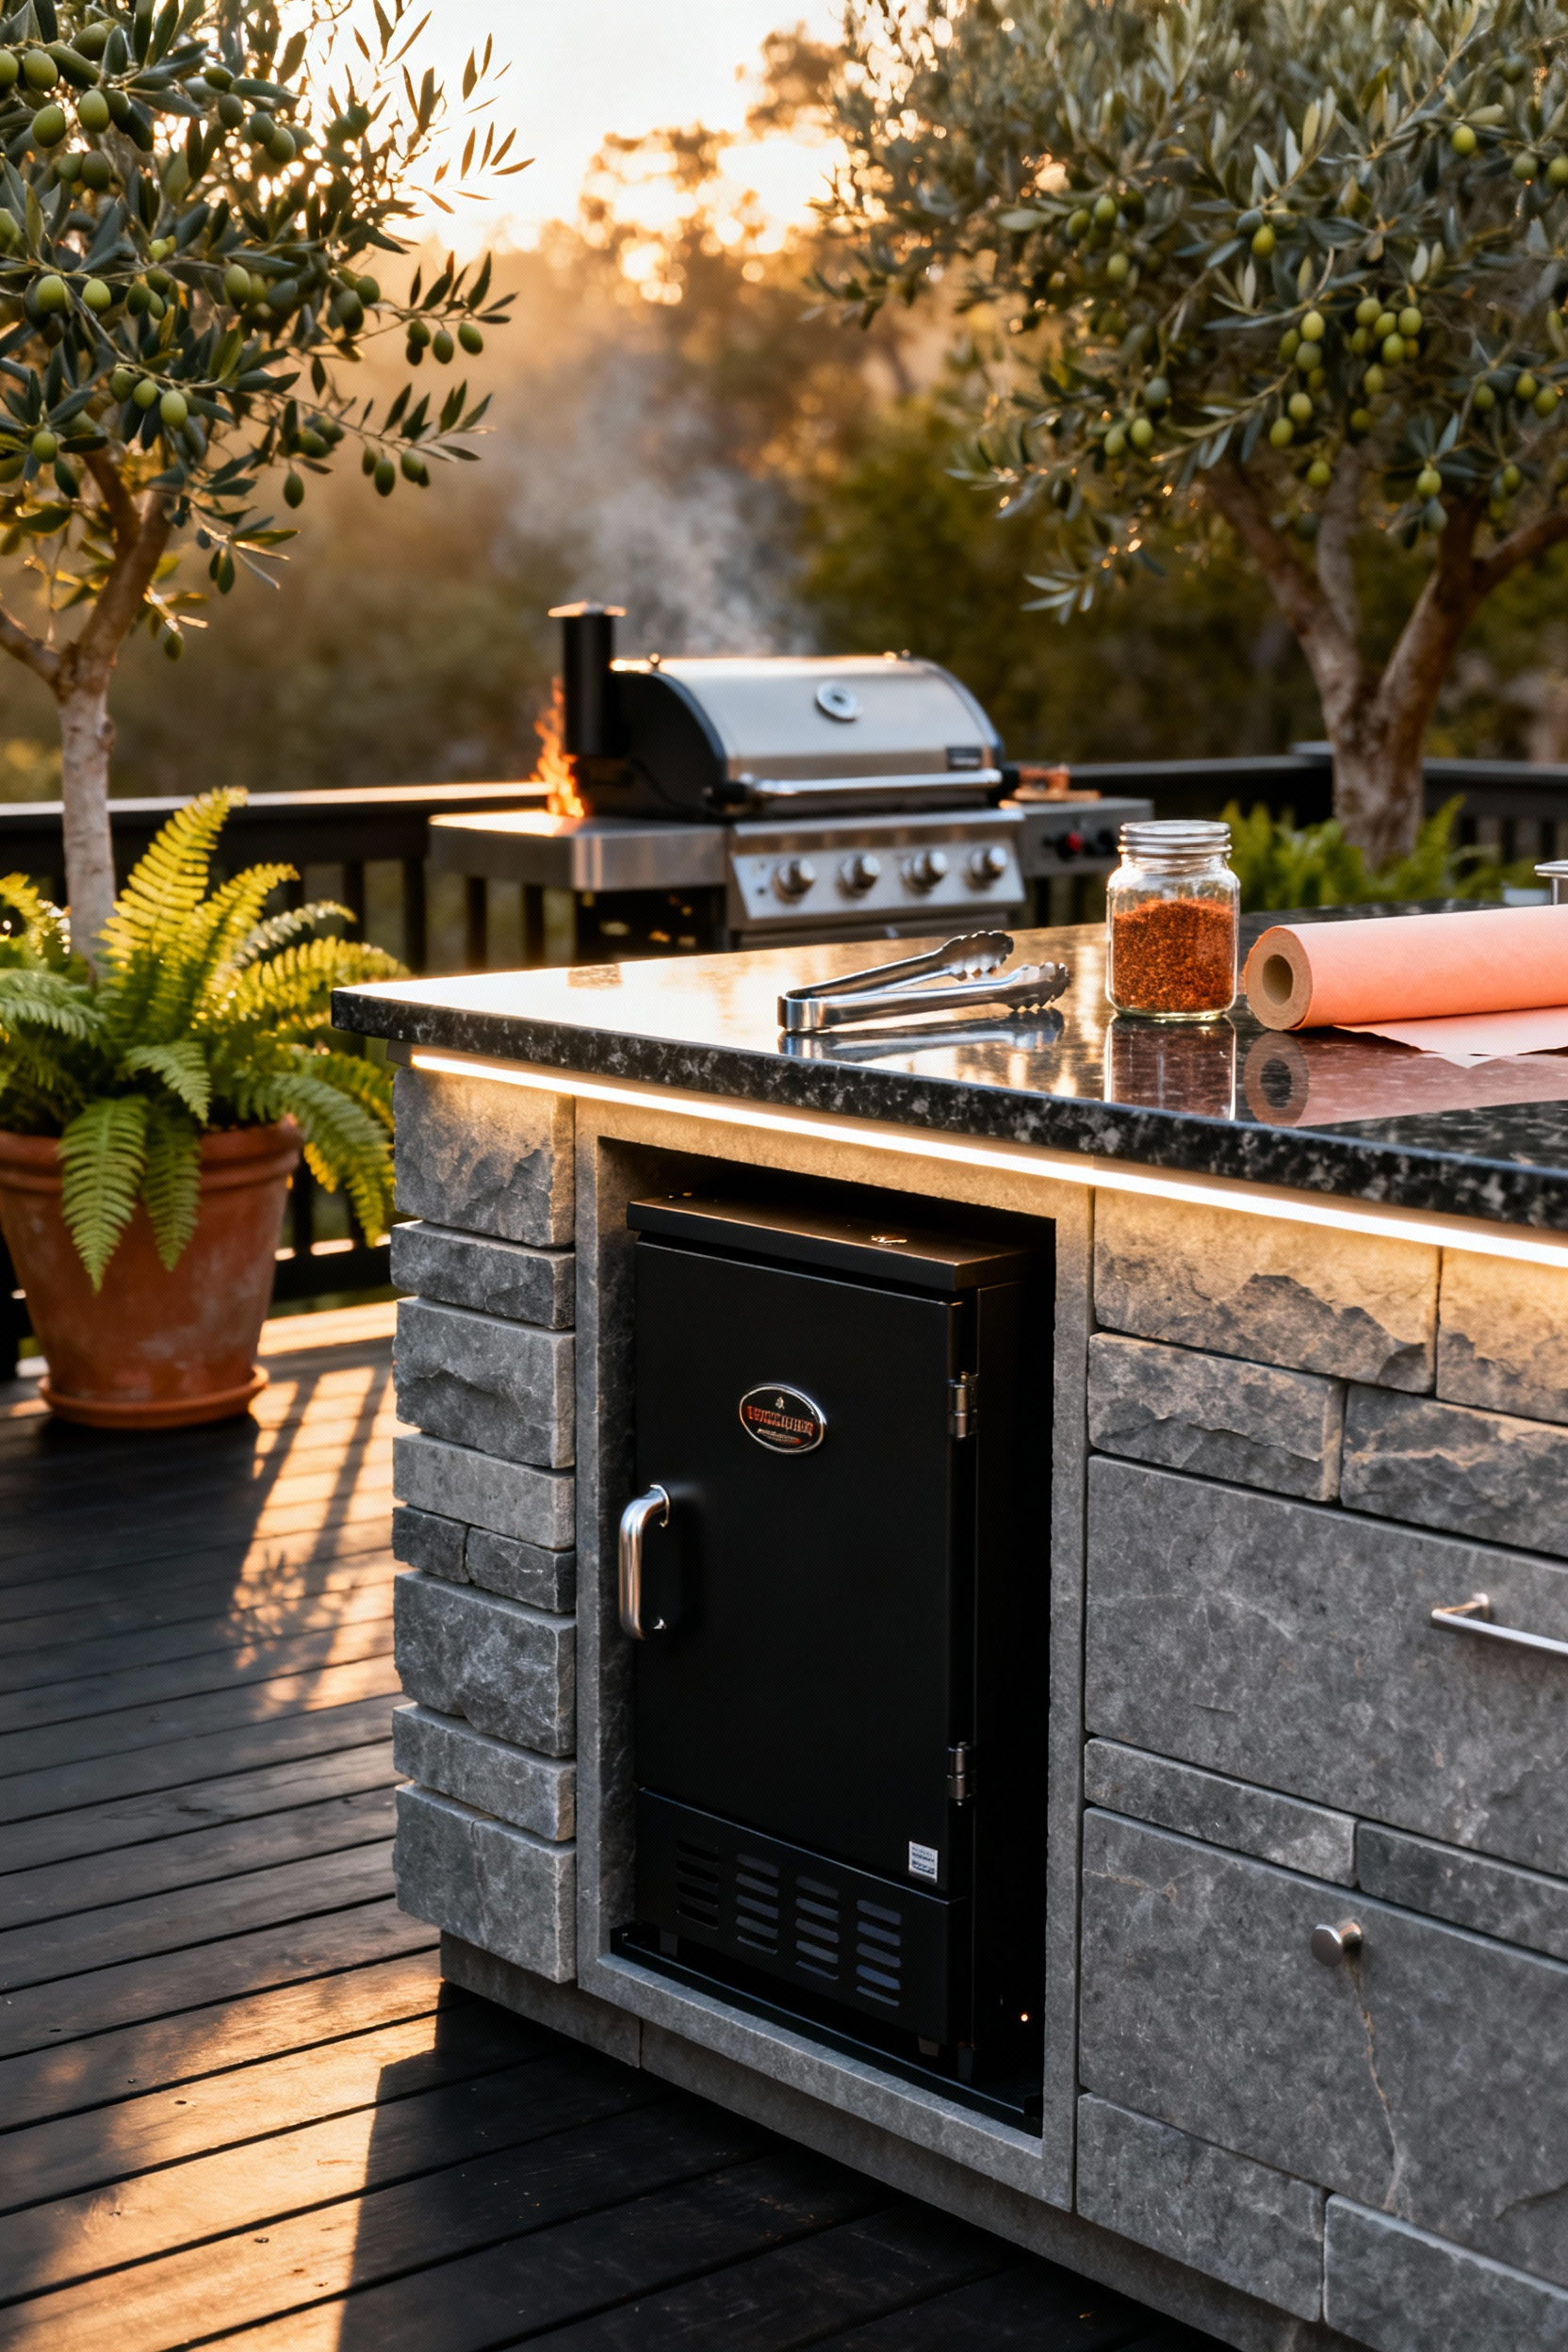
13. The Self-Serve Beverage Center: Kegerators and Wine Fridges to Keep Traffic out of the Work Zone
The grill station is sacred ground. Nothing disrupts a perfect sear like dodging guests hunting for a refill, so establish a dedicated beverage zone well away from your primary cooking triangle. This strategic placement acts as a magnet, drawing foot traffic out of your work path while empowering friends to serve themselves. This keeps the host focused on the food, ensuring the party flows naturally around a social hub rather than a bottleneck.

When outfitting this station, never compromise on equipment quality. Standard indoor mini-fridges struggle to maintain safe temperatures against summer heat; strictly prioritize appliances explicitly rated for outdoor use. To maximize functionality in a limited footprint, look for versatile units that adapt to your specific entertaining style:
- Dual-zone beverage centers allow you to store wine and soda at different, optimal temperatures within the same unit.
- Convertible kegerators dispense fresh draft beer on game days but convert into standard shelving for platters during formal dinners.
- Weather-resistant stainless steel finishes ensure your investment withstands the elements year-round.
By selecting flexible, durable equipment, you protect your culinary workflow and ensure every drink is served perfectly chilled.
14. Elevated Bar Seating: Creating an Interactive ‘Chef’s Table’ Experience
Transform your solitary grill station into a vibrant social hub by implementing a split-level countertop design. The best conversations happen where the food is prepared, yet safety remains paramount. By keeping your prep surface at a standard 36 inches and raising the guest seating to 42 inches, you clearly define the “chef’s zone.” This separation protects your workflow while inviting engagement. Guests enjoy a front-row seat to the culinary action without hovering dangerously close to hot grates or sharp knives.
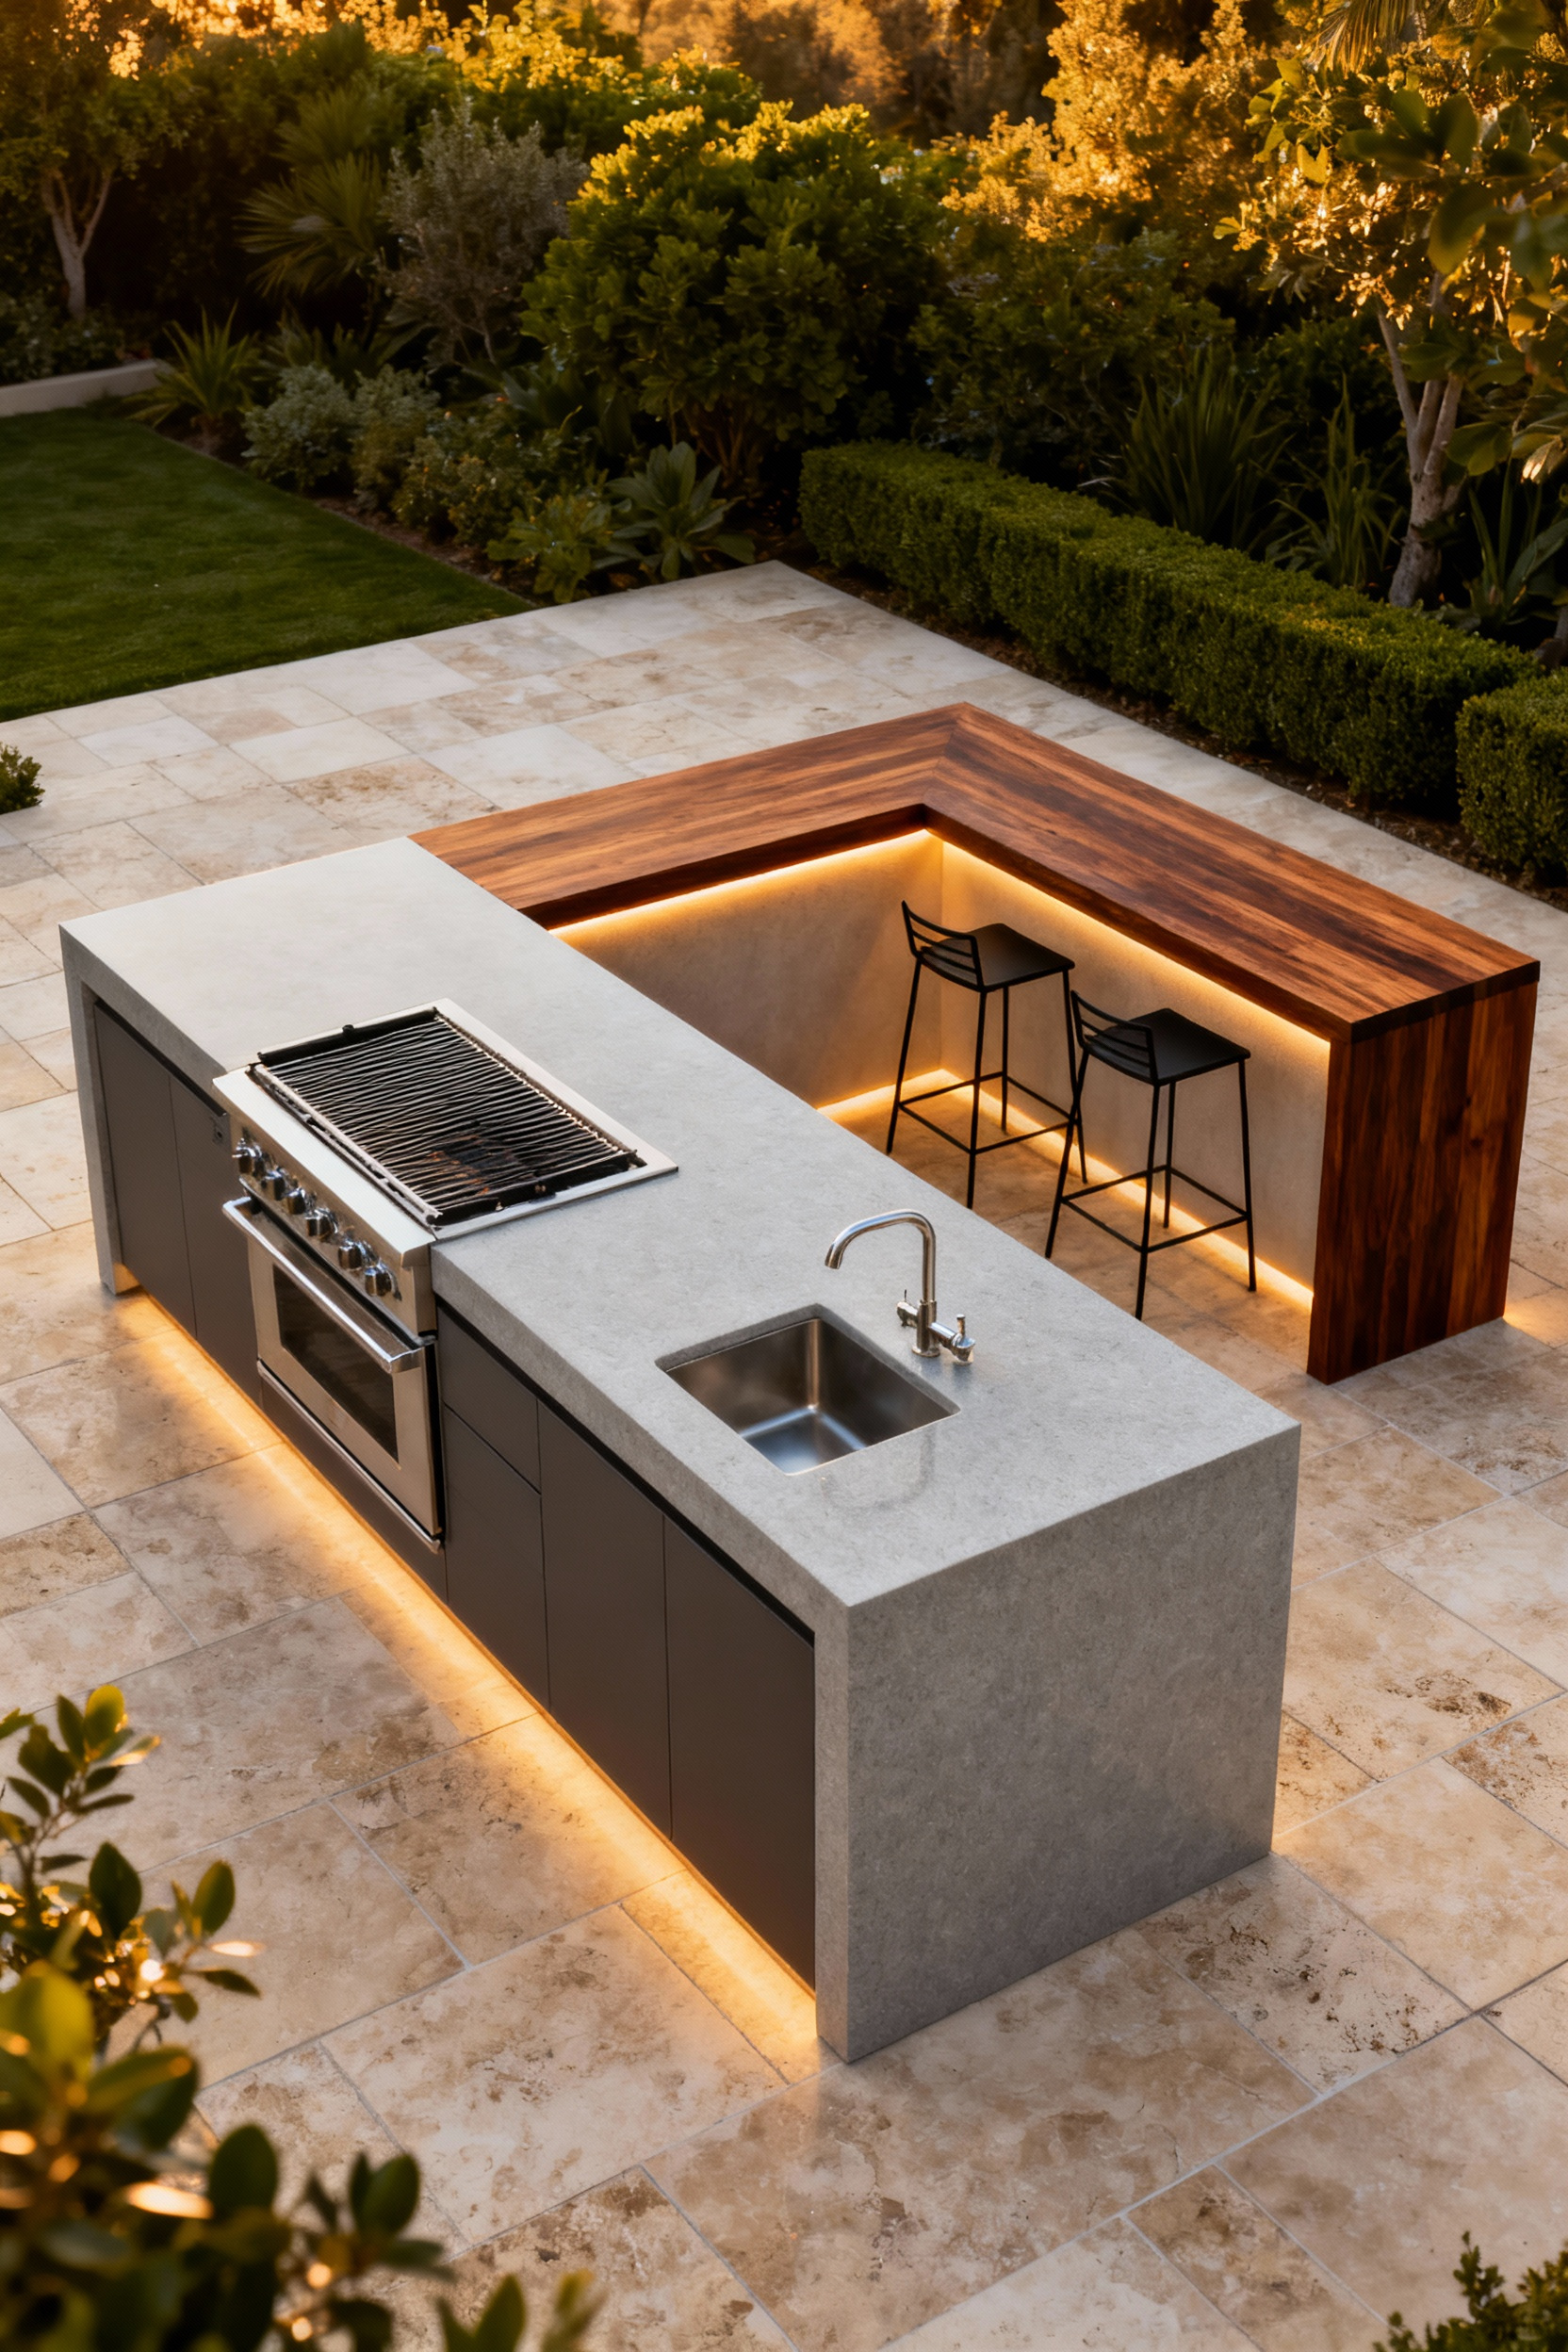
To truly elevate this “Chef’s Table” experience, prioritize comfort and self-sufficiency so the host never leaves the party. Treat this outdoor space with the same attention to detail as an indoor dining room:
- Invest in superior seating: Choose weather-resistant stools with lumbar support and cushions, encouraging friends to linger comfortably through multiple courses.
- Integrate a cocktail station: Embed an ice maker and beverage cooler directly into the island to mix drinks without turning your back on the conversation.
- Layer your lighting: Install warm pendant lights or under-counter LED strips to mimic the sophisticated ambiance of a high-end bistro.
This strategic approach turns meal preparation into entertainment, ensuring you remain the heart of the celebration rather than just the cook.
15. Bioclimatic Pergolas: Louvered Roof Systems for Cooking Rain or Shine
Nothing ruins a carefully timed roast like a sudden downpour. Reliable protection determines how often you actually use your outdoor kitchen. Bioclimatic pergolas with motorized louvered roofs offer the ultimate solution. You can angle the slats to vent smoke and heat, preventing the stifling buildup common under solid roofs. If rain starts, smart sensors automatically seal the roof, immediately shielding your expensive grill and cabinetry from water damage.
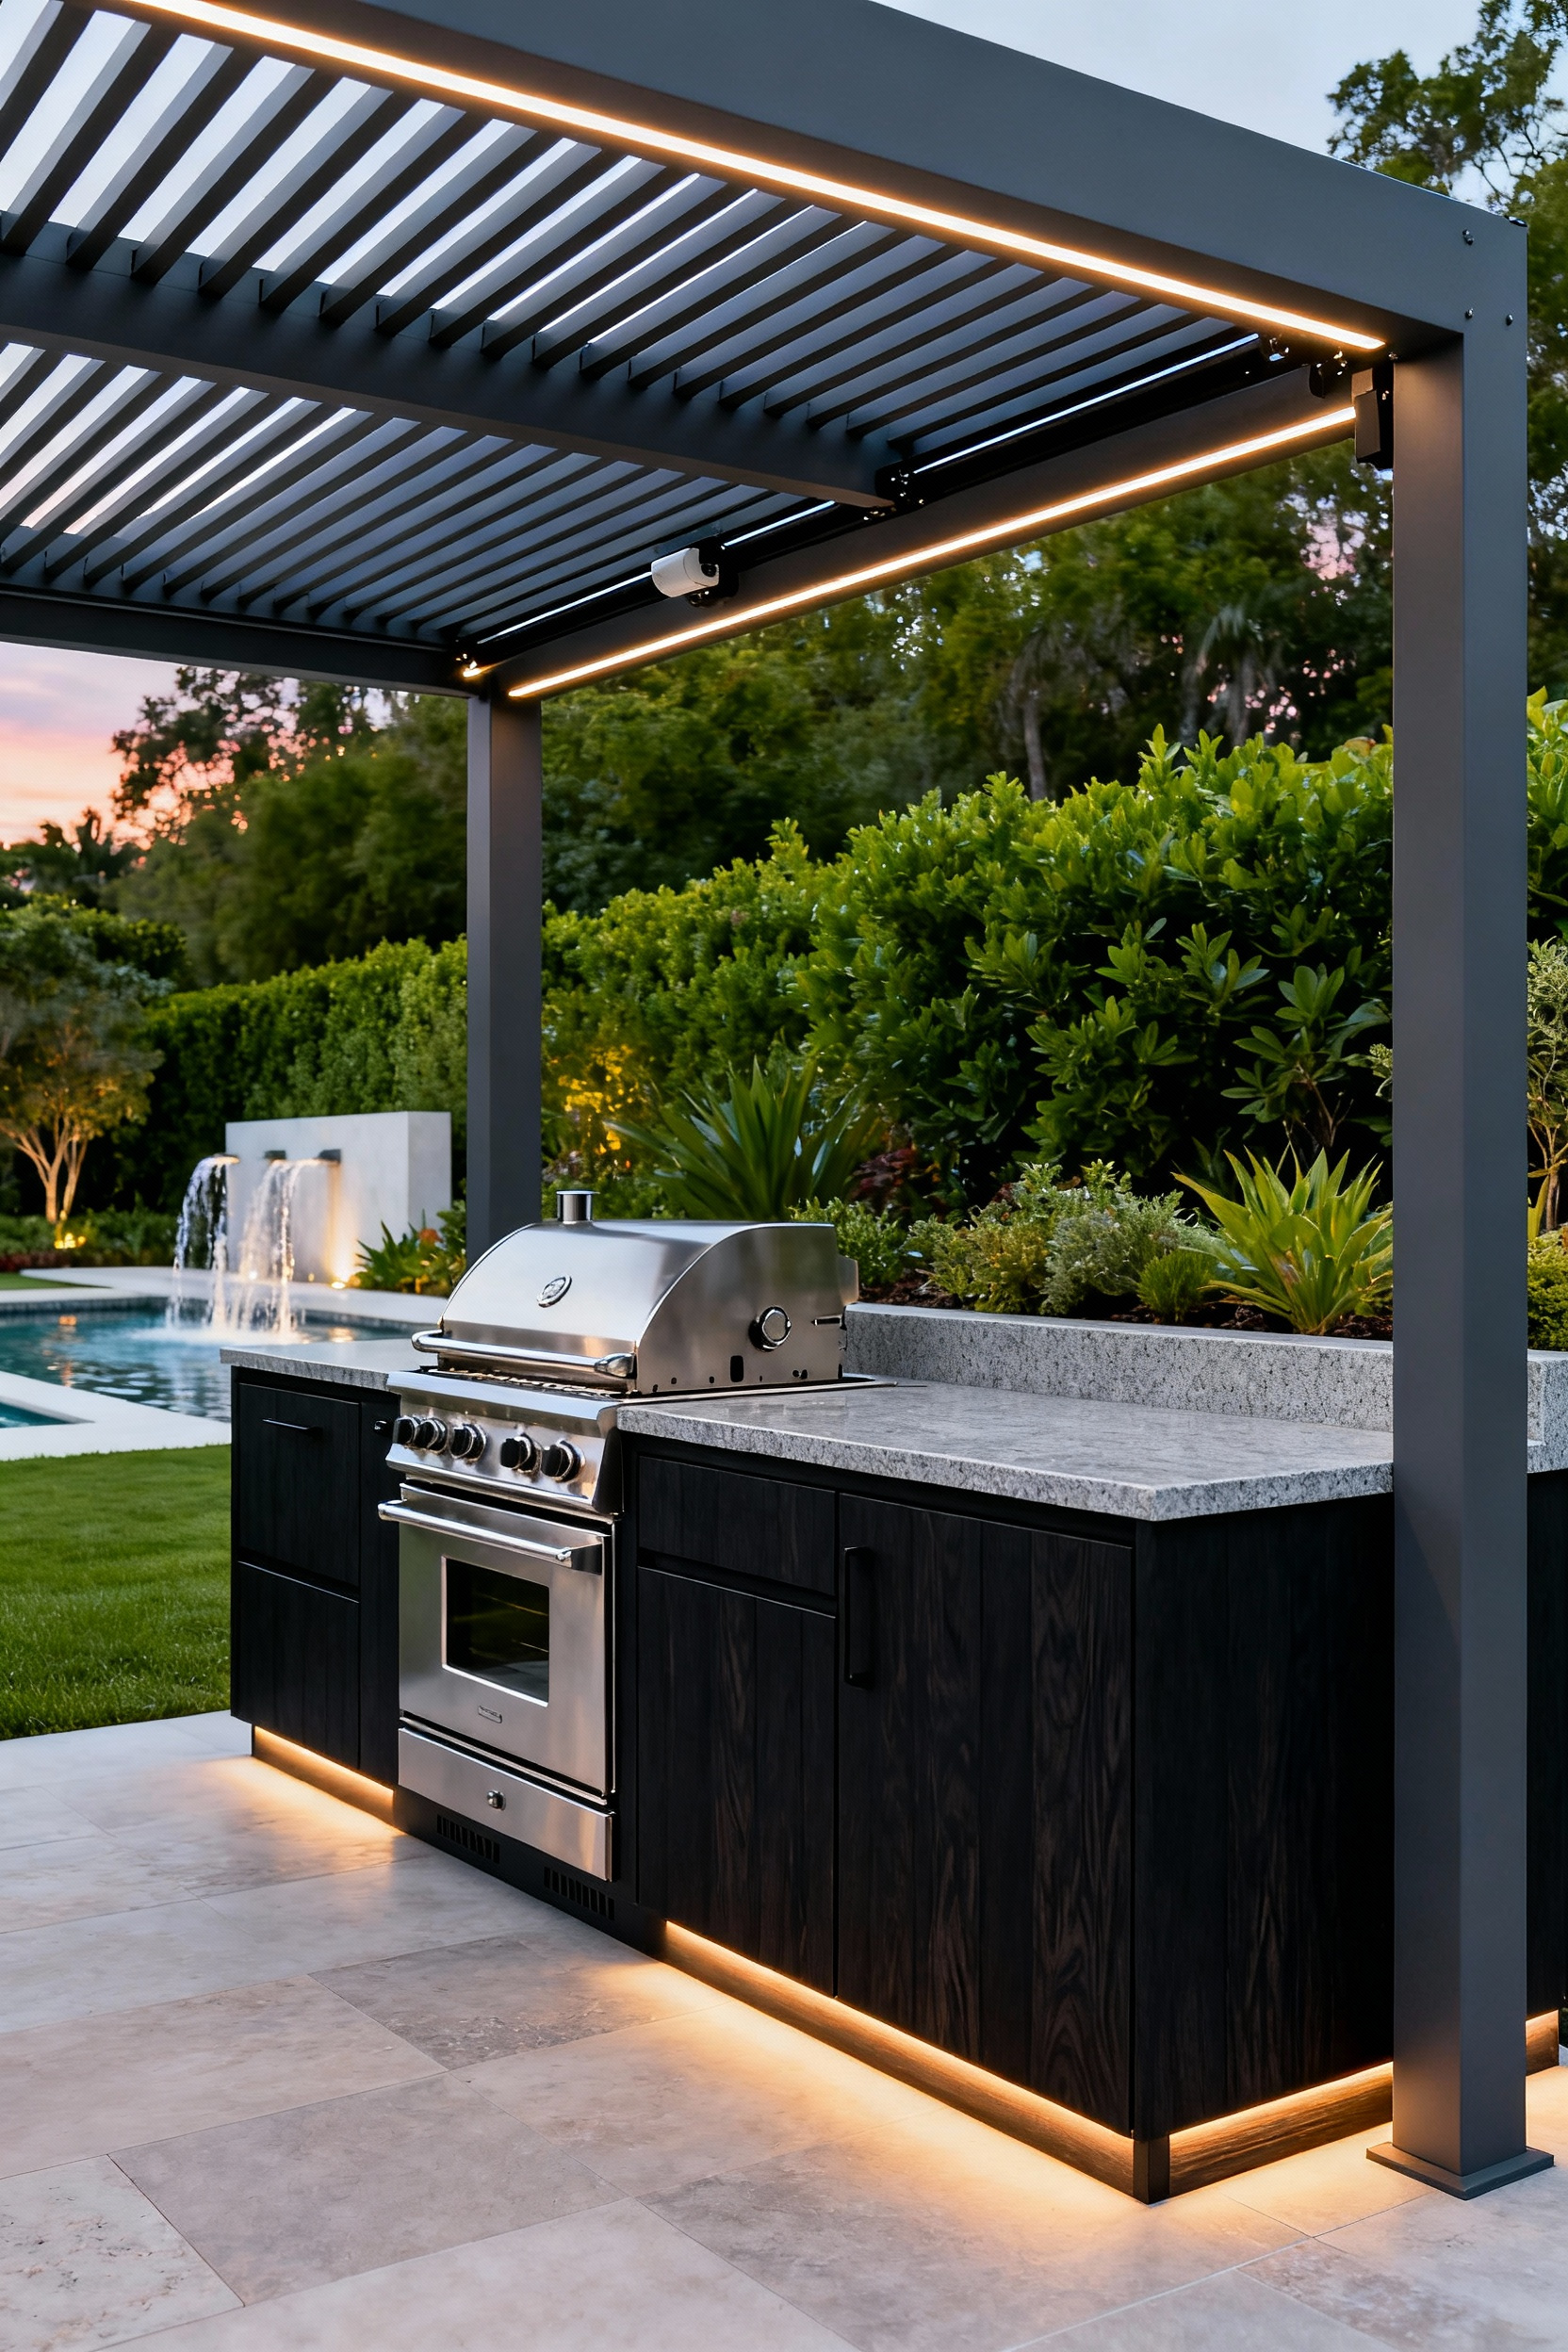
This system transforms a seasonal patio into a year-round culinary haven. Select architectural-grade, powder-coated aluminum to resist rust and kitchen grease effectively. For the best workflow, integrate these features directly into the structural beams:
- Flush-mounted heaters to extend entertaining into late autumn.
- Dimmable LED lighting for safe, precise knife work after sunset.
- Ceiling fans to keep guests cool while the oven runs hot.
By controlling the elements, you ensure the meal—and the memories—remain the focus.
16. Layered Illumination: Balancing Clinical Task Lighting with Ambient Mood Setting
Great meals require precision, but great parties demand atmosphere. Cooking in your own shadow is dangerous, so always place focused fixtures directly under cabinets or hoods to eliminate shadows on the cutting board. However, once the prep is done, that harsh “clinical” glare can ruin the vibe. To balance safety with warmth, implement a strict layering strategy:
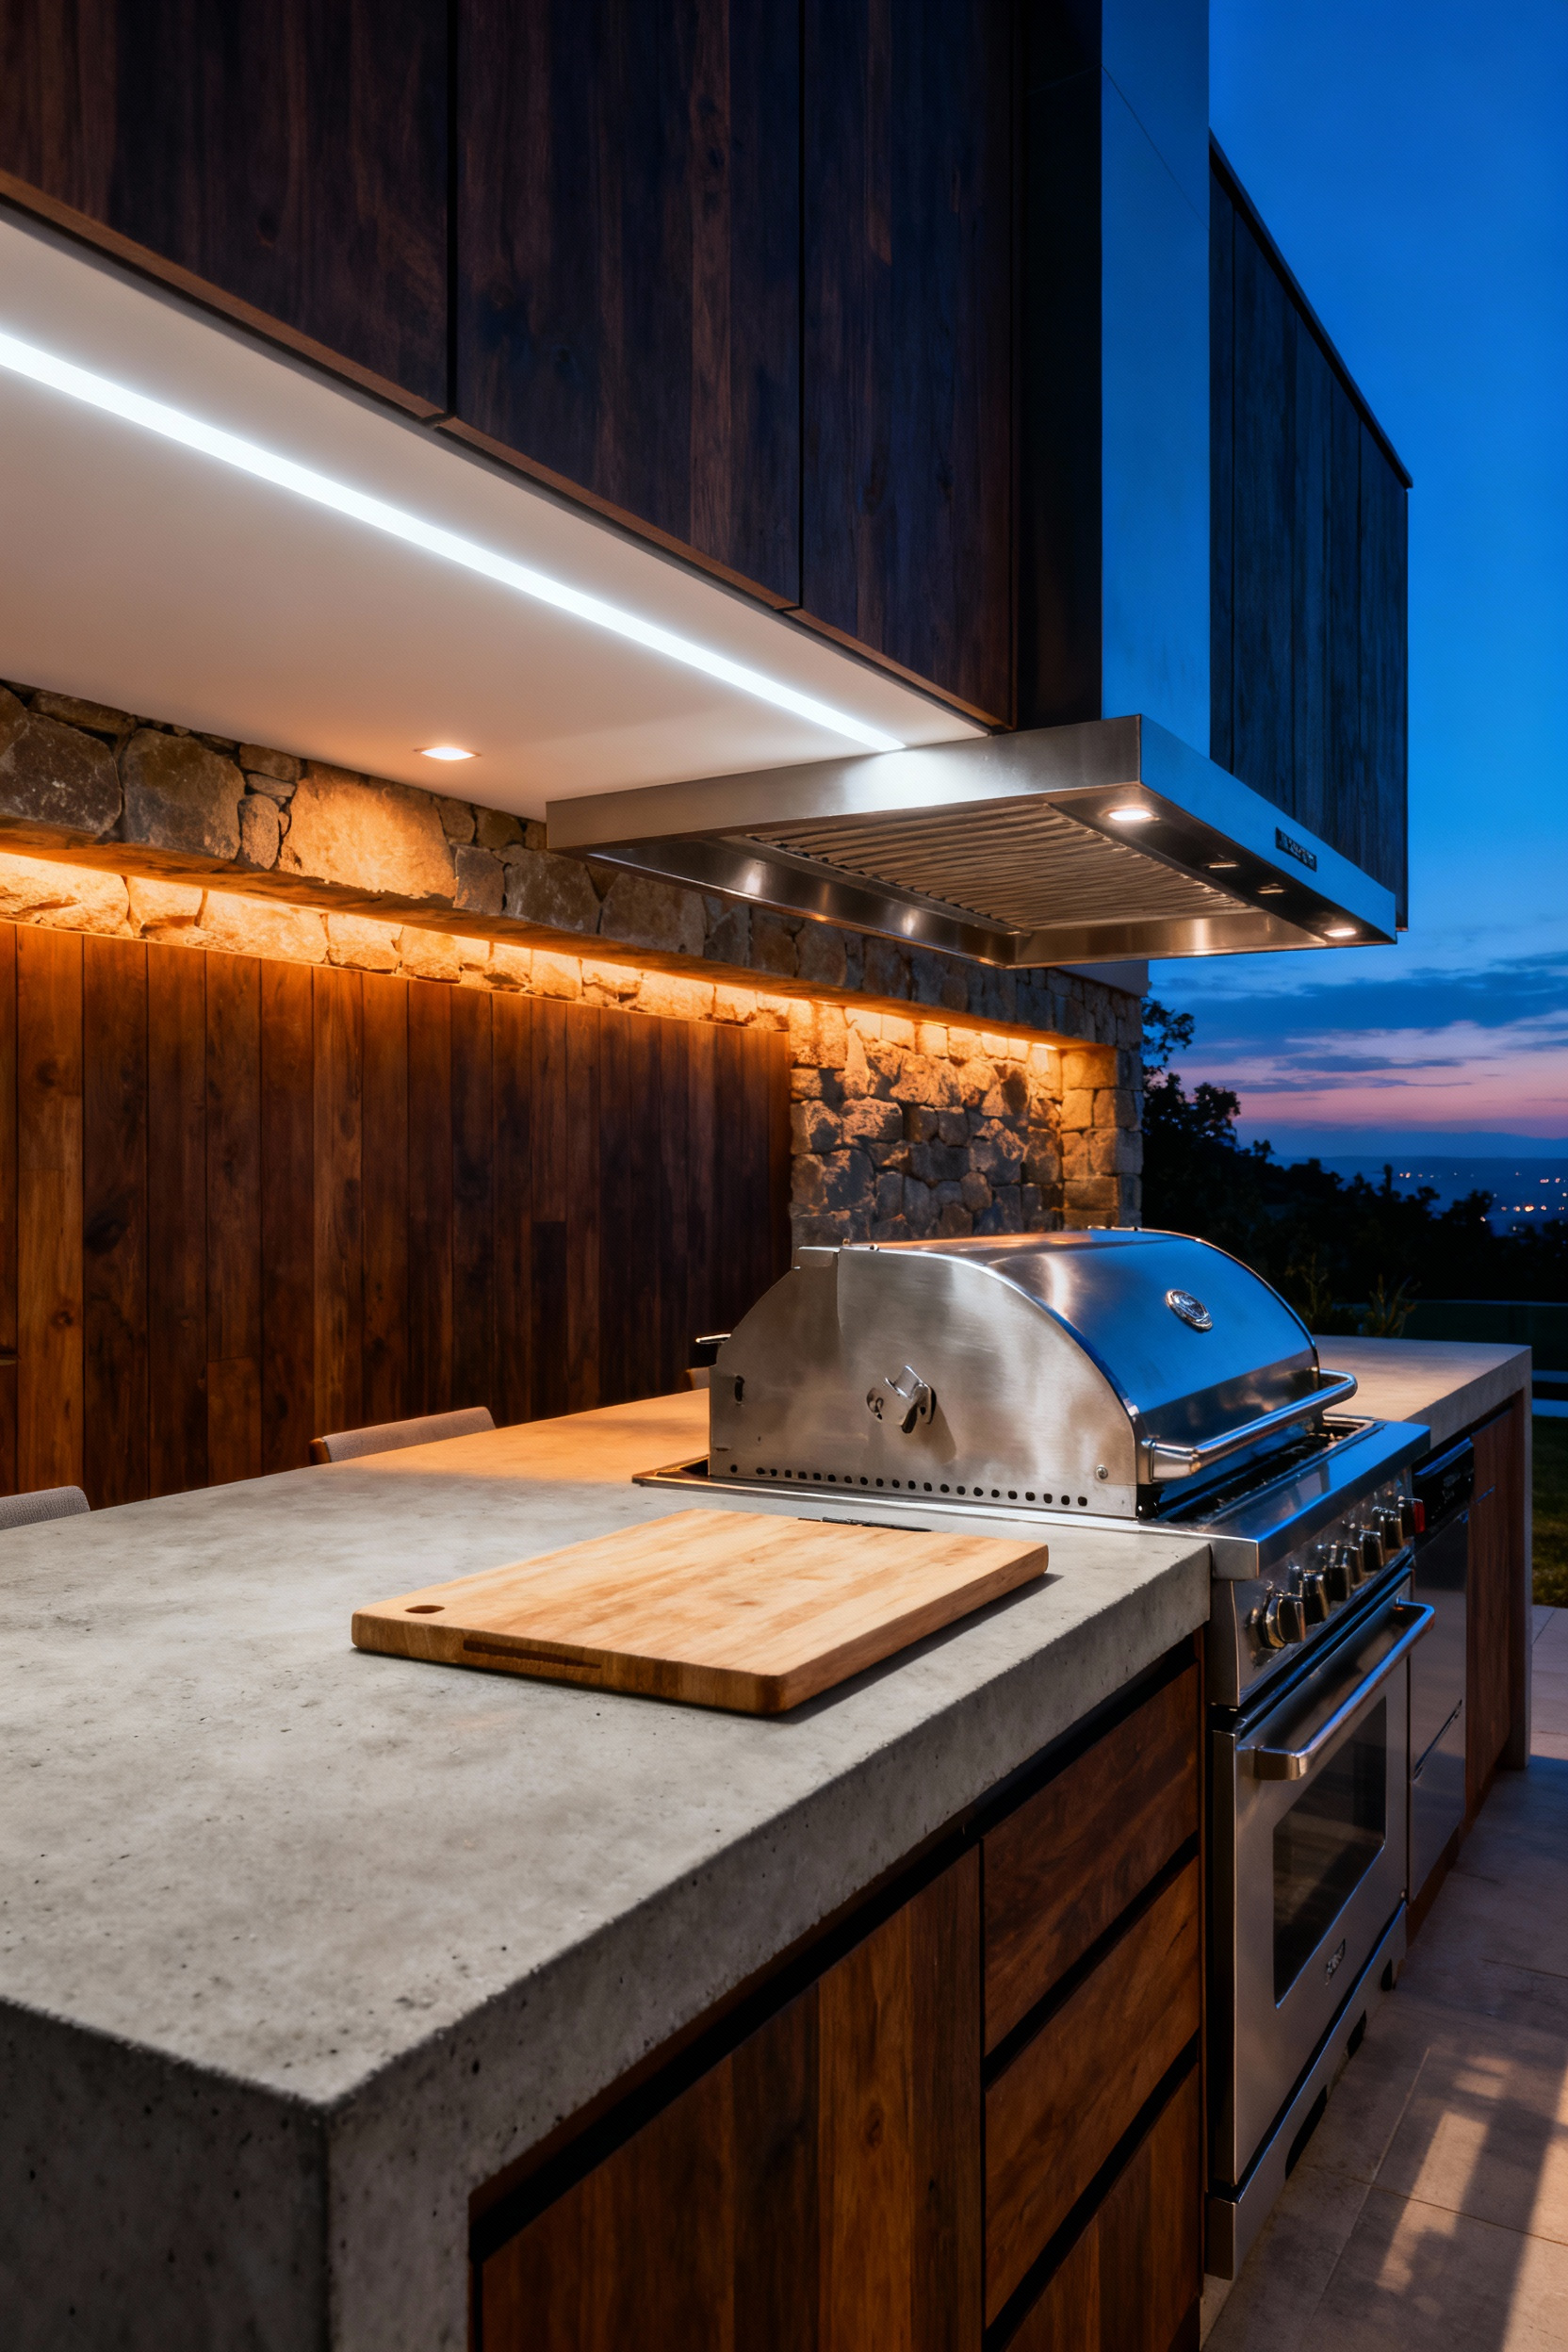
- Separate color temperatures: Use neutral 3500K–4000K bulbs over the grill to see the true color of the meat, but keep ambient fixtures at a cozy 2700K–3000K.
- Dim every circuit: Install dedicated switches that allow you to take task lighting from 100% brightness down to a soft 30% glow.
This approach allows recessed lights to bridge the gap between work and play. You can crank them up for clarity during the rush of cooking, then immediately dim them to blend with soft accent lighting once the wine is poured.
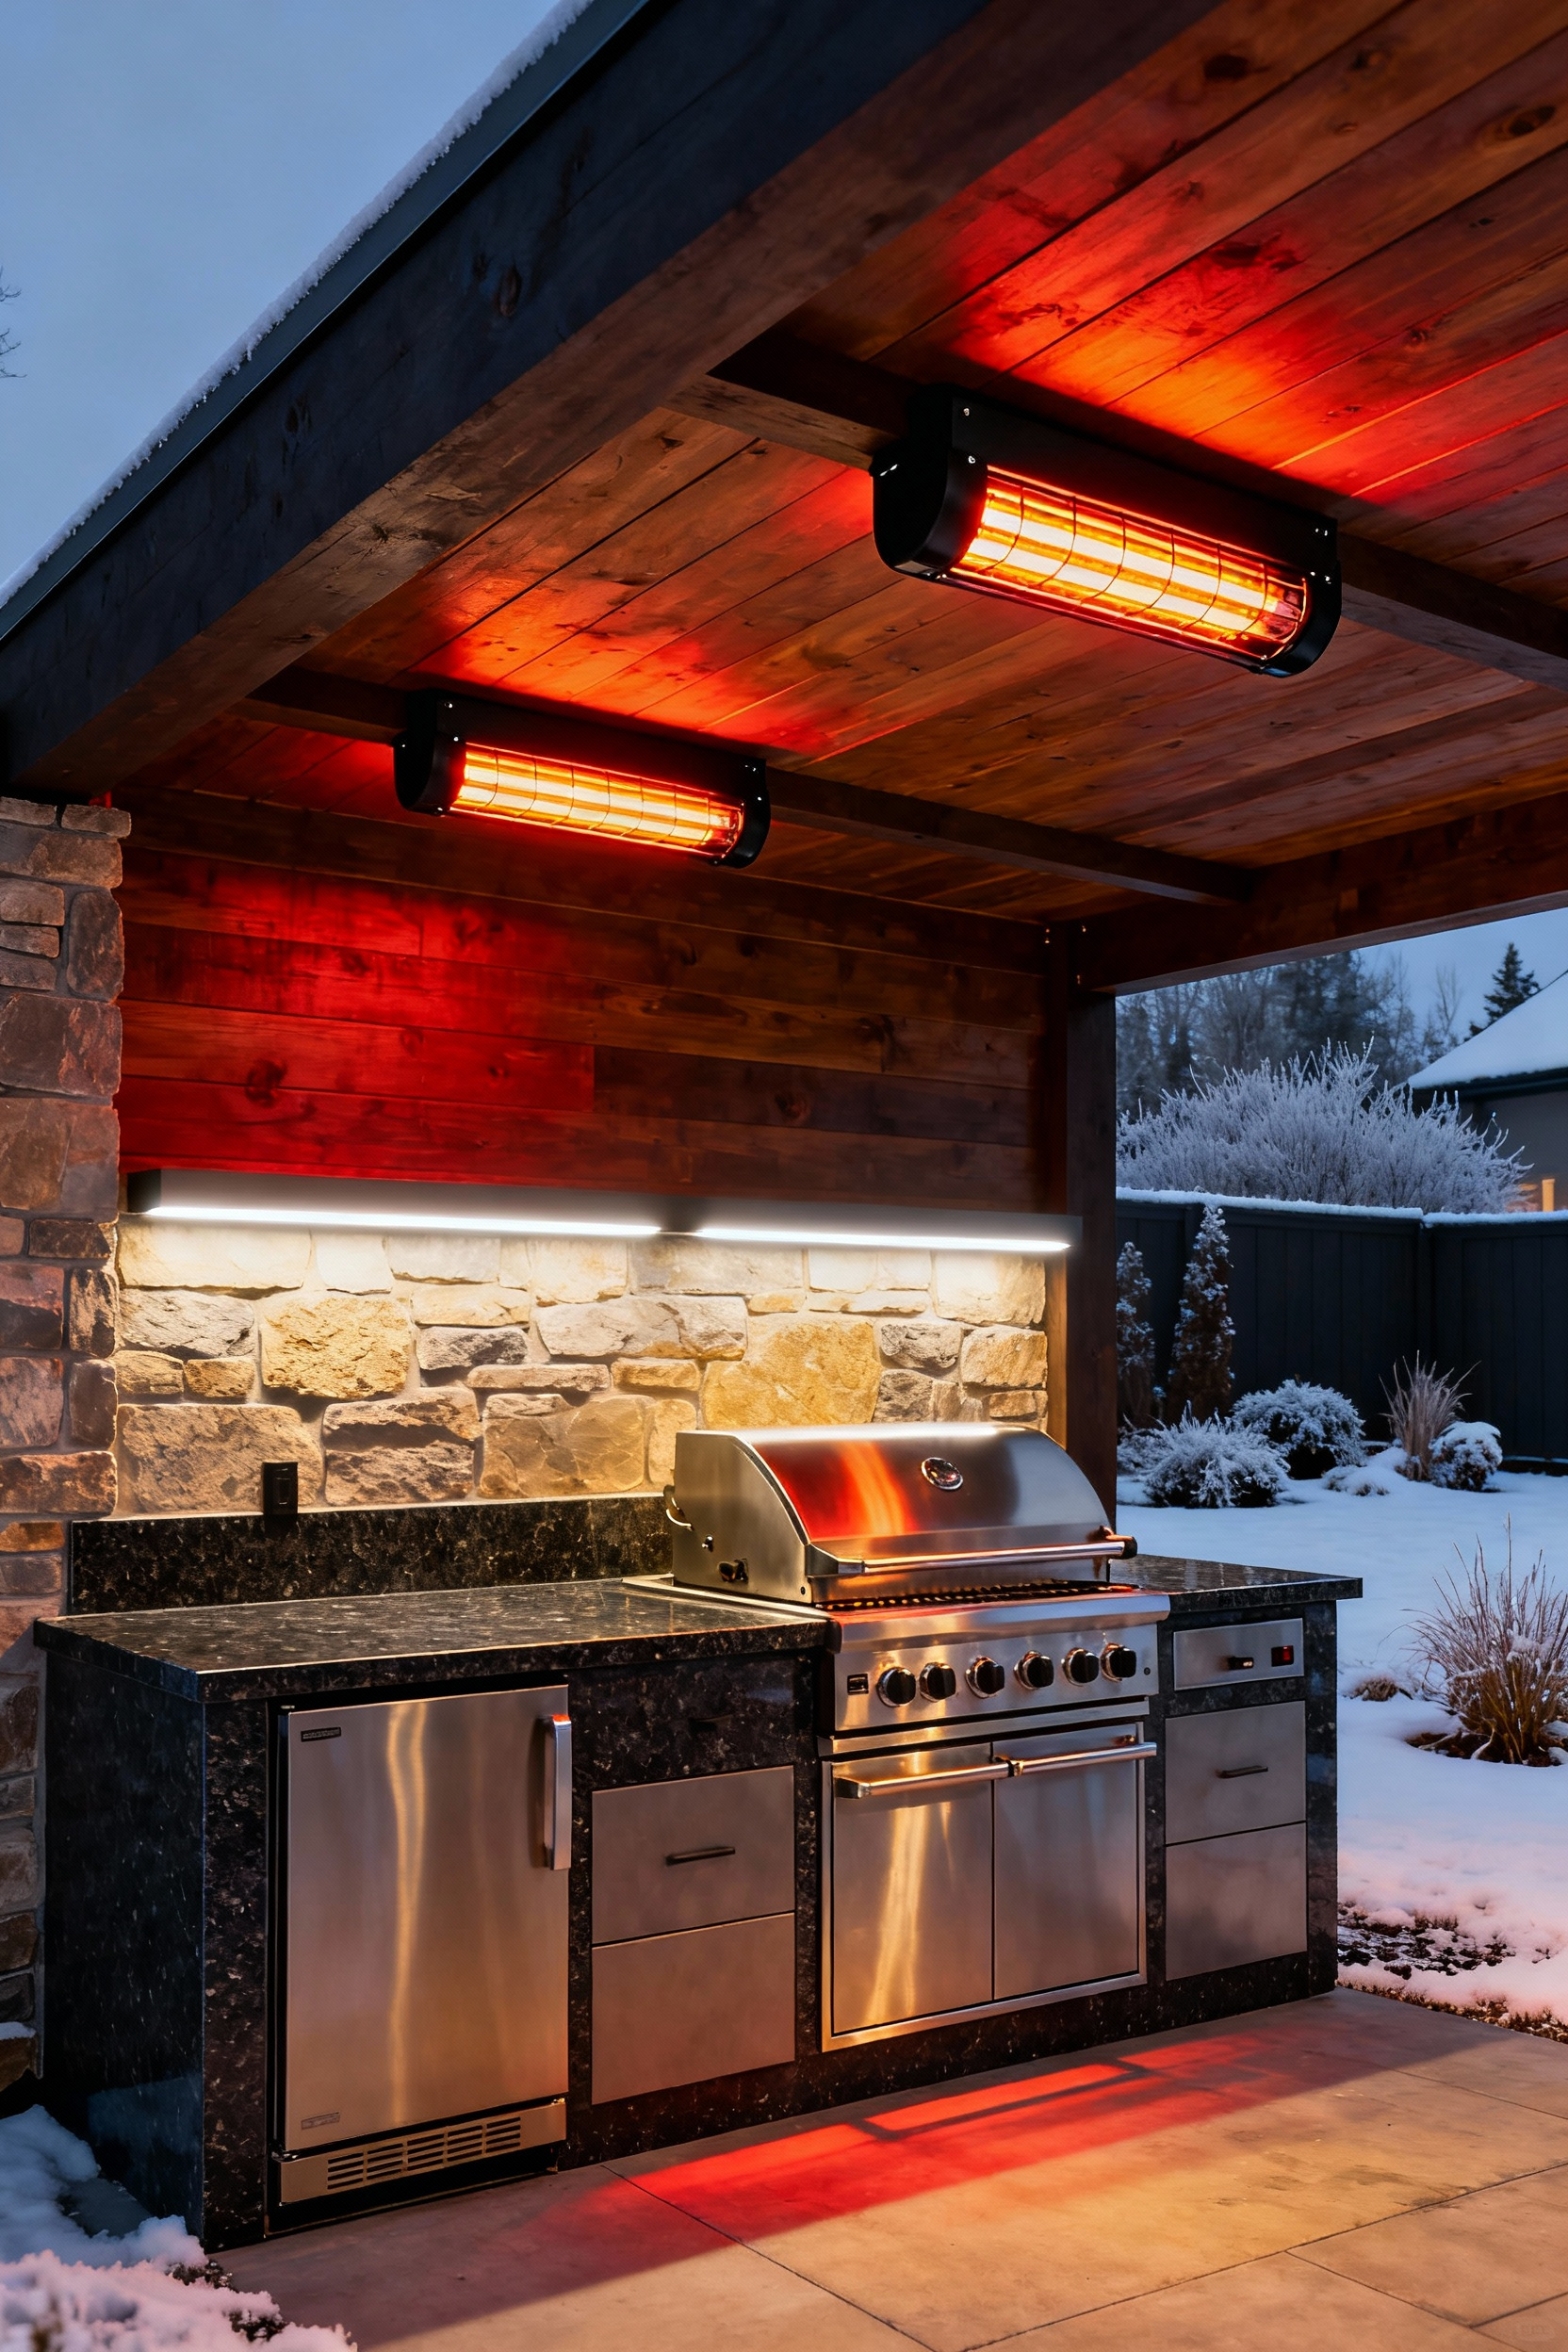
17. Infrared Heating Integration: Extending the Al Fresco Season into Winter
Don’t let falling temperatures drive your dinner parties indoors. The best memories often happen around a hot grill, regardless of the season. To truly extend your culinary haven into winter, install electric infrared heaters rather than propane units. Unlike convection heaters that waste energy heating the air, infrared technology uses radiant heat to warm people and surfaces directly. This keeps countertops warm to the touch and guests comfortable even in freezing conditions. For a seamless workflow, mount these units flush against walls or ceilings to keep floor space clear for busy cooks.
When selecting your system, prioritize features that enhance both ambiance and utility. Specifically, consider these specifications for the best experience:
- Smart Integration: Choose models with Wi-Fi capabilities to adjust heat settings via smartphone apps.
- Low-Light Output: Select “shadow” or “no-light” series heaters to avoid the harsh, orange glow of industrial lamps.
- Wind Protection: Pair heaters with strategic windbreaks, such as screens or half-walls, to retain radiant warmth.
By combining targeted heat with smart design, you ensure your winter roast tastes just as delicious eaten outdoors as it does inside.
18. Functional Landscaping: Surrounding the Prep Zone with Pest-Repelling Herb Gardens
Transform your outdoor prep zone into a sensory shield by prioritizing dual-function herbs. Select varieties that elevate your cooking while simultaneously driving away insects. Snipping fresh basil directly into a salad is efficient, but knowing its strong scent is actively repelling mosquitoes adds a layer of utility. To optimize workflow, install vertical planters or tiered boxes behind the counter. This keeps your workspace clear and places key ingredients like Rosemary and Chives at eye level for immediate “snip-and-use” access.
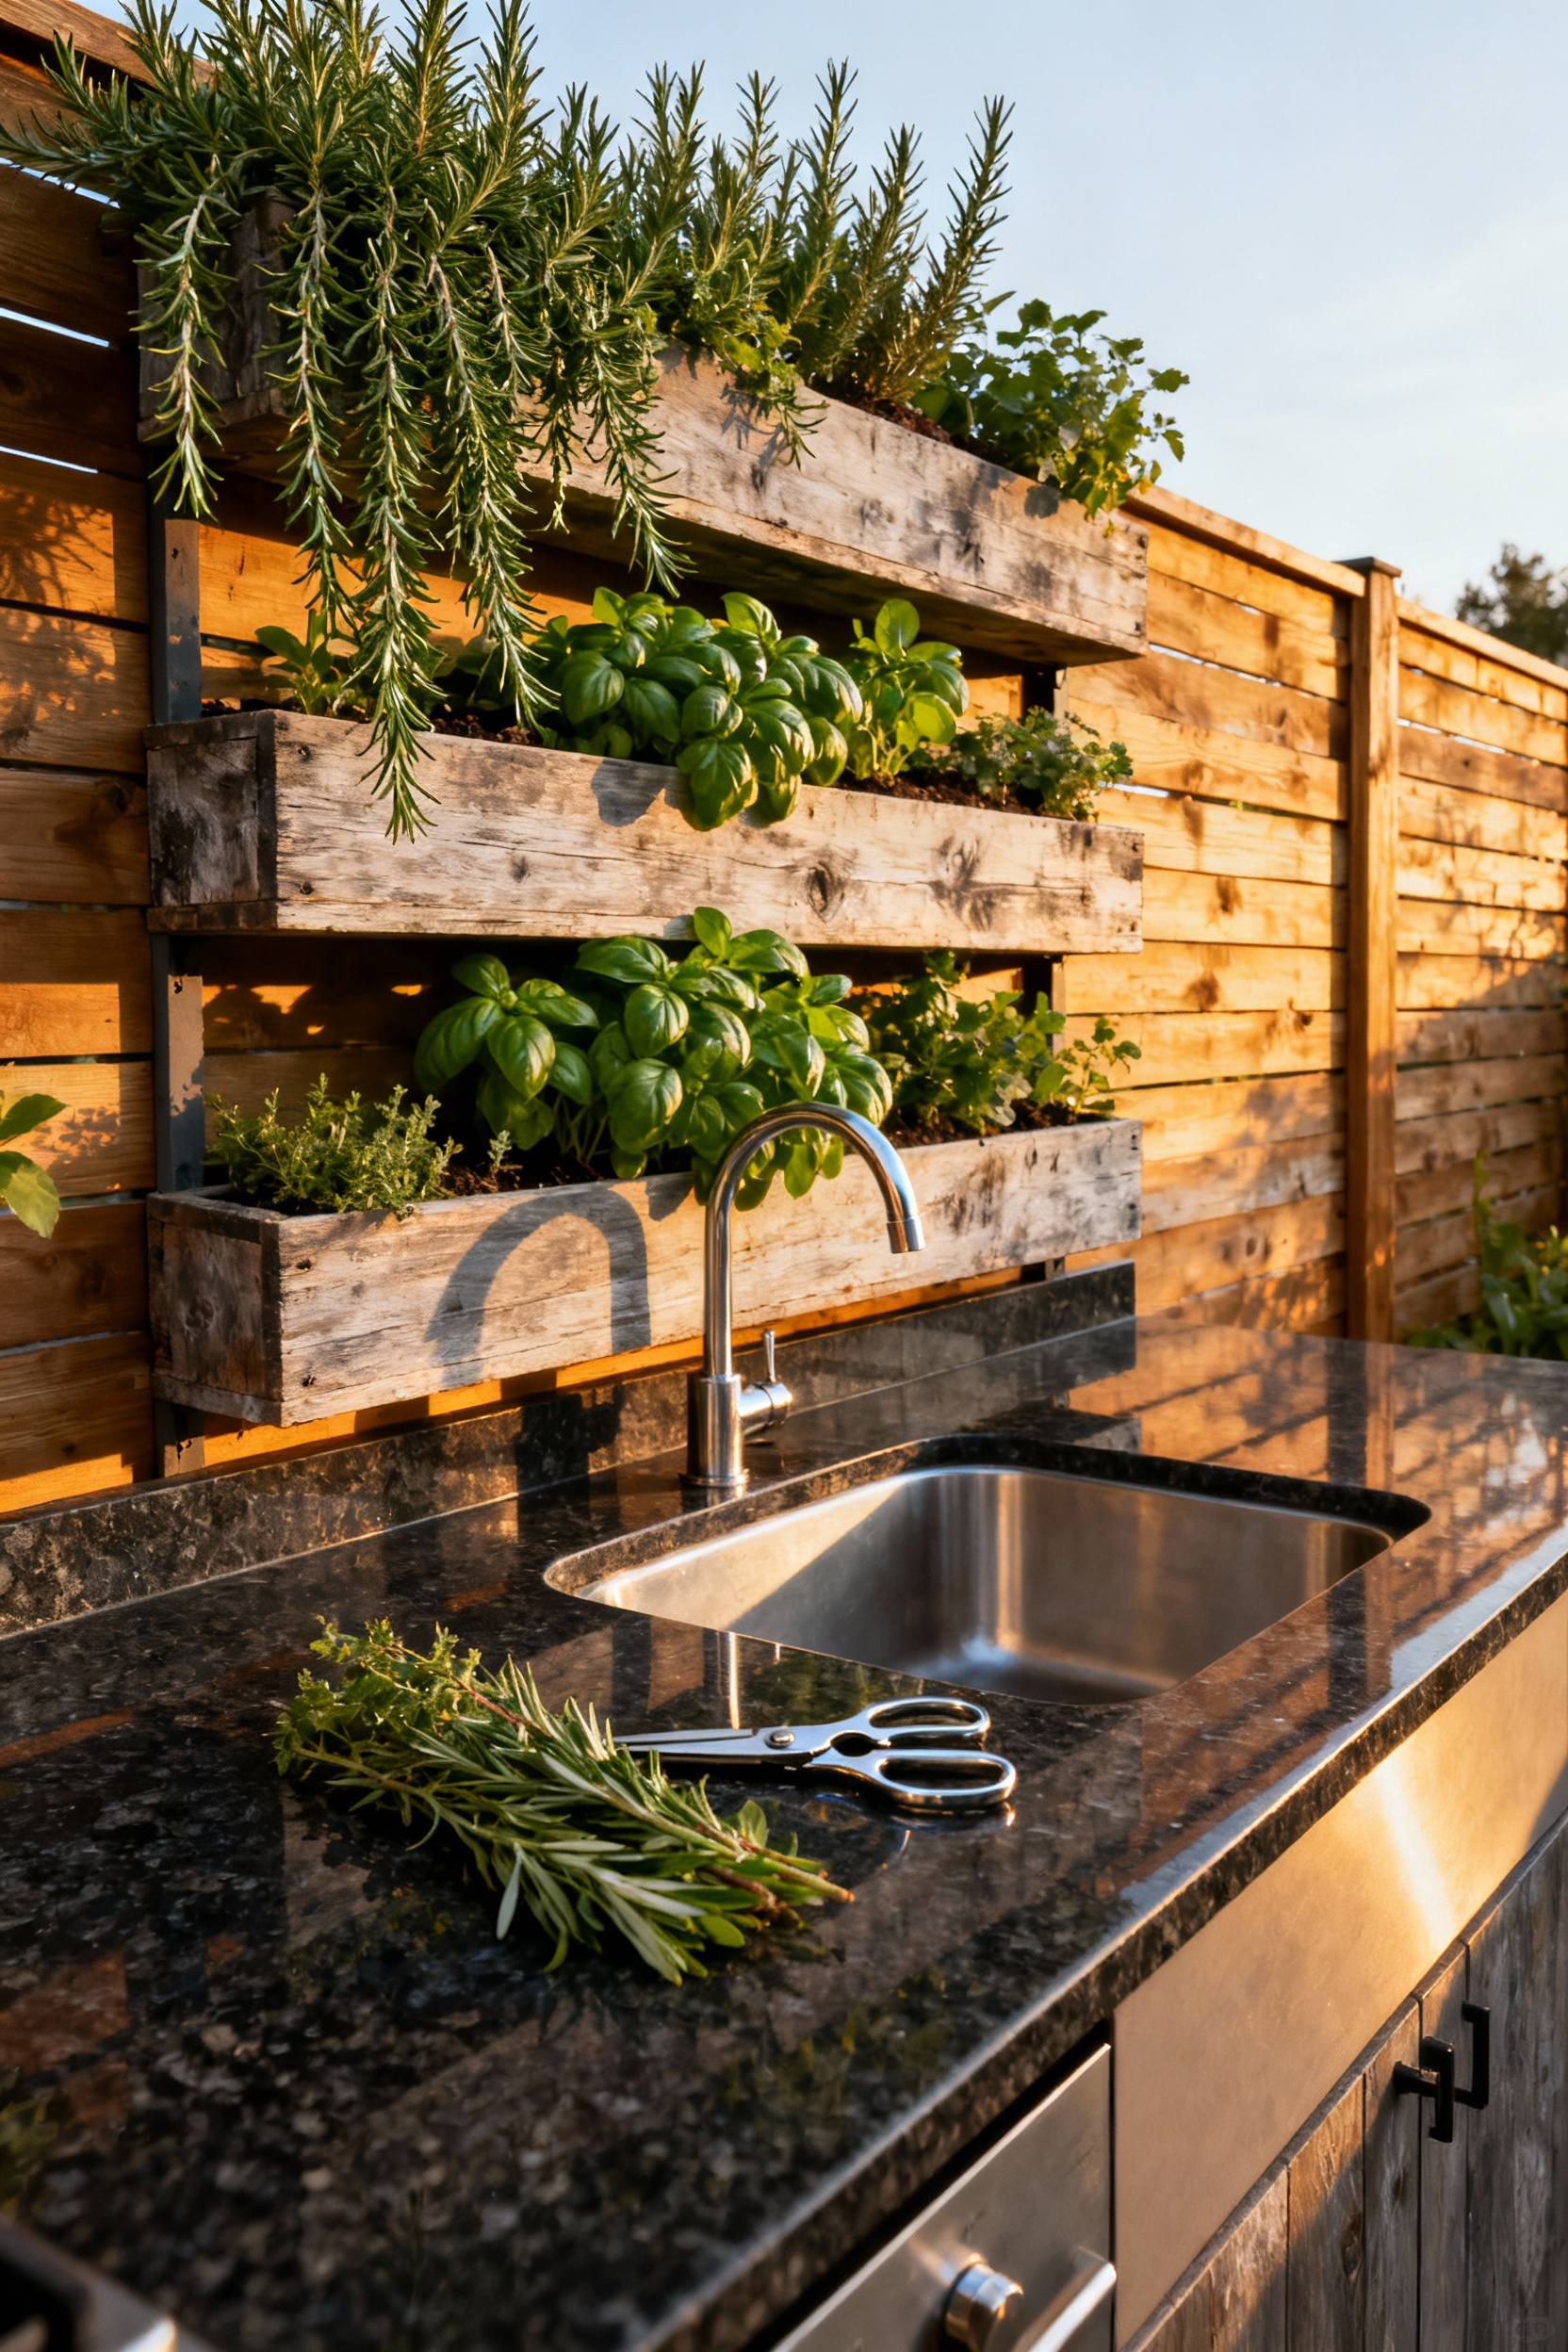
Strategic interaction with your garden ensures it remains a powerful tool rather than just decoration.
- Contain the spread: Isolate aggressive growers like Mint in separate pots to deter flies without overtaking the bed.
- Activate the barrier: Lightly brush Thyme or Lemon Balm leaves as you work to release their pest-deterring essential oils.
- Watch the heat: Place delicate herbs away from the grill’s direct exhaust to prevent wilting.
By integrating these living elements, you create a seamless design that enhances both the flavor of your meals and the comfort of your guests.
Frequently Asked Questions About Outdoor Kitchen Design
What are the most essential appliances for a functional outdoor kitchen?
While a high-quality grill is non-negotiable, the three most essential elements for maximizing functionality are the grill, a sink, and outdoor-rated refrigeration. These form the crucial “work triangle,” minimizing trips indoors. For serious entertainers, adding dedicated side power burners or a flat-top griddle greatly expands menu versatility.
How much should I budget for a mid-range, built-in outdoor kitchen?
The cost of an outdoor kitchen varies widely based on size, materials, and appliance selection. A simple, mid-range built-in unit featuring durable materials like natural stone veneer, a quality gas grill, and a basic refrigerator typically ranges from $10,000 to $25,000. Luxury, custom-built designs featuring elements like pizza ovens, bioclimatic pergolas, and marine-grade stainless steel can easily exceed $50,000.
Where is the optimal place in my yard to install an outdoor kitchen?
The best location prioritizes proximity and air flow. Install the kitchen within easy reach of the main house—ideally utilizing a pass-through window—to simplify utility hookups (gas, water, electric) and transport. Crucially, position the grill and hood downwind from the main dining and lounging areas to ensure smoke is directed away from guests.
How do I ensure my outdoor kitchen materials are durable enough for all weather conditions?
To guarantee longevity against UV rays, moisture, and temperature fluctuations, choose marine-grade materials. This includes using Sintered Stone or dark granite for countertops, Marine-Grade HDPE or powder-coated 304/316 Stainless Steel for cabinetry, and appliances specifically rated for continuous outdoor use. Proper sealing of porous stone and maintaining a robust drainage system are also vital protective measures.
- **
By meticulously applying these professional-grade outdoor kitchen ideas—from integrating bioclimatic pergolas to separating your prep and social zones—you move beyond a simple grill setup. You create a robust, functional, and socially engaging culinary environment that not only endures the elements but becomes the enduring heart of your home and garden. “`