Hey there, fellow kitchen enthusiasts! Are those blank walls staring you down every time you whip up a family meal? Well, get ready to transform your culinary space from drab to fab without breaking the bank! As a parent who’s navigated the choppy waters of home decor with kiddos in tow, I’ve got some tricks up my sleeve that’ll make your kitchen walls pop faster than popcorn on movie night.
In this DIY adventure, we’re diving into five budget-friendly projects that’ll inject some serious personality into your kitchen. From gallery walls that tell your family’s story to upcycled windows that’ll make your neighbors green with envy, we’ve got something for every style and skill level. So grab your paintbrush, dust off that DIY spirit, and let’s turn those kitchen walls into a masterpiece that’ll have everyone asking, “How’d you do that?” Trust me, your wallet (and your walls) will thank you!
Gallery Wall Glamour
Ah, gallery walls! They’re like a family photo album, but way cooler and on display for everyone to see. As a parent who’s always looking for ways to spruce up our kitchen without breaking the piggy bank, I’ve found that creating a gallery wall is a fantastic solution. It’s budget-friendly, customizable, and adds a ton of personality to what can often be a utilitarian space.
Sourcing Affordable Frames
First things first, let’s talk about where to find those frames without emptying your wallet:
- Thrift stores: These are goldmines for unique, vintage frames that often just need a little TLC.
- Online marketplaces: Sites like Facebook Marketplace, Craigslist, and eBay can be treasure troves for affordable frames.
- Your own home: You’d be surprised what you might find tucked away in closets or attics!
Here’s a little secret I discovered during my gallery wall adventure: thrift stores often have high-quality frames at a fraction of the cost of new ones. Look for frames with interesting details or textures that you can easily paint or refinish. I once found an ornate gold frame for $2 that became the centerpiece of our kitchen gallery wall after a quick coat of matte black spray paint.
Arranging Your Gallery Wall
Now, here’s where the fun begins! Arranging your gallery wall is like putting together a puzzle, but one where you get to make up the rules. Here’s how I tackle it:
- Mix and match: Don’t be afraid to combine different frame sizes and styles. It adds visual interest and makes the wall feel more organic.
- Plan it out: Use painter’s tape to create a layout on the wall before hanging your frames. Trust me, this step saves a lot of headaches (and wall holes).
- Start in the middle: Begin with your largest or most important piece in the center and work your way outwards.
- Keep it balanced: While you want variety, make sure the overall look feels balanced. Step back often to assess the big picture.
Remember, there’s no “right” way to create a gallery wall. It’s all about what feels good to you and reflects your family’s personality. In our kitchen, we’ve got a mix of family photos, kids’ artwork, and quirky prints we’ve collected over the years. It’s become a real conversation starter when we have guests over!
Step-by-Step Hanging Guide
- Gather your materials: Frames, hammer, nails, level, pencil, and measuring tape.
- Arrange frames on the floor: Play with different layouts until you find one you like.
- Trace frames on paper: Cut out the shapes and tape them to the wall to visualize the arrangement.
- Mark nail positions: Use a pencil to mark where each nail should go.
- Hang the frames: Start with the centerpiece and work your way out.
- Adjust as needed: Step back frequently to ensure everything looks level and balanced.
Creating a gallery wall in your kitchen is more than just decorating; it’s about telling your family’s story in a visually appealing way. It’s a project that can evolve, just like your family does. So don’t stress too much about getting it perfect right away – half the fun is in the process!
As we move from the charm of framed memories to our next DIY adventure, let’s explore how we can transform an unexpected item into a stunning kitchen focal point. Get ready to see old windows in a whole new light as we dive into our “Upcycled Window Wonderland.”
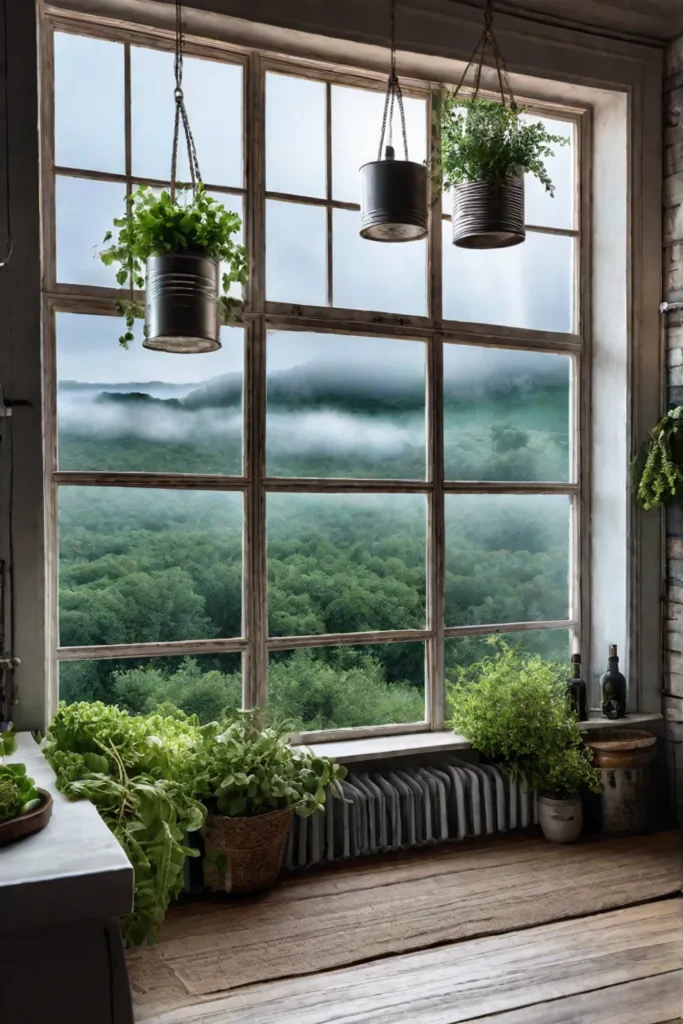
Upcycled Window Wonderland
Let’s dive into one of my favorite budget-friendly kitchen wall decor projects: transforming old windows into stunning focal points. Trust me, I’ve been there – staring at blank kitchen walls, wondering how to add some personality without breaking the bank. That’s when I stumbled upon the magic of upcycled windows, and I’ve never looked back!
Materials You’ll Need
Before we get started, let’s round up our supplies:
- An old window frame
- Sandpaper
- Primer and paint
- Chalkboard paint (optional)
- Magnetic paint (optional)
- Decorative elements (photos, plants, etc.)
- Hanging hardware
Prepping Your Window
- Clean that window like there’s no tomorrow! You’d be surprised how much grime can build up over the years.
- Sand down any rough spots or peeling paint. Safety first, folks – wear a mask for this step!
- Apply a coat of primer if you’re planning to paint. This will help your new color pop.
Decorating Your Upcycled Window
Now for the fun part! Here are some ideas to get your creative juices flowing:
- Chalkboard Panes: Remember when the kids used to draw on the walls? Well, now they can – guilt-free! Use chalkboard paint on a few panes to create a message center for grocery lists or your family’s favorite quotes.
- Magnetic Masterpiece: Apply magnetic paint to a pane or two, and voila! You’ve got a spot to display your little one’s latest art project or those adorable family photos.
- Vertical Herb Garden: Hang small planters from the window frame for a mini indoor garden. Fresh basil, anyone?
- Photo Gallery: Print out some family photos and create a collage within the window panes. It’s like Instagram, but way more personal!
- Seasonal Showcase: Change up the decor in each pane with the seasons. Think miniature pumpkins for fall, twinkle lights for winter – the possibilities are endless!
One of my favorite memories is when my daughter helped me decorate our kitchen window. She insisted on painting one pane with glitter paint (yes, it was messy), but you know what? It became the perfect spot to display her weekly school achievements. Sometimes, the best design ideas come from the most unexpected places!
Remember, the beauty of this project is its versatility. You can easily switch things up whenever the mood strikes, keeping your kitchen decor fresh and exciting without spending a dime.
As we wrap up our window wonderland adventure, I hope you’re feeling inspired to give this project a try. It’s a sustainable, budget-friendly way to add character to your kitchen walls. Plus, it’s a great excuse to raid your local thrift store or salvage yard – treasure hunting, anyone?
Now, let’s shift gears and explore another exciting way to jazz up those kitchen walls. Get ready to unleash your inner artist as we dive into the world of Geometric Mural Magic in our next section. Trust me, you won’t want to miss this colorful adventure!
Geometric Mural Magic
As a parent who’s navigated the treacherous waters of home decor with little ones underfoot, I can tell you that geometric murals are a game-changer. They’re modern, sophisticated, and best of all, totally kid-friendly. Let’s dive into how you can create your geometric masterpiece without breaking the bank or your sanity.

Choosing Your Design
First things first, let’s talk design. The beauty of geometric patterns is their versatility. Whether you’re into bold triangles, sleek hexagons, or playful circles, there’s a shape for every style. Here are some popular options to get your creative juices flowing:
- Herringbone: Perfect for a touch of elegance
- Honeycomb: Great for adding depth and interest
- Chevron: A classic that never goes out of style
- Starburst: For a fun, retro vibe
Pro tip: If you’re working with a smaller kitchen, opt for larger shapes or a simpler pattern. It’ll make the space feel more open and airy – trust me, I learned this the hard way in my first tiny apartment!
Painting Your Geometric Mural
Now, let’s roll up our sleeves and get painting! Here’s a step-by-step guide that even the most DIY-challenged among us can follow:
- Prep your wall: Clean it thoroughly and apply a base coat if needed.
- Plan your design: Sketch it out on paper first. It’s much easier to erase pencil than paint!
- Measure and mark: Use a level and pencil to mark your shapes on the wall.
- Tape it up: This is where painter’s tape becomes your best friend. Use it to create sharp, clean lines.
- Paint away: Start with lighter colors and work your way to darker shades.
- Peel and reveal: Once the paint is dry, carefully remove the tape to unveil your masterpiece.
Remember, the key to a successful geometric mural is patience. Take your time with the taping process – it’ll pay off in the end, I promise!
Color Combos That Pop
Now, let’s talk color. This is where you can let your personality shine through. Some winning combinations I’ve used in family homes include:
- Soft pastels for a calming effect
- Bold primaries for a playful, kid-friendly vibe
- Monochromatic schemes for a sophisticated look
Don’t be afraid to experiment! You might be surprised at how well-unexpected color pairings work together.
A geometric mural is more than just a pretty shape on a wall. It’s a way to infuse your kitchen with energy, create a focal point, and express your unique style. Plus, it’s a fun project you can involve the kids in – just be prepared for some creative “improvements” to your design!
As we move on to our next DIY adventure, get ready to bring a touch of nature indoors. In our “Hanging Herb Haven” section, we’ll explore how to create a functional and beautiful herb garden right in your kitchen. It’s the perfect complement to your new geometric masterpiece!
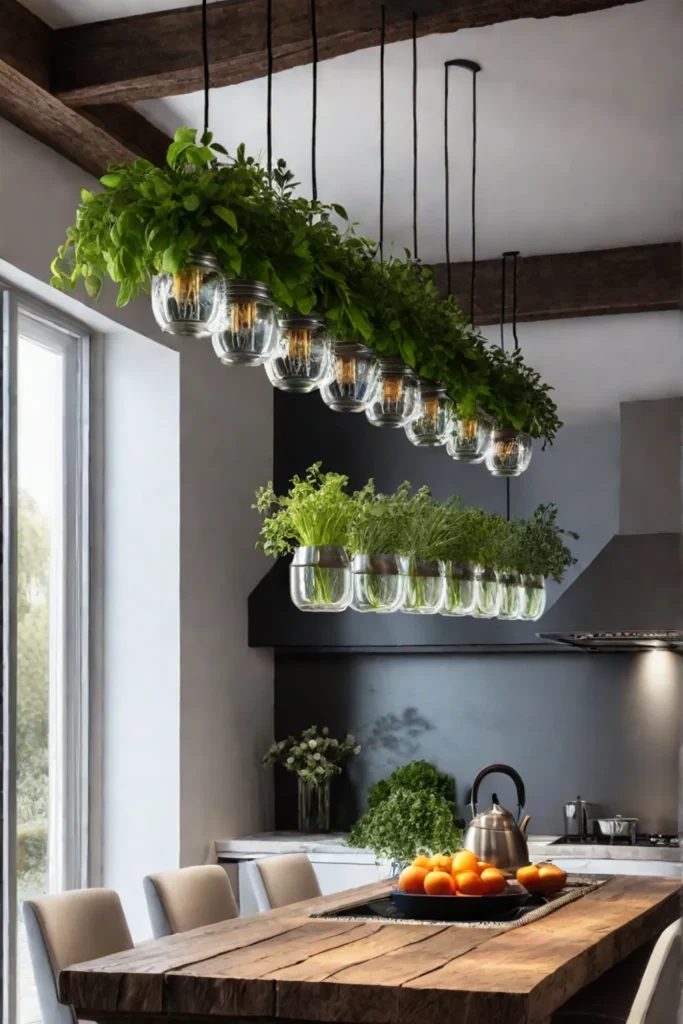
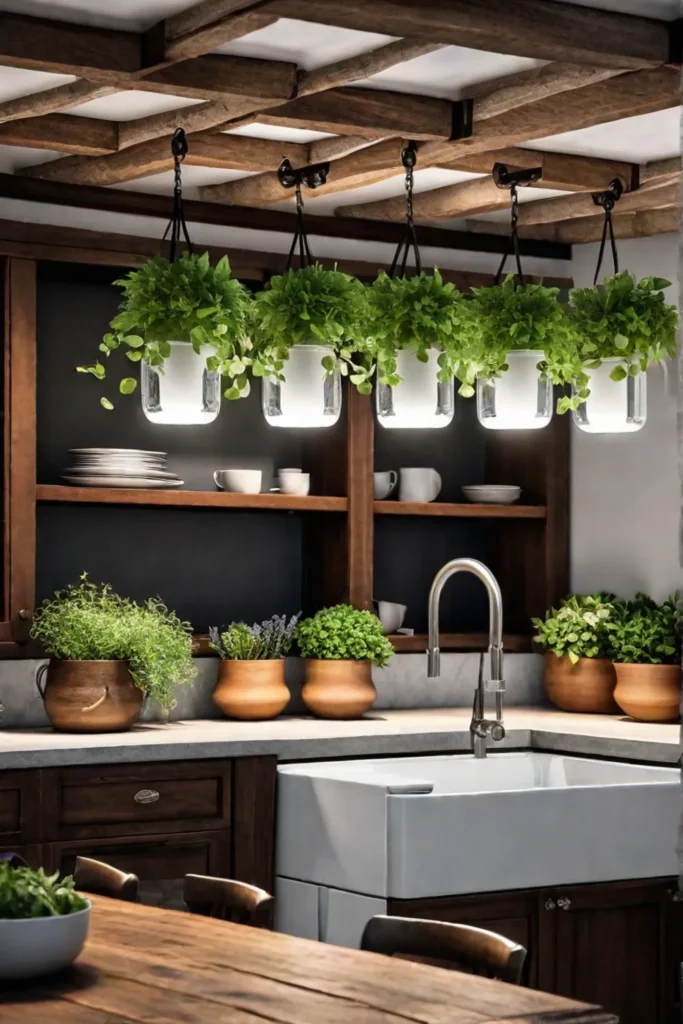
Hanging Herb Haven
Let’s face it, sometimes our kitchen walls can feel a bit… bland. Well, parents, I’ve got a solution that’s not only budget-friendly but also adds a dash of flavor to your cooking and your decor. Enter the hanging herb garden!
Choosing Your Herbs
First things first, let’s pick our green companions. When I created my first indoor herb garden, I went a bit overboard (who knew basil could grow so big?). Here are some herbs that play nice indoors and won’t take over your kitchen:
- Basil: Perfect for those impromptu pesto nights
- Mint: For refreshing teas and surprise mojitos (after the kids are in bed, of course)
- Thyme: A little goes a long way in soups and roasts
- Chives: Snip and sprinkle on everything from eggs to potatoes
- Parsley: The ultimate garnish and breath freshener
Remember, these little guys need sunlight, so choose a spot near a window where they can soak up those rays.
Creating Your Hanging Herb Garden
Now, let’s get crafty! You don’t need to be a DIY guru to pull this off. Trust me, if I can do it with a toddler “helping,” you’ve got this in the bag.
- Gather your containers: Mason jars, tin cans, or those plastic cups your kids refuse to part with – they all work!
- Drill drainage holes in the bottom of your containers (safety first, folks)
- Fill with potting soil and plant your herbs
- Attach sturdy twine or rope to create hangers
- Secure to a wooden plank or rod (I used an old curtain rod – talk about upcycling!)
- Hang your masterpiece and watch your kitchen come alive
Pro tip: Label your herbs with cute chalkboard tags. It’s not just adorable; it’ll save you from accidentally garnishing your pasta with mint instead of basil (been there, done that).
Caring for Your Indoor Herb Garden
Keeping your herbs happy isn’t rocket science, but it does require a bit of TLC:
- Water regularly, but don’t drown them (think gentle shower, not pool party)
- Snip often to encourage growth (and to flavor your dishes, of course)
- Rotate the planter occasionally for even sunlight exposure
- Talk to them if you want – I won’t judge, and the kids might join in!
Not only will this hanging herb haven add a pop of green to your kitchen walls, but it’ll also save you a few bucks on your grocery bill. Plus, there’s something magical about plucking fresh herbs for your family meals. It’s a small step towards sustainability that even the littlest hands can help with.
As we move from the fresh and fragrant world of herbs, let’s turn our attention to another wall-worthy wonder. Get ready to pin your way to an organization with our next DIY project: the Creative Corkboard Command Center. Trust me, it’s about to become your family’s new favorite spot for notes, artwork, and maybe even that elusive permission slip!
Creative Corkboard Command Center
Ready to tackle a project that’s as fun as it is functional? Let’s turn a simple corkboard into a stylish command center for your kitchen. Trust me, this is a game-changer when it comes to keeping your family organized and your kitchen walls looking fabulous.

Materials You’ll Need
- Large corkboard
- Decorative fabric or paper
- Paint (optional)
- Pushpins or thumbtacks
- Scissors
- Glue gun
- Hooks, small shelves, or magnetic strips (optional)
Decorating Your Corkboard
First things first, let’s give that plain corkboard a makeover! I remember when I first tried this project in my kitchen – my kids thought I was bonkers covering a perfectly good corkboard with fabric. But oh, how their eyes lit up when they saw the finished product!
- Choose a fabric or paper that complements your kitchen decor. Don’t be afraid to go bold!
- Cut the fabric or paper to size, leaving about an inch extra on all sides.
- Use a glue gun to carefully attach the fabric to the back of the corkboard, pulling it taut as you go.
- For a painted look, apply 2-3 coats of acrylic paint, allowing each coat to dry completely.
Pro tip: Want to add some pizzazz? Try using metallic paint for a touch of glamour, or create a color block effect by painting different sections in complementary hues.
Organizing Your Command Center
Now that your corkboard looks amazing, it’s time to make it work for you. Here’s how to transform it into a super-efficient command center:
- Create zones: Divide your board into sections for different purposes (e.g., meal planning, family calendar, to-do lists).
- Add storage: Attach small hooks for keys or measuring spoons, or magnetic strips for holding metal utensils or spice tins.
- Make it interactive: Use colorful pushpins or washi tape to create a weekly meal planner or chore chart.
- Include inspiration: Pin up favorite family photos or inspirational quotes to keep everyone motivated.
Remember, the key is to make this command center work for your family’s unique needs. In our house, we have a special section just for the kids’ artwork – it’s like our own little rotating gallery!
Keep It Fresh and Functional
Your command center should evolve with your family’s needs. Here are some ideas to keep it useful and engaging:
- Update your meal plan weekly
- Rotate family photos or kids’ artwork monthly
- Use different colored pins for various family members or types of tasks
- Include a small pocket or envelope for storing coupons or receipts
Did you know that cork is a sustainable and renewable resource? So not only are you getting organized, but you’re also making an eco-friendly choice. How’s that for a win-win?
By creating this DIY command center, you’re not just decorating your kitchen walls – you’re crafting a central hub for your family’s daily life. It’s a place where schedules align, meals are planned, and memories are displayed. Plus, it’s a constant reminder of all the amazing things your family has going on!
As we wrap up this creative project, let’s take a moment to appreciate how a simple corkboard can transform into something so useful and personalized. In our next section, we’ll be summing up all the fantastic ideas we’ve explored for budget-friendly kitchen wall decor. Get ready to see how these projects can come together to create a kitchen that’s uniquely yours!
Conclusion
Whew! What a journey we’ve been on, fellow DIY warriors! From framing memories to growing herbs, we’ve explored five fantastic ways to breathe new life into those kitchen walls without emptying our piggy banks. Remember, decorating your kitchen isn’t just about making it look pretty – it’s about creating a space that reflects your family’s personality and makes everyday moments a little more special.
As you embark on your kitchen wall makeover adventure, don’t be afraid to mix and match these ideas or put your spin on them. Maybe you’ll create a geometric mural with pockets for growing herbs, or turn your upcycled window into a command center. The possibilities are as endless as your imagination! So go forth, get creative, and most importantly, have fun. After all, the best kitchens are the ones filled with love, laughter, and a healthy dose of DIY spirit. Now, who’s ready to tackle those bathroom walls next?