You know what drives me absolutely bonkers? Walking into a stunning, gut-renovated kitchen with gorgeous cabinets and a quartz island the size of a small car… and the lighting is just sad. It’s either a sterile operating room or a cave with a few lonely pendants. Everyone focuses on the tile and the faucets, but they treat lighting as an afterthought, and it kills the entire mood of the most important room in the house. It’s my biggest pet peeve.
The thing is, light isn’t just about seeing what you’re chopping; it’s about feeling a certain way. Your brain is hardwired to react to light—it can make you feel energized, relaxed, focused, or anxious. And once you understand the ‘why’ behind it, you realize lighting isn’t just a utility. It’s the most powerful, and often most overlooked, tool you have for shaping your daily experience. So, let’s break down what actually matters and what’s just noise.
Planning Your Kitchen’s Luminous Foundation (Part 1)
Before you even think about looking at a single shiny fixture online, you have to do the groundwork. This is the part everyone wants to skip, and it’s precisely why so many kitchens end up feeling wrong. Think of it like this: you wouldn’t build a house without a blueprint, right? This is the blueprint for how your kitchen will feel.
1. Assess Your Kitchen’s Existing Light Levels and Natural Influx
First things first, you have to play detective in your own kitchen. Where is the light coming from right now, and when? Stand in the room in the morning, at noon, and in the evening. Notice where the sun pours in and, more importantly, where the shadows gather. The goal here isn’t just to see where it’s dark; it’s to understand the natural rhythm of light in your space. This is your baseline, your ground zero.
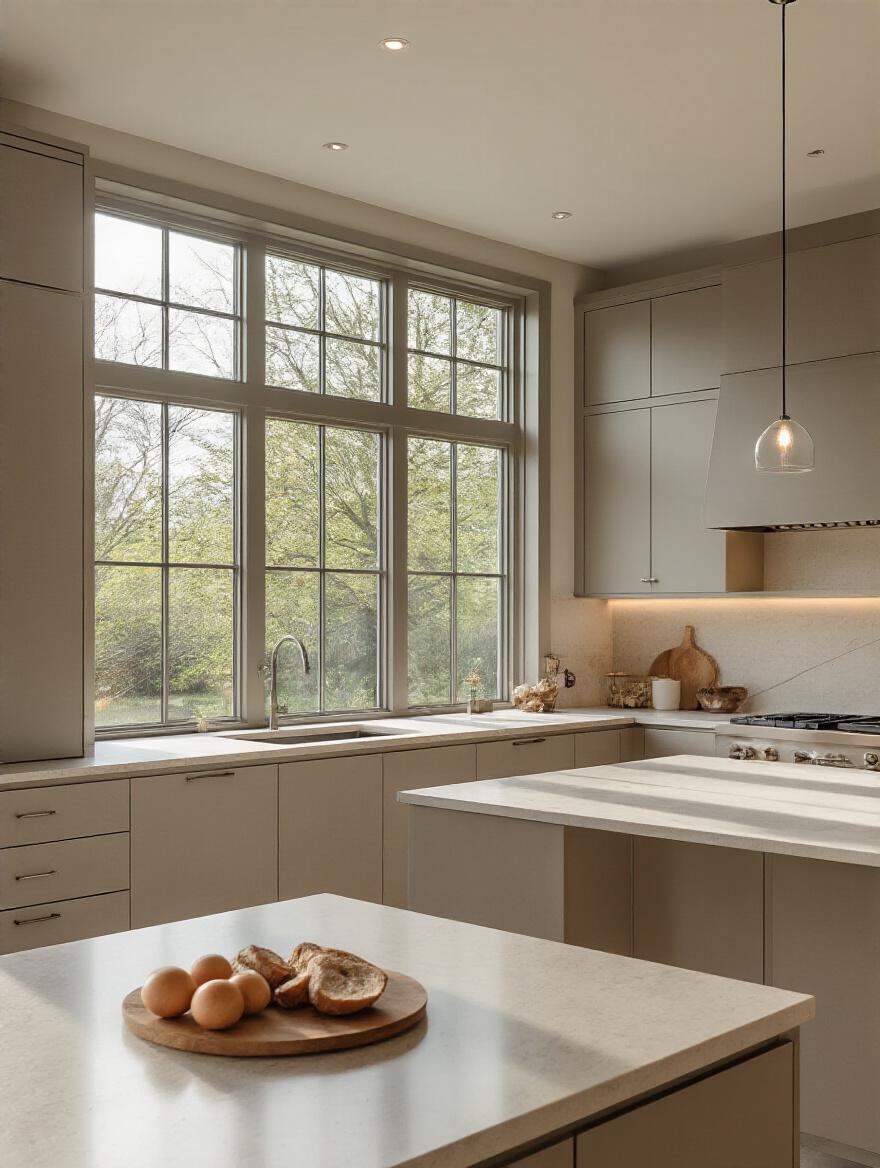
The big mistake people make is thinking a big window solves all their problems. But a north-facing window gives you cool, steady light, while a south-facing one can give you harsh glare at midday. Use a simple light meter app on your phone to get actual readings in the corners and on your countertops. Draw a goofy little map if you have to. Knowing this tells you exactly where you need to supplement with artificial light, so you aren’t blasting the whole room when you only need to illuminate a dark prep corner.
2. Master the Three Layers of Kitchen Lighting: Ambient, Task, and Accent
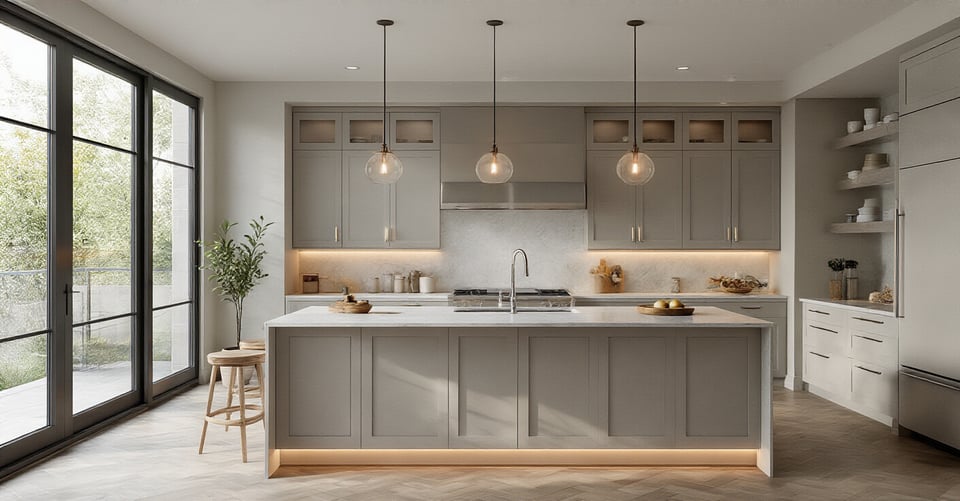
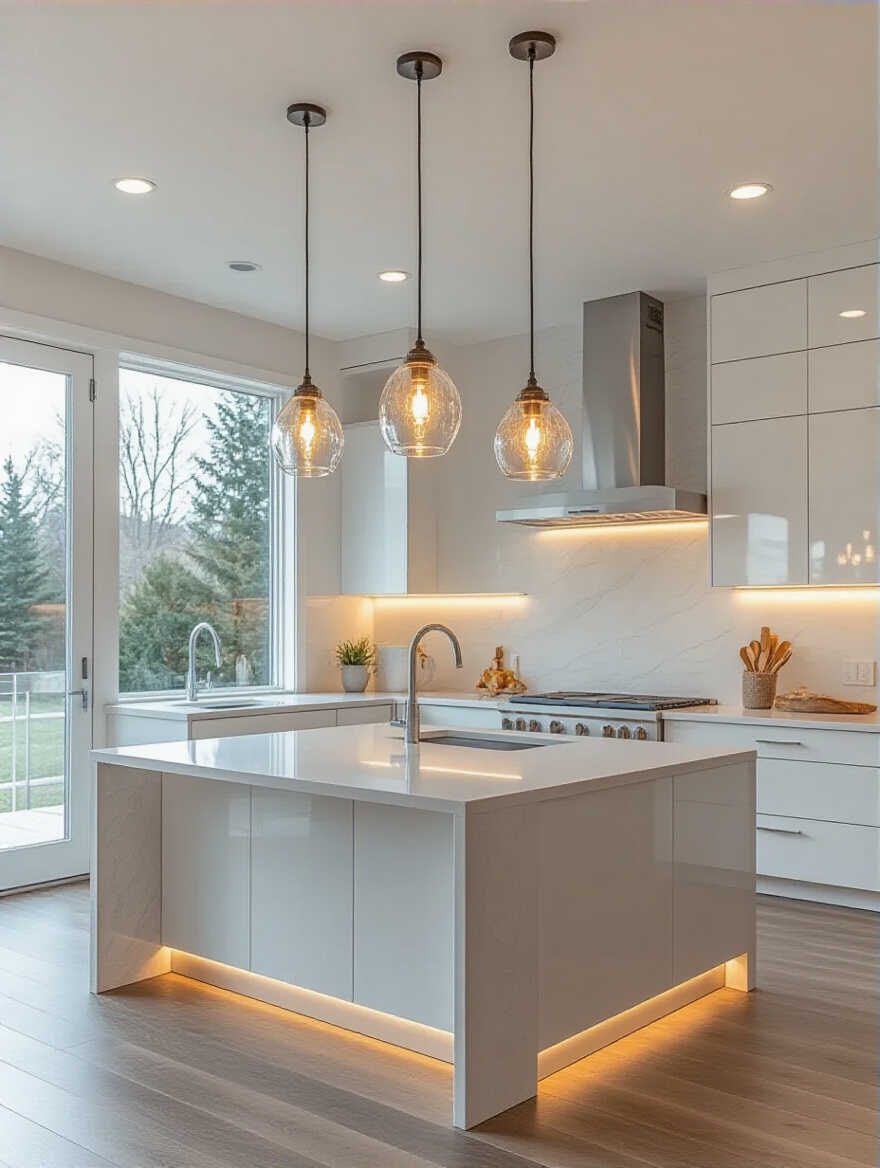
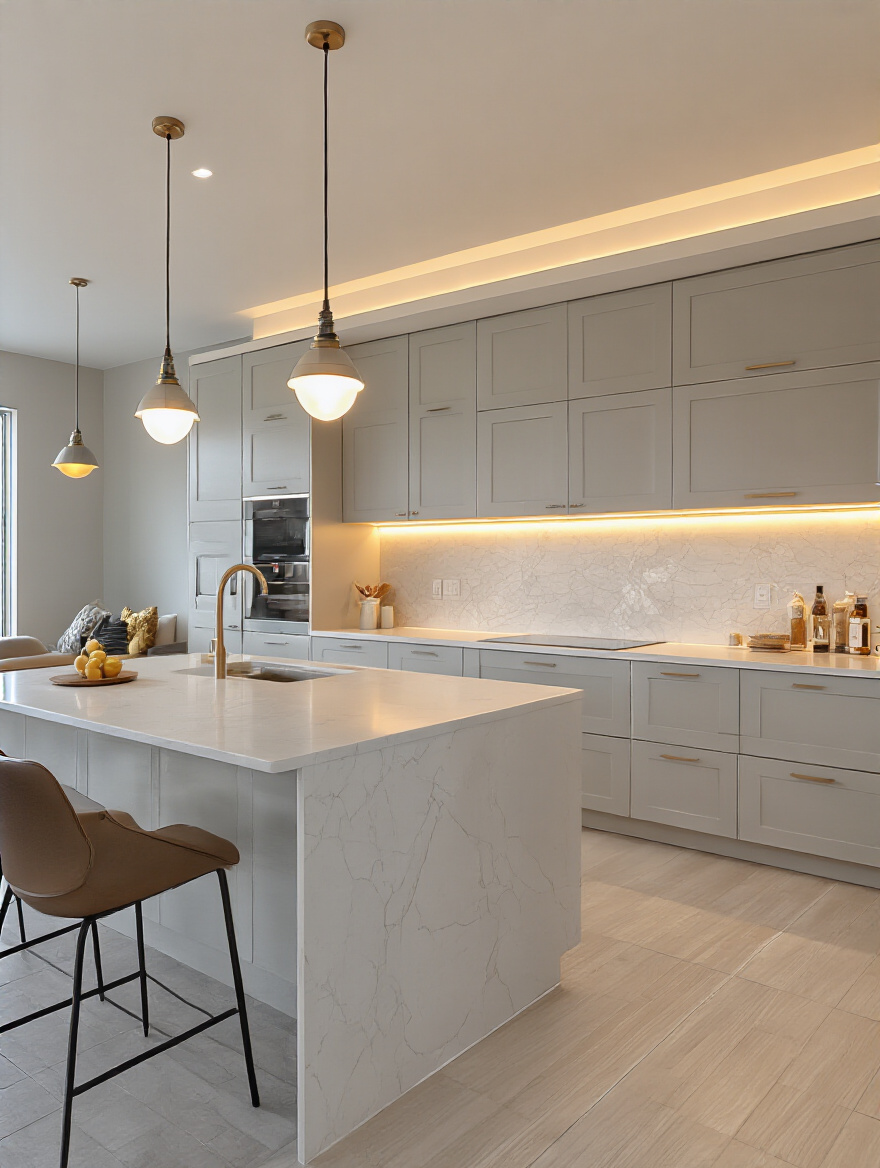
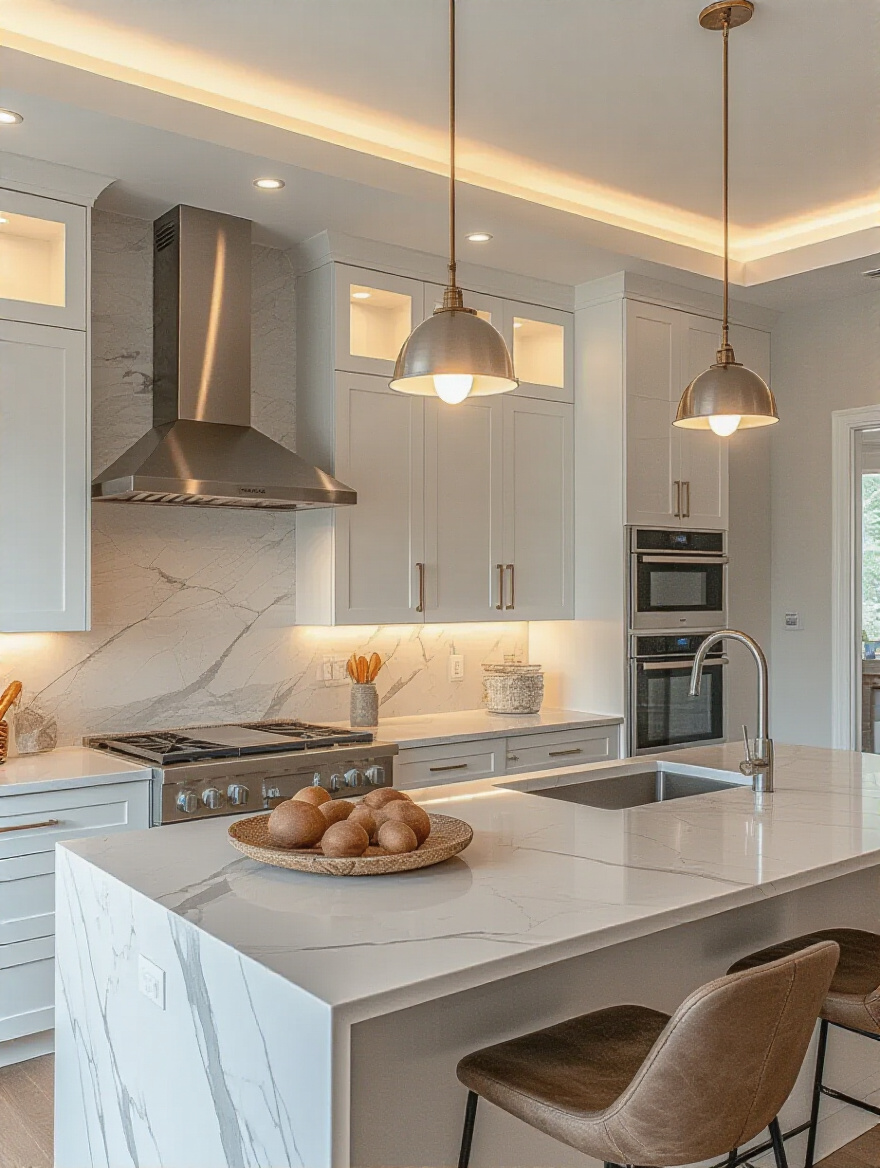
You’ve probably heard this term “layered lighting,” and it sounds like complicated designer-speak, but it’s dead simple. Think of it like getting dressed for a weird weather day. You have your main outfit (Ambient), a raincoat for when you need it (Task), and a cool scarf to tie it all together (Accent). You need all three. Ambient is the general, overall light that lets you walk around without tripping. Task is the focused light right over your work areas—your counters, your sink. Accent is the jewelry; it’s the little lights that make your pretty tile or cool glassware sparkle.
Everyone messes this up by just sticking a big fixture in the middle of the ceiling and calling it a day. The result? Your own head creates a giant shadow right where you’re trying to chop an onion. Start by identifying your task zones first. Where do you actually work? Light those areas perfectly. Then, fill in the gaps with your general ambient light. Finally, add a little accent sparkle. It’s the secret sauce that makes a kitchen feel complete and intentional.
3. Precisely Calculate Room Dimensions for Accurate Fixture Sizing and Placement
This sounds like math class, but I swear it’s easy and it will save you from making a rookie mistake: choosing a fixture that’s hilariously too big or sadly too small. For a main, central light, here’s a shortcut I use constantly: add the length and width of your room in feet, and that’s your ideal fixture diameter in inches. So, a 10-foot by 12-foot kitchen (10 + 12 = 22) would look great with a 22-inch diameter light.
For pendants over an island, you’re looking for balance. They shouldn’t hang so low you’re knocking your head into them or blocking your view of the person across from you—about 30-36 inches above the countertop is the sweet spot. Don’t just guess. I once had a client who fell in love with these massive industrial pendants for her 7-foot island. We held up cardboard cutouts to simulate the size and she immediately realized it would have felt like an interrogation room. Use painter’s tape on the ceiling to visualize placement before the electrician shows up.
4. Define Your Kitchen’s Aesthetic Style to Guide Cohesive Fixture Choices
Okay, here’s where your inner artist gets to play. Before you fall down a Pinterest rabbit hole, take a breath and define your kitchen’s vibe in two or three words. Is it “Modern Farmhouse”? “Industrial Chic”? “Minimalist Scandinavian”? Write them down. These words are now your bouncers; if a light fixture doesn’t fit the description, it doesn’t get in. This stops you from buying a bohemian beaded chandelier for your sleek, modern kitchen just because it looked cool online.

A huge mistake is choosing fixtures in isolation. Lighting is the jewelry of the room; it needs to complement the outfit. Look at your cabinet hardware, your faucet finish, the style of your backsplash. Are they curvy and traditional or clean and modern? Your lights should speak the same language. I’m not saying they have to be a perfect match—a little contrast can be great—but they have to feel like they belong in the same family. A cohesive look feels calm and intentional; a mismatched one just feels chaotic.
Planning Your Kitchen’s Luminous Foundation (Part 2)
Now that you’ve got a handle on the big-picture planning, let’s talk money. I know, it’s the boring part, but getting this right at the beginning is the difference between a joyful project and a stress-filled nightmare that ends in compromise.
5. Establish a realistic budget for Fixtures, Bulbs, and Professional Installation
Let’s get real about money. People always budget for the fixtures they can see, but they completely forget about the hidden costs. The electrician’s labor, the weirdly expensive smart bulbs, the dimmer switches—it all adds up, fast. You have to budget for the entire system, not just the pretty pendant.
The shortcut everyone needs to know is that professional installation can easily be 30-50% of your total lighting cost. So when you’re drooling over a $500 light, mentally tell yourself it’s an $800 light. Get at least three quotes from licensed electricians before you buy anything. And please, for the love of all that is holy, add a 15% contingency fund. You never know when they’ll open a wall and find something unexpected. I watched a client have to scrap her dream under-cabinet lighting because she didn’t budget for labor and a contingency, and it broke my heart.
Selecting Essential Fixture Types for Every Zone (Part 1)
Okay, with the planning and budgeting sorted, we can get to the fun part: picking out the actual hardware. Each zone in your kitchen does a different job, and each one needs a different kind of light to do it well. This is your toolkit.
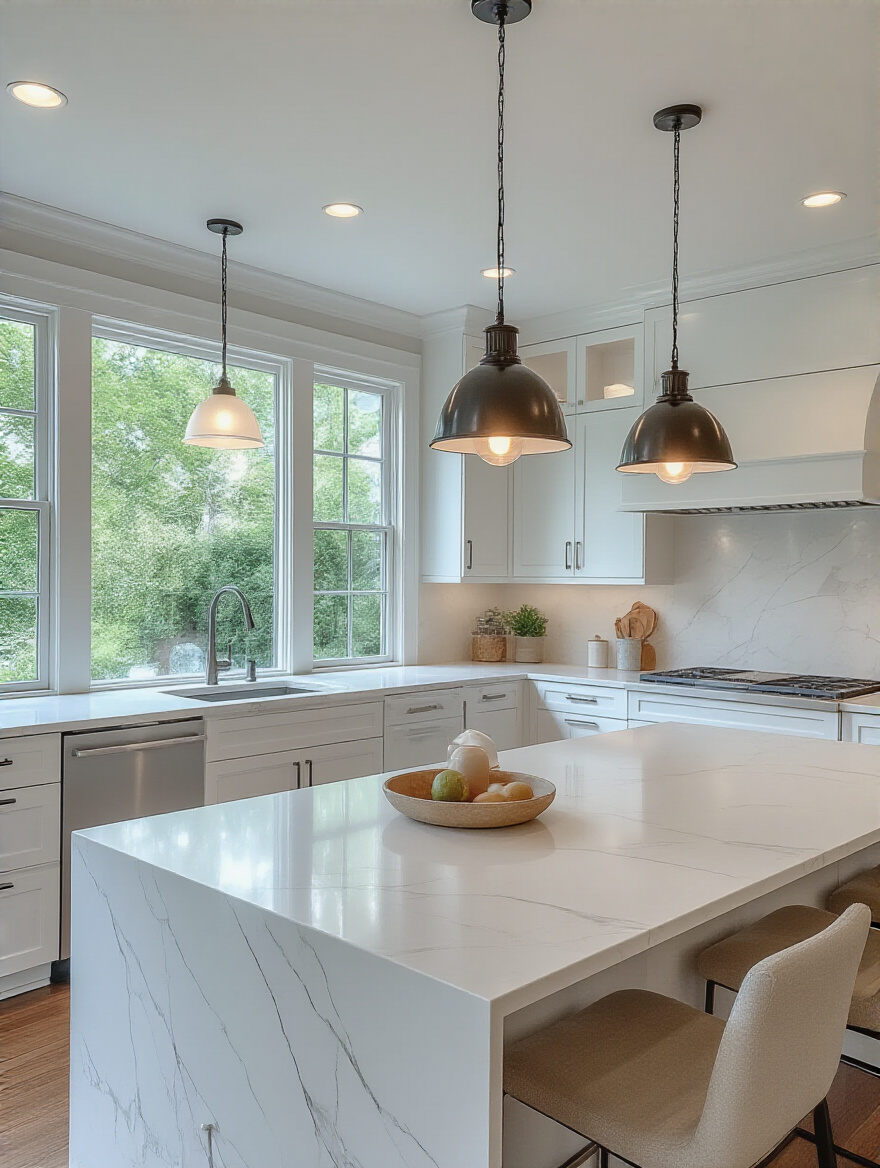
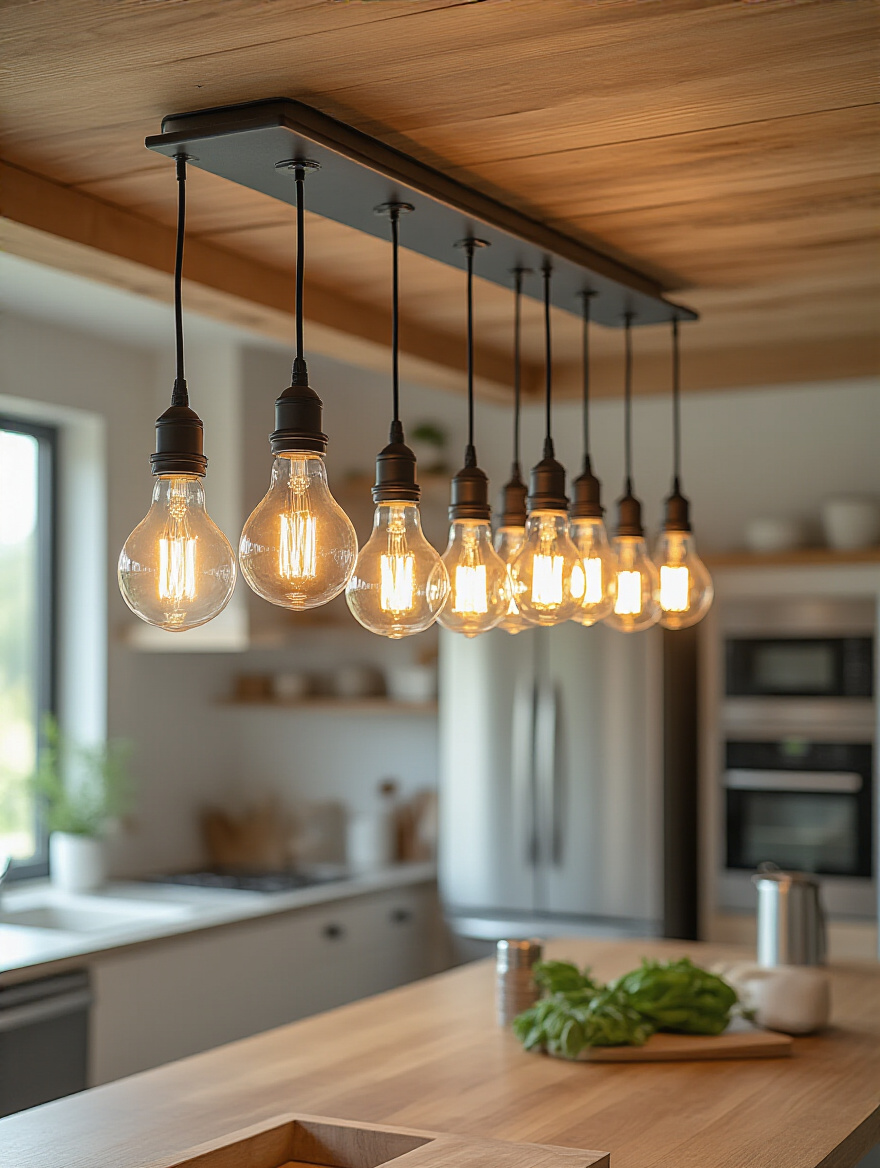
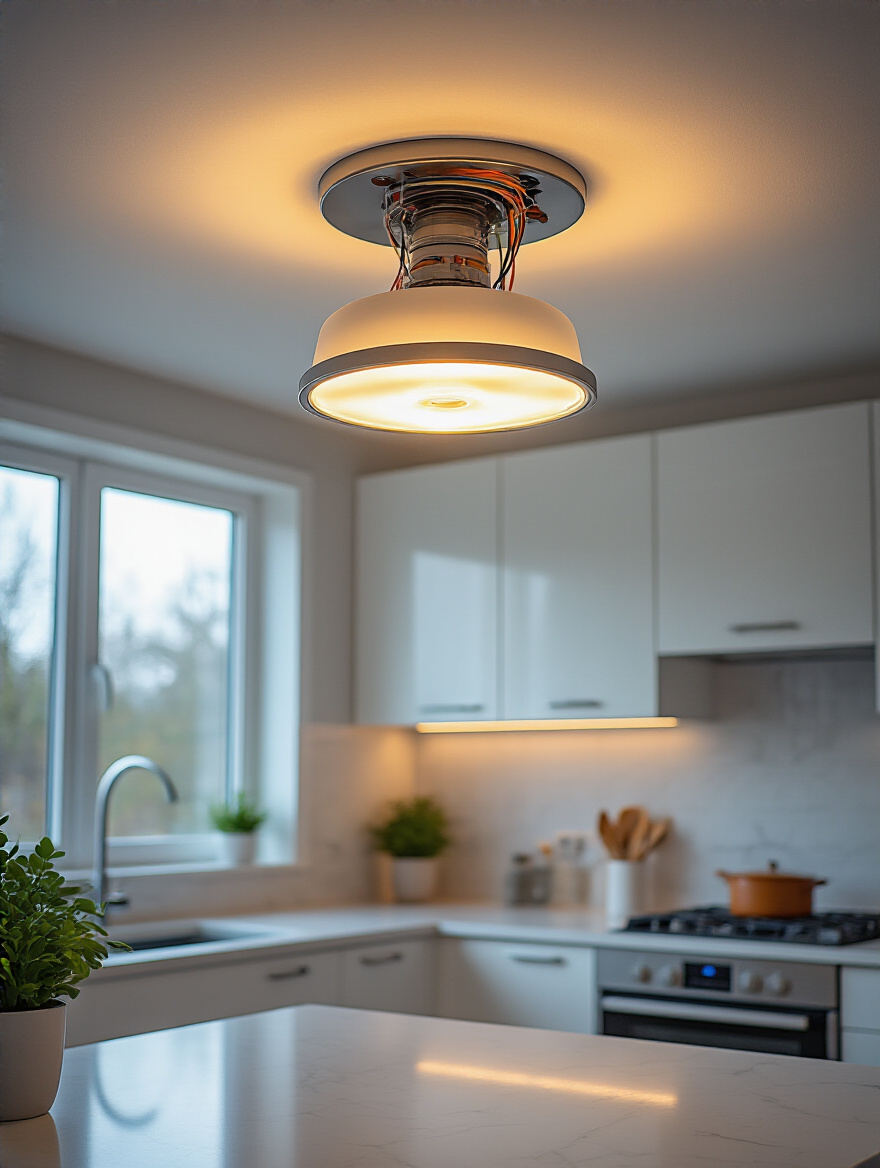
6. Differentiate Between Pendant, Recessed, and Flush Mount Overhead Options
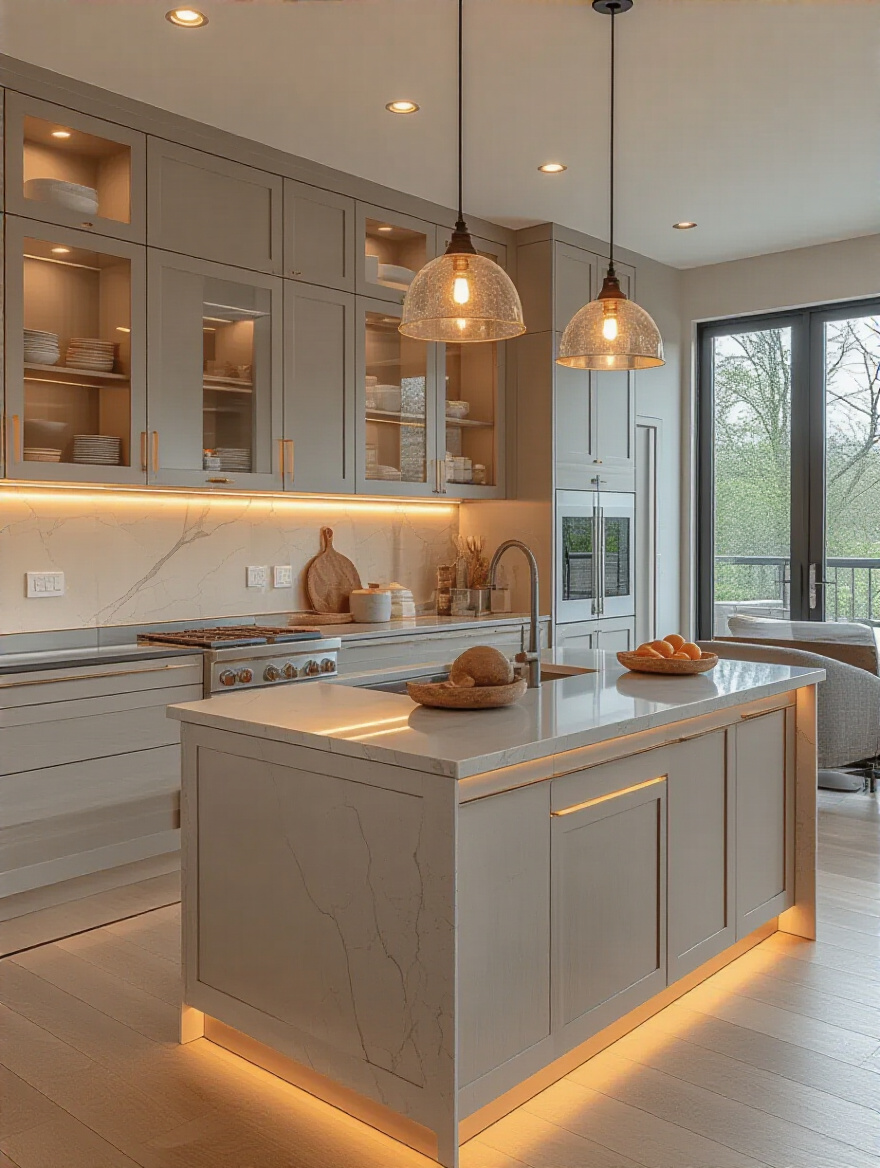
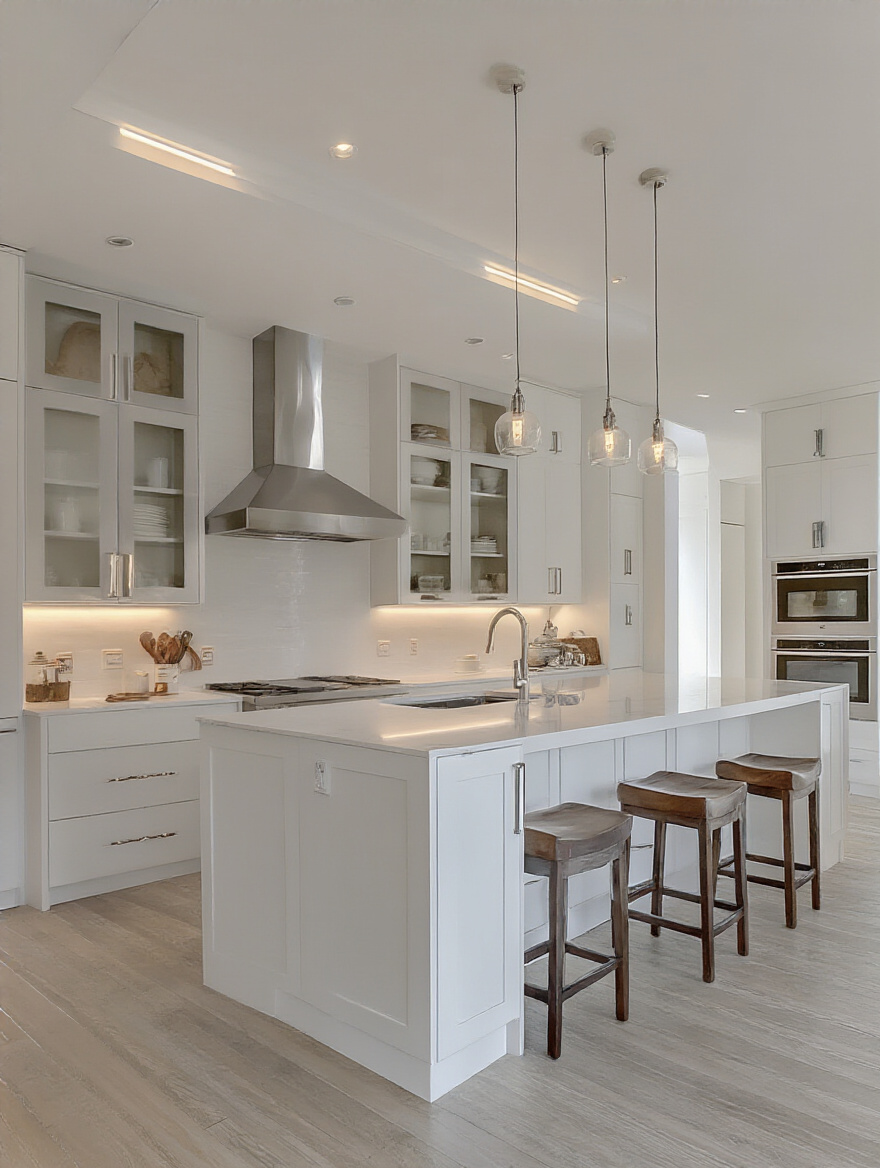
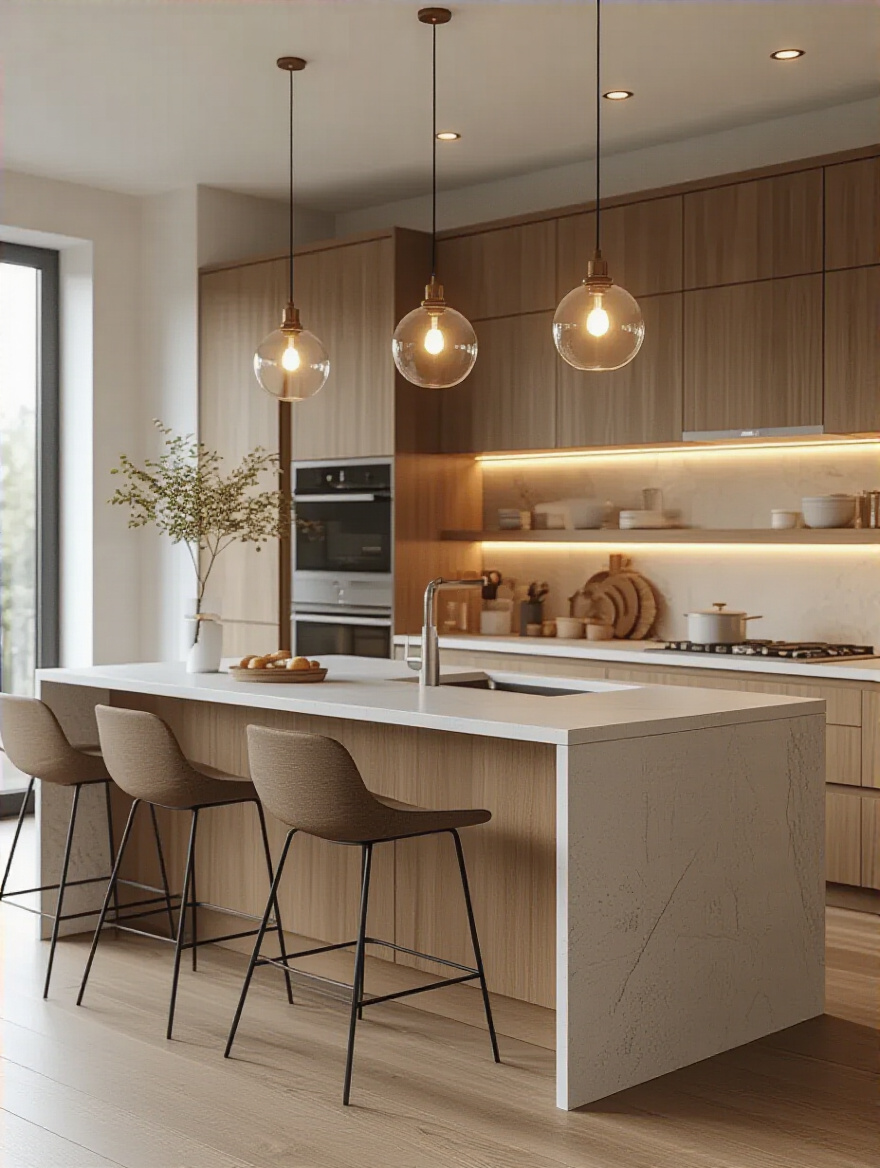
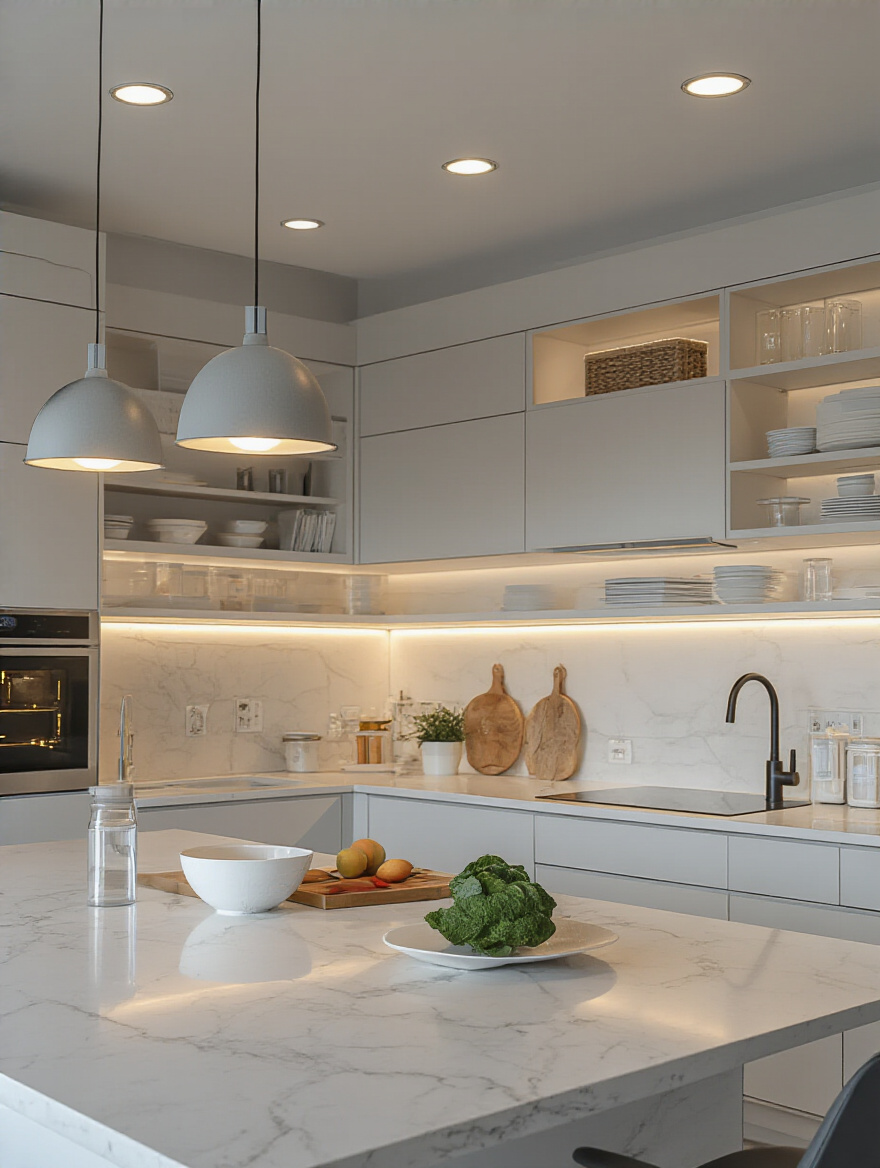
Your overhead lighting is the foundation of your room’s general (ambient) light. You’ve got three main players. Recessed lights (or can lights) are the workhorses; they disappear into the ceiling and provide clean, unobtrusive light. Flush or Semi-Flush Mounts sit right against the ceiling (or hang a few inches down) and are perfect for lower ceilings where a hanging light would be a menace. Pendants are the statement pieces; they hang down and are great for defining a space like an island or sink.
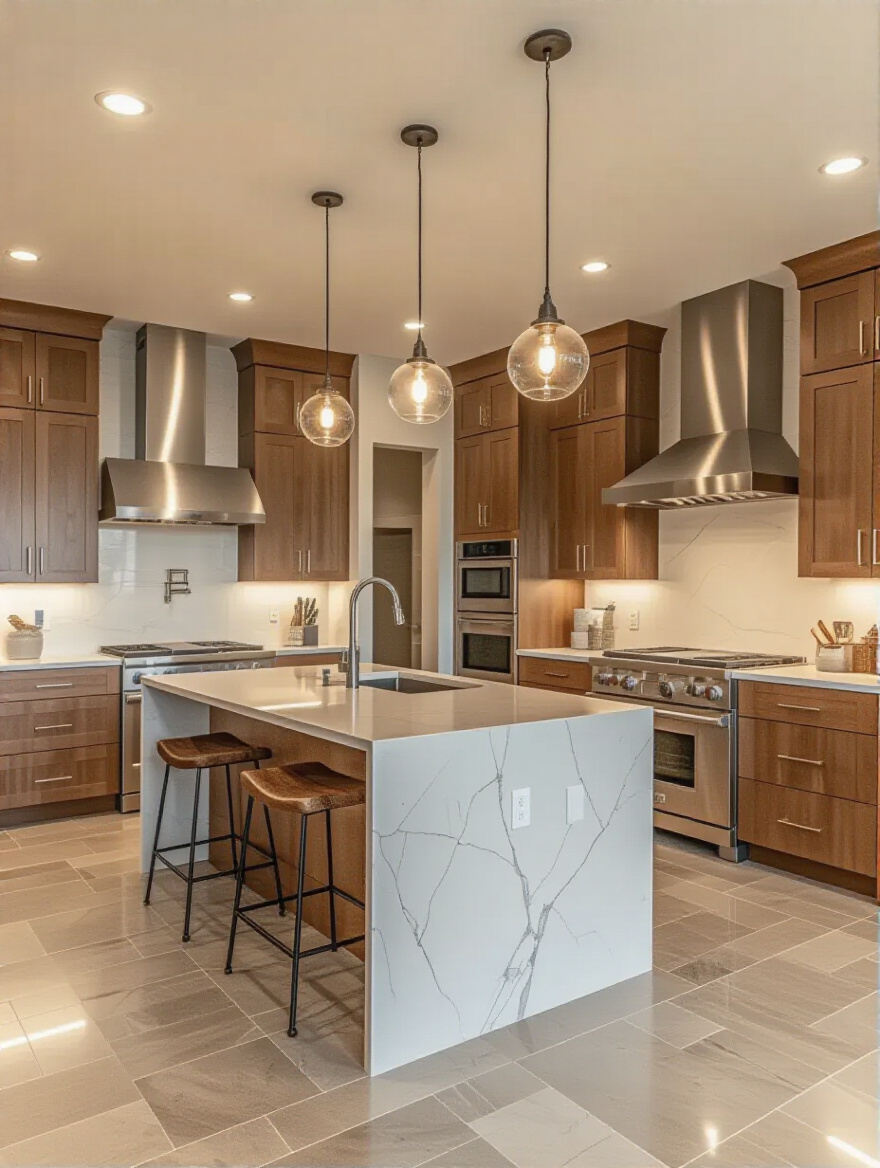
The BS everyone believes is that you have to choose just one. Nope. The best kitchens use a mix. You might have recessed lights for overall coverage, and then bring in pendants over the island for targeted light and a dose of style. Think of recessed cans as your reliable basics and pendants as your personality pieces. Just don’t make the classic mistake of putting recessed lights in a perfect grid in the middle of the room—it creates a runway effect and casts shadows everywhere you don’t want them.
7. Prioritize Undercabinet Task Lighting for Enhanced Work Surface Visibility
If you do only one thing from this entire list, let it be this. Undercabinet lighting is not a luxury; it is a non-negotiable necessity. I mean it. Your main ceiling lights are almost always behind you when you’re working at the counter, which means your own body is casting a massive shadow exactly where you’re wielding a sharp knife. This is a functional and safety issue.
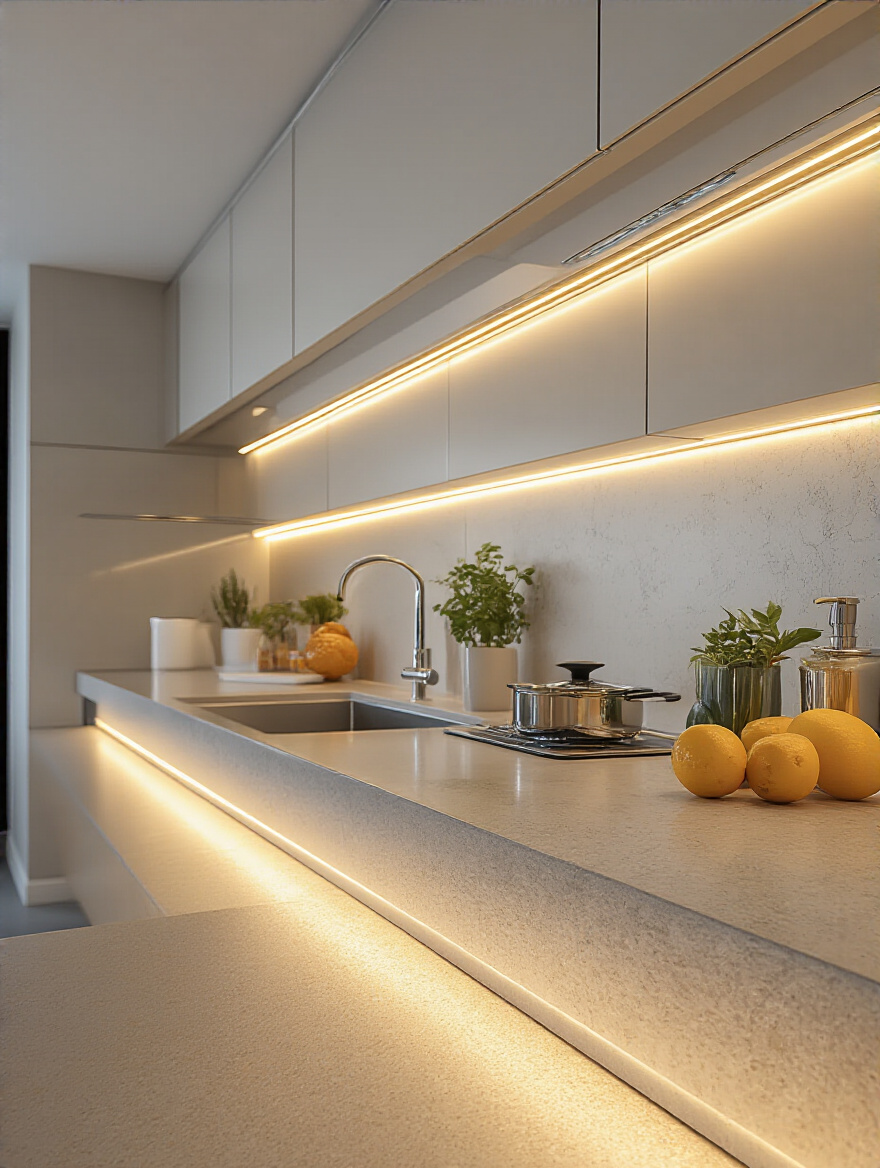
Modern LED strips or tapes are brilliant for this. They’re super slim, so you don’t see the fixture, just a beautiful, even glow across your entire work surface. Suddenly, you can see what you’re doing, your backsplash looks amazing, and the whole kitchen feels more spacious. I had a client who was convinced her eyesight was failing; turns out she was just trying to cook in her own shadow. We installed undercabinet lighting, and it was life-changing for her.
8. Select Specific Fixtures for Islands, Peninsulas, and Breakfast Nooks
Islands, peninsulas, and nooks are the social hubs of the kitchen. This is where you have conversations, where kids do homework, where guests gather with a glass of wine. The lighting here has to be a flexible multitasking hero. It needs to be bright enough for chopping veggies but also be able to dim down for a cozy, intimate dinner. This is where pendants or a statement chandelier really shine.
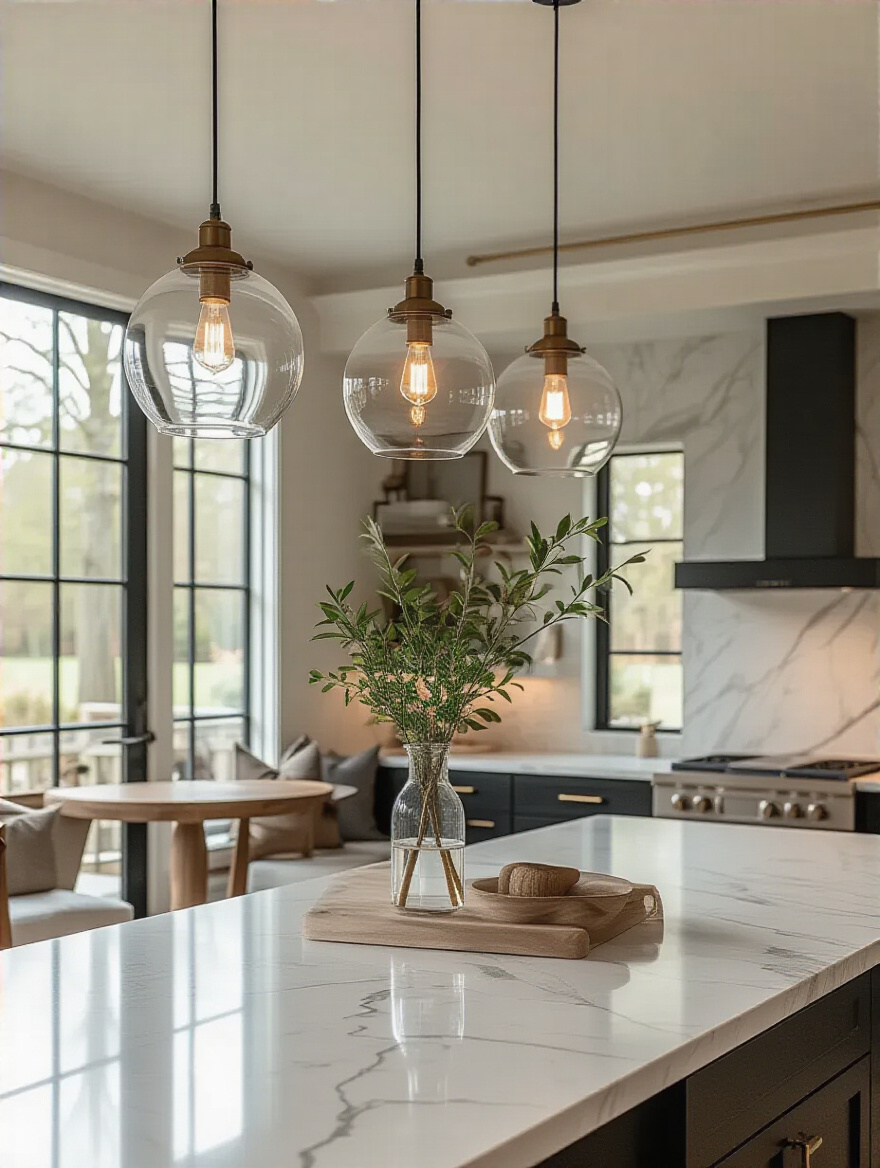
The key is scale. Don’t put tiny little pendants over a massive island; it will look ridiculous. And don’t hang a gigantic fixture over a small breakfast table. A good rule of thumb for multiple pendants over an island is to leave about 30 inches between each fixture so they have room to breathe. And always, always put them on a dimmer switch. Not having a dimmer here is a crime against ambiance.
9. Incorporate Cabinet Interior and Toe-Kick Lighting for Decorative Flair
This is the advanced-level stuff that makes a kitchen look like it was designed by a high-end professional. Putting soft lighting inside glass-front cabinets turns your everyday dishes into a curated art display. It adds so much depth and warmth, especially in the evening when you turn the main lights down. It’s pure atmosphere.
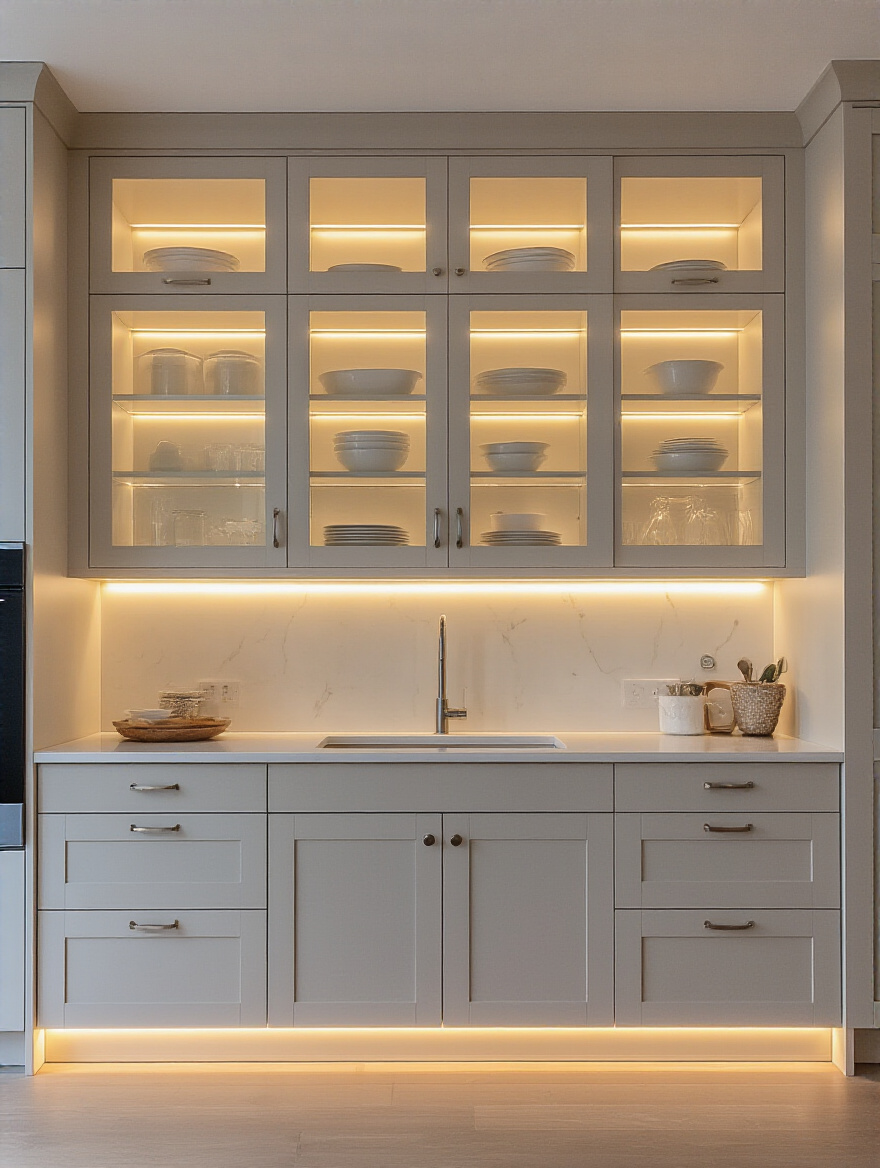
Toe-kick lighting—a strip of LEDs running along the recessed base of your cabinets—is another one of my secret weapons. It creates this magical ‘floating’ effect and serves as the perfect gentle nightlight. Imagine stumbling into the kitchen for a glass of water at 2 a.m. and having a soft, guide-path of light instead of a blinding overhead glare. It’s a small touch that has a huge impact on how luxurious the space feels.
Selecting Essential Fixture Types for Every Zone (Part 2)
We’re in the home stretch of picking fixtures. The last piece of this puzzle is about choosing the right light for the right conditions, because a kitchen is a place with steam, grease, and water—all of which are enemies of electricity.
10. Choose Wet-Rated or Damp-Rated Fixtures for Sinks and High-Humidity Areas
This is the one I get very serious about. You cannot put just any light fixture directly over your sink. Water and electricity are not friends. You need to look for fixtures that are specifically “damp-rated” or “wet-rated.” A damp rating means it can handle moisture and condensation (like from a steamy dishwasher or boiling pot of pasta). A wet rating means it can handle direct exposure to water.
Look for the UL or ETL listing on the box. It will say “Suitable for Damp Locations” or “Suitable for Wet Locations.” Putting a regular “dry-rated” fixture over a sink is a code violation and, more importantly, a genuine safety hazard. I once had to tell a client that the gorgeous vintage chandelier he bought for over his sink was a no-go. He was disappointed, but it’s so much better to be disappointed than to risk an electrical fire. Safety is never optional.
Enhancing Light Quality and Control for Ambiance (Part 1)
Okay, you’ve chosen all your fixtures. High five! But the fixture is just the shell. Now we have to talk about the light itself—the bulb, the controls, the color. This is where we get into the deep psychology of light and how to wield it to create the perfect mood.
11. Incorporate Dimmers and Smart Controls for Adjustable Ambiance and Energy Savings
I will say this until I’m blue in the face: put. everything. on. a dimmer. Everything. Your kitchen isn’t just one thing—it’s a bright, bustling prep station, a calm spot for morning coffee, and a moody backdrop for a dinner party. A simple dimmer switch is the only way to make your lighting work for all of those scenarios. It’s the single most effective and cheapest way to control the mood of a room.
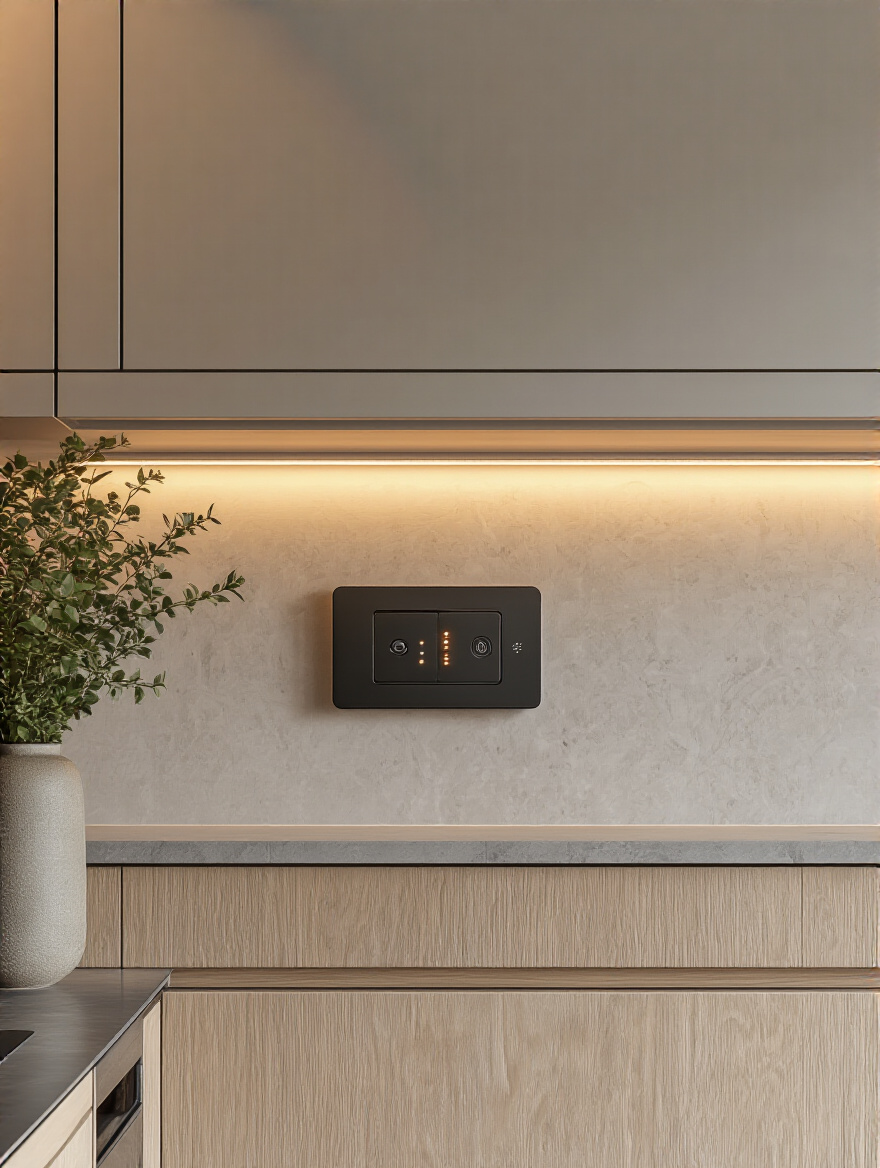
If you want to take it a step further, smart controls are incredible. Being able to say, “Hey Google, set kitchen to ‘Cooking Mode'” and have your task lights pop to 100% while the pendants dim to 70% is a game-changer. It’s not about being lazy; it’s about seamless control over your environment. And a bonus: dimming your lights even slightly saves energy and makes your expensive LED bulbs last way, way longer.
12. Opt for LED Bulbs to Maximize Energy Efficiency and Longevity
At this point, there is no good reason to use anything other than LED bulbs. Seriously. The old incandescent bulbs were tiny heaters that happened to produce a little light. LEDs use a fraction of the energy and can last for a decade or more. The initial cost might be a few dollars more, but the long-term savings in your electricity bill and the sheer convenience of not having to change a bulb for years make it an absolute no-brainer.
The only “gotcha” is that not all LEDs are created equal. You must buy “dimmable” LEDs if you’re using them with a dimmer switch (which you are, because you listened to me in the last point, right?). Using a non-dimmable bulb on a dimmer circuit is what causes that annoying flickering or buzzing. Also, look for a high CRI (Color Rendering Index) of 90+. This means the light shows colors accurately, so your steak will look savory brown instead of a weird gray, and your veggies will look vibrant and fresh.
13. Choose Appropriate Color Temperatures (CCT) to Match Your Kitchen’s Mood
This is my favorite topic because it’s where the science of psychology and design truly meet. Color Temperature, measured in Kelvins (K), is essentially the color of the light itself. A lower number (like 2700K) produces a warm, yellow, cozy light like an old incandescent bulb—think candlelight, relaxation, unwinding. A higher number (like 4000K or 5000K) produces a cool, blue-white, crisp light like daylight—think focus, energy, alertness.
The pro move is to use different color temperatures for different layers of light. I often recommend a cooler, neutral white (3500K-4000K) for your task lighting, because that bright, clear light helps with focus and precision when you’re working. Then, for your ambient pendants or dining nook light, go for a warmer white (2700K-3000K) to create a cozy, inviting, and flattering glow for people’s skin. Mixing them this way gives you the best of both worlds: functional light where you need it and beautiful ambiance where you want it.
14. Utilize Accent Lighting to Highlight Architectural Features or Decorative Elements
We touched on this earlier, but let’s dive deeper. Accent lighting is all about creating focal points. It’s what tells the eye where to look. Have a gorgeous textured backsplash? Graze it with light from an LED strip to show off that texture. Have a beautiful piece of art on the wall? Hit it with a small, focused spotlight. It’s what separates a “lit room” from a “designed space.”
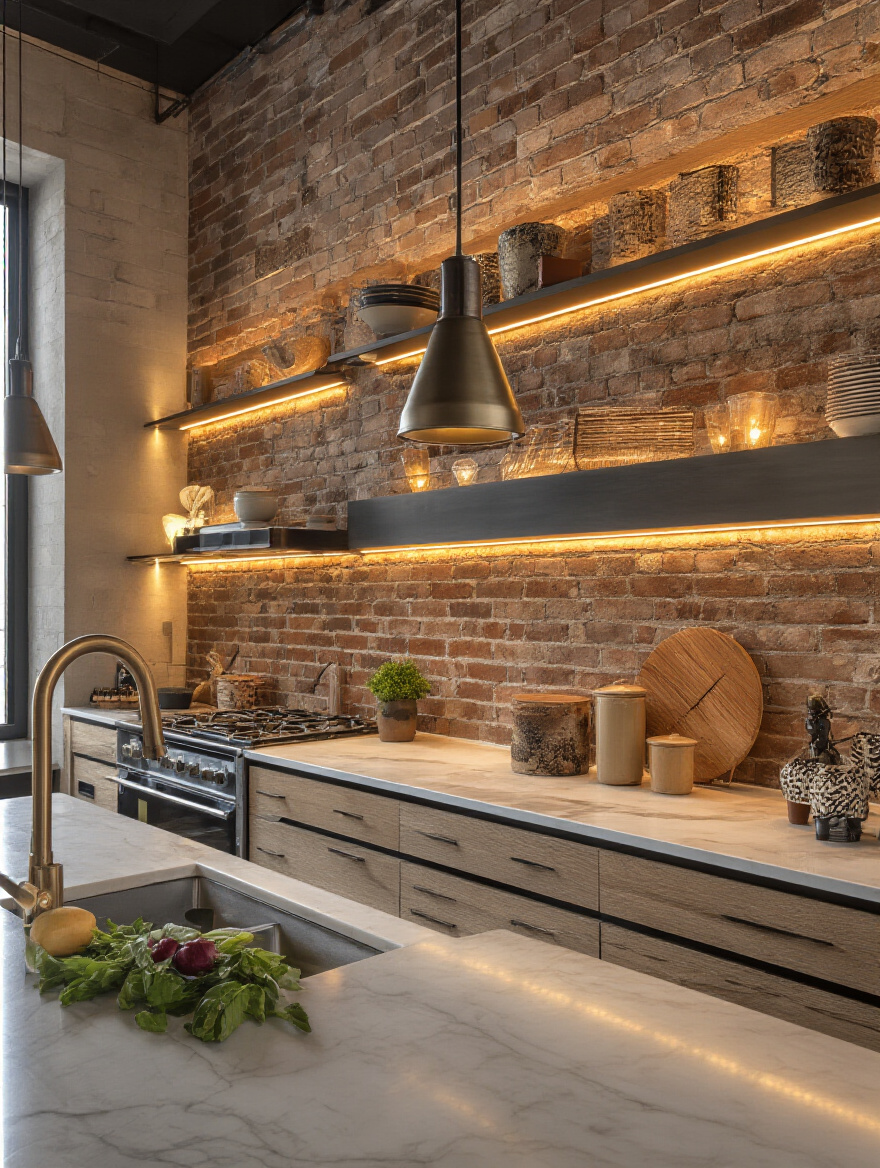
The trick here is subtlety. Accent lighting should be about three times brighter than the surrounding ambient light to really pop, but you don’t want it to be obnoxious. The goal isn’t to flood the feature with light but to highlight it gracefully. Use narrow-beam spotlights and make sure they are on a separate switch or dimmer so you can turn them on in the evening to add drama and depth when the bright task lights are off.
Enhancing Light Quality and Control for Ambiance (Part 2)
Now you’re a master of light quality. But even the best-laid plans can go awry. Let’s talk about the common traps and how to dodge them to keep your lighting scheme from falling flat.
15. Avoid Common Lighting Mistakes That Create Glare, Shadows, or Poor Coverage
The three horsemen of the bad lighting apocalypse are Glare, Shadows, and Splotches. Glare is caused by seeing a bare, exposed bulb—it’s uncomfortable and visually jarring. The fix? Use fixtures with shades or diffusers, or position recessed lights so the bulb is shielded from direct view. Shadows, as we’ve discussed, are your enemy at the countertop. The fix is always dedicated undercabinet task lighting.
Splotchy coverage comes from poorly spaced recessed lights, creating bright spots and dark corners. You want an even wash of light. Instead of just a few super-powerful cans, it’s often better to use more, lower-output cans spaced closer together. And before you commit, test it out. Have someone hold a flashlight where you plan to put a light and stand at the counter. Do you see a shadow? Is it glaring in your eyes? Better to find out now than after the holes are cut.
Installation, Maintenance, and Advanced Considerations (Part 1)
We’re almost done! The final phase is all about making sure your beautiful, functional system stays that way. This involves a little bit of practical know-how for installation and maintenance, plus a smart look toward the future.
16. Adhere to Electrical Codes and Safety Guidelines for Secure Fixture Installation
This is short and simple: Don’t mess with electricity if you don’t know what you’re doing. Seriously. Electrical codes exist to keep your house from burning down. While changing a light bulb is fine, installing new fixtures, especially if it involves running new wires, is a job for a licensed professional.
It’s not just about safety; it’s about insurance and resale value. An unpermitted, DIY electrical job can void your homeowner’s insurance and become a major red flag when you try to sell your house. Pay the professional. It’s the best money you’ll spend on the entire project for peace of mind alone.
17. Implement a Regular Cleaning Schedule to Maintain Fixture Brightness and Appearance
Kitchen light fixtures get disgusting. It’s a fact of life. A sticky, greasy film coats everything over time, and it can seriously dim your light output. You might think your bulbs are dying when really, your fixtures are just dirty. A fixture caked in grime can block up to 30% of its light!
Wipe down your fixtures with a soft cloth and a gentle cleaner every few months. Turn off the power at the breaker first, of course. For glass shades, you can often take them down and wash them in the sink like dishes. It takes five minutes and makes a huge difference in keeping your kitchen feeling bright and clean.
18. Understand Bulb Wattage, Lumens, and Compatibility for Safe Replacements
Forget watts. Watts just measure energy use. The number you need to care about now is lumens, which measures actual brightness. When replacing a bulb, look at the lumens to match the brightness you want. The package will almost always say “800 lumens (60W equivalent)” to help you translate.
The one time you do need to pay attention to wattage is the “Maximum Wattage” label on your fixture. This is a safety rating. You should never, ever exceed it. Luckily, with super-low-wattage LEDs, this is rarely an issue. You could put an LED bulb that’s as bright as a 100W incandescent into a fixture rated for 60W, and because the LED itself only uses about 15 watts, you’re perfectly safe.
19. Troubleshoot Flickering, Dimming, or Non-Functioning Fixture Issues Safely
If a light is acting up, don’t panic. 90% of the time, it’s a simple fix. Before you call an electrician, go through this checklist (after turning the power off at the breaker!). Is the bulb screwed in all the way? Try a new bulb that you know works. Is the dimmer switch compatible with your LED bulb? Is the breaker tripped?
If you’ve checked all the simple things and it’s still not working, that’s when you call for backup. A non-contact voltage tester is a cheap, amazing tool that can tell you if a wire is live without you having to touch anything. It’s a great little gadget to have for basic, safety-first diagnostics.
Installation, Maintenance, and Advanced Considerations (Part 2)
One final thought. Technology is changing fast. Here’s how to make sure your investment today doesn’t feel dated tomorrow.
20. Consider Future-Proofing with Integrated Smart Home Connectivity and Upgradeability
Future-proofing sounds intimidating, but it’s really about making smart choices now so you have options later. When it comes to lighting, this means two things: using fixtures with standard, replaceable bulbs, and ensuring your wiring is ready for smart technology.
Instead of buying recessed lights with a built-in, integrated LED that can’t be replaced, choose fixtures that take a standard socket bulb (like a GU10 or E26 base). That way, in five years when a brighter, more efficient, or color-changing bulb comes out, you can just swap it in without tearing out your ceiling. Also, if you’re renovating, make sure the electrician runs a “neutral wire” to every switch box. Many smart switches require it, and adding it later is a massive pain. Doing this now gives you the freedom to upgrade to any smart system you want down the road.
Conclusion
See? It’s not so complicated when you break it down. It’s about understanding that lighting is an active ingredient in your home’s recipe, not just a passive utility. It’s the tool you use to tell the story of your space—to create focus, to foster relaxation, and to make the heart of your home feel truly alive. You’ve got the secrets now. You understand the ‘why’ behind the choices. So take a look at your kitchen, not just at what’s in it, but at how it’s lit. Start asking how you want it to feel. Don’t be afraid to experiment. You now have the power to shape your environment in a profound way. Go make it shine.


