Picture this: You’re standing in what you think is a hopelessly small kitchen. Maybe it’s a city apartment galley, a charming but cramped cottage kitchen, or just a corner of an open-plan room that feels like an afterthought. You see the limitations. The lack of counter space, the awkward corners, the way you have to choreograph a ballet just to open the fridge and the oven at the same time.
But I want you to see something else. As a curator, my job is to see the potential in a space—to understand its light, its flow, and how the objects within it can create an experience. Your kitchen isn’t a lost cause; it’s a creative challenge. It’s a beautifully constrained canvas that forces you to be deliberate, intelligent, and deeply personal. A truly great small kitchen isn’t about compromise. It’s about curation. It’s about making every single object, every surface, and every inch a masterpiece of function and personal expression. So, let’s reframe the problem and start creating something extraordinary.
Foundational Planning & Smart Budgeting
Before we even think about tile or paint, we need to do the unglamorous but essential work. Think of this as stretching the canvas and sketching the composition. Get this right, and the beautiful part—the part where it all comes to life—becomes effortless. Mess it up, and you’re painting on a lumpy, unstable surface.
1. Define Your Kitchen’s Functional Zones Before Design
You know how everyone talks about the “work triangle”? Forget the work triangle. That’s generic gallery advice. The real question is, what is your dance? Where do you pivot from the sink with a handful of wet kale? Where do you set down the hot pan when it comes off the stove? These are your zones, your unique choreography, and they are everything. This is about observing yourself and designing a space that supports your natural movement, not forcing yourself into a textbook diagram.
Before you choose a single finish, map out where you will prep, cook, clean, and store. In a small space, this isn’t just about efficiency; it’s about creating a sense of calm. When your knives are beside your cutting board, which is next to the sink, the frantic energy of cooking just melts away. I had a client once who insisted on placing their espresso machine across the kitchen because it “looked better.” They spent a month miserably sloshing milk across the floor before we moved it. Design for your life, not for a photograph.
And once you’ve laid out the horizontal flow, don’t forget the vertical. It’s time to build your budget.
2. Establish a Realistic Budget Early to Avoid Surprises
Can we talk about the most important, least artistic part of any creative project? The budget. It’s the frame for your artwork. It defines the boundaries. And without it, your beautiful vision can spiral into a crisis of compromises and regret. Setting a realistic budget from the very beginning is the kindest thing you can do for your future self. It turns a thousand dizzying choices into a manageable, focused path forward.
And here’s the secret no one wants to admit: You need a contingency fund. I’m not talking about a “maybe if there’s money left over” fund. I mean a real, 15-20% chunk of your budget, walled off and untouchable. This isn’t for a fancier faucet; it’s for the ninety-year-old plumbing you discover behind a wall. It’s for the mold, the weird wiring. I once watched a client blow their entire fund for high-end appliances because they didn’t have a contingency, and the cost of unexpected electrical work meant they ended up with a gorgeous oven in a half-finished kitchen for six months. Don’t do that.
With your budget firmly in hand, you now have the power to decide what truly matters.
3. Prioritize Must-Have Features for a Focused Remodel
A small space demands brutal honesty. You can’t have it all. This is the moment to channel your inner editor and curate your priorities. What are the things that will fundamentally change how you experience your kitchen? This isn’t about fleeting trends you saw on Instagram. It’s about solving your deepest frustrations with the current space. Is it the desperate lack of counter space? The soul-crushing darkness? The single drawer that holds all your utensils in one chaotic jumble?
Make two lists: ‘The Absolute Needs’ and ‘The Beautiful Wants.’ The Needs are non-negotiable—a functional layout, safe electrical, enough storage so you’re not storing pots in the bathroom. The Wants are the high-end faucet or the specific marble countertop. Fund all of your Needs first. Only then can you see what’s left for a Want. This focused approach is what separates a frustrating project from a satisfying one. It ensures you’re spending money on what will bring you daily joy and utility, not just temporary sparkle.
Now that you have your vision, you have to make sure it can actually be built.
4. Investigate Necessary Permits and Local Building Codes
I know. Permits sound like the death of all creative fun. They feel like bureaucracy for the sake of it. But let me reframe it for you: Permits are the gallery’s insurance policy for your masterpiece. They ensure your beautiful kitchen won’t cause a fire, flood the apartment below you, or devalue your home when you try to sell it because a savvy inspector spots the unpermitted work from a mile away.
Here’s the thing they don’t tell you: you need a permit for almost anything that involves moving plumbing or electrical. Changing a faucet? Probably not. Moving the sink three feet to the left? Almost certainly. A friend of mine did a “minor” DIY remodel and skipped the permits to save a few hundred bucks. When they sold their condo, the buyer’s inspection flagged the electrical work. Their deal nearly collapsed, and they had to pay a contractor triple the normal rate to rip open the walls and have it all redone, inspected, and approved on a rush timeline. Don’t learn that lesson the hard way. Call your local building department. It’s a boring 30-minute phone call that can save you five-figure headaches.
Think of it as the responsible, grown-up part of the process, a prerequisite before you can bring in the true artists.
5. Consult Kitchen Design Professionals for Expert Guidance
Even as a curator with a trained eye, I would never try to light a complex sculpture without a lighting designer. You hire a professional not because you lack vision, but because they have a specific, technical expertise that will elevate your vision into a stunning reality. A good kitchen designer, especially one who specializes in small spaces, is an alchemist. They see potential in millimeters. They know how to bend light, create flow, and solve spatial puzzles you didn’t even know you had.
People think hiring a designer is an extravagance, but that’s completely wrong. A great designer saves you money. They stop you from making costly mistakes. They have access to materials and solutions you’ve never heard of. They’ll be the ones to suggest a 4-inch wide pull-out pantry for your spices, freeing up an entire cabinet. They’ll know that the counter-depth fridge from that one brand is a quarter-inch narrower and will fit perfectly. They are the ultimate shortcut to a better result.
Now, let’s get into the magic. Let’s start transforming this small space with some truly ingenious moves.
Ingenious Space Optimization & Storage Solutions
This is where the artistry begins. In a small kitchen, storage isn’t just about putting things away; it’s about revealing and concealing. It’s about turning practical needs into moments of visual delight and surprise. It’s a game of illusions, where we make the space work and feel exponentially larger than it is.
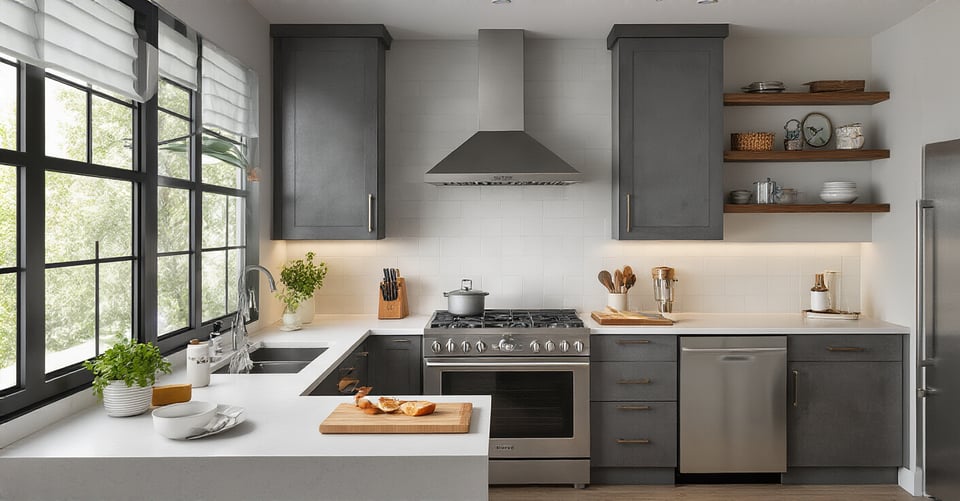
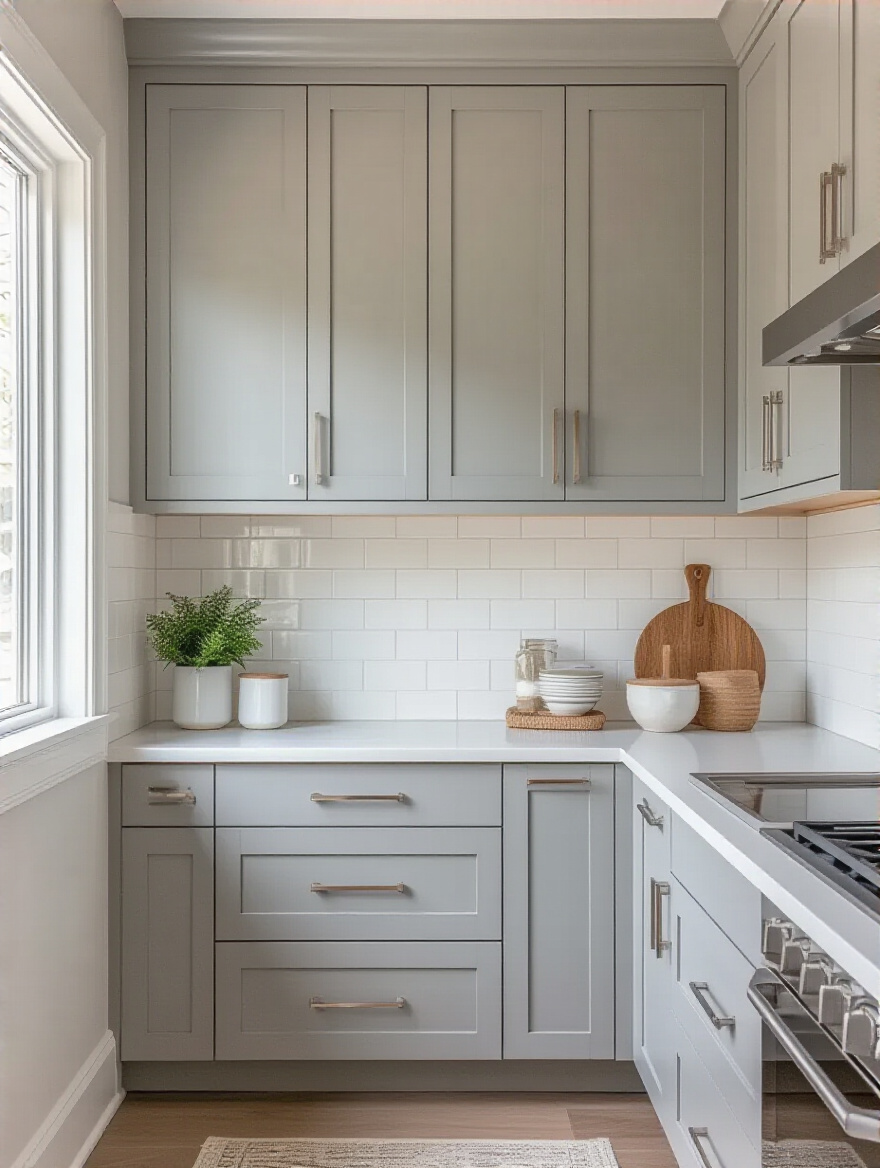
6. Embrace Vertical Storage with Floor-to-Ceiling Cabinetry
The most powerful illusion in any small space is to draw the eye upward. When you run your cabinetry from the floor all the way to the ceiling, you’re doing more than just gaining storage for your turkey platter and seasonal dishes. You’re creating a strong, clean vertical line that makes the entire room feel taller, grander, and more architectural. The dusty, awkward gap above traditional cabinets is visual clutter. Eliminating it creates a seamless, custom, and monolithic look that feels intentional and luxurious.
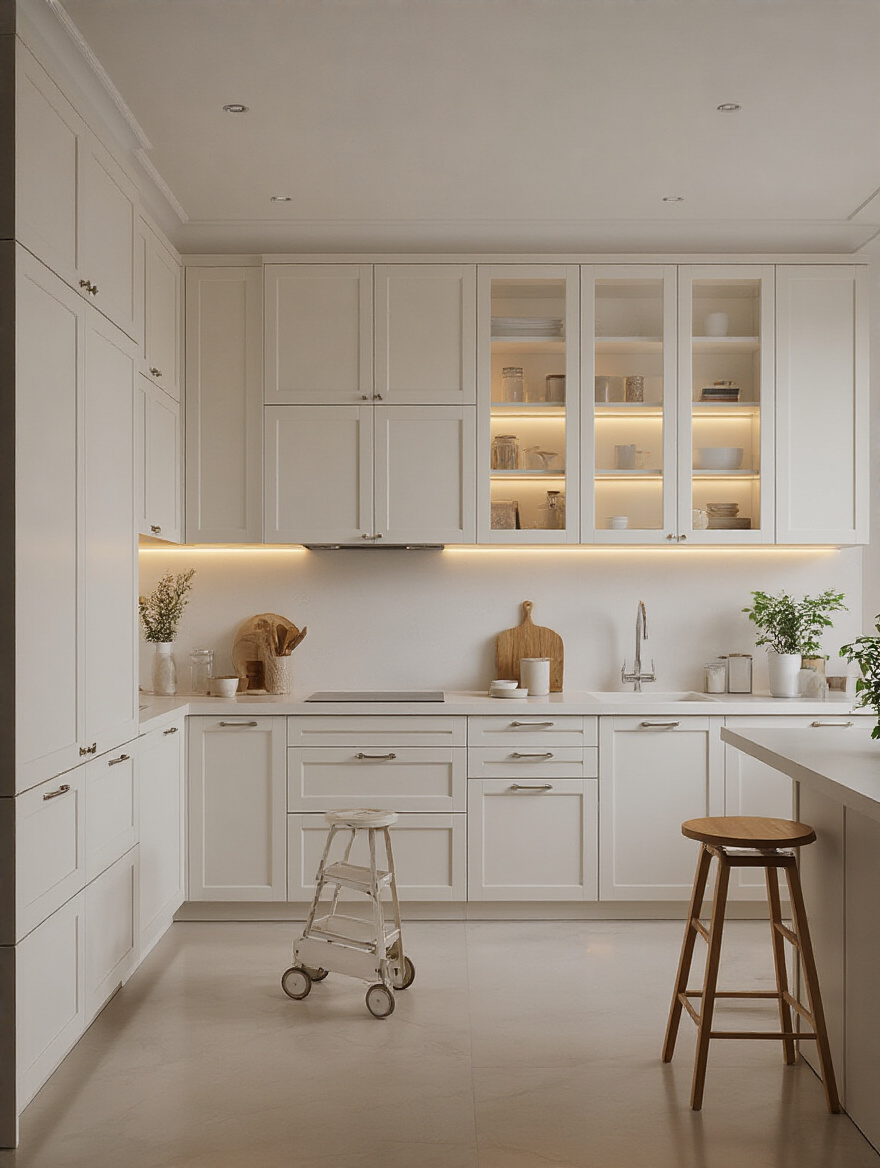
Think of it as creating a full-bleed photograph versus one with an awkward border. The effect is immediate and profound. A client of mine with a tiny, 8-foot ceiling kitchen felt completely boxed in. We replaced her standard uppers with floor-to-ceiling cabinetry painted the same light color as the walls. The room instantly felt like it had gained two feet in height. It was the single most transformative decision we made, turning a cramped box into a soaring, light-filled space.
With the vertical plane established, let’s look inside at how to make every cubic inch count.
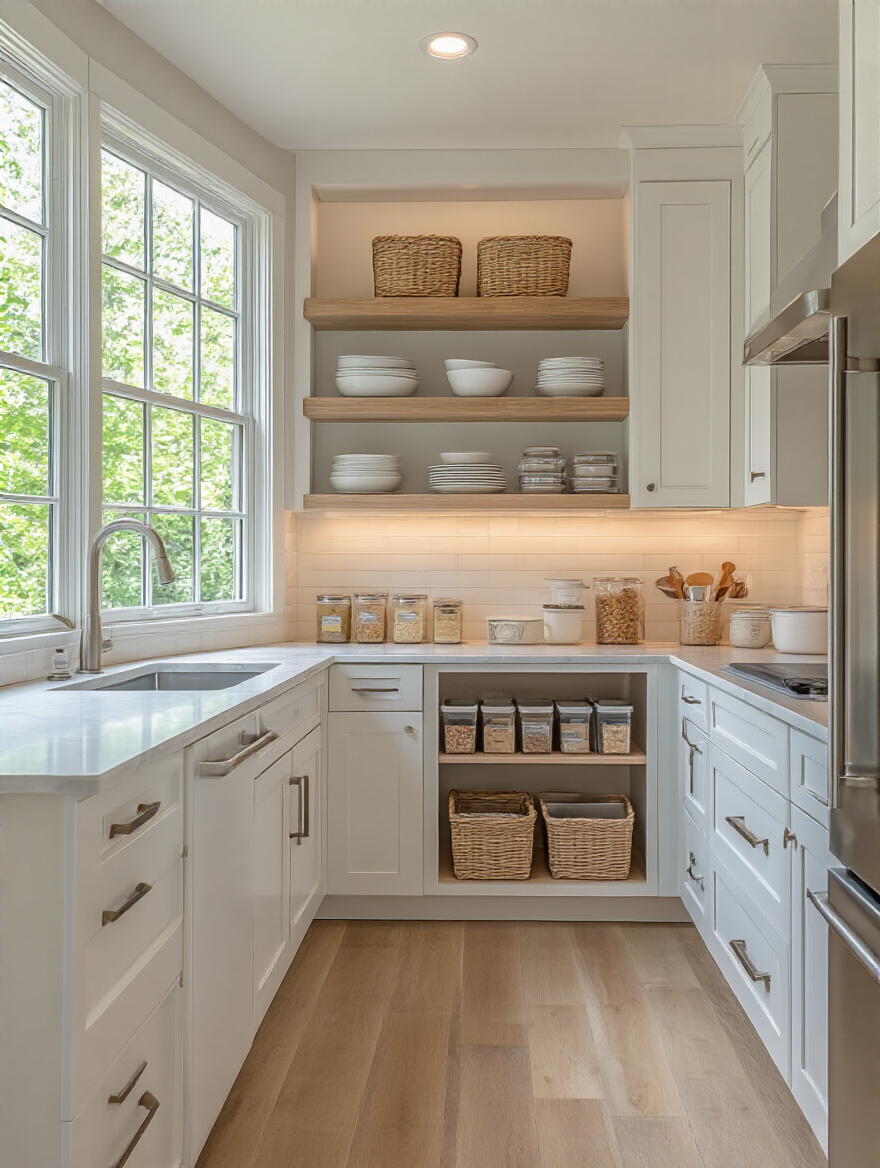
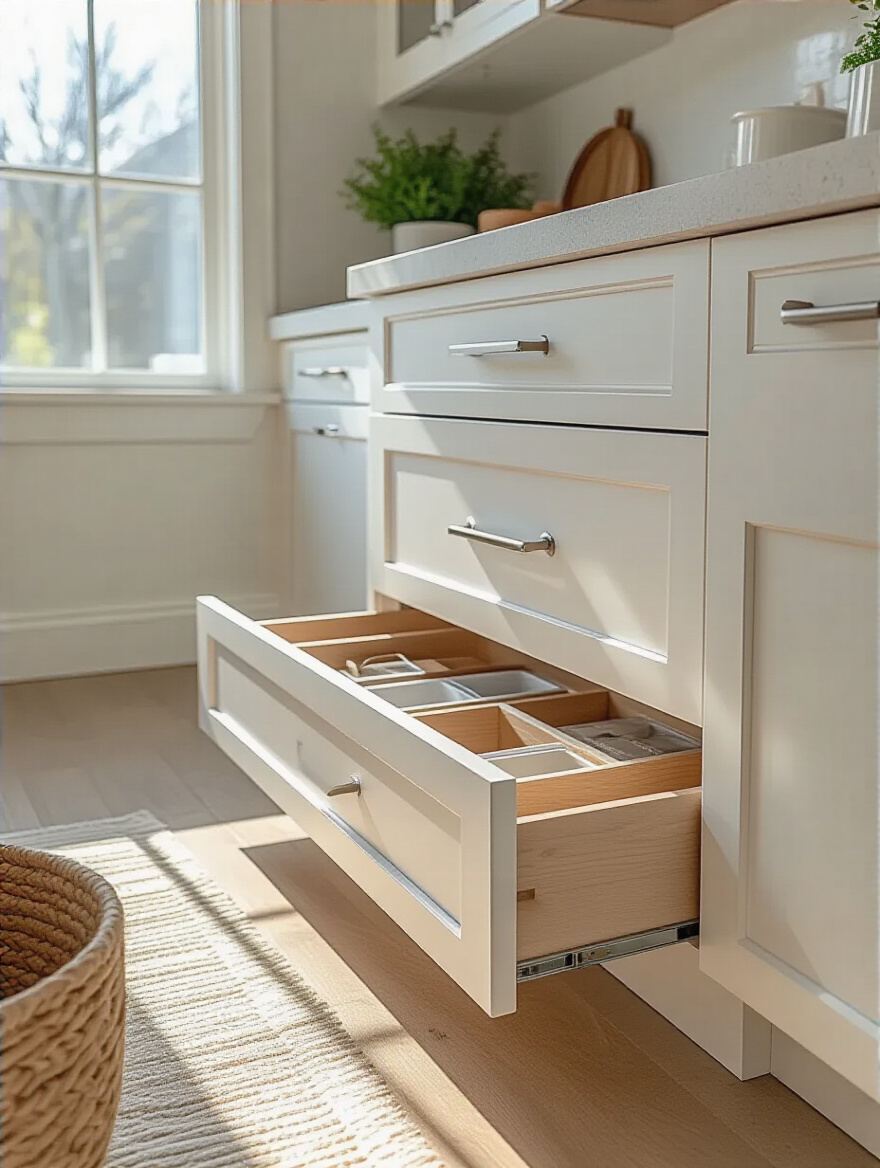
7. Install Pull-Out Drawers for Accessible Pantry Organization
Can we all agree to ban deep, fixed pantry shelves? They are chaotic black holes where jars of pesto and cans of chickpeas go to expire in darkness. Installing pull-out drawers is less of an upgrade and more of a sanity-saving necessity. It’s the difference between a frustrating archeological dig and an effortless, library-like system where every single item presents itself to you with a gentle pull. It’s about total visibility and accessibility.
This isn’t just for pantries, either. You can retrofit them into any deep base cabinet. I did this in my own kitchen and it was a revelation. The cabinet where I used to stack my pots and pans—requiring me to get on my knees and unstack the entire pile to get to the one at the bottom—is now a set of two deep pull-out drawers. One holds pots, the other lids. It’s organized, it’s ergonomic, and it turns a moment of daily frustration into a moment of calm efficiency.
From fixed storage, let’s pivot to a solution that’s all about movement and flexibility.
8. Integrate Multi-Functional Furniture Like a Rolling Island
I love things that are not what they first appear to be. A rolling island is the kinetic sculpture of your kitchen. One moment, it’s a dedicated prep station, giving you that precious extra counter space you crave. An hour later, it’s a bar for serving drinks to friends. The next morning, it’s a breakfast spot for two. Its genius lies in its ability to transform the function and composition of your room on a whim.
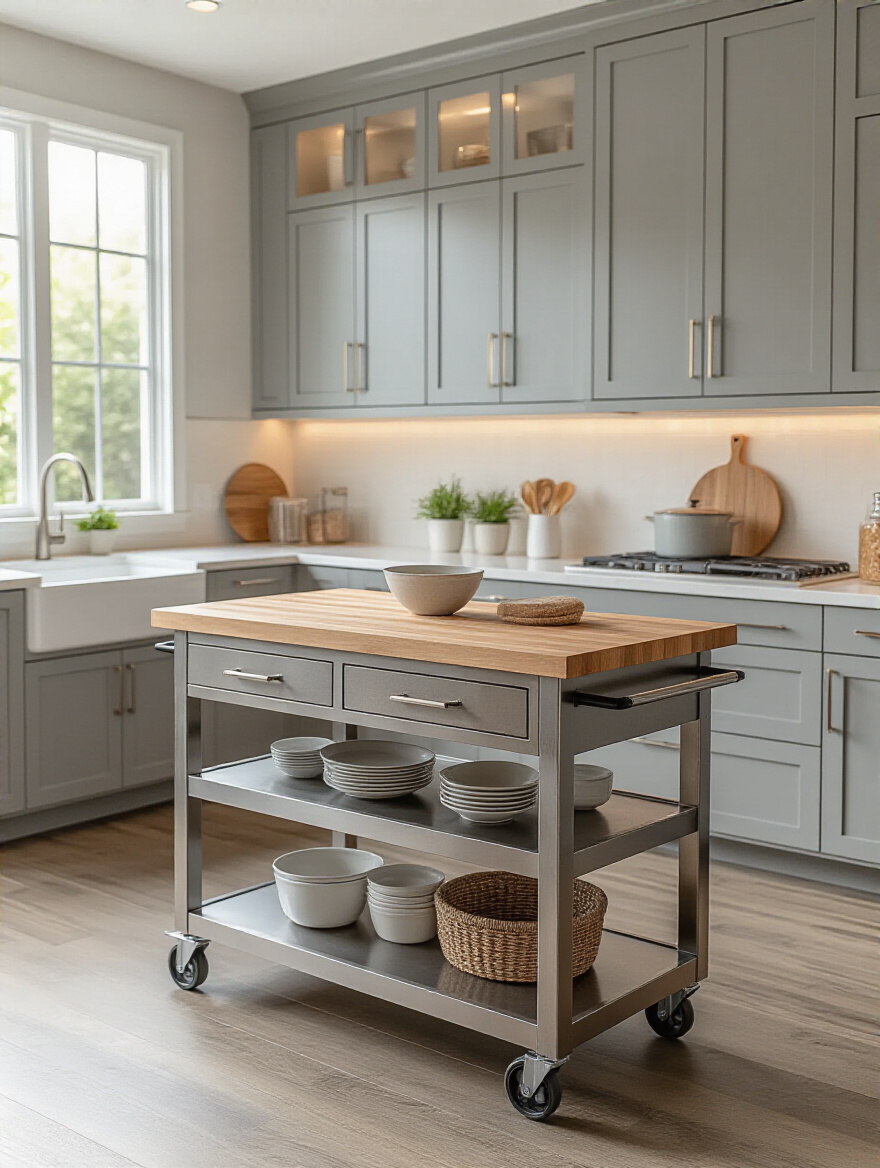
In a small kitchen, a fixed island can be a brutal obstacle, ruining your flow. A rolling island, however, gives you options. You can tuck it against a wall when you need open floor space, or float it in the center when you’re cooking. A friend in a studio apartment has one that serves as a kitchen island, a desk for working from home, and a dining table for four. It’s the hardest-working piece of art in her home. When you choose one, look for locking wheels—that’s non-negotiable—and a material that complements your aesthetic, like a warm butcher block or a cool, industrial stainless steel.
That solves the middle of the room. But what about those notoriously difficult edges?
9. Utilize Corner Cabinet Solutions for Maximum Efficiency
The blind corner cabinet: the Bermuda Triangle of the kitchen. It’s where Tupperware lids and obscure wedding-gift appliances go to disappear forever. But what if we thought of it not as a problem, but as an opportunity for some beautiful mechanical engineering? Modern corner solutions are no longer just a rickety Lazy Susan. They are works of art in their own right.
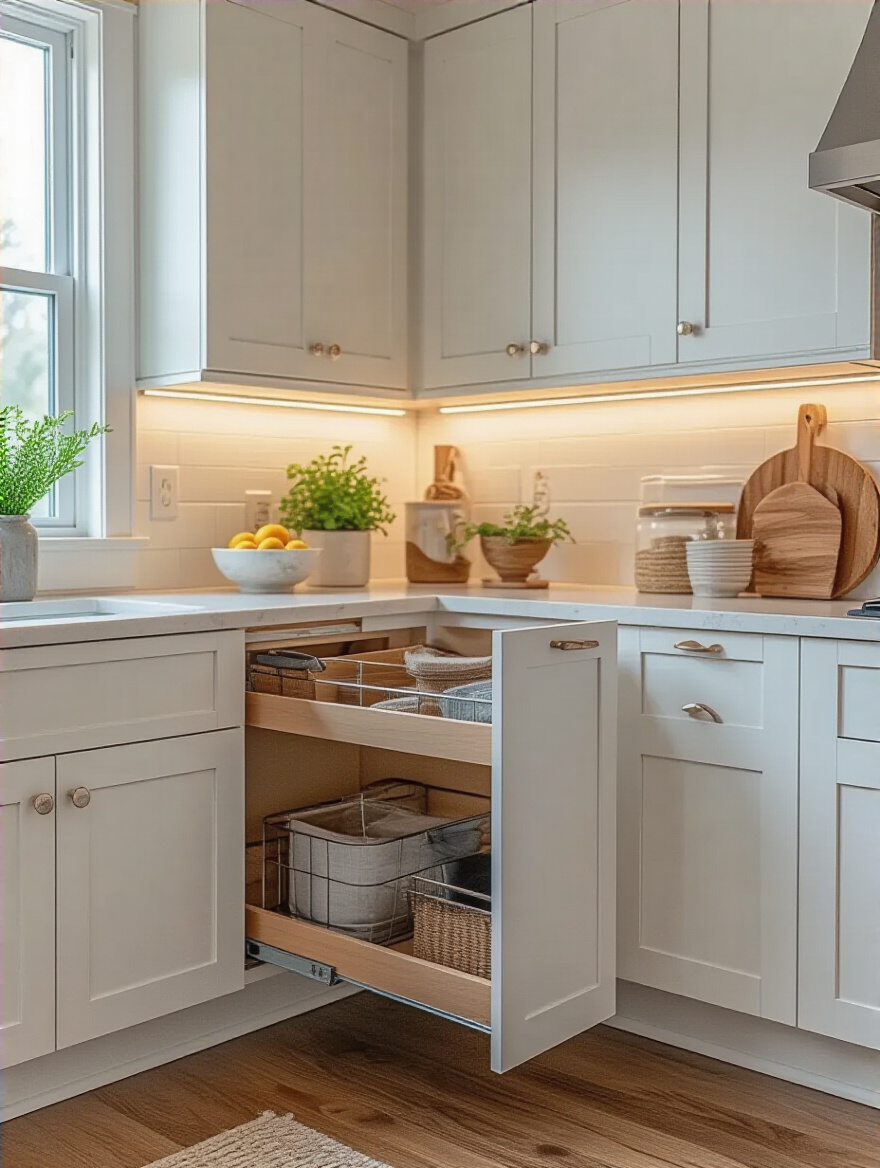
The gold standard is a pull-out system like a LeMans unit, where the shelves swing out gracefully from the dark recess of the corner and glide directly in front of you, presenting their contents in the light. It’s an elegant, satisfying movement that transforms the most frustrating part of a kitchen into one of the most functional. Yes, they’re an investment, but when you consider that they can reclaim 80% of an otherwise useless space, the value becomes immediately clear. It’s about turning a dead zone into a powerhouse of intelligent storage.
From big corners, let’s zoom in on the impossibly small gaps.
10. Add Slim Pantry Pull-Outs for Awkward Narrow Gaps
Every now and then, a design solution comes along that is so simple and so brilliant, you can’t believe it wasn’t always a standard. The slim pull-out pantry is one of those. You know that 6-inch gap between your fridge and the wall? The one that just collects dust bunnies and dropped spaghetti noodles? That is prime real estate. It’s a hidden column of space just waiting to be activated.
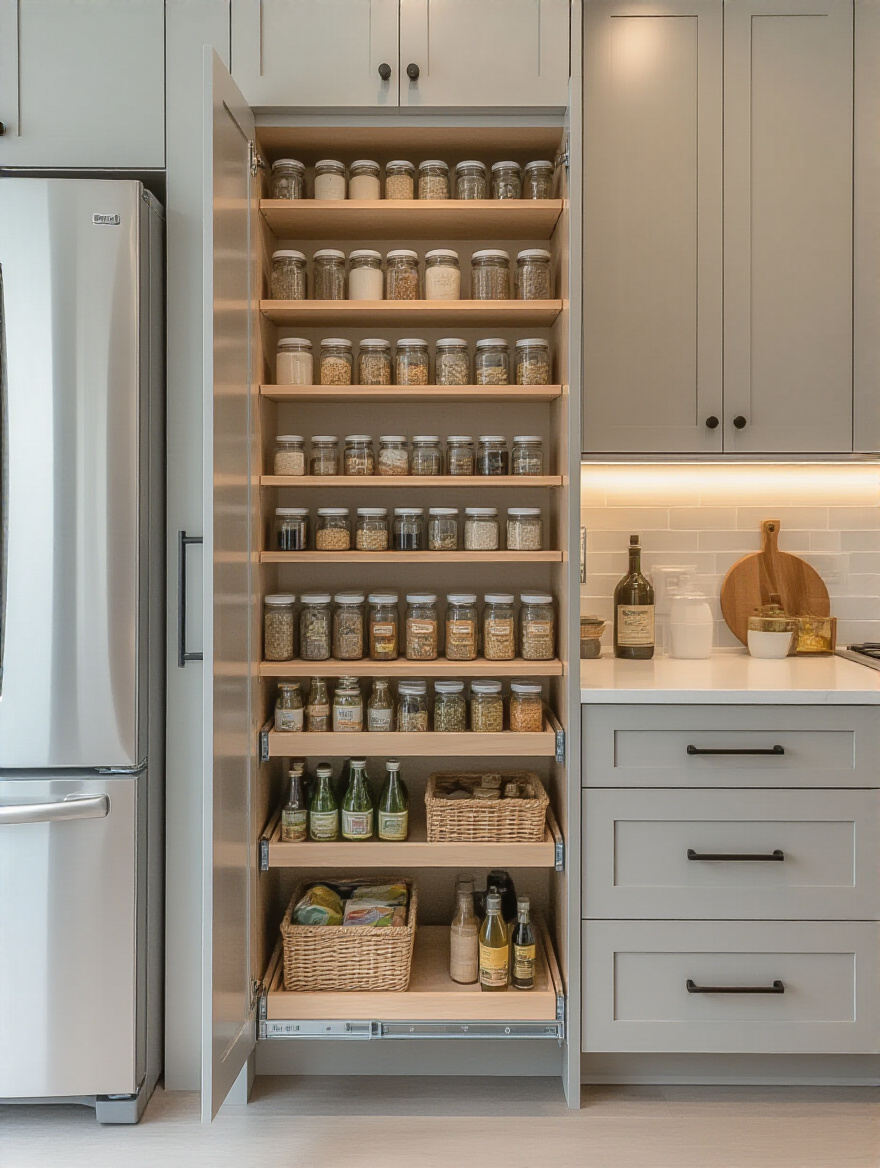
These tall, narrow units slide out to reveal rows of perfectly organized spices, oils, and vinegars, all within arm’s reach of the stove. Or use one for cutting boards and baking sheets. It’s an act of design magic, conjuring an incredible amount of functional storage from a space you had already written off as useless. It’s the ultimate “aha!” moment in small kitchen design, and it’s one of the most satisfying ways to prove that every single inch truly does count.
Now, for a more visible and highly curated approach to storage…
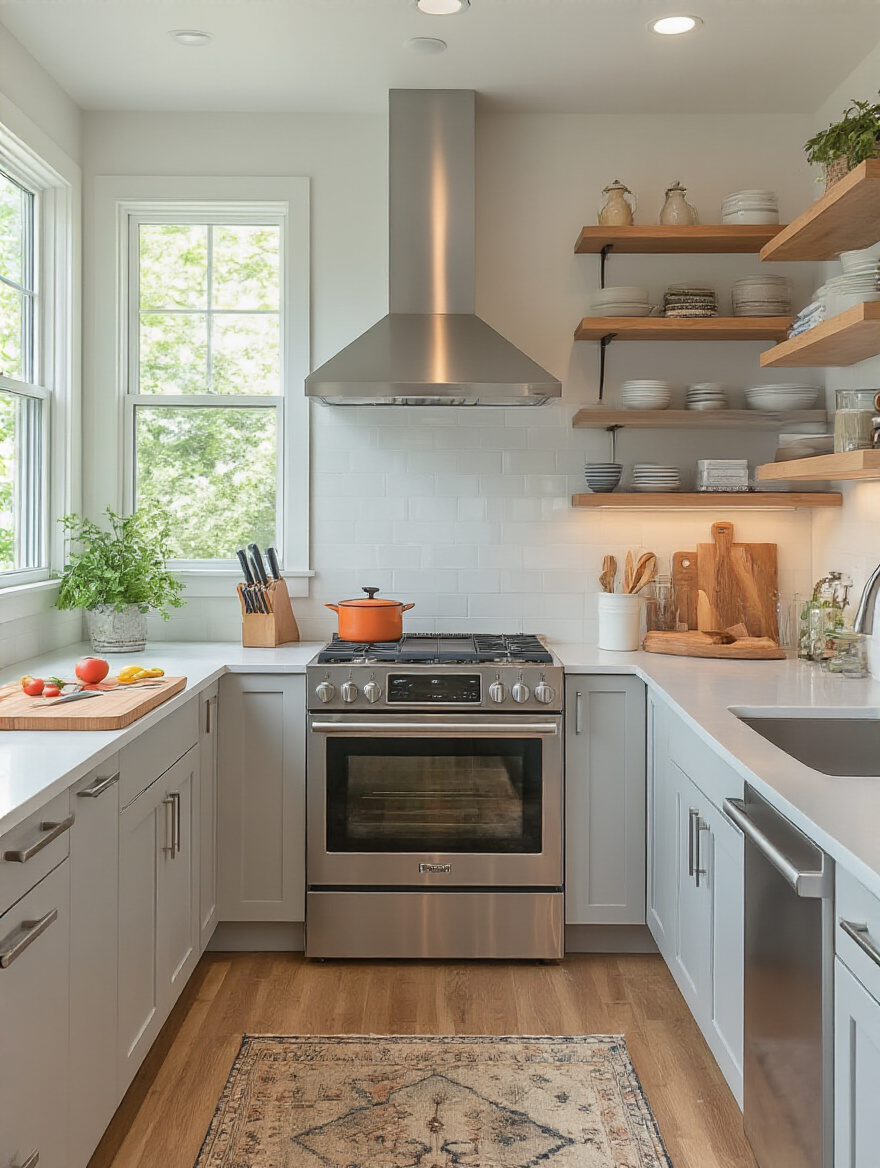
11. Maximize Wall Space with Strategic Open Shelving
Okay, let’s talk about open shelving. Done right, it is breathtaking. It makes a kitchen feel airy, personal, and alive. Done wrong, it’s a cluttered, dusty nightmare. The secret is in the word “strategic.” This is not an excuse to dump everything you own onto a plank of wood. This is an exercise in curation. You are creating a living still life with your most beautiful and most frequently used objects.
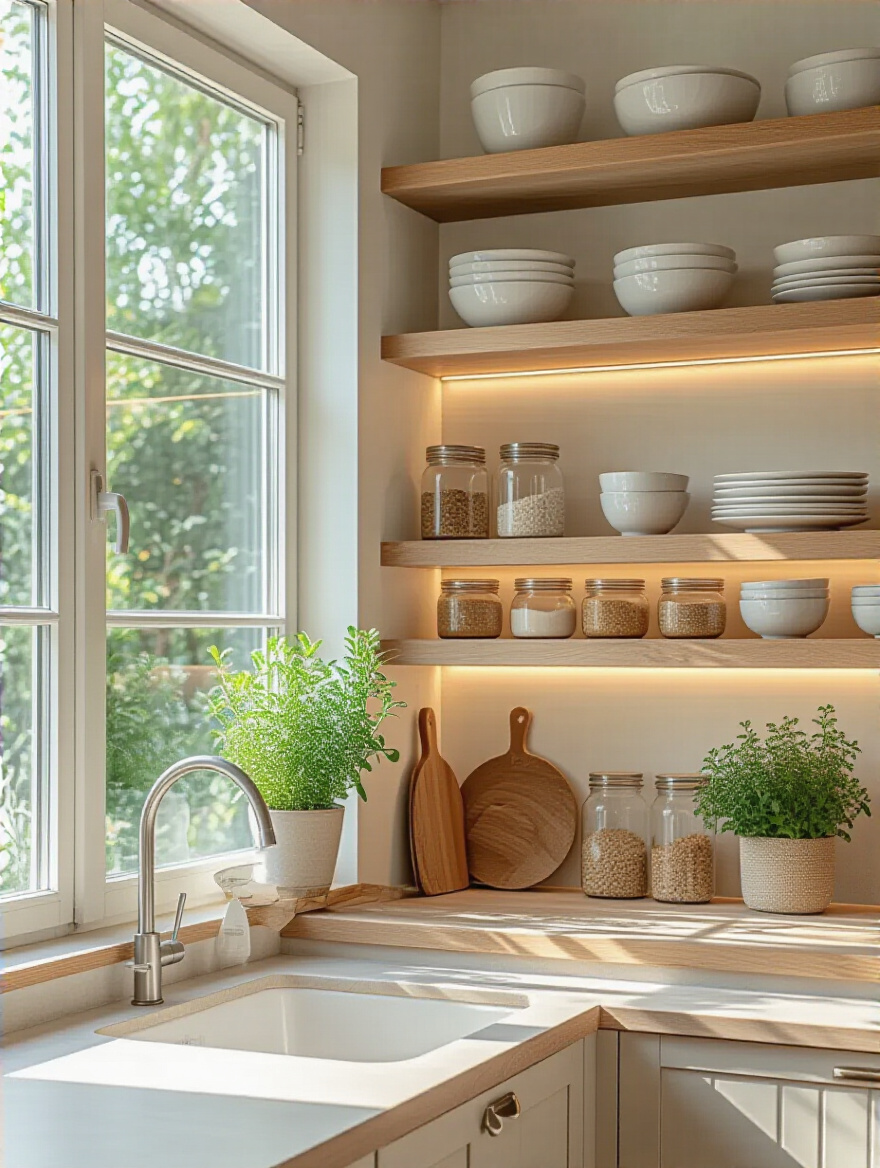
Here are the rules: First, edit ruthlessly. If it’s not beautiful or used daily, it doesn’t make the cut. Your everyday ceramic dishes, your collection of coffee mugs, your most-used cookbooks—yes. The plastic party cups and the chipped blender—no. Second, less is more. One or two long, substantial shelves look infinitely more sophisticated than a clutter of small, flimsy ones. This is your chance to turn storage into a statement, to display your personality, and to make your most-used items incredibly accessible. It’s a bold move that replaces visual bulk with light and air.
For a more secretive approach, we look to the ground.
12. Incorporate Toe-Kick Drawers for Hidden Extra Storage
If you think you’ve maximized every possible inch, look down. That 4-inch-high space at the very bottom of your base cabinets—the toe-kick—is the final frontier of hidden storage. Most people see it as just a structural necessity. I see it as a secret drawer. It’s the perfect, clandestine spot for the things you don’t need often but don’t want taking up prime real estate.
Think about it: shallow baking sheets, serving platters, a foldable step stool for reaching those high shelves, even a hidden pull-out for pet food bowls. I love using push-to-open hardware on them, so they become completely invisible, seamless panels. It’s a detail that feels custom, clever, and immensely satisfying. It’s that final touch that says this space has been considered down to the last millimeter.
With your storage optimized, it’s time to choose the materials that will bring the whole composition together.
Strategic Design Elements & Material Choices
This is where we play with light, color, and texture to create feeling and manipulate perception. Choosing the right materials for a small kitchen isn’t just about durability; it’s about making the space feel brighter, bigger, and more refined. Every surface is an opportunity to add to the story.
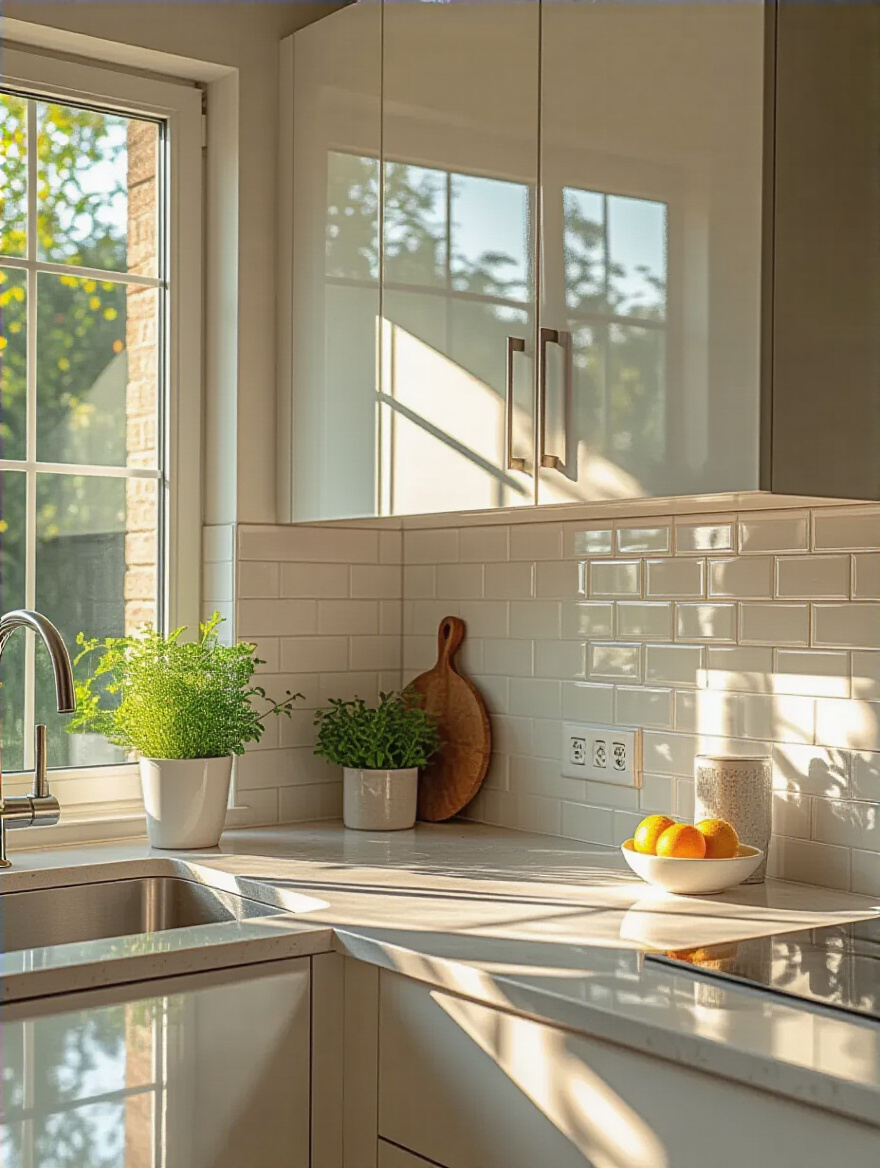
13. Choose Light, Reflective Colors to Visually Expand Space
This is the oldest trick in the book because it works. There is a reason art galleries are painted white. It’s not because curators are boring; it’s because white is a light machine. It bounces light around a room, making walls recede and ceilings lift. In a small, dark kitchen, painting the walls, ceiling, and even the cabinets in a palette of whites, pale greys, and soft neutrals is the most powerful move you can make to instantly expand the sense of space.
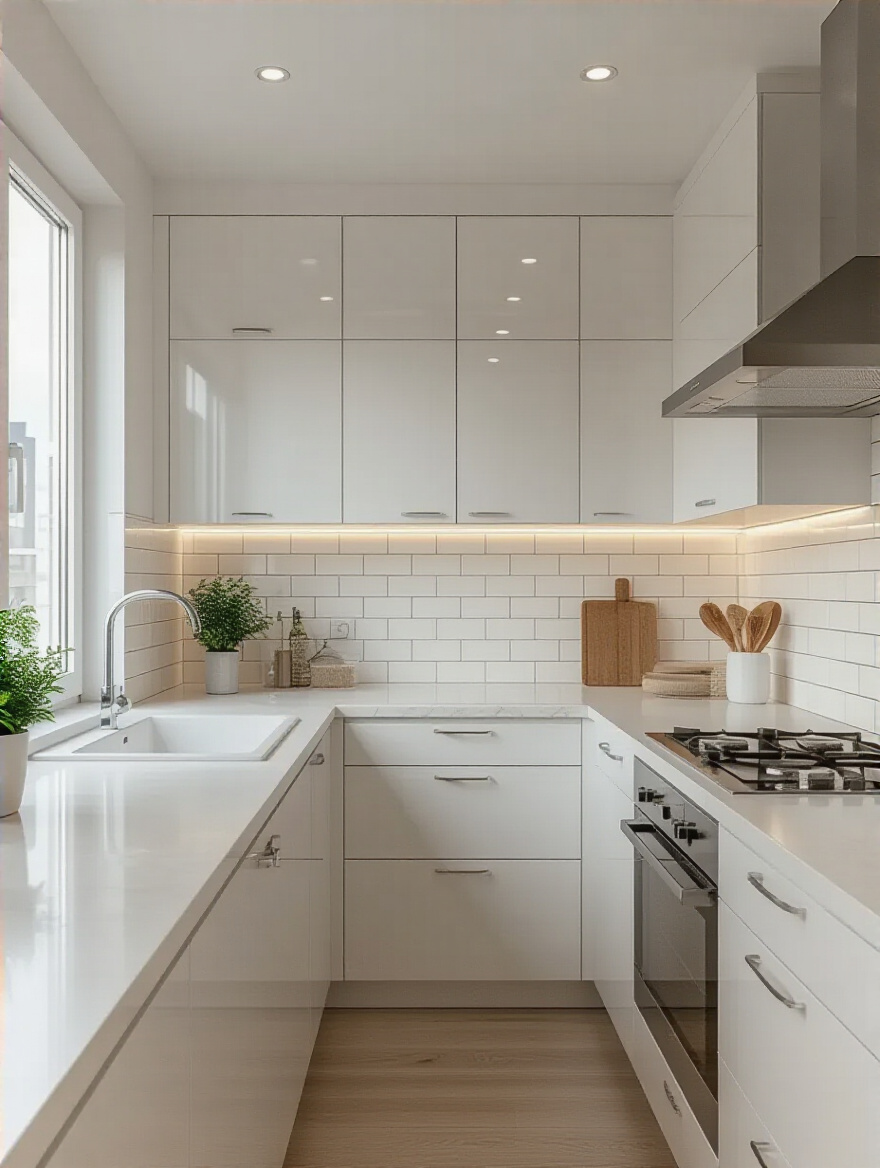
But light and bright doesn’t have to mean sterile. The key is to layer textures within that light palette. A matte white cabinet next to a glossy white tile, a polished white quartz countertop, a piece of light-toned wood—these subtle shifts create depth and interest. The color provides the canvas, and the materials provide the soul. It’s a quiet, sophisticated backdrop that makes everything else—the vibrant food you’re cooking, the art on the wall, the people in the room—the focus.
Of course, a light palette needs something to reflect. That’s where lighting comes in.
14. Install Adequate Task Lighting for Brighter Workspace Zones
You can have the most beautiful kitchen in the world, but if you’re chopping carrots in your own shadow, it’s a failure. Lighting isn’t an accessory; it is a core functional element. A single, sad overhead fixture is a recipe for a dreary, inefficient space. You need layers of light, and the most critical layer in a kitchen is task lighting. This is the focused, brilliant light aimed directly at your work surfaces.
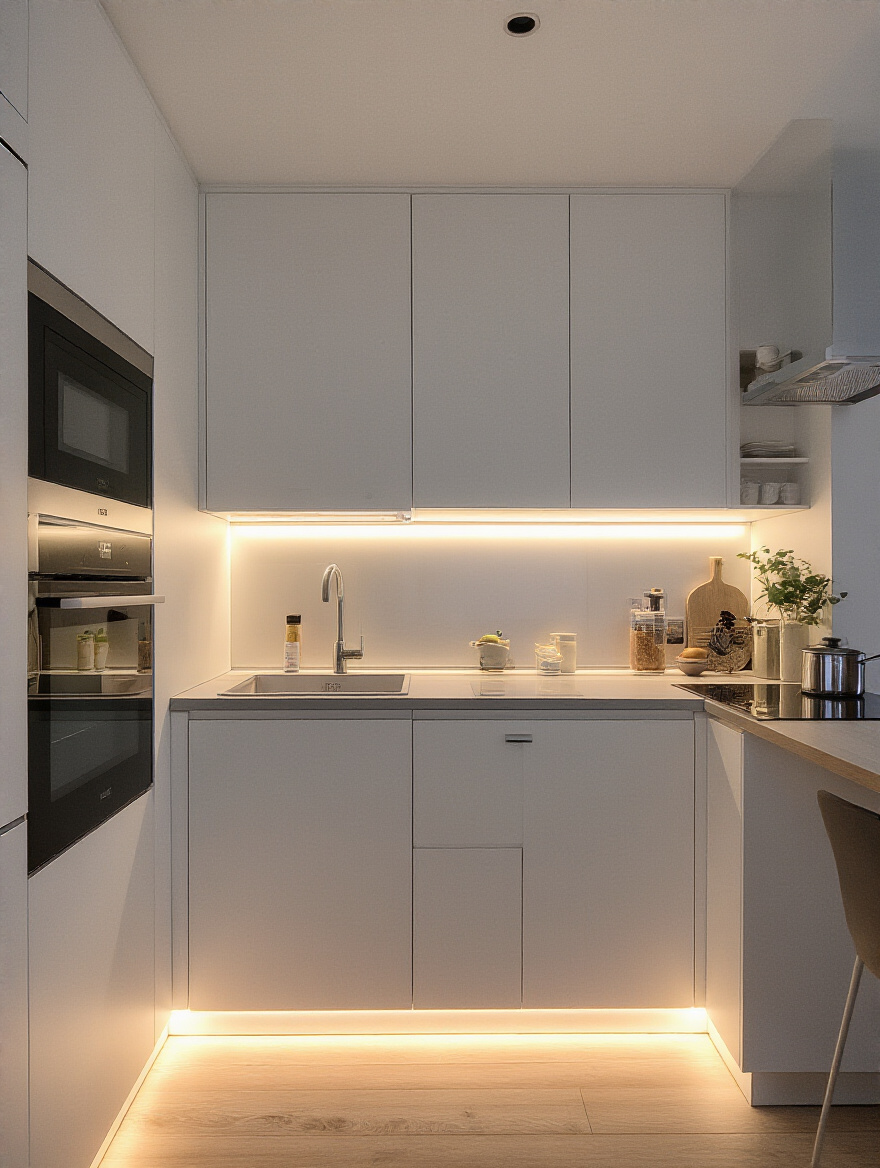
The hero of kitchen task lighting is the under-cabinet LED strip. It’s a simple, relatively inexpensive addition that is utterly transformative. It washes your countertops in a clean, even glow, eliminating shadows and making prep work safer and more pleasant. Suddenly, every inch of your counter is a viable, brilliant workspace. Think of it like spotlighting the art in a gallery. You’re drawing attention to the most important areas, creating focus and depth, and making the entire space feel more dynamic and alive.
Next, we address the biggest players in the kitchen composition: the appliances.
15. Select Smaller-Scale, Integrated Appliances to Save Room
The visual noise of a hulking, mismatched refrigerator can kill the vibe of a small kitchen faster than anything. The solution is to go European: smaller, smarter, and seamlessly integrated. Choosing compact, 24-inch appliances, especially counter-depth or fully-integrated, panel-ready models that disappear behind your cabinetry, is a game-changer. It creates a clean, uninterrupted plane that calms the eye and makes the whole space feel more cohesive and expansive.
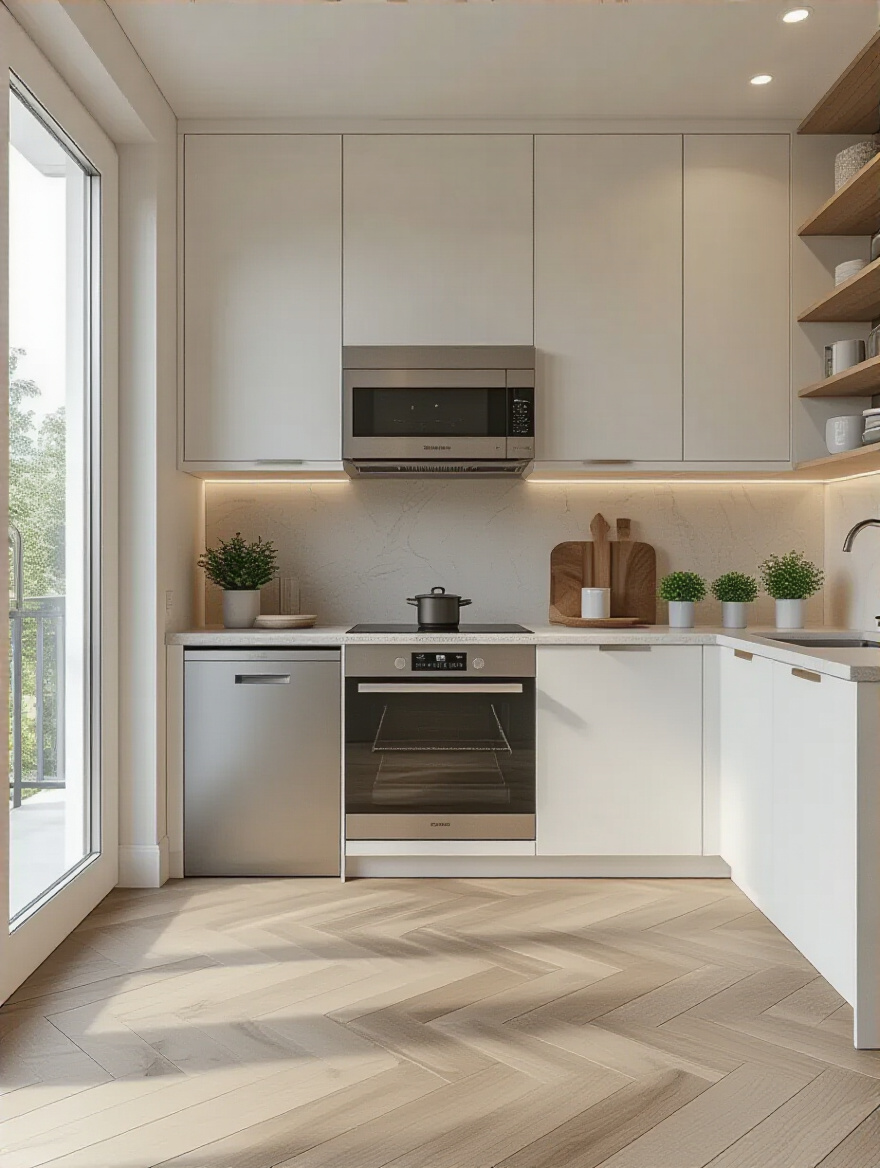
Yes, a smaller fridge means you can’t buy groceries for a family of six for a month. But for many households, it’s a more than welcome trade-off for reclaiming precious inches and creating a streamlined aesthetic. It forces you to be more intentional about your shopping, which can even reduce food waste. Look for smart, multi-functional pieces like a speed oven that combines a convection oven and a microwave, or dishwasher drawers that offer flexibility. It’s about choosing elegance and integration over sheer, bulky size.
That sleek line of integrated cabinetry needs a surface that can perform.
16. Opt for Durable, Low-Maintenance Countertops Like Quartz
Your countertop is the workhorse of your kitchen. In a small space, every square inch of it will be used for everything from a brutal chopping session to a delicate pastry project. This is not the place to choose a precious, high-maintenance material that will stain if you look at it sideways. You need something archival-quality, something that can stand up to real life. For this, engineered quartz is king.
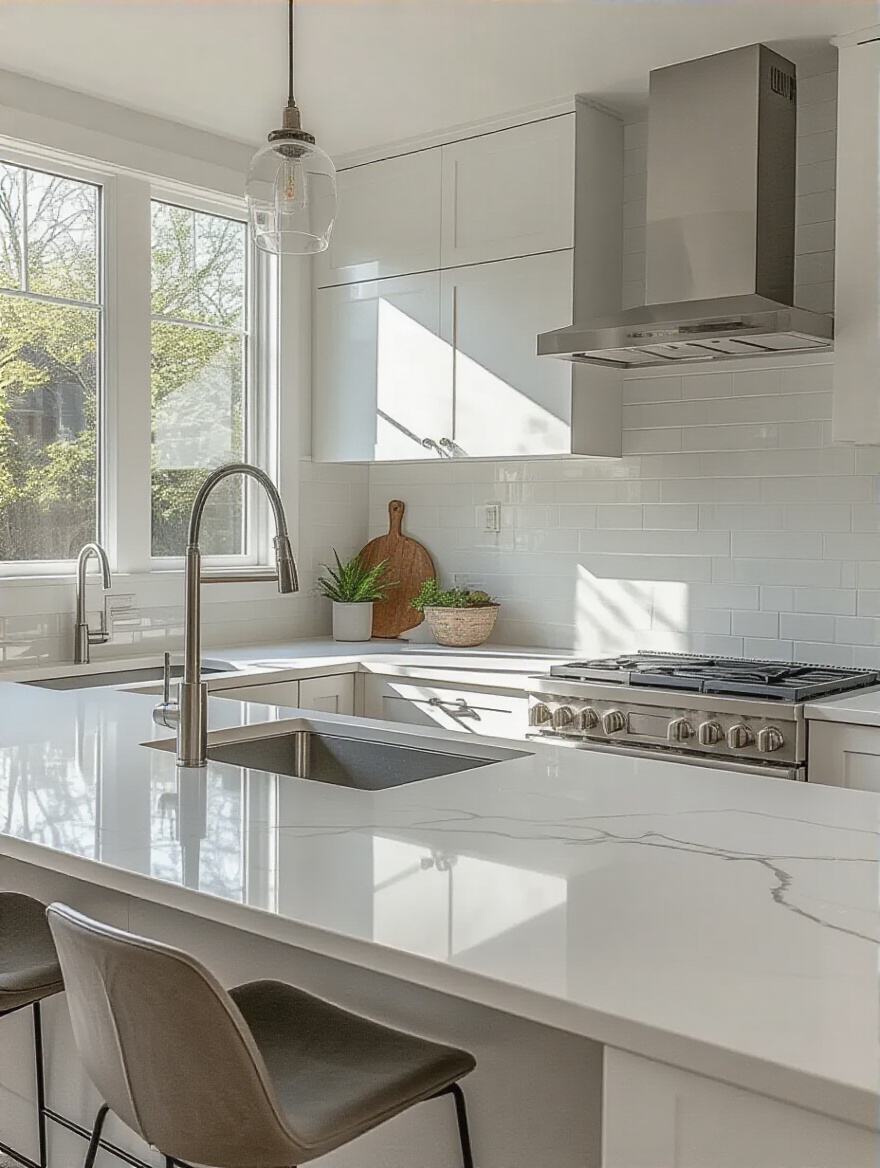
Unlike marble, which is porous and can etch and stain, quartz is non-porous, practically indestructible, and requires zero sealing. You can spill red wine or turmeric on it and just wipe it clean. This peace of mind is priceless. It allows you to actually live in your beautiful new kitchen without being in a constant state of panic. And with today’s technology, you can find quartz that mimics the subtle beauty of natural stones, giving you both a bomb-proof surface and a sophisticated aesthetic.
Now for a detail that elevates the whole sink area from utilitarian to sculptural.
17. Incorporate a Wall-Mounted Faucet for Cleaner Countertops
This is one of my favorite high-impact design moves. Mounting the faucet on the wall behind the sink, rather than on the countertop, does two brilliant things. First, it frees up that little bit of precious counter space, creating a clean, uncluttered look. But more importantly, it eliminates that grimy, hard-to-clean seam where the base of a traditional faucet meets the counter. It is functionally superior and infinitely more elegant.
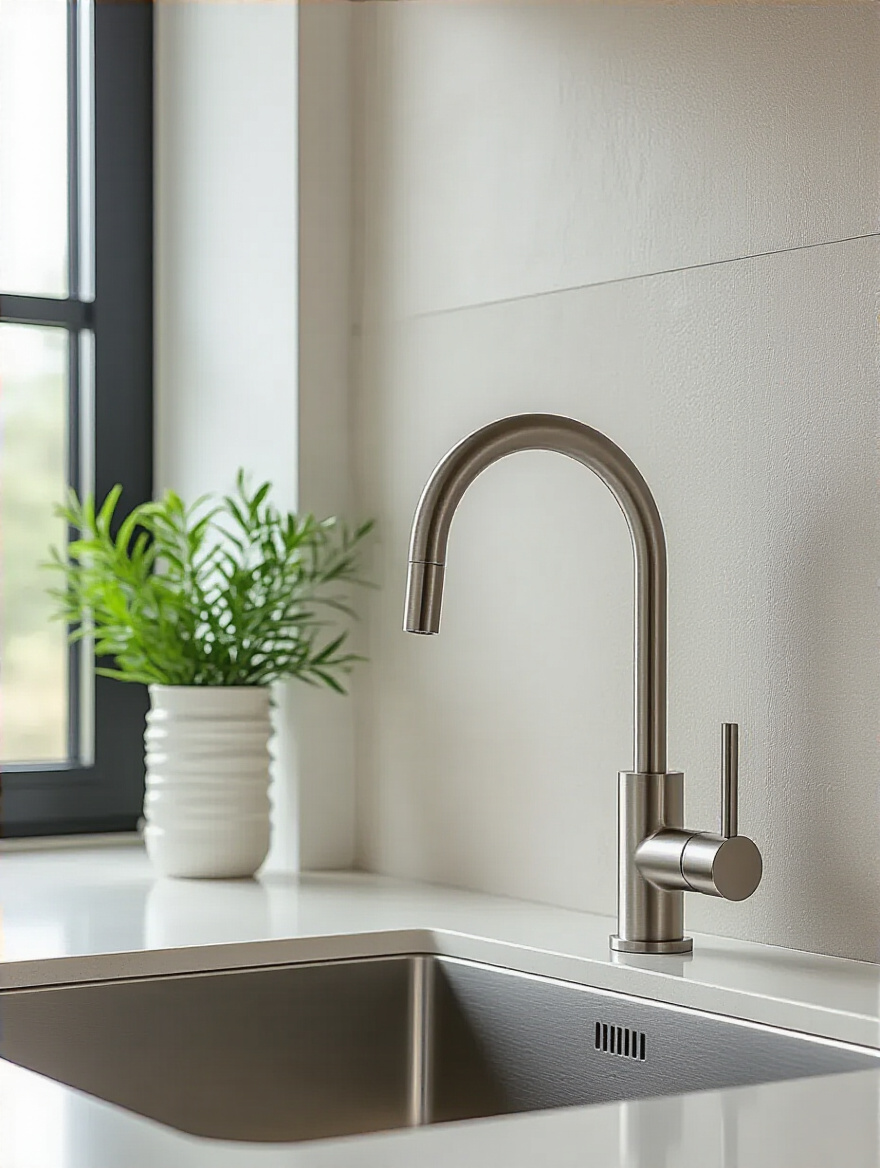
A wall-mounted faucet feels special. It’s unexpected. It turns a piece of plumbing into a deliberate, sculptural element that appears to float above the sink. Paired with an undermount sink, it creates a completely seamless counter-to-sink transition that is a dream to wipe down. It’s a small detail, but it speaks volumes about the level of thought and curation that went into the design.
To bounce even more light around, we look to the backsplash.
18. Utilize Reflective Backsplashes to Amplify Natural Light
Think of your backsplash as a functional piece of art—one that has the power to manipulate light. By choosing a material with a reflective quality, like high-gloss ceramic tile, back-painted glass, or even a subtly mirrored finish, you essentially install a light-multiplying machine in your kitchen. It will catch whatever natural light you have and bounce it deep into the room, illuminating dark corners and making the whole space feel brighter and more alive.
This doesn’t mean you have to turn your kitchen into a disco ball. The effect can be very subtle. A classic subway tile with a glossy finish is a perfect example. The gentle reflection on each tile adds a layer of depth and shimmer that flat, matte surfaces lack. I saw a tiny, windowless kitchen transformed by a backsplash made of a single sheet of pale, back-painted glass. It created this soft, luminous glow and gave the illusion of depth, completely tricking the eye into perceiving a larger, brighter space.
Now that we’ve covered the design, let’s talk about getting it all done without going broke.
Cost-Saving Execution & Project Management
A beautiful design is nothing without a smart execution plan. This is where savvy, strategic decisions can save you thousands of dollars, allowing you to allocate your resources to the things that matter most. A masterpiece isn’t just about the vision; it’s about the practical craft of bringing it to life within your means.
19. Reface Existing Cabinets for Significant Cost Savings
Everyone assumes a kitchen remodel means ripping everything out. But if your cabinet boxes are structurally sound, a full replacement is often a waste of money and material. Cabinet refacing is the brilliant shortcut. You keep the solid frames and simply replace the public-facing elements: the doors and drawer fronts. Then, you apply a new veneer to the visible parts of the frame. The result? A kitchen that looks brand new, for about half the cost and in a fraction of the time.
This is the ultimate design hack. You can completely change the style of your kitchen—from dated oak to modern flat-panel, for example—in just a few days. It’s less disruptive, more sustainable, and it frees up a huge chunk of your budget for other things, like that quartz countertop or a professional-grade faucet. It’s the smartest way to get a high-end look without the high-end price tag.
But if even refacing is beyond the budget, there’s an even more accessible option.
20. DIY Simple Updates Like Painting Cabinets Yourself
If you have more time than money, painting your existing cabinets is the single most impactful DIY project you can undertake. Nothing transforms a kitchen more dramatically, for less money, than a fresh coat of paint. A dark, dreary kitchen can become bright and airy. A dated wood finish can become crisp and modern. It is a total aesthetic reset for the cost of a few cans of paint and some sandpaper.
But hear me on this: the success of this project is 90% preparation. Do not skimp on this. You must clean, degrease, sand, and prime meticulously. If you try to paint over grimy, glossy cabinets, the paint will peel off in sheets within months. Take the doors off, label everything, and take your time. Use a high-quality enamel paint designed for cabinets. The labor is intense, but the payoff is immense. It’s your chance to put your own mark on the space and achieve a million-dollar look on a ramen-noodle budget.
Next, let’s hunt for some deals.
21. Shop Off-Season Appliance Sales for Best Deals
Being a savvy collector means knowing when to buy. The same goes for appliances. Never, ever buy a major appliance at full price if you can help it. The industry has a predictable sales cycle. New models are released in the fall, which means retailers are desperate to clear out last year’s floor models from September through November. Black Friday, Memorial Day, and Labor Day are also prime times to find significant markdowns.

A little patience and planning can save you hundreds, even thousands, of dollars. Start your research early, identify the models you want, and then track them. Set up price alerts online. This saved budget is what allows you to upgrade from a basic model to the one with the features you really want, or it can cover the cost of your entire backsplash. I had a client save nearly $1,500 on her appliance package by waiting for a Labor Day sale, which then paid for the professional designer who saved her from a dozen other costly mistakes.
Of course, for the work you can’t do yourself, you need to find the right partner.
22. Obtain Multiple Quotes from Qualified Local Contractors
Choosing a contractor based on a single quote is like buying the first piece of art you see. It’s a huge gamble. You must get at least three detailed, itemized bids from qualified, vetted professionals. This isn’t just about finding the lowest price—in fact, the lowest bid is often a red flag. It’s about understanding the market, comparing approaches, and finding a contractor whose communication style and quality of work you trust.
Give each contractor the exact same, highly detailed project brief. This ensures you’re comparing apples to apples. Ask for their license and insurance. Call their references. And look at their past work. You are entering into a significant financial and personal relationship with this person. Due diligence isn’t insulting; it’s essential. This process will protect you from hidden costs and give you the confidence that you’re getting fair value for a job well done.
Finally, a bit of practical advice for surviving the chaos.
23. Plan a Temporary Cooking Zone During the Remodel
The number one thing that drives people mad during a remodel is the loss of routine—and the constant expense of takeout. The solution is to create a temporary kitchen before the demolition begins. This is non-negotiable. Designate a corner of your dining room, basement, or garage. Set up a folding table with a microwave, a toaster oven, an electric kettle, and an induction hot plate. A mini-fridge is your best friend.
This simple setup will save you an astonishing amount of money and stress. You can still make your morning coffee, heat up leftovers, and prepare simple meals. Batch-cook and freeze meals in the weeks leading up to the project. Having a functional, if makeshift, kitchen keeps a sense of normalcy in a chaotic time and protects your budget from death by a thousand DoorDash orders. It is the key to surviving your remodel with your sanity and your savings intact.
Conclusion
A small kitchen isn’t a sentence to a life of cramped, frustrating meal prep. It’s an invitation to be a brilliant editor. It’s a chance to create a space that is so perfectly tailored to your life, so intentional in its design, that every moment you spend in it is a quiet joy. By combining foundational planning with ingenious, space-bending solutions and thoughtful material choices, you can craft a kitchen that feels open, efficient, and deeply personal.
See your kitchen as a curator would: a space defined not by its limitations, but by its potential for beauty and meaning. It is your personal gallery, a stage for the art of daily living. Trust your instincts, embrace the constraints, and don’t be afraid to make bold, creative choices. Your dream kitchen isn’t about more square footage; it’s about more ingenuity. And now you have the tools to create it.


