Tired of staring at blank kitchen walls that are about as exciting as watching paint dry? Well, buckle up, butter cup, because we’re about to embark on a wild ride through the world of unexpected kitchen wall decor! Say goodbye to boring backsplashes and hello to walls that wow faster than you can say “soufflé”!
In this culinary adventure, we’ll explore seven deliciously different ways to spice up your kitchen walls. From textured treasures to hanging gardens, and from chalkboard canvases to mirrored marvels, we’ve got a smorgasbord of ideas that’ll make your kitchen the talk of the town (or at least the envy of your book club). So grab your decorating apron, and let’s cook up some serious style!
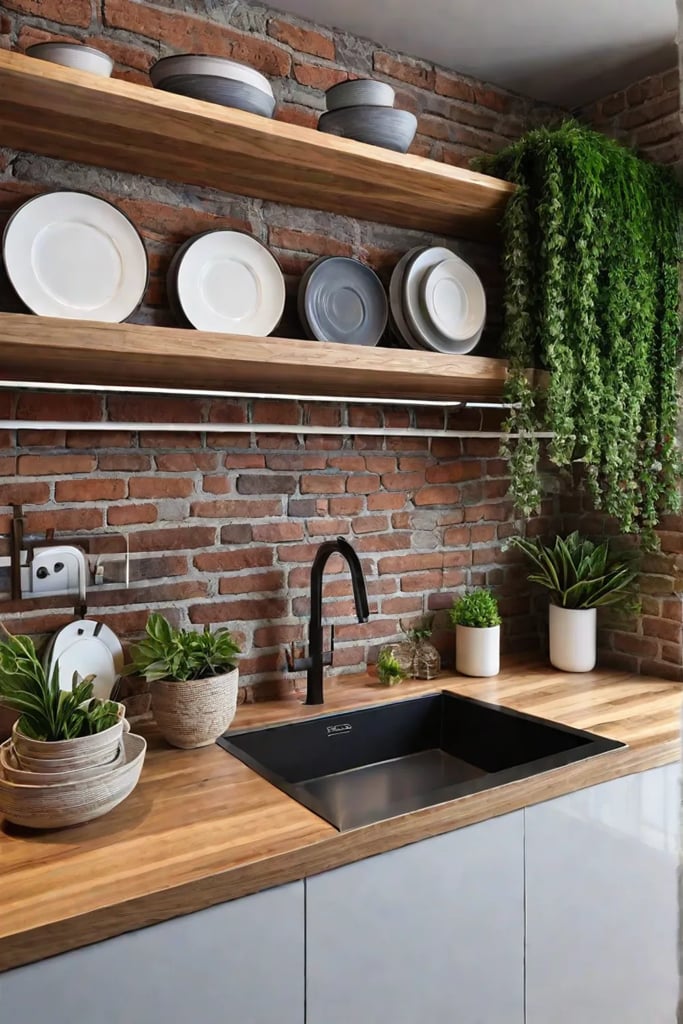
Textured Walls: Add Depth and Dimension
Who says your kitchen walls need to be as flat as a pancake? Let’s dive into the world of textured walls – a deliciously different way to spice up your kitchen’s visual flavor!
Types of Textured Walls
- Venetian Plaster: For a sleek, modern look that’s smoother than a perfectly whipped meringue.
- Brick or Stone Veneer: Perfect for adding a rustic charm or industrial edge to your culinary space.
- Stucco: Brings a touch of Mediterranean flair to your kitchen.
- Textured Paint: An easy DIY option that can create various patterns and depths.
Choosing the Right Texture for Your Kitchen
Picking the perfect texture for your kitchen is like selecting the right seasoning for your signature dish – it needs to complement the existing flavors! Consider your kitchen’s current style and color scheme. A sleek, minimalist kitchen might benefit from the subtle elegance of Venetian plaster, while a farmhouse-style space could shine with a brick veneer.
Pro tip: Lighting plays a huge role in how your textured walls will look. Just like how different lighting can make or break a selfie, it can dramatically change the appearance of your textured walls. Natural light will highlight the texture, while softer, ambient lighting can create a cozy atmosphere.
Durability and Maintenance
Now, I know what you’re thinking – “Riley, won’t textured walls be a nightmare to clean?” Fear not, my fellow kitchen enthusiasts! Some of the most durable and easy-to-clean options include:
- Tile-effect panels
- Washable textured wallpaper
- Sealed stone or brick veneer
These options can handle splashes and splatters with grace, making them perfect for even the most enthusiastic home chefs.
DIY Textured Wall Application
Feeling adventurous? Why not try your hand at creating a textured wall yourself? It’s easier than you might think! Here’s a quick and dirty guide:
- Clean and prep your wall surface
- Apply a base coat of paint
- Mix your texturing compound
- Apply the compound using a trowel, sponge, or roller
- Let it dry and paint as desired
Remember, practice makes perfect. Maybe start with a small section before tackling the whole kitchen!
The Sound of Silence
Here’s a fun fact that’ll make your ears perk up – certain textured walls can help absorb sound, making your kitchen a bit quieter. So if you’re tired of hearing the echo of clanging pots and pans, a textured wall might just be your new best friend!
Textured walls are more than just a pretty face in your kitchen. They’re a practical, stylish alternative to traditional backsplashes that can hide imperfections, add visual interest, and even help with acoustics. Whether you’re going for sleek and modern or rustic and charming, there’s a texture out there that’s perfect for your kitchen.
As we move from the depths of textured walls to the heights of our next topic, let’s shelf this discussion for a moment. Up next, we’ll explore how Open Shelving Displays can combine style and functionality in your kitchen. Get ready to clear some space for some seriously stylish storage solutions!
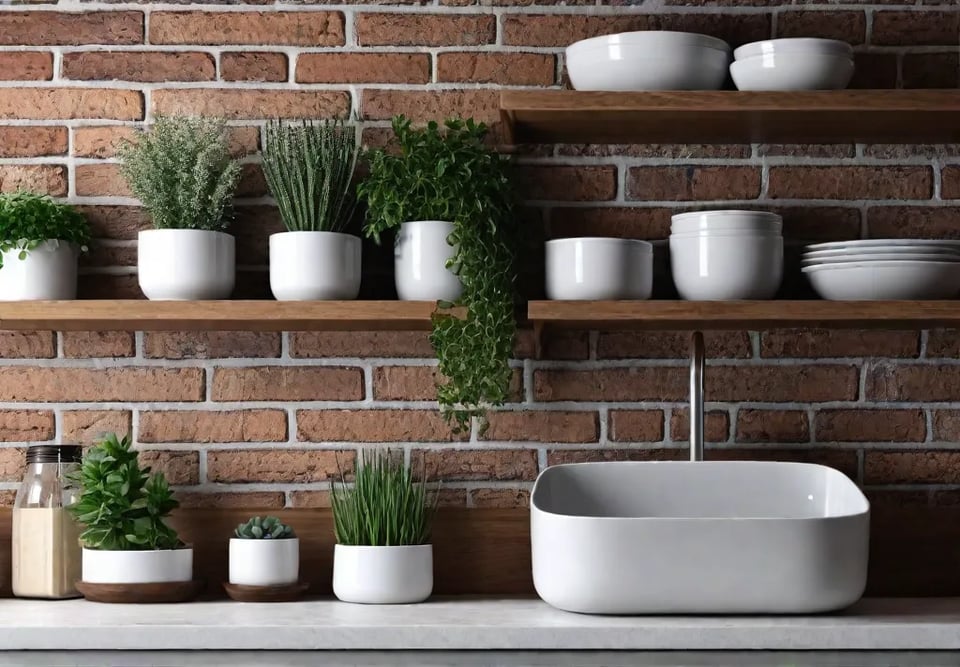
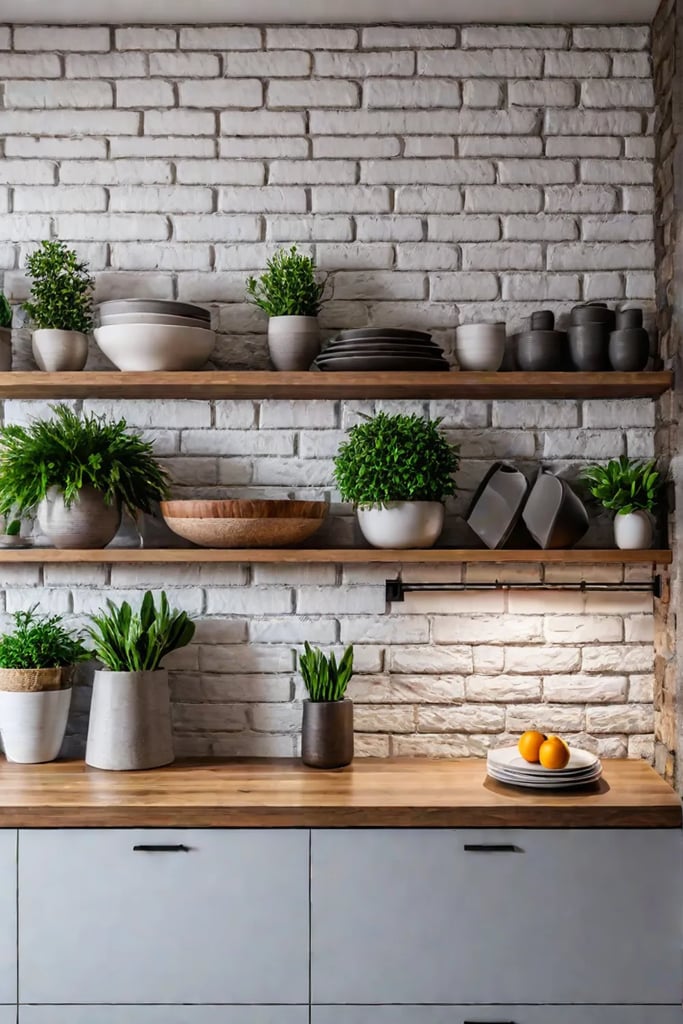
Open Shelving Displays: Style and Functionality Combined
Let’s shake things up a bit and talk about open shelving – the unsung hero of kitchen wall decor that’s been making waves in the design world. Trust me, folks, this isn’t just about slapping a few planks on the wall and calling it a day. Oh no, we’re diving into a world where style meets substance, and your kitchen walls become a canvas for your culinary creativity!
Choosing the Right Shelves: A Shelf-Help Guide
First things first, let’s talk shelf selection. It’s like picking the perfect dance partner for your kitchen – you want something that complements your style and doesn’t step on your toes (or in this case, your cooking space).
- Floating shelves: Perfect for the minimalist at heart. They’re sleek, they’re chic, and they make your kitchen look like it’s straight out of a modern art gallery.
- Rustic wood shelves: Ideal for farmhouse enthusiasts or industrial-style lovers. They bring warmth and character faster than you can say “barn door.”
- Metal shelves: For those who want their kitchen to look like it means business. They’re sturdy, stylish, and can handle whatever you throw at them (though I don’t recommend throwing things at your shelves).
Remember, the right shelves can make a small kitchen feel like it’s had a growth spurt. It’s all about creating that illusion of space – like magic, but without the rabbits and top hats.
Styling Tips: The Art of Shelf-Expression
Now, let’s get down to the nitty-gritty of styling. This is where you channel your inner curator and create displays that would make even the fanciest museums jealous.
- Group by color: Create a rainbow effect with your dishes. It’s like a color wheel, but way more delicious.
- Play with height: Mix tall items with short ones. Think of it as creating a skyline for your kitchen.
- Embrace odd numbers: Groups of three or five items tend to look more balanced. It’s the Goldilocks principle of shelf styling – not too many, not too few, but just right.
- Add some greenery: A few plants can breathe life into your shelves faster than you can say “photosynthesis.”
Pro tip: Keep your most-used items within easy reach. There’s nothing worse than playing Jenga with your dishes when you’re trying to make dinner.
Keeping It Clean: The Shelf-Care Routine
Now, I know what you’re thinking – “Riley, won’t open shelves just collect dust faster than my gran collects teacups?” Well, yes and no. Here’s the scoop on keeping your shelves spick and span:
- Regular dusting: Make it part of your weekly routine. Think of it as giving your shelves a little massage – they work hard, they deserve it.
- Rotate items: This not only keeps things fresh visually but also makes cleaning easier.
- Use shelf liners: They’re like little protective blankets for your shelves. Easy to clean and they add an extra pop of style.
Small Space? No Problem!
For those of you with kitchens cozier than a hobbit hole, fear not! Open shelving can still be your friend. Try these space-savvy ideas:
- Corner shelves: Utilize those awkward corners and turn them into storage superstars.
- Above the window: Is that space above your kitchen window? Prime real estate for a slim shelf.
- Mix and match: Combine open shelves with closed cabinets for the best of both worlds.
Remember, in the world of open shelving, less is often more. It’s about creating breathing room for your kitchen, not recreating your local kitchenware store.
As we wrap up our shelf-exploration (shelf-ploration?), remember that open shelving is more than just a storage solution – it’s a chance to let your personality shine through in your kitchen. It’s about creating a space that’s as functional as it is fabulous and as organized as it is original.
Now, if you thought open shelving was a bold move, just wait until you see what’s coming next. We’re about to take your kitchen walls from bland to grand with our next topic: Large-Scale Art. Get ready to make a statement that’s bigger than your appetite after a day of cooking!
Large-Scale Art: Make a Statement
It’s time to think big, folks! Large-scale art is the secret ingredient that can transform your kitchen from a mere cooking space into a culinary masterpiece. Let’s dive into how you can make your kitchen walls pop with oversized artwork that’ll have your guests saying “Wow!” before they even taste your famous lasagna.
Selecting the Right Artwork
Choosing the perfect piece is like finding the right seasoning for your signature dish – it’s all about complementing the flavors (or in this case, the style) of your kitchen. Here are some tasty options to consider:
- Abstract paintings: Perfect for adding a dash of sophistication to modern kitchens.
- Botanical prints: Bring a fresh, natural vibe that’ll make your space bloom.
- Vintage food posters: A pinch of nostalgia that’s always in good taste.
- Oversized photographs: Capture a moment that’s larger than life.
Remember, the key is to go big or go home! A large piece can make your kitchen feel more spacious and lived-in. It’s like optical illusion meets interior design – magic!
Framing and Lighting Considerations
Now that you’ve picked your showstopper, it’s time to frame it and shine a light on your new kitchen centerpiece.
- Framing: Choose a frame that complements both the artwork and your kitchen’s style. A sleek, minimalist frame works wonders in contemporary spaces, while a chunky, ornate frame might be just the thing for a more traditional kitchen.
- Lighting: Don’t leave your art in the dark! Install some gallery lighting to make it shine. Picture lights or track lighting can create a museum-worthy display right in your kitchen. Plus, it’s a great way to add some ambiance for those late-night snack runs.
Hanging Heavy Artwork: A Weighty Matter
Worried about hanging that hefty masterpiece? Fear not! Here’s a quick guide to ensure your art stays put:
- Locate the studs on your wall using a stud finder.
- Use heavy-duty hanging hardware rated for the weight of your artwork.
- If you can’t find a stud, use drywall anchors designed for heavy loads.
- Consider using a French cleat for extra security with particularly large pieces.
Protecting Your Art from Kitchen Chaos
Let’s face it, kitchens can be messy battlegrounds. To keep your artwork safe from grease splatters and steam:
- Position it away from the stove and sink areas.
- Apply a protective glass or plexiglass cover.
- Regularly dust with a soft, dry cloth to prevent buildup.
- For extra protection, consider a professional sealant application.
By following these tips, your kitchen masterpiece will stay as fresh as the day you hung it!
Large-scale art is more than just decor – it’s a statement about who you are and what your kitchen means to you. It’s an investment in creating a space that’s not just functional, but truly spectacular. So go ahead, be bold, and let your kitchen walls do the talking!
As we move from the grandeur of large-scale art, let’s not forget that sometimes, the most beautiful things come in small packages – or this case, hanging planters. Get ready to bring a breath of fresh air into your kitchen as we explore how to “Bring the Outdoors In” with our next section on hanging planters.
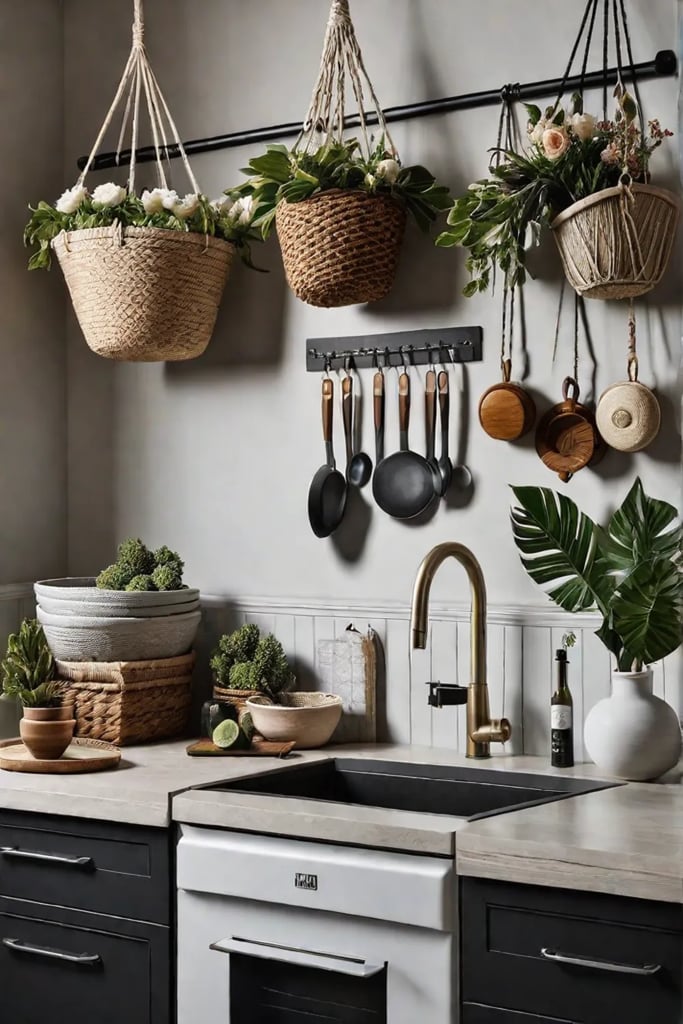
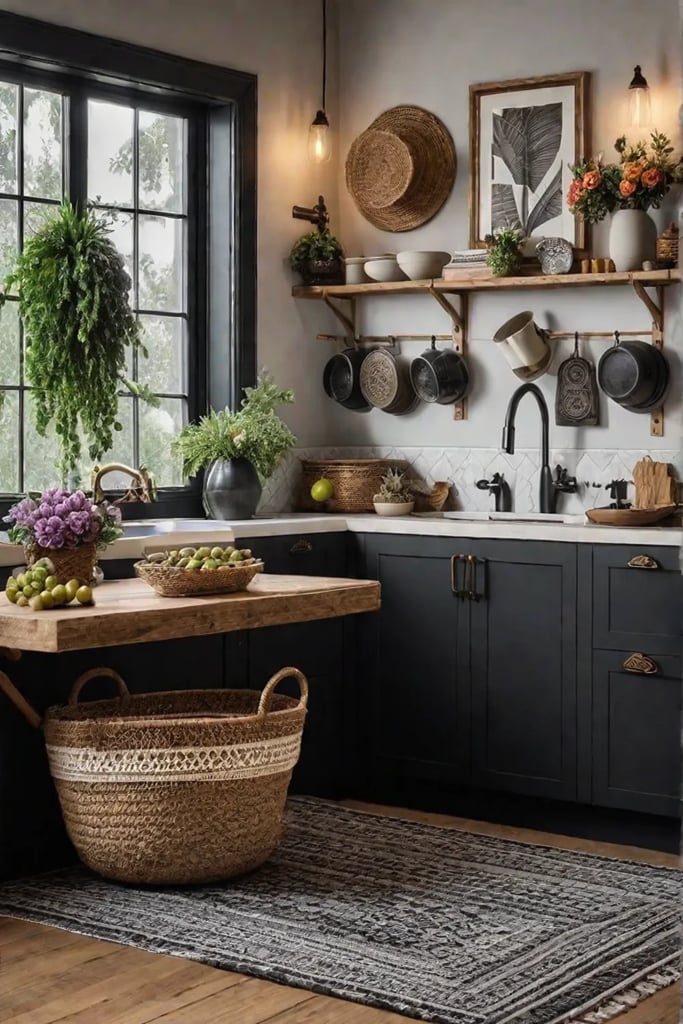
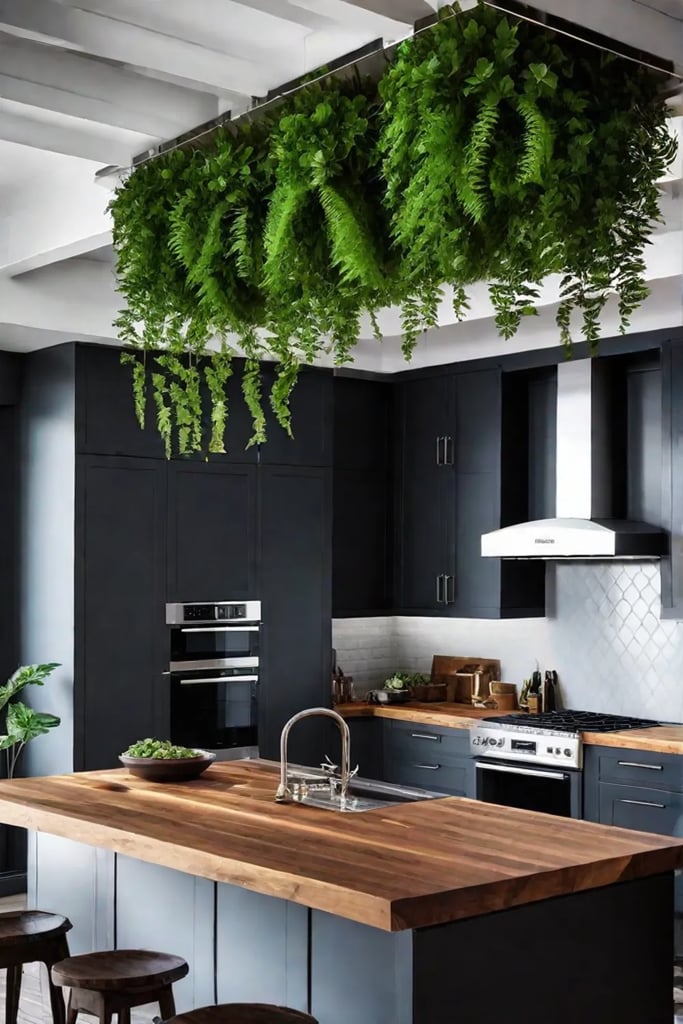
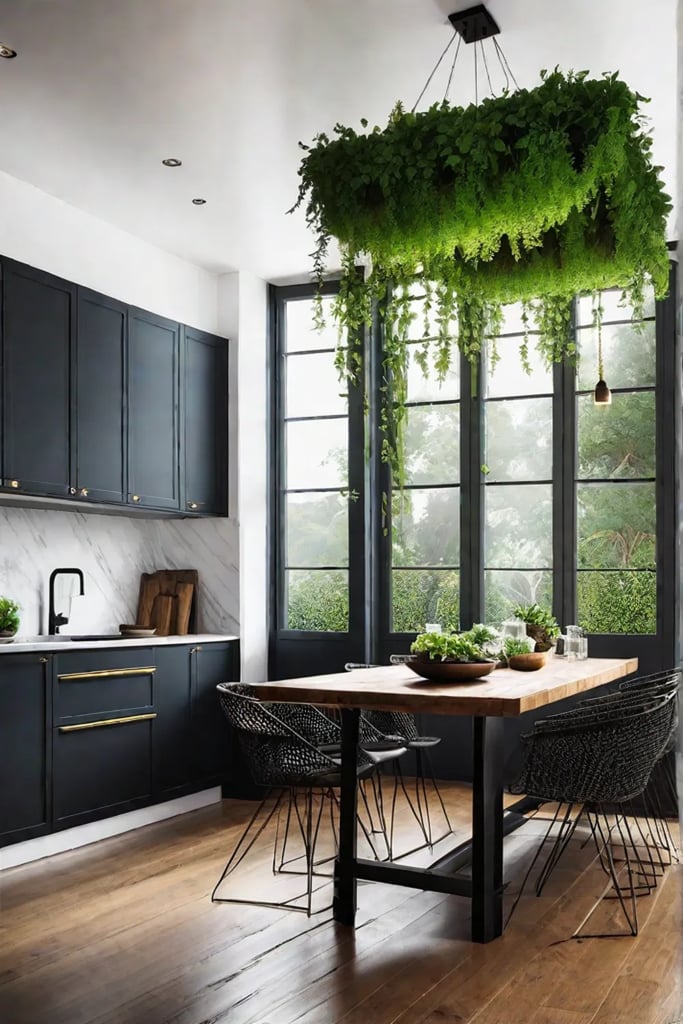
Hanging Planters: Bring the Outdoors In
Who says your kitchen walls should be all business and no pleasure? Let’s shake things up a bit and turn your culinary space into a lush, green oasis with hanging planters! Trust me, folks, this is one trend that’s sure to grow on you. (See what I did there?)
Best Plants for Kitchen Environments
When it comes to choosing plants for your kitchen, you’ll want to pick varieties that can handle the heat – literally! Here are some top contenders:
- Herbs: Basil, thyme, and mint are not only easy on the eyes but also perfect for adding fresh flavors to your dishes.
- Spider plants: These air-purifying champions are as low-maintenance as they come.
- Pothos: A hardy vine that can thrive in low light and add a cascading effect to your space.
- Succulents: For those of us with less-than-green thumbs, these water-wise wonders are a godsend.
Fun fact: Did you know that some indoor plants can help purify the air in your kitchen? It’s like having a natural air freshener that looks good too!
Creative Hanging Planter Ideas
Now, let’s talk about how to display these leafy lovelies. Here are some ideas that’ll have your kitchen walls looking like a Pinterest board come to life:
- Macrame hangers: Channel your inner bohemian with these trendy, textured plant holders.
- Repurposed containers: Turn old colanders or teapots into quirky planters for a touch of whimsy.
- Metal grids: Create a living wall by attaching small pots to a wire grid.
- Floating shelves: Mix and match plants with other decor items for a curated look.
I once turned an old ladder into a vertical garden in my kitchen, and let me tell you, it’s been the talk of every dinner party since!
Practical Tips for Kitchen Plant Care
Keeping your plants happy in the kitchen doesn’t have to be a full-time job. Here are some tips to keep your green friends thriving:
- Water wisely: Most indoor plants prefer to dry out between waterings. Stick your finger in the soil – if it’s dry an inch down, it’s time to water.
- Fertilize sparingly: A little plant food goes a long way. Aim for once a month during the growing season.
- Rotate regularly: Give your plants a quarter turn every week to ensure even growth.
- Mind the humidity: Kitchens can get steamy, which most plants love. But if your space is dry, consider misting your plants occasionally.
For those of you with limited ceiling space, fear not! Wall-mounted planters or over-the-sink hanging gardens can be your ticket to a greener kitchen without sacrificing precious real estate.
Remember, adding plants to your kitchen isn’t just about aesthetics. Studies have shown that being around greenery can boost your mood and productivity. So, the next time you’re chopping veggies for dinner, you might just find yourself whistling while you work!
As we wrap up our foray into the world of hanging planters, let’s not forget that the kitchen is a place for creativity – both culinary and decorative. Speaking of creativity, our next stop on this kitchen wall makeover journey is sure to chalk up some interest. Get ready to unleash your inner artist as we explore the world of chalkboard paint and how it can transform your kitchen into a canvas of functionality and fun!
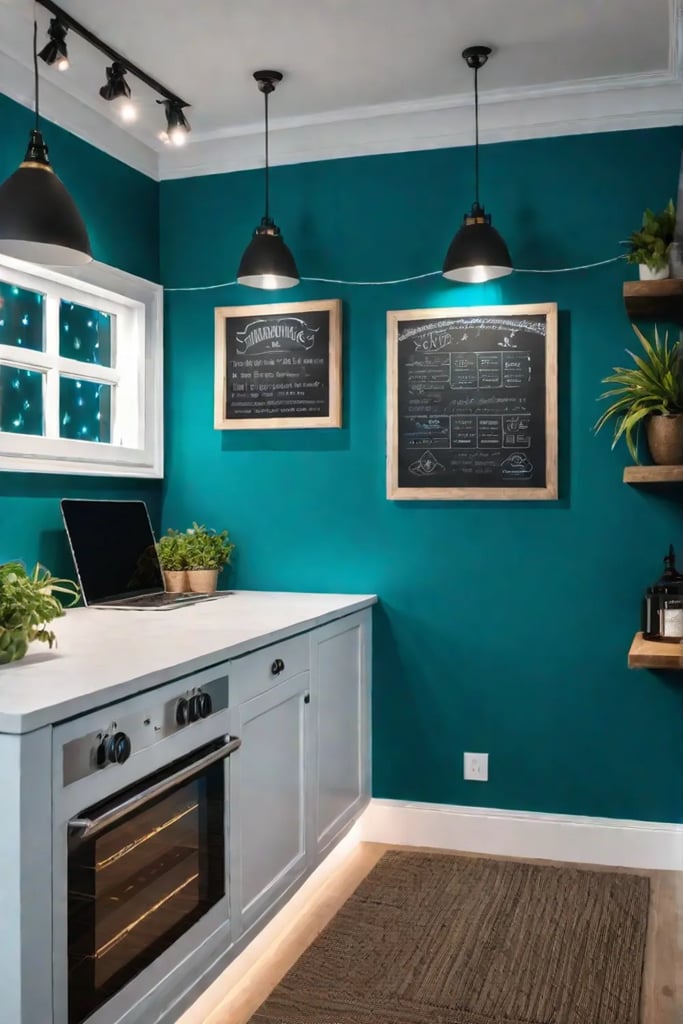
Chalkboard Paint: Functionality Meets Creativity
With chalkboard paint, your kitchen walls can become a canvas for your thoughts, grocery lists, and even your kids’ latest masterpieces. Let’s dive into this fun and functional way to spice up your kitchen decor!
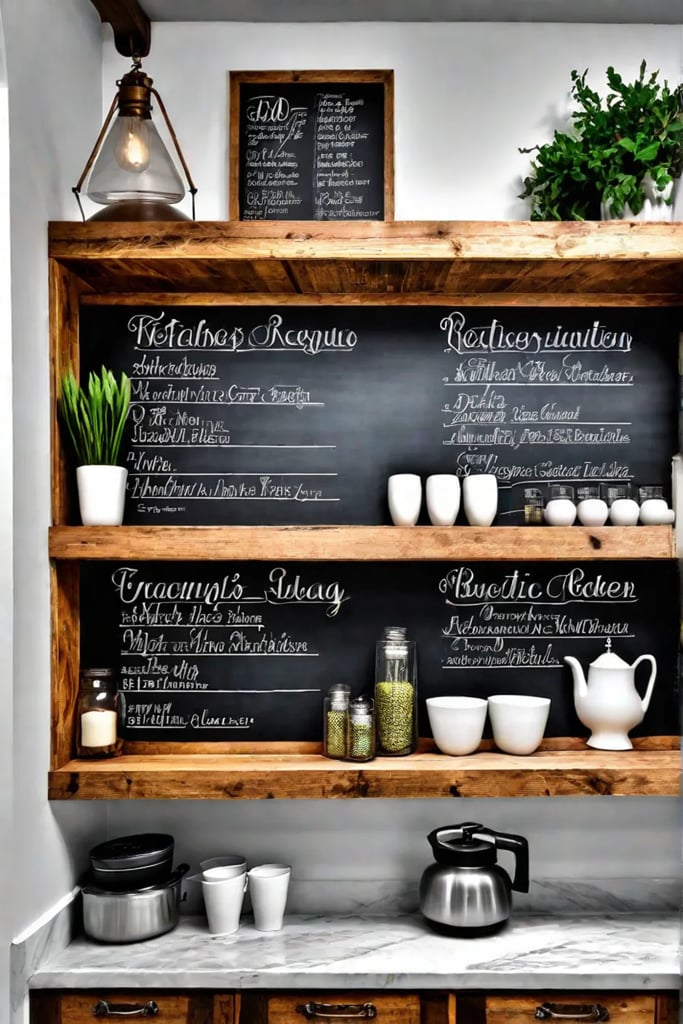
Creating a Chalkboard Wall
Ready to chalk up a win for your kitchen walls? Here’s how to get started:
- Choose your surface: Walls, cabinets, or even your fridge can be transformed.
- Prep the area: Clean and sand the surface for better paint adhesion.
- Tape it off: Use painter’s tape for crisp, clean lines.
- Prime time: Apply a primer if needed (especially on dark surfaces).
- Paint away: Apply 2-3 coats of chalkboard paint, allowing each to dry completely.
- Season the surface: Once dry, rub the entire area with chalk and erase for a perfect finish.
Pro tip: For a pop of personality, try colored chalkboard paint instead of traditional black. Teal chalkboard wall, anyone?
Decorating with Chalkboard Paint
Now that you’ve got your chalkboard wall, it’s time to let your creativity shine! Here are some ideas to get you started:
- Create a family message center: Leave notes, and reminders, or just draw silly faces.
- Recipe central: Write down your favorite recipes or meal plans for the week.
- Grocery list hub: Never forget the milk again!
- Quote of the day: Inspire your family with daily words of wisdom.
- Kids’ art gallery: Let the little ones showcase their artistic talents.
Remember, you’re not limited to just chalk. Chalk markers come in a rainbow of colors and are perfect for more detailed designs. Just be sure to use the right type for your surface – some are better suited for non-porous chalkboards.
Speaking of chalk, let’s address the dusty elephant in the room: what’s the best type to use? Traditional chalk works well and is easy to erase, but for a more vibrant look, opt for high-quality artists’ chalk or chalk markers. Just keep in mind that some chalk markers may require a bit more elbow grease to erase.
Now, what if you decide chalkboard paint isn’t your cup of tea anymore? No worries! It’s relatively easy to paint over. Just sand the surface lightly, apply a good primer, and then paint as usual. Voila! A blank slate for your next kitchen adventure.
The beauty of chalkboard paint lies in its versatility and ever-changing nature. It’s a practical solution that encourages creativity and adds a dash of fun to your kitchen. Plus, it’s a budget-friendly way to keep your decor fresh and exciting. Who knows? Your grocery list might just become your next masterpiece!
As we wrap up our chalkboard chat, let’s reflect on how this simple idea can transform your kitchen walls into a functional and fun focal point. But if you’re looking for a way to make your space feel bigger and brighter, you’re in luck! In our next section, we’ll explore how mirrors can expand your kitchen horizons and add a touch of sparkle to your culinary haven.
Mirrors: Expand Your Space
Ever feel like your kitchen is closing in on you faster than a soufflé in a slammed oven? Fear not, my fellow home enthusiasts! It’s time to reflect on a brilliant solution that’ll have your kitchen looking twice as nice. That’s right, we’re talking mirrors, and trust me, they’re not just for checking if you’ve got flour on your nose!
Choosing the Right Mirrors
When it comes to selecting mirrors for your kitchen, think of it as picking the perfect ingredient for your signature dish. You want something that complements your kitchen’s flavor profile, er, I mean, design aesthetic. Here are some tasty options to consider:
- Oversized statement mirrors: Go big or go home! These bad boys can make even the tiniest galley kitchen feel like a banquet hall.
- Mirrored backsplashes: For a dash of glamour that’ll make your kitchen shine brighter than a freshly polished saucepan.
- Vintage framed mirrors: Perfect for adding a pinch of character to your culinary space.
- Geometric shapes: For those who like their kitchens with a side of modern flair.
Placement and Styling Tips
Now that you’ve got your mirrors picked out, it’s time to hang them up. But before you start swinging that hammer, let’s dish out some placement wisdom:
- Opposite windows: Reflect natural light and bring the outdoors in. It’s like having a window with a view, even if your actual view is just the neighbor’s brick wall.
- Dark corners: Brighten up those gloomy spots faster than you can say “Let there be light!”
- Above the sink: Give yourself a front-row seat to your cooking show. Plus, it’s handy for checking if you’ve got spinach in your teeth.
- Gallery wall style: Group smaller mirrors together for an eclectic look that’s sure to reflect your personality.
Pro tip: In a narrow kitchen, place mirrors on the shorter walls to create the illusion of width. It’s like optical seasoning for your space!
Keeping Your Mirrors Squeaky Clean
Let’s face it, kitchens can get messier than a toddler’s first attempt at pancakes. To keep your mirrors sparkling:
- Use a mixture of equal parts white vinegar and water for a streak-free shine.
- Microfiber cloths are your best friend – they’re gentler than your grandma’s hugs and won’t leave lint behind.
- For stubborn grease splatters, a dab of rubbing alcohol will do the trick.
Remember, a clean mirror is a happy mirror, and a happy mirror makes for a dazzling kitchen!
Mirrors: The Small Kitchen’s Secret Weapon
Do you have a kitchen smaller than a broom closet? Mirrors are about to become your new BFF. Here’s how they can help:
- Create the illusion of depth by placing a large mirror at the end of a galley kitchen.
- Use mirrored cabinet doors to make the space feel more open and airy.
- Reflect your organized shelves or a beautiful light fixture to double the visual impact without taking up any extra space.
With these mirror tricks up your sleeve, your tiny kitchen will feel bigger than a celebrity chef’s ego in no time!
So there you have it, folks! Mirrors are the secret ingredient to expanding your kitchen space, brightening up dark corners, and adding a dash of style to your culinary canvas. They’re like the Swiss Army knife of kitchen decor – versatile, practical, and always ready to make you look good.
Now, if you thought mirrors were a reflection of great taste, just wait until you see what’s coming up next. We’re about to dive into the world of gallery walls, where your kitchen can become a veritable museum of your style. Get ready to showcase your artistic side as we explore how to turn your kitchen walls into a gallery that would make even the Louvre jealous!
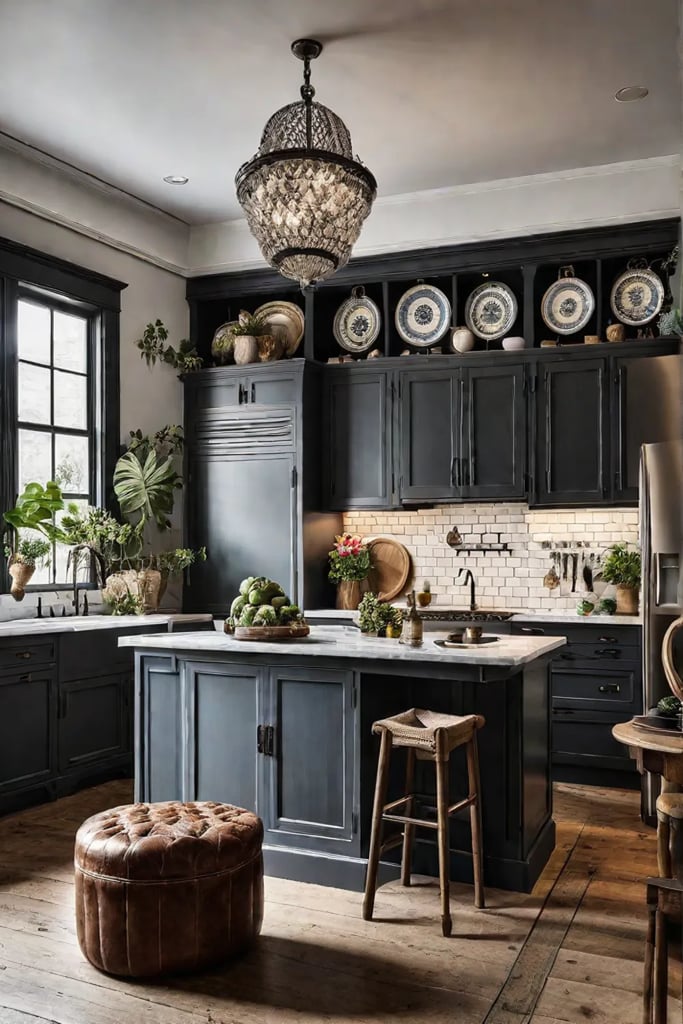
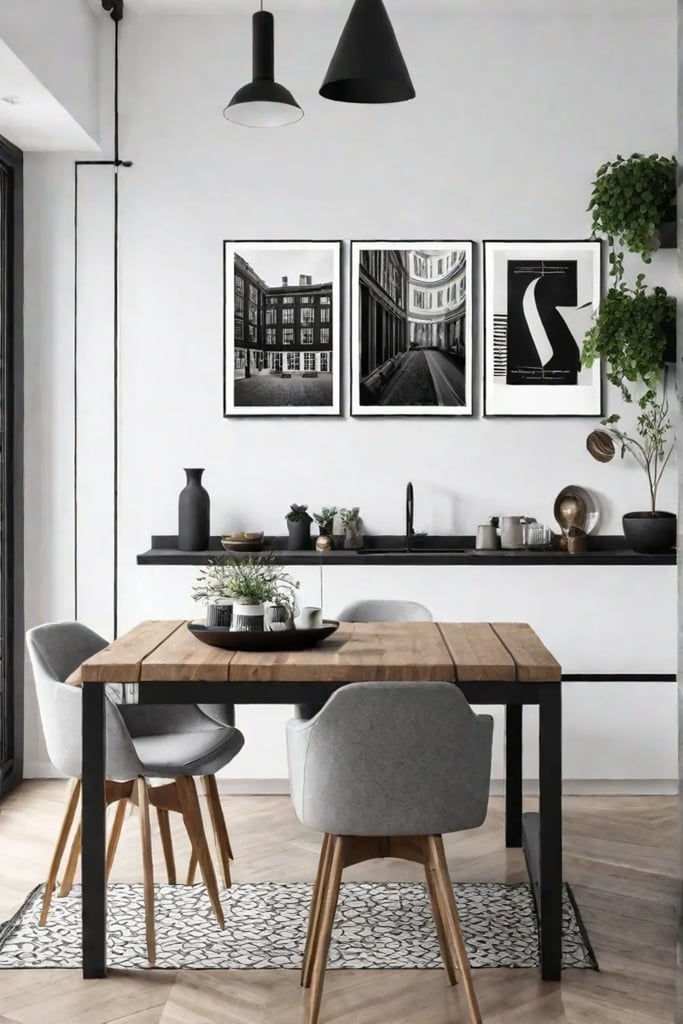
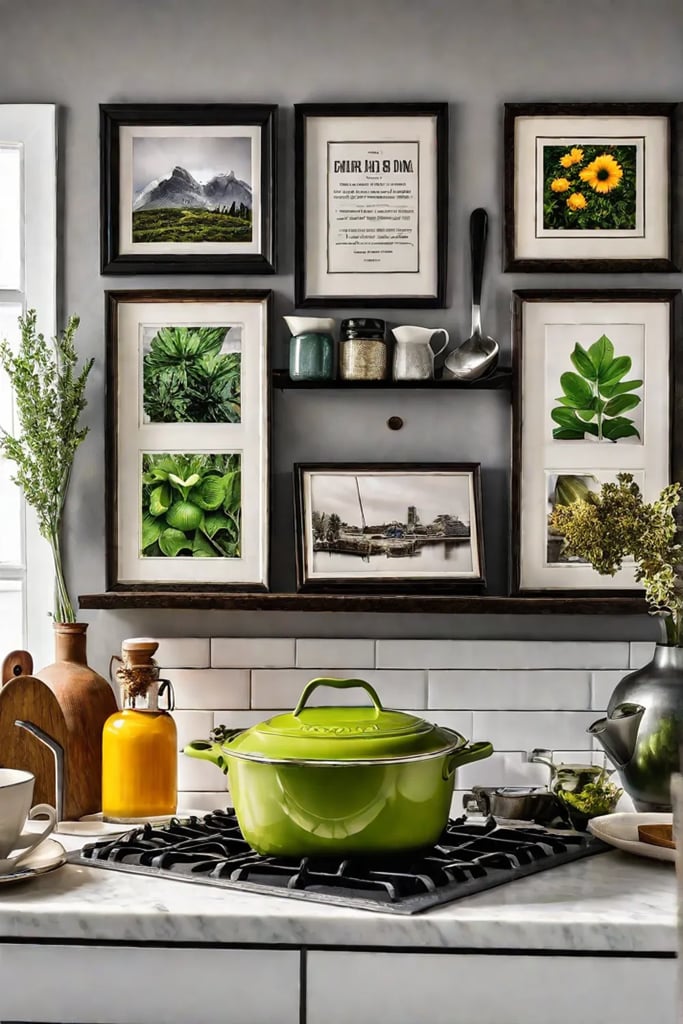
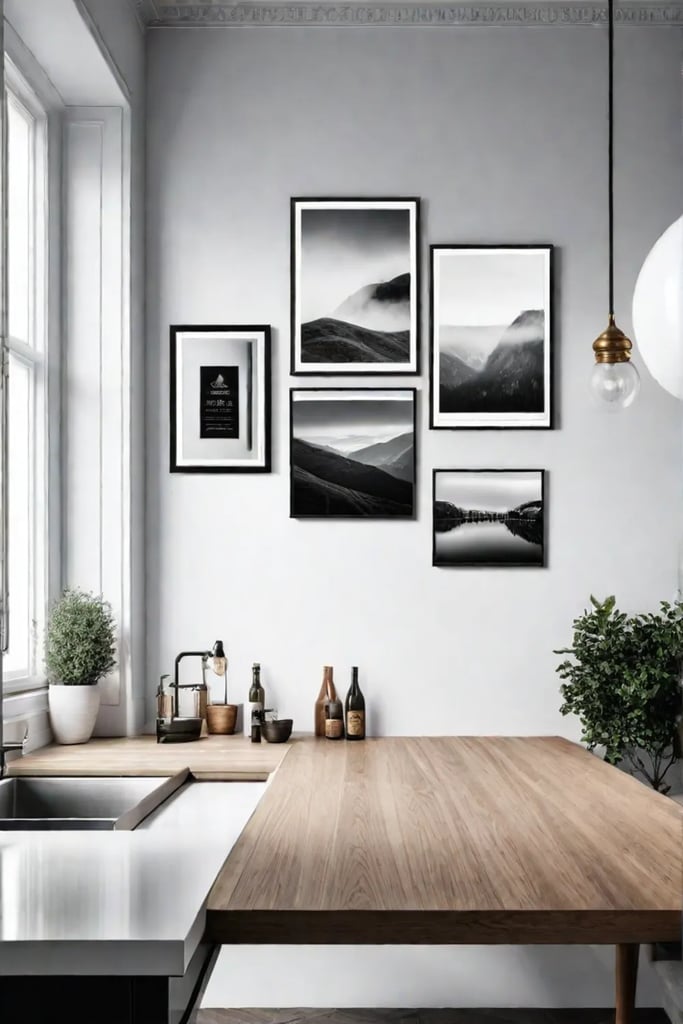
Gallery Walls: Showcase Your Style
Ready to turn your kitchen walls into a masterpiece? Let’s dive into the world of gallery walls – the perfect recipe for adding a dash of personality to your culinary space!
Creating a Cohesive Gallery Wall
Whipping up a gallery wall is like crafting the perfect dish – it’s all about balance and harmony. Start by choosing a theme or color palette that complements your kitchen’s existing decor. Maybe you’re drawn to vintage food advertisements or have a collection of family recipes passed down through generations. Whatever your flavor, make sure it tells your unique story.
Here’s a quick and easy recipe for gallery wall success:
- Gather your ingredients (artwork, photos, and decorative objects)
- Mix and match frames of different sizes and styles
- Arrange items on the floor to experiment with layouts
- Use a consistent color palette for frames or mats to create unity
- Sprinkle in different textures and materials for visual interest
Pro tip: Take a snapshot of your floor arrangement before hanging. It’s like having a visual recipe to follow when you’re ready to serve up your gallery wall!
Choosing the Right Items to Display
Now, let’s talk about curating your gallery wall items. This is where you can let your creativity simmer! Mix in a variety of elements to keep things interesting:
- Family photos
- Vintage kitchen utensils
- Framed recipes or menu cards
- Quirky food-related quotes
- Small shelves for 3D objects
Remember, your gallery wall is like your kitchen’s fingerprint – unique to you. Don’t be afraid to incorporate sentimental items or travel mementos. That pasta strainer you picked up in Italy? Frame it! The fortune from the cookie that predicted your culinary success? Pop it in a shadow box!
Hanging Your Masterpiece
Worried about turning your walls into Swiss cheese with all those nail holes? Fear not! Here are some hanging hacks to keep your walls (and your security deposit) intact:
- Use adhesive strips for lighter frames
- Invest in a picture hanging kit for heavier items
- Try a picture rail system for easy rearranging
For kitchens with limited wall space, think vertically! Utilize that narrow strip of wall next to the fridge or the space above your cabinets. You’d be surprised how much impact a slim gallery wall can make.
Creating a gallery wall in your kitchen is like adding the perfect seasoning to a dish – it brings everything together and makes the space uniquely yours. So go ahead, get creative, and let your walls do the talking!
As we wrap up our tour of unexpected kitchen wall decor, let’s take a moment to digest all these delicious ideas. In our conclusion, we’ll recap the key ingredients that make for a truly memorable kitchen design. Get ready to put the icing on the cake of your culinary canvas!
Conclusion
Well, fellow kitchen enthusiasts, we’ve stirred up quite the pot of decorating delights, haven’t we? From turning your walls into a tactile treat with textures to creating a green oasis with hanging planters, we’ve explored a veritable buffet of ways to make your kitchen walls sing. And let’s not forget the magic of mirrors, the creativity of chalkboards, and the personality-packed punch of gallery walls. Who knew your kitchen could be such a canvas for self-expression?
Remember, decorating your kitchen walls isn’t just about following trends or ticking boxes. It’s about creating a space that reflects your unique taste and makes you smile every time you reach for that coffee mug in the morning. So go ahead, mix and match these ideas like you’re whipping up your favorite recipe. After all, the best kitchens are the ones that tell your story – complete with a dash of whimsy, a sprinkle of practicality, and a whole lot of heart. Now, if you’ll excuse me, all this talk of kitchens has made me hungry. Time to put these newly decorated walls to the test with some serious cooking!


