You know what people always ask me? They have this sad little slab of concrete hanging off their apartment or house, and they treat it like an outdoor closet for a rusty bike and a dead plant. They ask, “What can I even do with this?” and my answer is always the same: You can turn it into the most popular room in your house.
This isn’t about just making it “pretty.” This is about making it an experience. It’s the spot where you have your morning coffee before the world goes nuts. It’s the pre-game zone before everyone comes over to watch the match. It’s the place you and your partner actually connect after a long day, with a real drink in hand instead of just collapsing on the couch. Forget the corporate blog posts with their sterile, stock-photo advice. Here’s the real story on how to build a balcony that actually brings people together.
Foundations: The “Don’t Screw This Up” Section
Look, I get it. You want to jump straight to the cool string lights and the comfy chairs. But if you don’t nail these first few steps, you’re either going to waste a ton of money, tick off your building manager, or—and I’m not kidding—create a serious safety hazard. Do this stuff once, do it right, and you’ll never have to worry about it again.
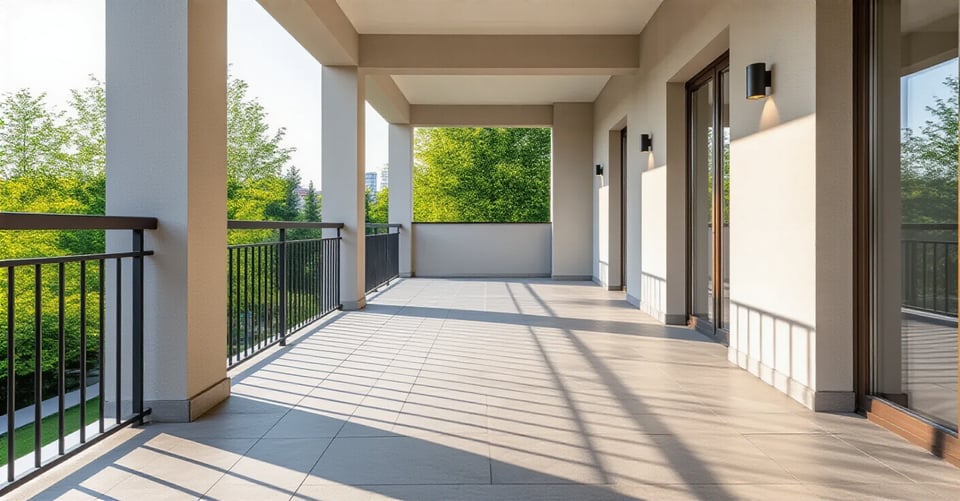
1. Evaluate Balcony Size and Load Capacity Safely
Can we just talk about this for a sec? This isn’t boring red tape; this is the crucial ‘don’t-let-your-balcony-collapse-during-a-party’ step. Everyone assumes their balcony is an indestructible slab of concrete. It’s not. Most are designed to hold about 50 pounds per square foot. That sounds like a lot, but a few big guys, some heavy planters full of wet soil, and a solid table can get you there shockingly fast.
I once consulted for a client who wanted to put a six-person “compact” hot tub on their new condo balcony. I ran the numbers. The hot tub alone, when filled with water and people, would have put them at nearly double the balcony’s rated capacity. It would have been a legitimate disaster. Stop thinking about it as outdoor space and start thinking about it like an elevator: there is a hard limit. Your first job is to find that limit by checking your building’s documents or HOA rules before you buy a single thing.
From foundations to feelings, let’s nail down what you actually want this space to be.
2. Define Your Outdoor Style and Ambience Clearly
“What’s the vibe?” It’s the first question I ask for any entertainment space. Are you going for a “chill morning coffee” spot, a “cocktails at sunset” lounge, or a “miniature beer garden” for you and your friends? If you don’t decide this first, you’ll end up with a random collection of stuff that doesn’t quite work together. It’s the #1 mistake people make—they buy a cool chair here, a neat planter there, and end up with a cluttered, confused space they never use.
So, get on Pinterest or Instagram, but don’t just mindlessly scroll. Make a specific mood board. Call it “My Balcony Hangout.” After you pin 20 photos, look for the pattern. Is it all light wood and white cushions (Scandinavian)? Or is it tons of plants and mismatched textiles (Bohemian)? Naming the vibe gives you a filter. When you’re shopping, you can ask, “Does this fit my ‘Rooftop Sports Bar’ vibe?” If the answer is no, you don’t buy it. It’s that simple, and it saves you so much time and money.
Once you know the vibe, it’s time to talk money without making it weird.
3. Set a realistic budget for Your Balcony Transformation
Okay, let’s be real. You could spend $500 or $15,000 on this project. Having a clear budget isn’t about limiting your dream; it’s about making it happen without the stress of credit card debt. The biggest BS line in home design is “just get what you love!” That’s how you end up with one incredible, wildly expensive chair and nowhere for your friends to sit.
Instead, list out your “must-haves” (seating, a small table) and your “nice-to-haves” (fancy solar lights, an outdoor speaker). Get a rough cost for each. And here’s the shortcut I wish I knew earlier: always, always add a 15% “oops” fund to your total. Because something will be more expensive than you thought, you’ll need a specific tool, or you’ll see the perfect thing that wasn’t on your list. Plan for the unexpected, and it won’t derail you. It’s the difference between a finished project and a half-finished project that taunts you for months.
With your budget in hand, let’s make sure you don’t get a angry letter from “the man.”
4. Understand Building Rules for External Balcony Additions
This is another one of those boring but critical steps. Your HOA or building management can be your best friend or your worst enemy. Before you drill a single hole, read the rules. Seriously. Most have weirdly specific guidelines about what you can hang from railings, what color your planters can be, or if you can install anything on the walls. Ignoring this is the fastest way to get a fine and be told to undo all your hard work.
I learned this the hard way years ago. I helped a friend install this gorgeous, custom-built vertical garden on their condo balcony. It was epic. Two weeks later, they got a notice from their HOA. Why? The structure was visible from the street and wasn’t a “pre-approved color.” They had to take it all down. We could have avoided the whole mess if we’d just spent 20 minutes reading the bylaws. Don’t be us. Read the rules first.
Okay, let’s make your space feel like a private club, not a fishbowl for your neighbors to stare into.
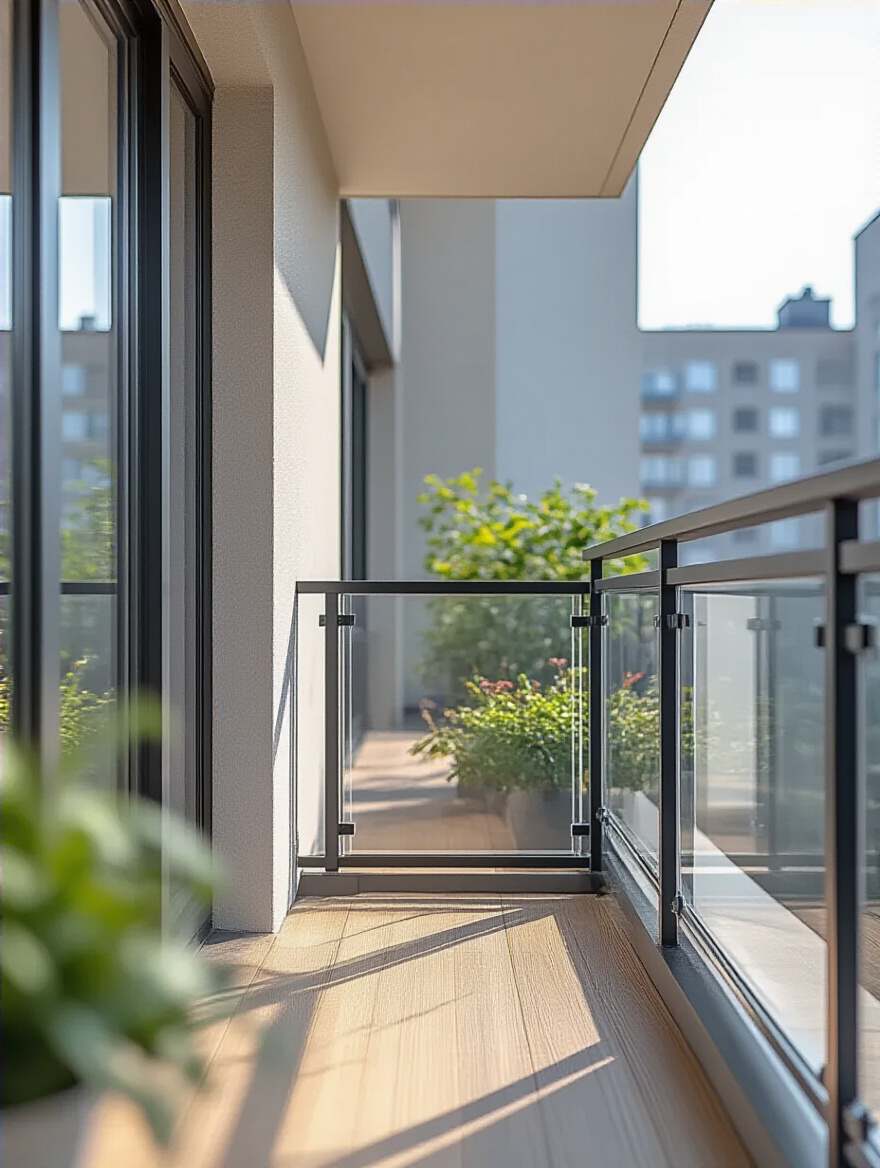
5. Prioritize Privacy Needs with Smart Screening Solutions
Unless you love making eye contact with your neighbor while you’re trying to relax, you need a privacy plan. A balcony without privacy is a stage, not a sanctuary. But here’s what everyone gets wrong: they just throw up a single, giant, ugly screen that blocks all the light and airflow, turning their balcony into a stuffy box. That’s not the answer.
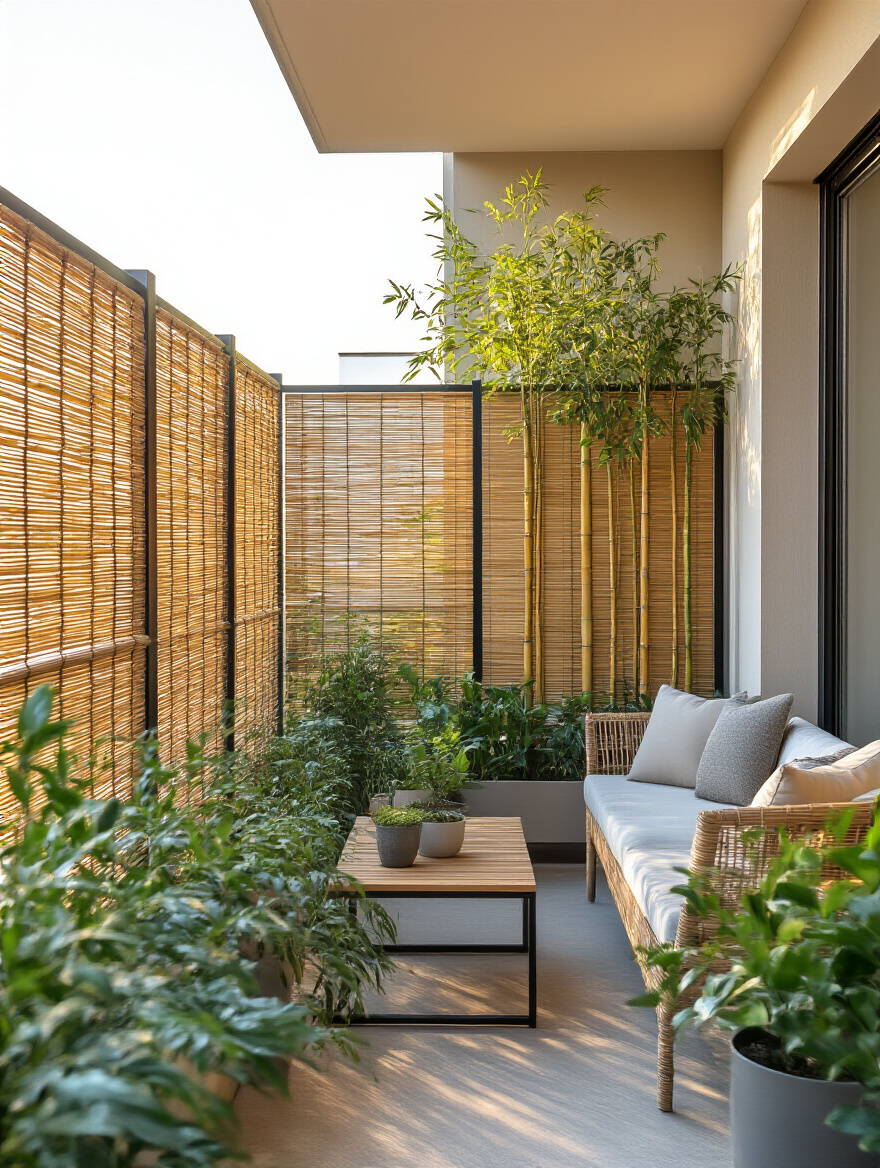
The key is to layer your privacy. Think about it like a bouncer at a club. You can have a solid screen at the bottom half of the railing to block the direct line of sight. Then, use a trellis with some climbing plants for the upper half to filter the view without totally killing the light. Maybe add an adjustable umbrella or a retractable side awning for on-demand privacy. It’s not about building a wall; it’s about creating a sense of enclosure that makes you and your guests feel relaxed and unobserved.
Now that you’re hidden from prying eyes, let’s make even the tiniest space feel huge.
6. Maximize Small Spaces with Clever Layout Planning
Most balconies are small. Like, really small. And the natural instinct is to shove a bunch of furniture in there. Wrong. The secret to making a small space feel good isn’t filling it; it’s leaving some of it empty. It’s called negative space, and it’s your best friend. Your goal should be clear pathways and defined zones, even if they’re tiny.
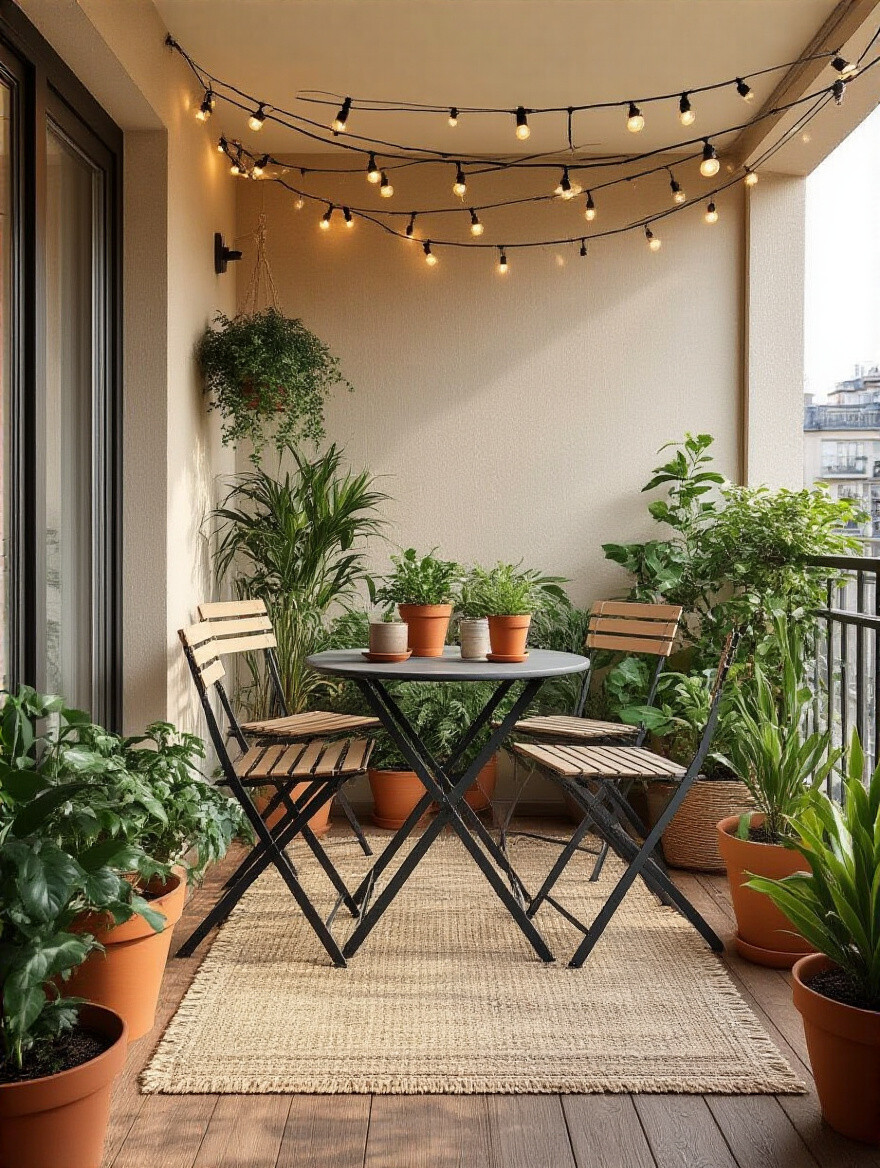
The biggest game-changer here is verticality. We’re conditioned to think horizontally, but your walls and railings are prime real estate. Wall-mounted planters, hanging baskets, and slim shelves draw the eye upward and get clutter off the floor. The other pro move? Foldable furniture. A bistro set that folds flat against the wall means you can have a dining spot for two, or you can clear it completely for a morning yoga session. Multi-functionality is the golden rule of small-space living.
Essential Balcony Setup & Furnishings
You’ve got the plan, you’ve got the budget, and you’ve got the vibe. Now it’s time for the fun part: actually building the space. This is the hardware, the stuff that forms the backbone of your outdoor social club.
7. Upgrade Flooring Easily with Interlocking Tiles
Hate that ugly, cracked concrete floor? You’re not alone. Most people think their only options are to live with it or hire an expensive contractor. Nope. Interlocking deck tiles are one of the most brilliant inventions for renters and homeowners alike. They’re like adult LEGOs for your floor. You can literally snap them together and cover an entire balcony in about an hour. No glue, no grout, no mess.
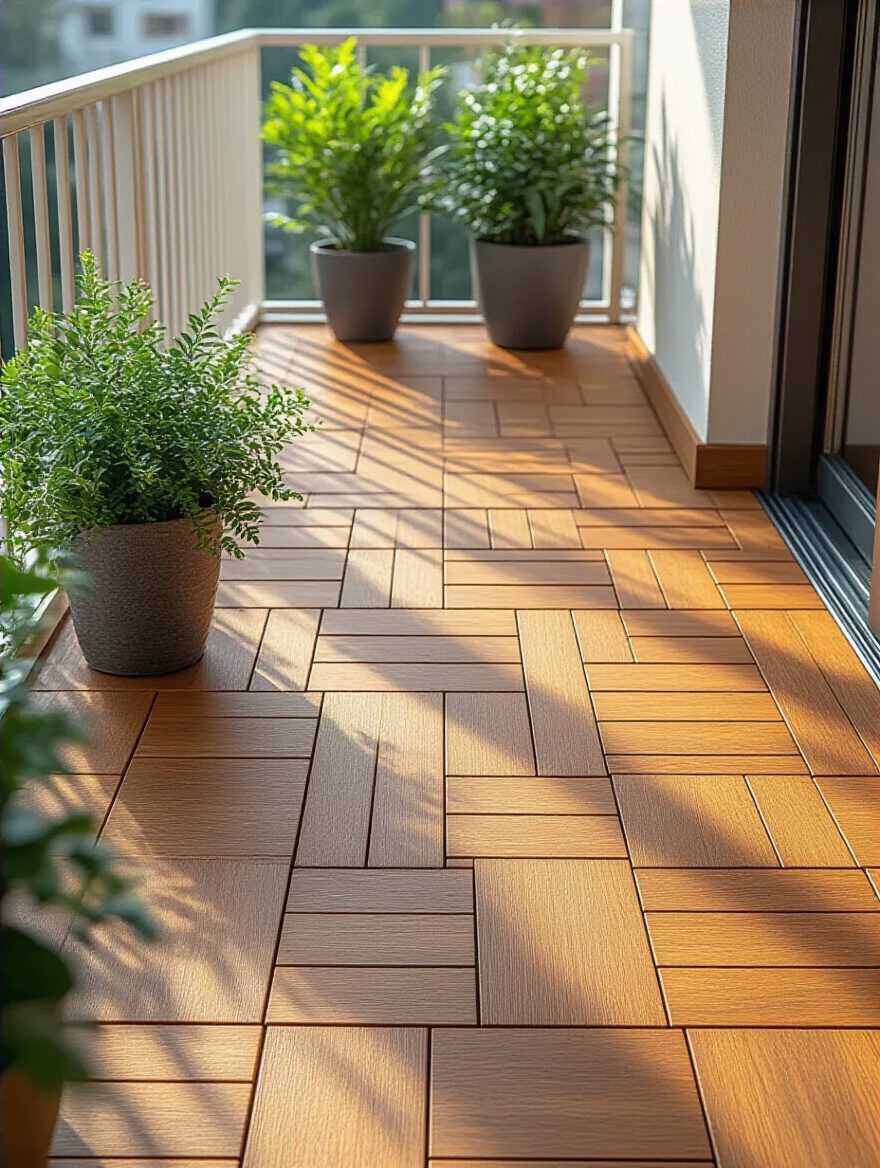
The pro move is to get the ones made from wood composite or a durable plastic that have built-in drainage channels underneath. This lets water and air flow freely, so you don’t get that gross, moldy scum building up. When I first used these on a project, my client couldn’t believe it. We took his grim, industrial-looking balcony and gave it a warm, spa-like wood floor in the time it took to drink a coffee. It’s the single biggest visual upgrade you can make for the least amount of effort.
Okay, your floor is epic. But what are you gonna sit on?
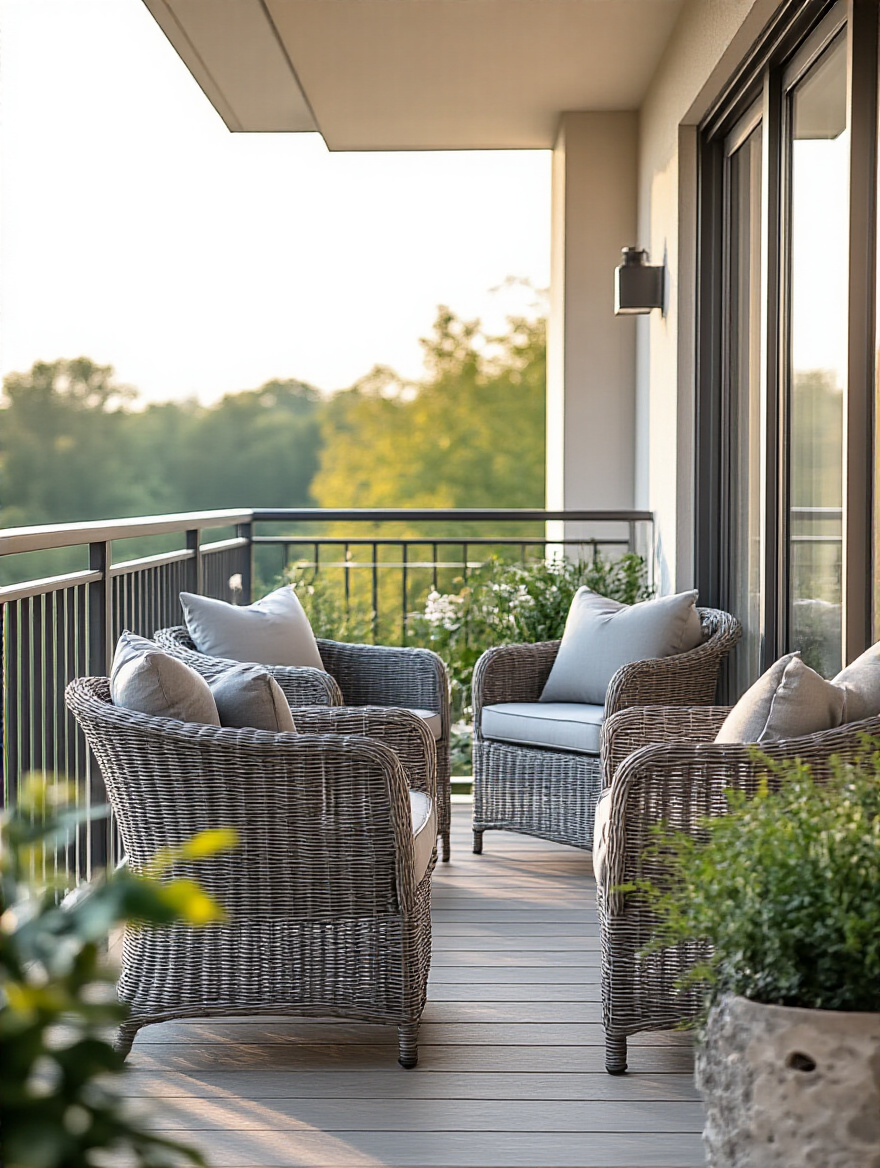
8. Choose Durable, Weather-Resistant Furniture for Longevity
Let me save you some money right now: stop buying cheap outdoor furniture. I know it’s tempting. You see a cute little set for a bargain price and think, “perfect!” But I guarantee you, after one season of sun and rain, the “wood” will be splintering, the metal will be rusting, and the cushions will be a disgusting, faded, mildewy mess. It’s a waste of money and resources.
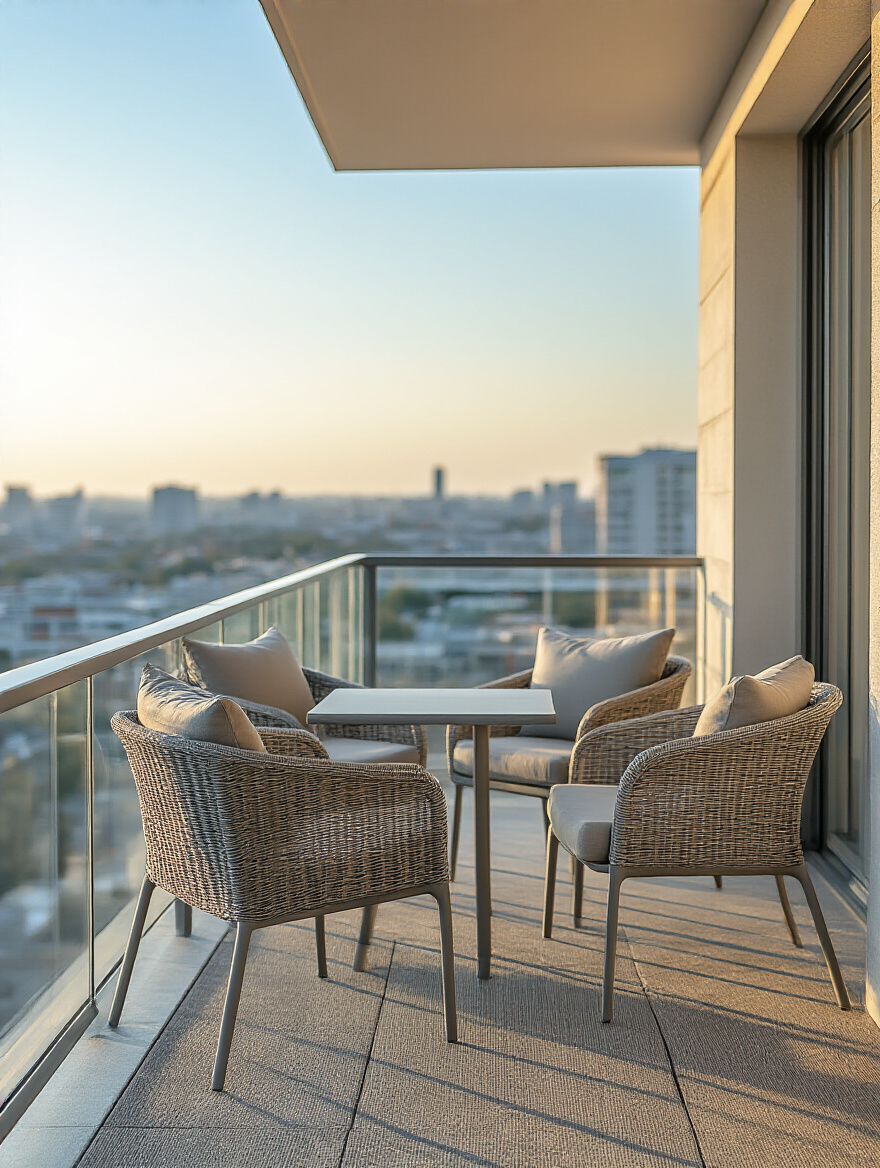
You have to think of outdoor furniture like a car—it lives outside and gets beat up by the elements. You need materials that can take a punch. Look for powder-coated aluminum (it doesn’t rust), high-density polyethylene (HDPE) wicker (it won’t crack or fade), or natural teak (it ages beautifully). For fabrics, the gold standard is Sunbrella. Yes, it’s more expensive upfront. But you’re buying something for 5-10 years, not for 5-10 months. You’re buying for keeps.
Alright, the sun is down. Time to bring on the mood.
9. Install Ambient Lighting for Evening Enjoyment Safely
This is my jam. Lighting is everything. It’s the difference between a balcony that feels like a sterile operating room and one that feels like a cool, private rooftop bar. And please, for the love of all that is holy, do not use your indoor desk lamp out here. It’s a recipe for a short circuit, or worse, a fire. Outdoor lights are built differently for a reason—they’re sealed against moisture.
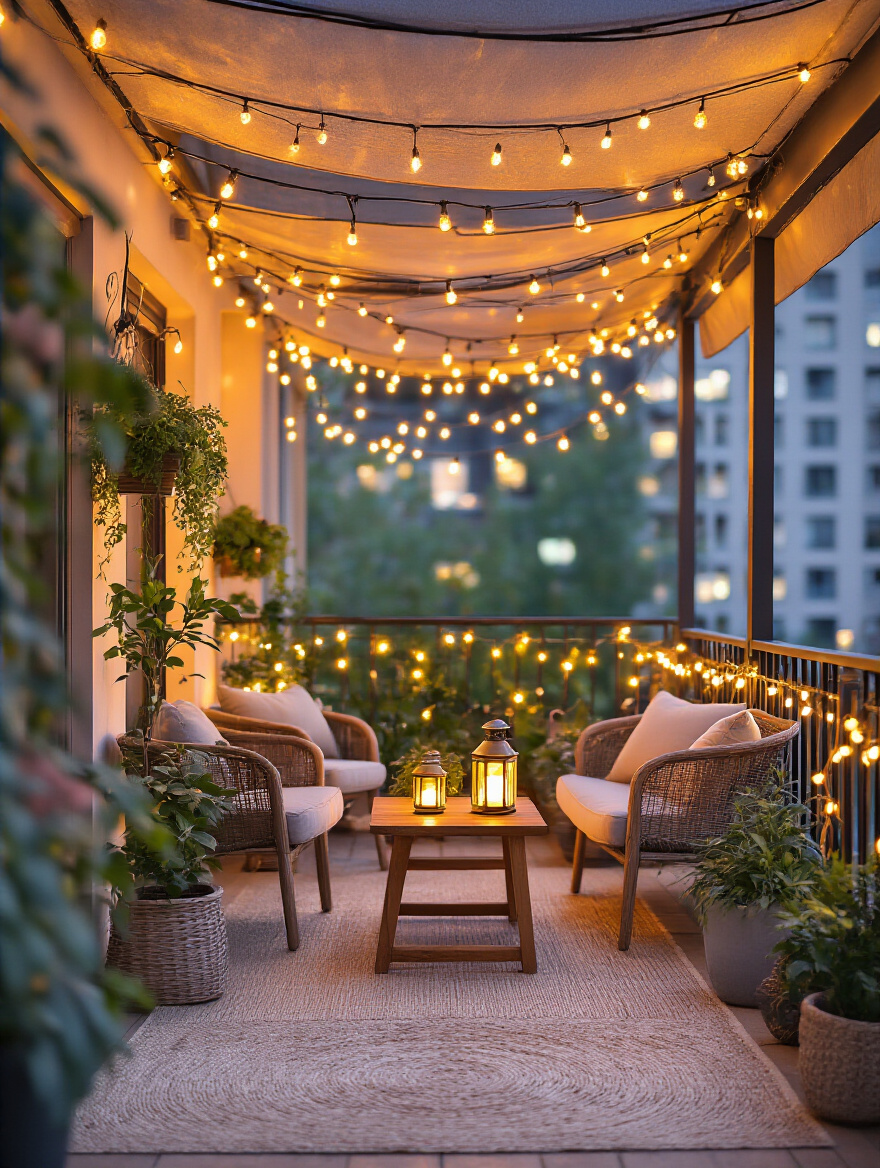
Your best friends here are solar-powered string lights, battery-operated LED lanterns, and plug-in bistro lights. Here’s the shortcut: put everything on a dimmer or a smart plug. One click and you can go from bright, “I-dropped-my-keys” light to a low, warm “let’s-open-another-bottle-of-wine” glow. This is what makes a space feel dynamic and professional. Layer your lighting—some overhead, some on the table, and maybe a small uplight on a cool plant. That’s how you create depth and drama.
With the vibe set, let’s bring some life into this space.
10. Select Right Plants for Sunlight Exposure and Size
Everyone wants a lush, green balcony. But then they go to the nursery, buy what looks pretty, and wonder why everything is dead in a month. It’s because they ignored the golden rule of gardening: right plant, right place. You wouldn’t put a cactus in a swamp, and you shouldn’t put a shade-loving fern in a spot that gets blasted by the sun for eight hours a day.

Before you buy a single plant, spend a day being a sunlight detective. Does your balcony get gentle morning sun (east-facing)? Brutal afternoon sun (west-facing)? Or barely any direct light at all (north-facing)? Write it down. Then go to the nursery and read the tags. Match the plant to your specific conditions. And pay attention to the “mature size.” That tiny little shrub might look cute now, but if it wants to be 6 feet tall in two years, your tiny balcony is not the place for it.
The plants are in, but where does the watering can and bag of soil go?
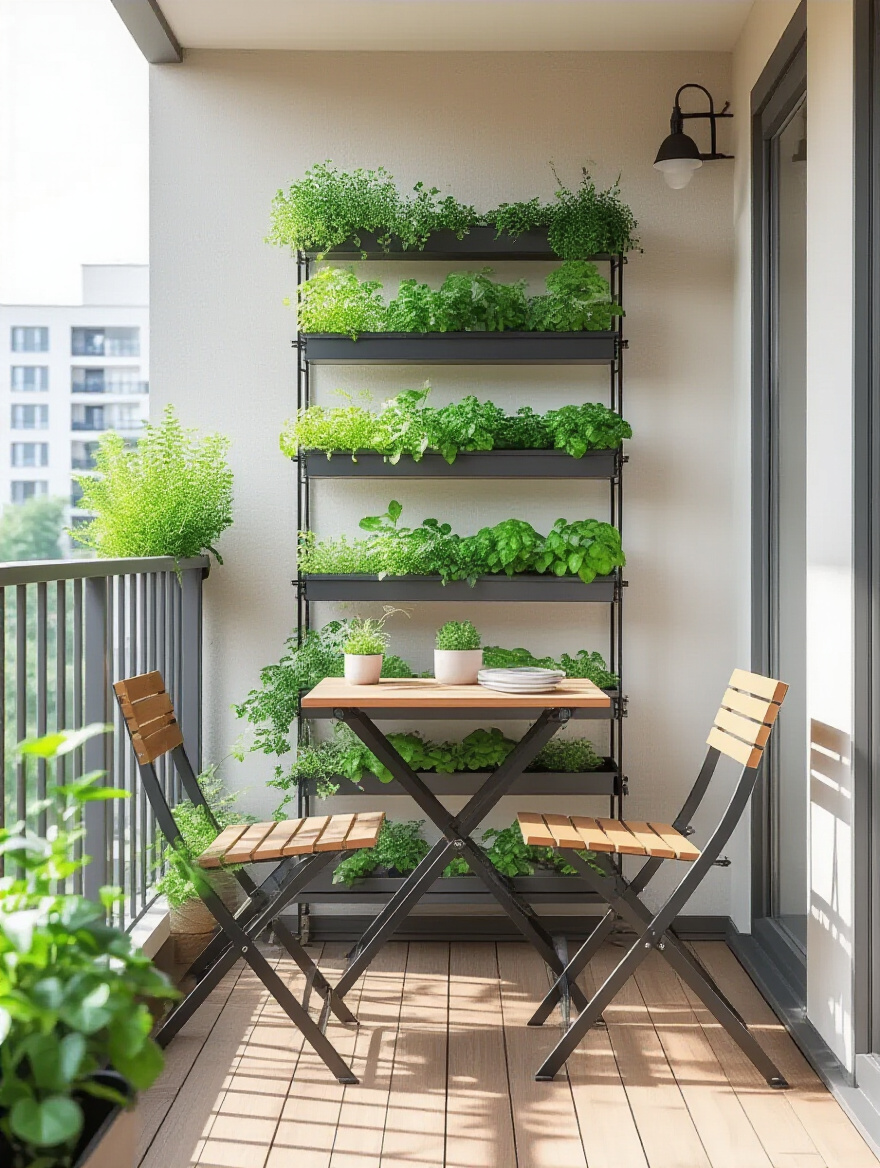
11. Add Vertical Storage to Reclaim Floor Space
If your balcony floor is cluttered with gardening tools, extra cushions, and a sad-looking charcoal bag, you’re doing it wrong. Your floor is for feet and furniture legs, that’s it. Everything else needs to go up. Think vertically. Walls and railings are your untapped real estate. A slim, wall-mounted cabinet or a simple pegboard can hold an insane amount of stuff without taking up a single square inch of floor space.
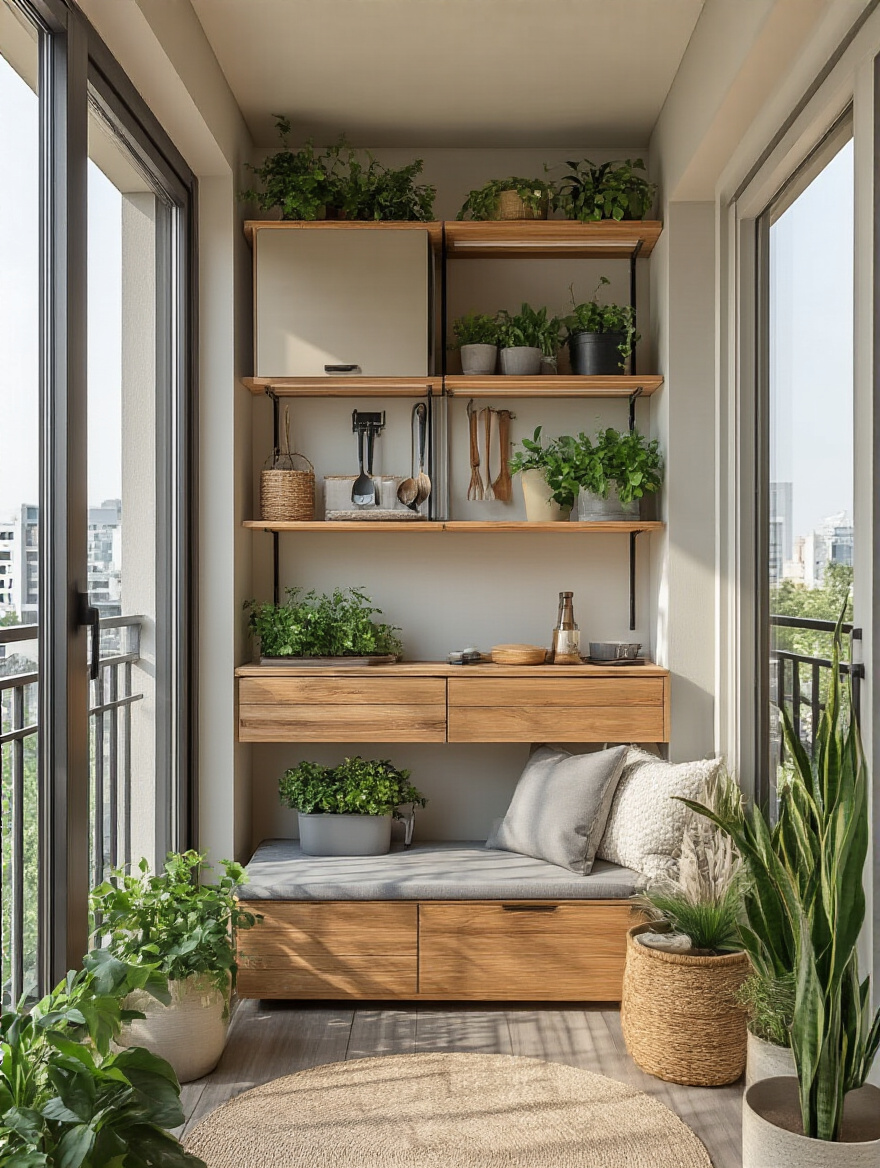
One of the coolest things I ever did on a small project was install a narrow, wall-mounted bench that had a hinged top. Inside? Room for all the cushions, a watering can, and a few small blankets. It was seating and storage. It’s about being clever. Your goal is to have everything you need accessible, but hidden. It makes the space feel cleaner, bigger, and way more relaxing for you and your guests.
Okay, this next one is non-negotiable for parents and pet owners.
12. Secure Railings Safely for Pet and Child Protection
I’m going to be blunt: this is a life-or-death issue. Standard balcony railings often have gaps that are way too wide for a curious toddler or a small pet. A 4-inch gap is big enough for a small child’s head to get stuck, and an even smaller one is an escape route for a cat or a small dog. You cannot be too careful here. Assuming “I’ll just watch them” is not a plan. It only takes a second.
There are great, non-ugly solutions. Clear plexiglass panels can be securely fastened to the inside of your railings, creating an invisible, unclimbable barrier. Heavy-duty, UV-resistant netting is another fantastic option, especially for cats. Just make sure it’s installed taut, with no gaps. I had friends who adopted a kitten and spent one weekend making their balcony “cat-proof.” It was the best peace of mind they ever bought, allowing their cat to enjoy the fresh air without them having a constant, low-grade panic attack.
Elevating Comfort & Visual Appeal
The foundations are solid. The essential gear is in place. Now we layer on the personality. This is the stuff that makes your guests say, “Wow, I love this spot,” and actually mean it. This is what turns a functional space into an irresistible one.
13. Integrate Soft Textiles for Immediate Comfort and Style
You know that feeling when you sink into a couch with great pillows and a soft throw blanket? You can—and should—have that same feeling on your balcony. Hard chairs and bare floors scream “don’t stay too long.” Soft textiles—rugs, pillows, throws—are a visual and physical invitation to hang out, get comfortable, and relax. It’s the fastest way to blur the line between your indoor living room and your outdoor one.
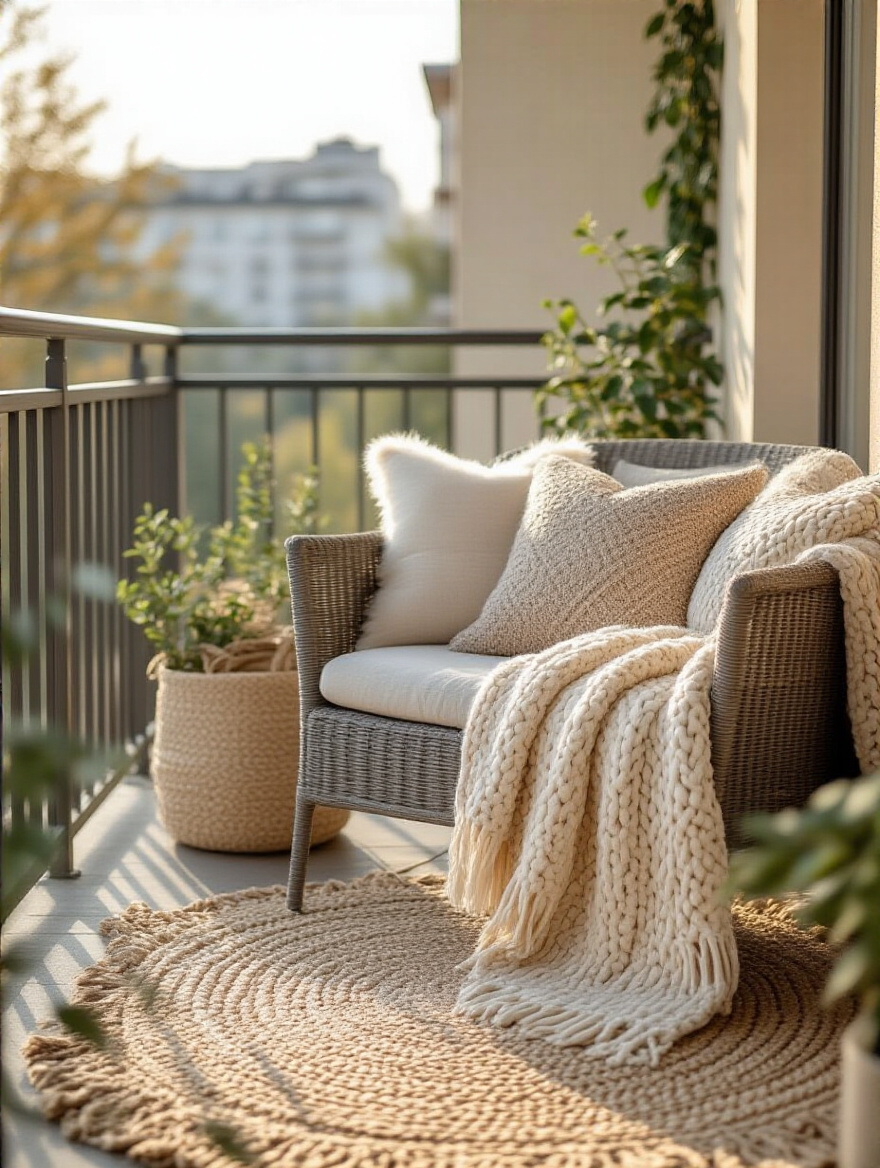
But here’s the deal: you can’t just use your indoor stuff. It’ll be ruined in a week. Invest in an outdoor rug (made of polypropylene, it can handle rain) and pillows made with outdoor-rated fabric (like that Sunbrella stuff I mentioned). The shortcut? Get a waterproof deck box or a storage bench. When you’re done for the night or if it looks like rain, toss everything inside. It takes 60 seconds and will make your textiles last for years.
The space is now officially cozy. Let’s make it lush.
14. Curate Greenery with Planters and Hanging Baskets
Plants are more than just decoration; they’re living architecture. They add color, texture, and can even make your space feel more private. The key is to mix it up. Don’t just line up a sad little row of identical pots on the floor. Think in three dimensions: high, medium, and low.
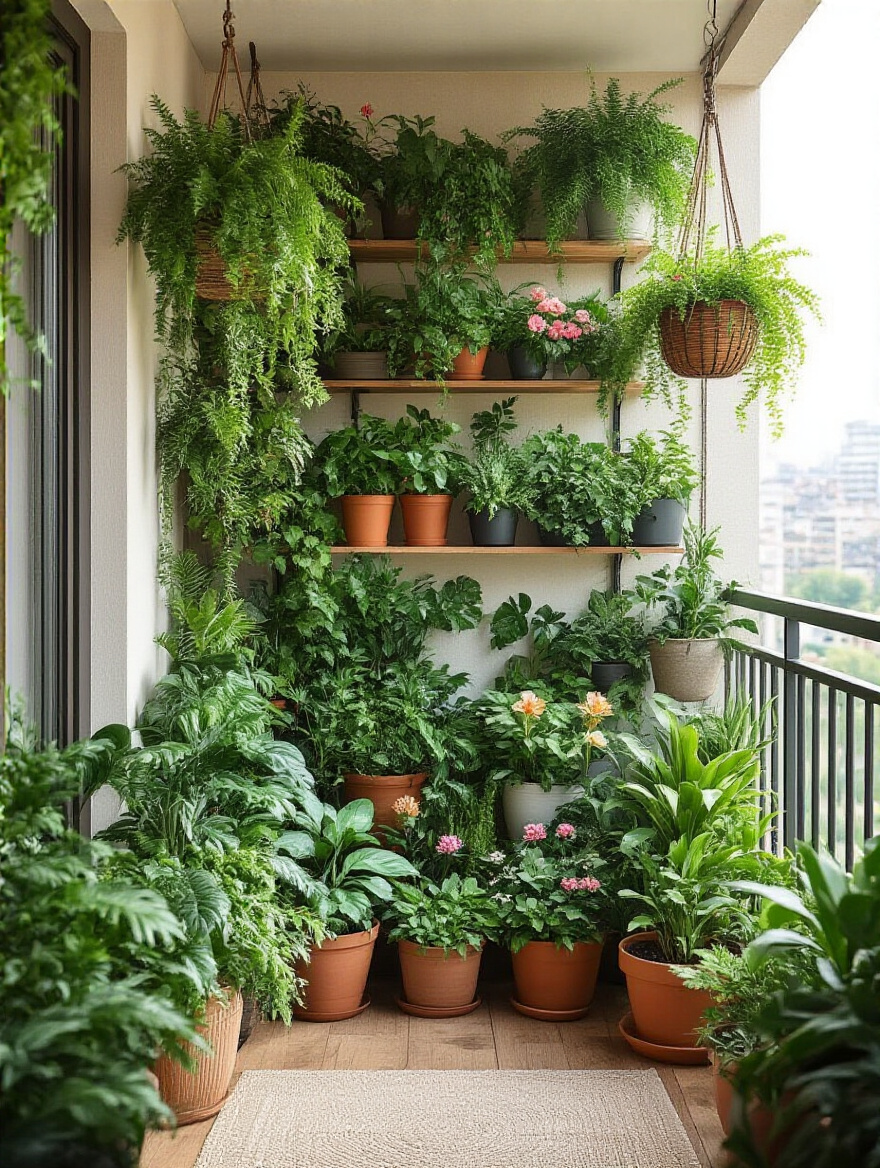
Use a couple of larger pots on the floor for bigger statement plants. Then, use railing planters for color at eye level. Finally, add hanging baskets for trailing plants that create a beautiful, lush canopy effect. This layering is what creates that immersive, “secret garden” feel, even on a 10th-floor balcony. Just be mindful of weight—use lightweight fiberglass or plastic pots, especially for anything you’re hanging.
Let’s make this space unmistakably yours.
15. Add Personal Touches with Decorative Accents
This is where your personality comes out to play. A space without personal touches feels like a hotel room—nice, but soulless. This is your chance to add things that tell a story. Maybe it’s a few cool lanterns you picked up on a trip, a quirky statue, or a wind chime that makes a sound you love.
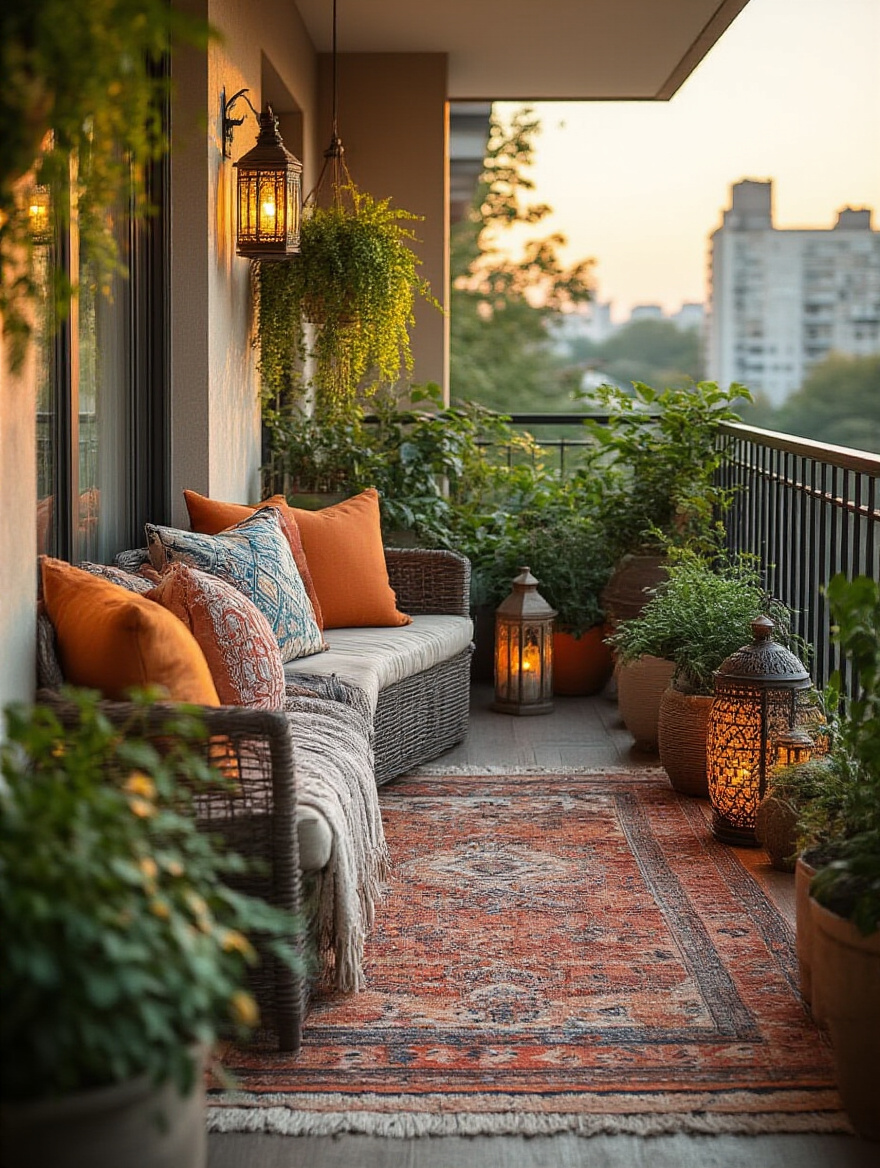
The trick is to curate, not clutter. Don’t just fill every surface with little knick-knacks. Choose a few meaningful items and give them room to breathe. I tell my clients to think multi-sensory. You have the visuals covered, but what about sound (wind chimes, a tiny water feature) and smell (a pot of lavender or scented candles in hurricane lamps)? When you engage multiple senses, you create a much richer and more memorable experience for everyone.
The space is pretty, but is it usable when the sun is beating down?
16. Optimize Shade Solutions for All-Day Comfort
A sun-blasted, scorching hot balcony is a useless balcony. If you can only use it for an hour in the morning and an hour in the evening, you’re missing out. Shade isn’t a luxury; it’s a necessity for making the space functional all day long. And a good shade solution doesn’t just block sun, it can drop the “feels like” temperature by a good 10-15 degrees.
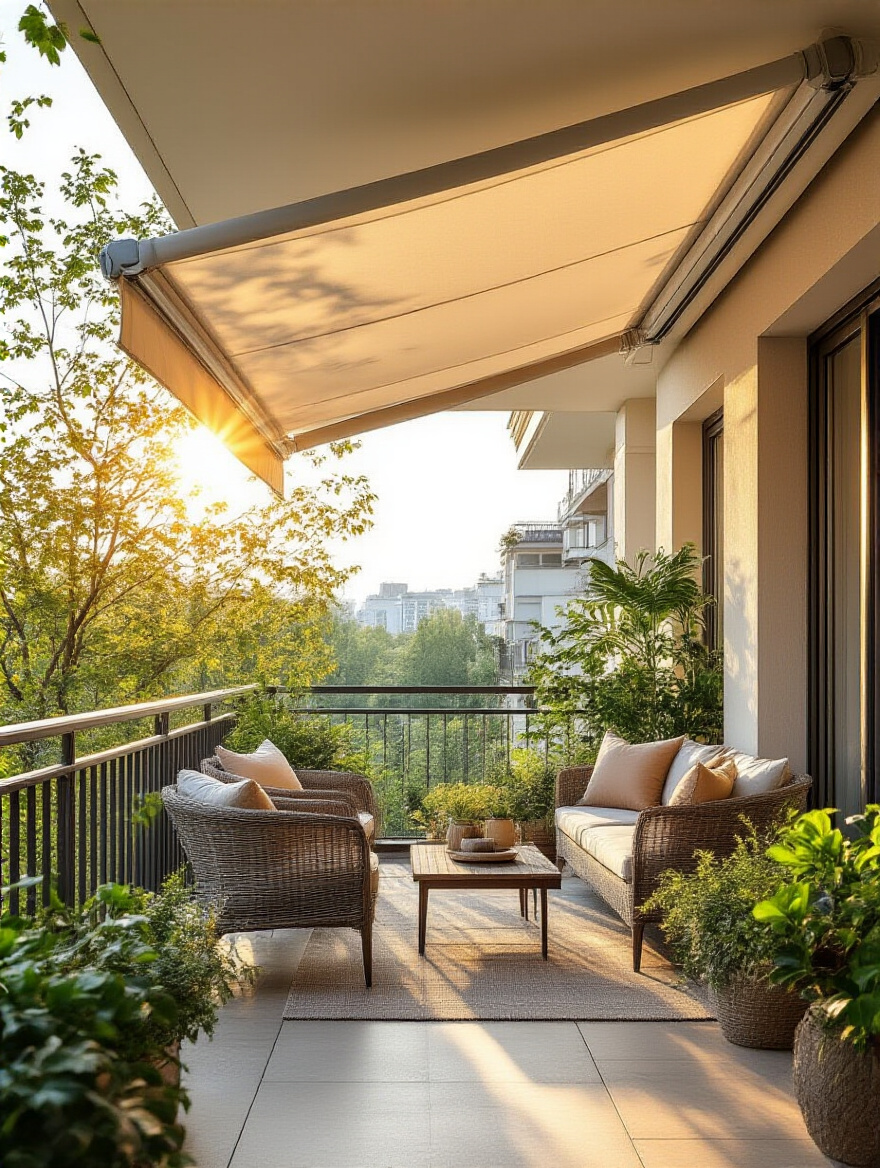
Your best options are a high-quality cantilever umbrella (the kind with the base on the side, so it doesn’t get in the way of your table), a retractable awning if you can install one, or a shade sail. The pro tip is to get something adjustable. The sun moves, so your shade needs to be able to move with it. A tilting umbrella or a retractable screen gives you control, which means you can create the perfect comfortable environment for you and your guests, no matter the time of day.
With all that space, let’s carve out a special little zone.
17. Design a Cozy Nook for Relaxation and Reading
Even on a party-ready balcony, you need a “me space.” This is the one corner that’s all about total, selfish comfort. It’s your escape pod. Find the most protected corner of your balcony and claim it. It could be for a single, super-comfortable armchair, a hanging cocoon chair, or even just a pile of giant, weather-resistant floor cushions.
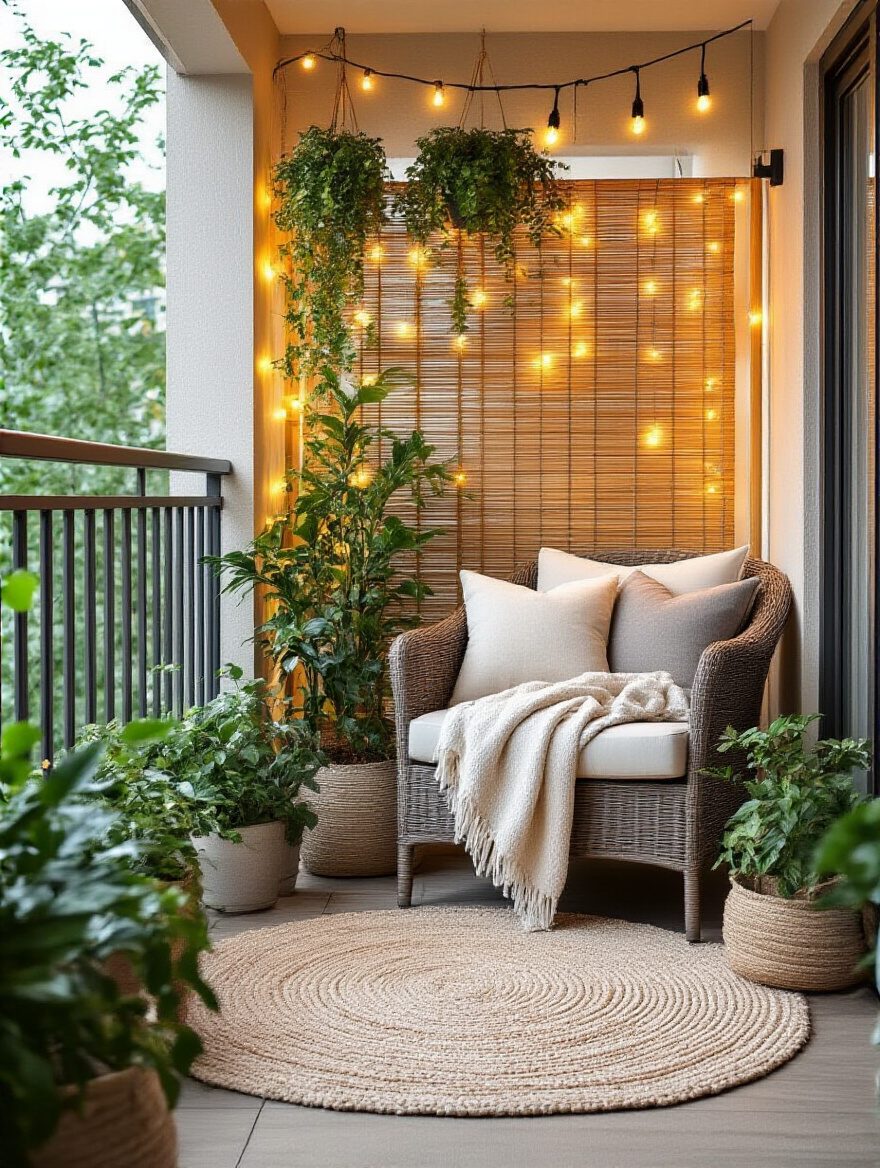
The key is to define it as a separate zone. Use a small rug to anchor it, maybe a small privacy screen to shield it, and give it its own dedicated light source, like a single lantern or a small, directional reading light. This is the spot you retreat to with a book or your headphones when you need to decompress. It makes the whole balcony feel more versatile and special.
Smart Balcony Living & Ongoing Maintenance
You’ve built your amazing space. High-five. Now, let’s make it easy to manage and protect your investment. This is where a little bit of tech and smart planning saves you a ton of time and hassle down the road.
18. Implement Smart Watering Systems for Effortless Plant Care
Remember all those beautiful plants you bought? They’re thirsty. And if you’re busy or travel a lot, remembering to water them is a pain. This is where tech is a game-changer. A simple drip irrigation system connected to a battery-powered timer is a set-it-and-forget-it solution that will keep your plants perfectly watered without you lifting a finger.
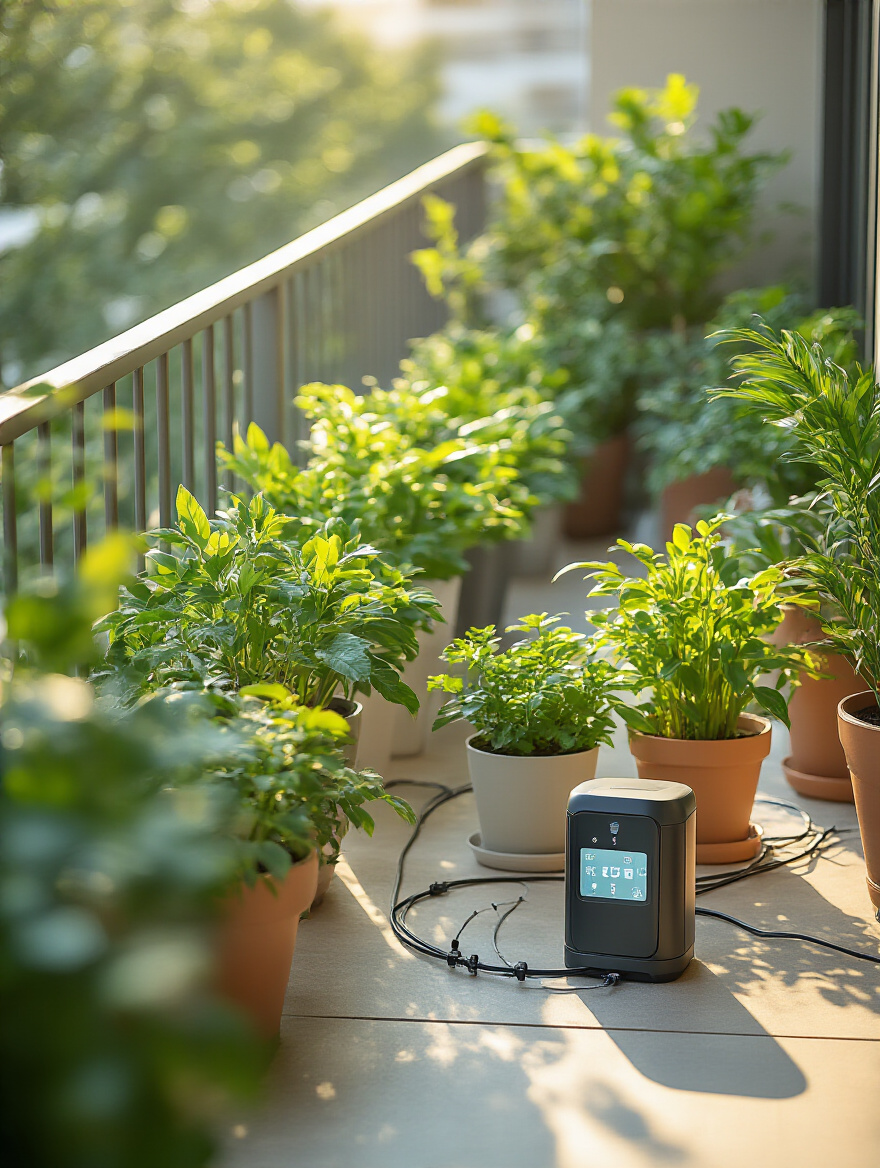
These kits are surprisingly cheap and easy to set up. You just run a thin tube around to all your pots, poke in a little emitter for each one, and set the timer. Your plants get a slow, steady drink right at the roots, which is way more effective than just blasting them with a hose. It saves water, saves time, and most importantly, saves your plants from a slow, thirsty death while you’re on vacation.
Let’s make those plants work for you, shall we?
19. Create a Vertical Herb or Vegetable Garden Easily
Why just grow flowers when you can grow your own mojito ingredients? A vertical garden is the perfect way to cultivate fresh herbs (mint, basil, rosemary, chives) and even small veggies (lettuce, strawberries) without sacrificing any floor space. You can buy pre-made systems or even just hang a series of railing planters in a tiered arrangement.
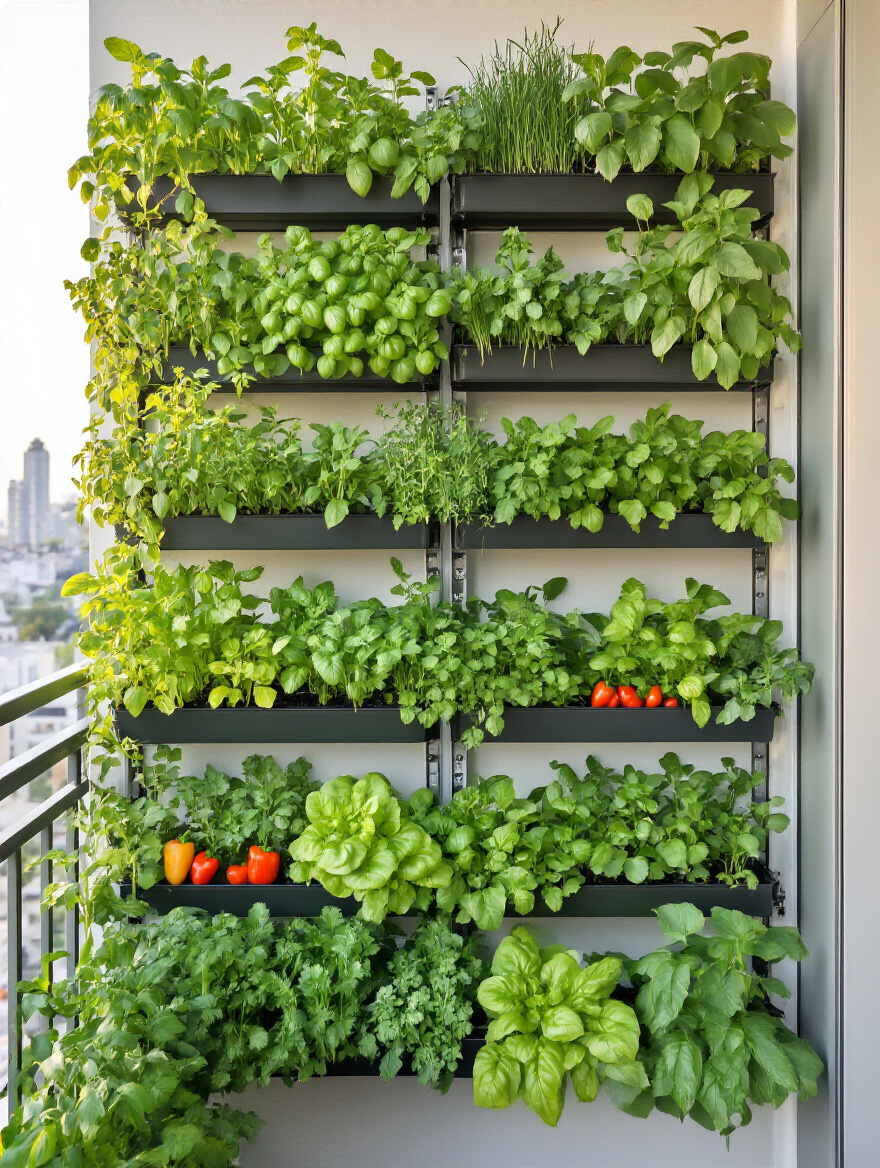
The “wow” factor of snipping fresh mint for your guests’ drinks right from your balcony wall is off the charts. It’s a conversation starter and a functional upgrade. The key, again, is watering. Vertical gardens dry out fast. That smart drip irrigation system we just talked about? It’s perfect for this. Run a line up your vertical garden and your ‘balcony-to-table’ setup is complete.
Now for lighting that’s both smart and sustainable.
20. Select Solar-Powered Lights for Sustainable Evening Glow
I love smart home tech, but I also love simple, effective solutions. Modern solar lights have gotten so good. We’re not talking about those dim, bluish, pathetic little stakes you stick in the ground. We’re talking about beautiful, warm-white bistro string lights and stylish lanterns that soak up the sun all day and then automatically turn on at dusk, casting a gorgeous glow all evening.
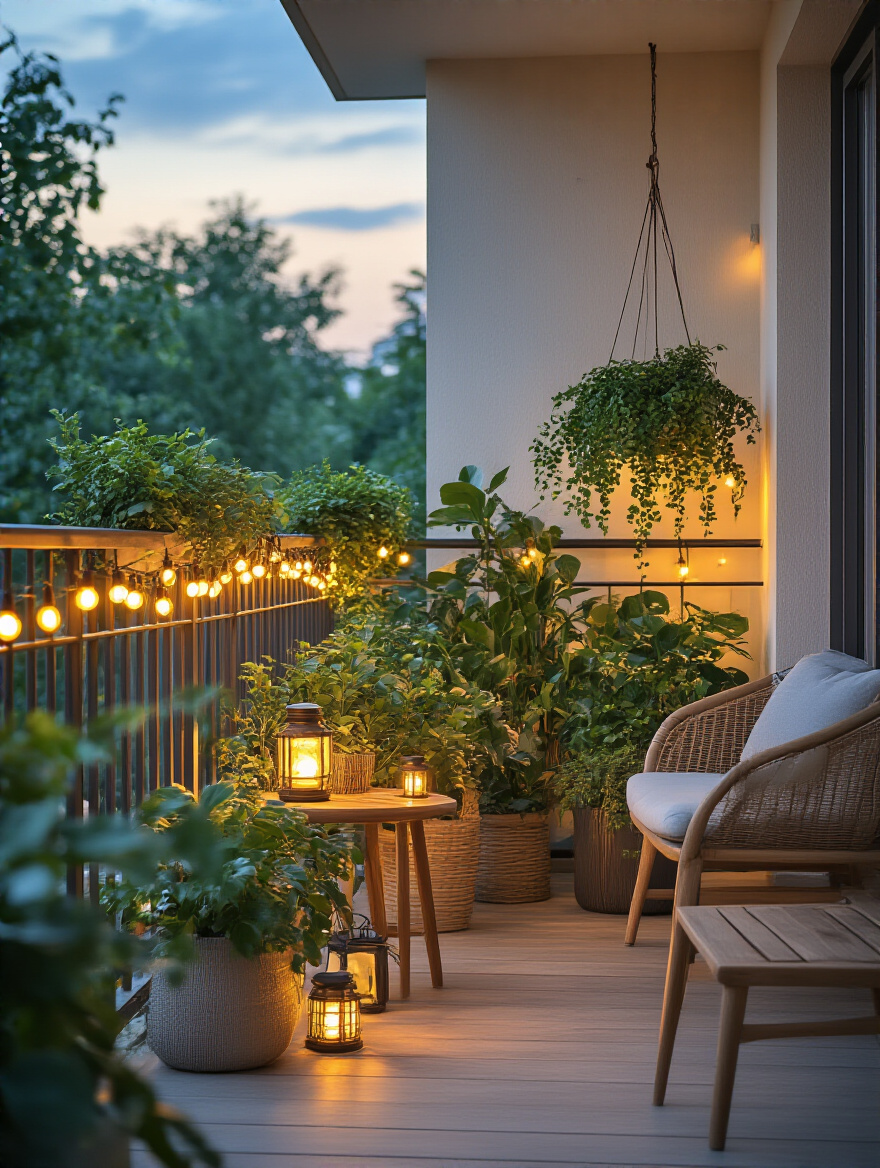
The best part? No wires, no electricians, and a $0 addition to your electricity bill. This is the ultimate “set it and forget it” lighting solution. Just make sure the solar panel is in a spot that gets at least 6 hours of direct sun. I use these all the time on projects where running power isn’t practical. It’s an easy, eco-friendly win that creates an incredible atmosphere.
You’ve invested time and money in this stuff. Let’s make sure it lasts.
21. Protect Your Decor From Harsh Weather Damage
Mother Nature is undefeated. Sun will fade fabrics, rain will cause mildew, and wind will turn your favorite umbrella into a projectile. Protecting your investment isn’t just a chore; it’s a financial strategy. The #1 thing you can do is buy high-quality, breathable, waterproof covers for your furniture. They are worth every penny.
My pro-level tip is to get everything slightly off the ground. Put small plastic or rubber “feet” under your furniture legs and even your planters. This little bit of elevation allows air to circulate underneath and stops water from pooling, which is the primary cause of rot and mildew on both your decor and your balcony floor. A little bit of routine maintenance—covering things up, sealing wood once a year—is what separates decor that lasts two years from decor that lasts ten.
Finally, let’s keep things fresh.
22. Plan Seasonal Refresh for Year-Round Balcony Enjoyment
The best entertainment spaces are dynamic, not static. Don’t let your balcony get stale. A simple seasonal refresh keeps it exciting and, more importantly, keeps it comfortable and usable all year round. It doesn’t have to be a major overhaul.
In the spring and summer, it’s all about vibrant flowers, lightweight throws, and maybe a mister for hot days. When fall hits, swap the annuals for hardy mums, bring out the warmer wool blankets, and add a small, safe electric or infrared heater. You can even use the same foundational furniture but just swap out the pillow covers—from bright yellows in summer to deep oranges and reds in the fall. This simple habit turns your balcony from a “summer-only” space into a true four-season retreat.
It’s Not a Balcony, It’s a Stage for Your Life
So, there you have it. This isn’t just a list of 22 ideas; it’s a roadmap to reclaiming a piece of your home and turning it into a magnet for good times. A well-designed balcony is more than just a project. It’s where memories are made. It’s the impromptu dinners, the late-night conversations, the morning coffees, and the quiet moments of peace. It’s an investment in your social life and your personal well-being. So stop using it as a storage locker. Go out there, pick one or two of these ideas to start with, and begin building the best room in your house.


