Picture this: It’s 6 PM on a Tuesday. You’re trying to get a healthy dinner on the table after a long day of meetings. You open the pantry to grab a can of diced tomatoes, and a cascade of half-empty chip bags and precariously balanced pasta boxes comes tumbling down. You know the tomatoes are in there somewhere, but finding them means excavating three layers of stuff you forgot you even owned. Defeated, you grab your phone and order takeout.
That moment of frustration—that expensive, time-wasting, morale-crushing chaos—is where my world of corporate efficiency design collides with yours. An inefficient system, whether it’s in a Fortune 500 company’s workflow or your kitchen pantry, bleeds time, money, and energy. It’s that moment of realization that separates intentional, high-performance system design from the accidental accumulation of clutter most of us are living with. This isn’t about creating a Pinterest-perfect pantry; it’s about building a functional, ergonomic system that gives you back your time and peace of mind.
Laying the Groundwork: Planning & Assessment (Part 1)
Before you buy a single acrylic bin, stop. This first phase is the blueprint stage, and it’s non-negotiable. So many people get excited, rush to The Container Store, and try to organize the chaos they already have. That’s like trying to decorate a house before the foundation is poured. Here, we’re going to conduct a full-scale audit of your space and your stuff to build a rock-solid plan. This groundwork ensures that every choice you make from here on out is intentional, effective, and built to last.
1. Conduct a Thorough Pantry Purge and Inventory
This isn’t the fun part, I get it. But it is, without question, the most critical step. The biggest mistake people make is trying to organize clutter. You can’t. You have to start with a clean slate. This purge is an audit—it tells you what you actually use, what you waste money on, and how much space you truly need. You wouldn’t design a new office without knowing exactly what equipment and personnel need to fit inside it. Same principle.
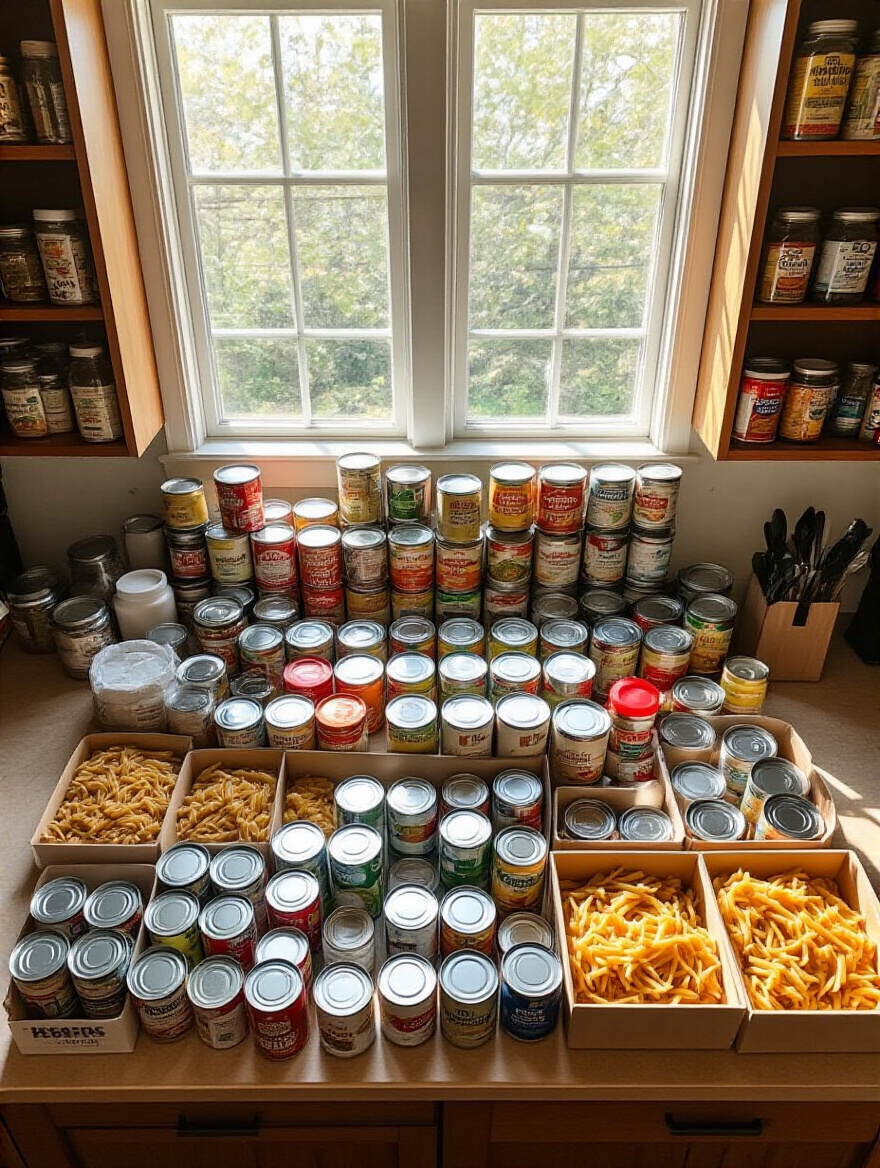
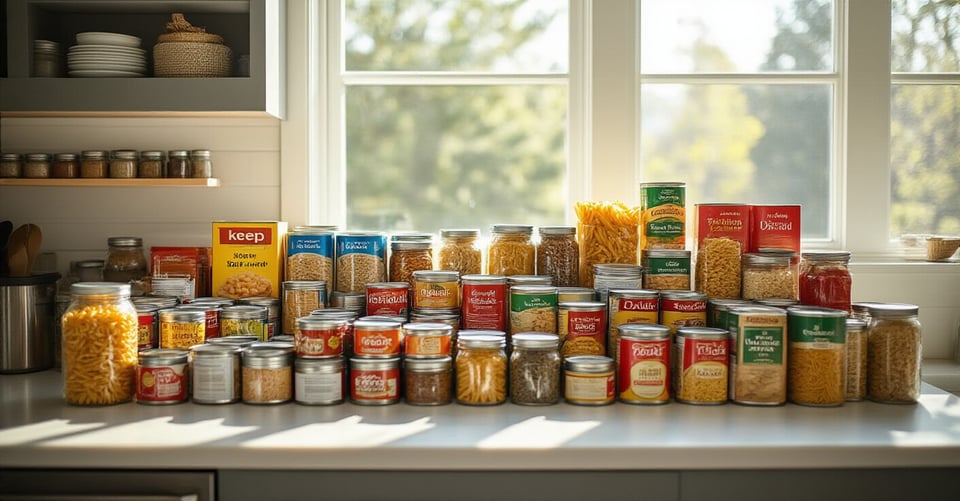
Pull everything out. Yes, every last spice jar and bag of lentils. Get it all onto your countertop or dining table where you can see it. Now, be ruthless. Check every single expiration date. If it’s expired, it’s trash. If it’s something you bought for a recipe two years ago and never touched again, donate it (if it’s unexpired and unopened). What’s left is your real-world inventory. Group it into categories and make a list. This is your data, and it’s going to drive every decision we make next.
2. Accurately Measure Your Pantry Dimensions and Space
Okay, you’ve purged. Now, before you even think about putting things back, grab a measuring tape. The BS everyone falls for is thinking “it will probably fit.” Hope is not a strategy. You need exact dimensions of your pantry’s width, depth, and—this is the million-dollar measurement everyone forgets—the vertical height between each shelf. This tells you what containers will actually stack, what risers will fit, and how much usable volume you’re working with.
Write these numbers down. Sketch a quick diagram. Note any obstructions like pipes or outlets. Think of this like a floor plan for your pantry. You wouldn’t buy a new desk for your office without measuring the wall space, and you’re not going to buy storage solutions without a precise plan. This five-minute task will save you hours of frustration and dozens of dollars in returns later.
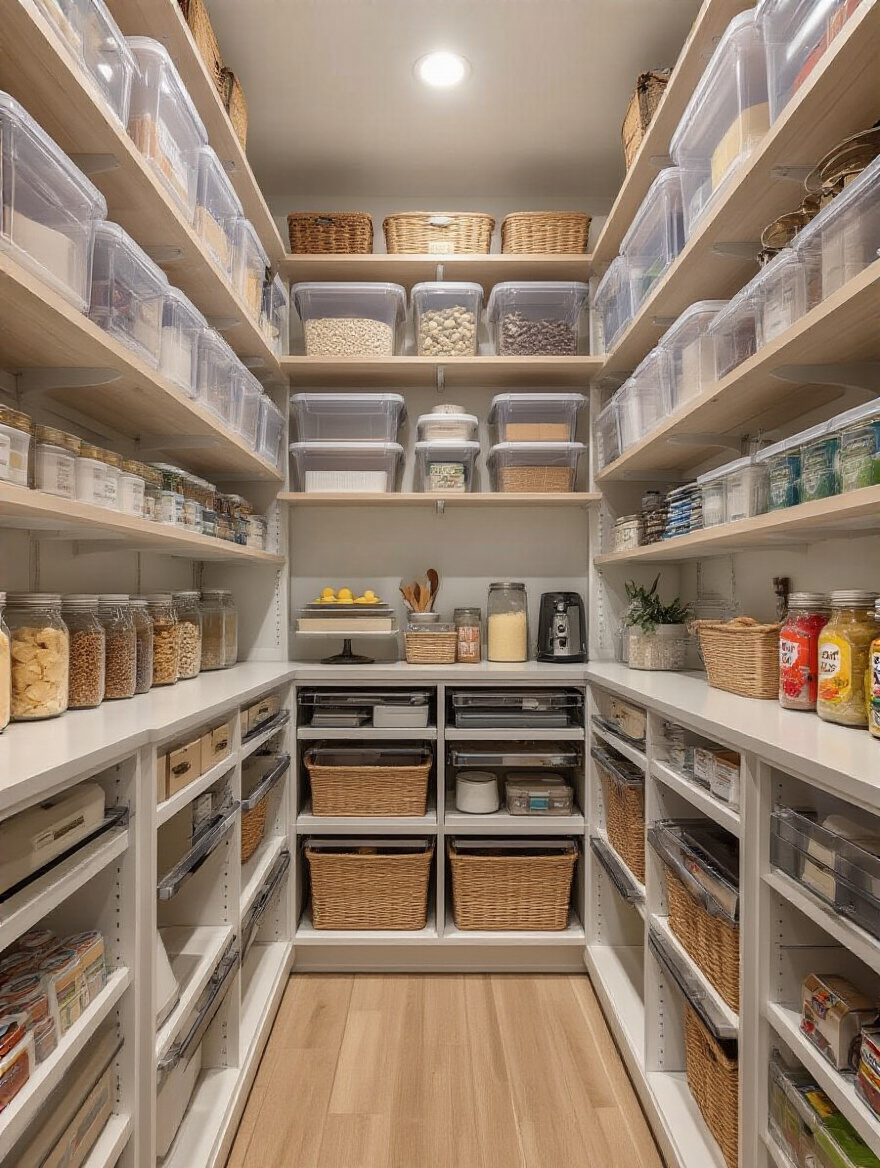
3. Define Your Pantry Zones for Logical Item Grouping
Zoning is a concept I use constantly in office design to improve workflow, and it’s a game-changer for a pantry. It’s about reducing cognitive load. You shouldn’t have to think about where things are; it should be intuitive. By creating designated “zones,” you’re creating an ergonomic map for your kitchen. Prime real estate—the shelves at eye-level—should be for your daily drivers: oils, spices you use constantly, breakfast items, maybe coffee.
Group all your categories from the purge into logical zones: “Baking,” “Pasta & Grains,” “Canned Goods,” “Snacks,” “Breakfast.” Heavy items like bulk bags of flour or cases of sparkling water go on the floor or the lowest shelf to prevent strain. Less-frequently used items (like your Thanksgiving turkey-brining kit) go up high. This simple act of assigning a home to every category transforms your pantry from a storage closet into a high-functioning workspace.
4. Establish a “Use By” Date Rotation System
Here’s a shortcut ripped straight from professional kitchens and grocery stores: FIFO. It stands for “First-In, First-Out,” and it’s the simplest, most effective way to stop wasting money on expired food. The concept is brutally simple: when you buy a new can of beans, it goes to the back of the row, pushing the older cans to the front. That’s it. This ensures you’re always using up the oldest items first.
When you decant items into containers, use a piece of painter’s tape or a small dissolvable label on the bottom to write the expiration date. For a real pro-level shortcut, create a small basket or bin labeled “Use Me First!” Anything that’s nearing its expiration date goes in there. When you’re meal planning for the week, you start with that basket. It’s an active inventory management system that will immediately cut down your food waste.
Laying the Groundwork: Planning & Assessment (Part 2)
We’ve audited our inventory and taken precise measurements. Now we move from analysis to design. This part is about envisioning the most efficient version of your pantry. Think like a designer—we’re not just putting stuff on shelves, we’re architecting a space for maximum performance. This is where you research the tools and layouts that will bring your system to life, ensuring every purchase is purposeful.
5. Research Optimal Pantry Layout Designs for Efficiency
Now that you have your zones and measurements, you can start looking for inspiration with purpose. Don’t just scroll Pinterest aimlessly. Instead, search for layouts designed for your type of pantry—is it a deep, narrow closet? A wide, shallow cabinet? A walk-in? Look at how others have solved the specific challenges you face. Pay attention to how they use vertical space, corners, and door storage.
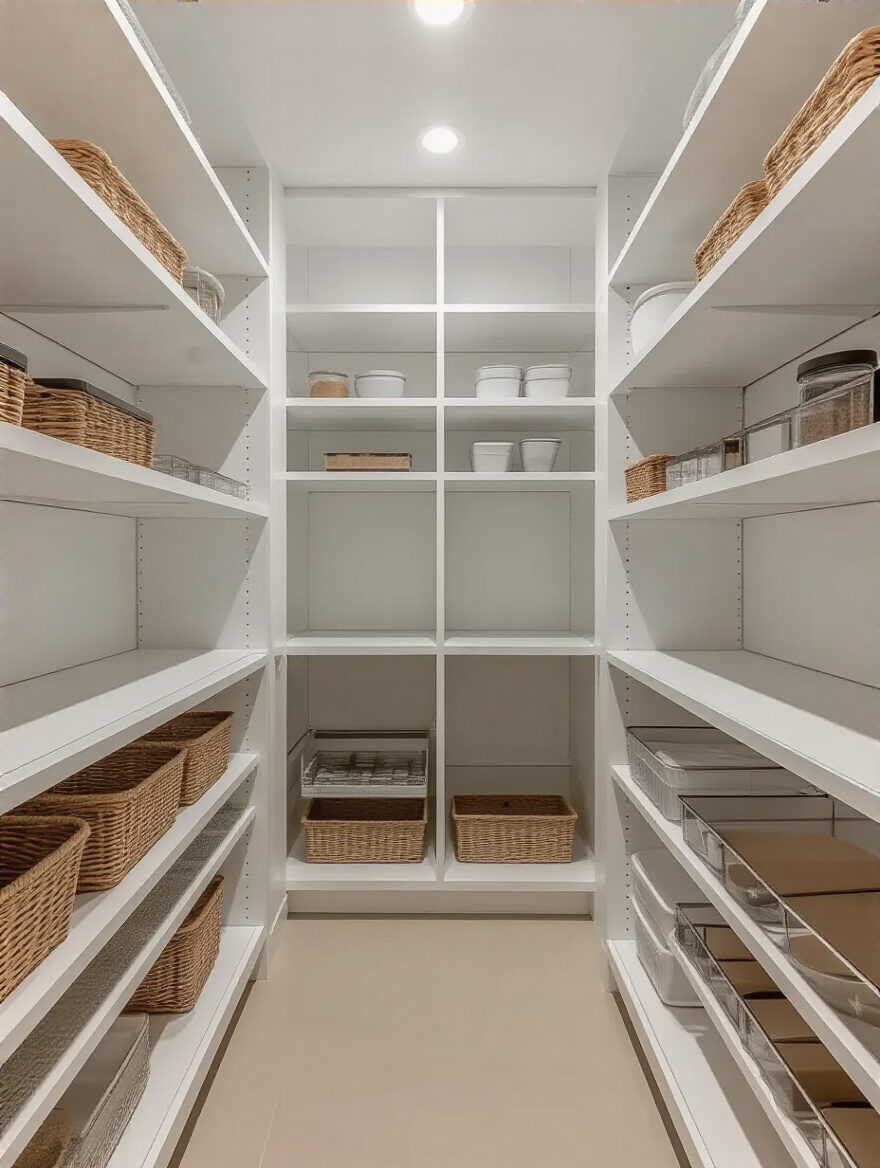
This is where you marry your data (your inventory and measurements) with design possibilities. For a deep pantry, you might realize pull-out drawers are the only logical solution. For a shallow one, tiered risers and door racks become your best friends. The goal here isn’t to copy someone else’s pantry, but to steal the principles that will make your specific space work harder for you. Make a list of the solutions you think will best serve your zones and workflow.
Essential Tools & Core Implementation (Part 1)
This is the phase where the plan starts to become a physical reality. Now that you have a strategy, it’s time to select the hardware that will execute it. The key here is to invest in tools that solve specific problems—visibility, accessibility, and preservation. We’re not just buying containers; we’re investing in the infrastructure of our high-efficiency system.
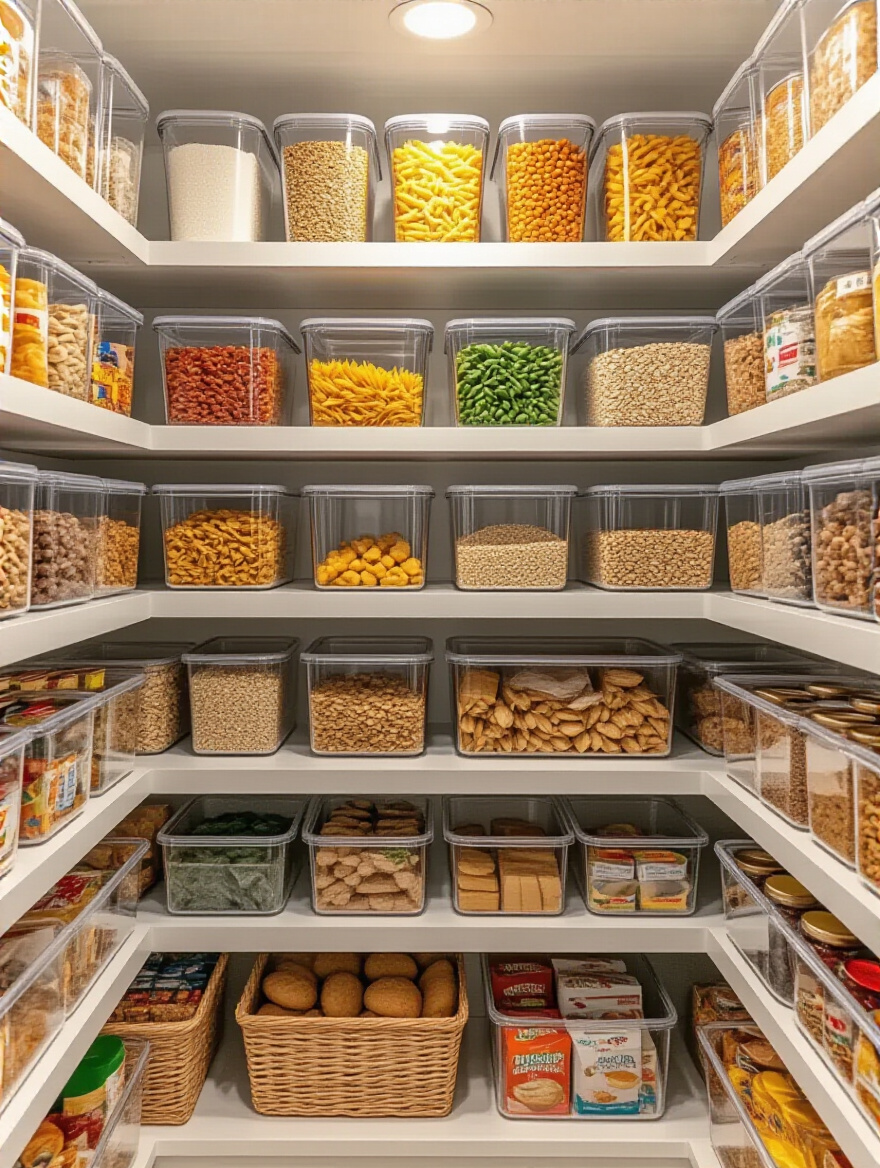
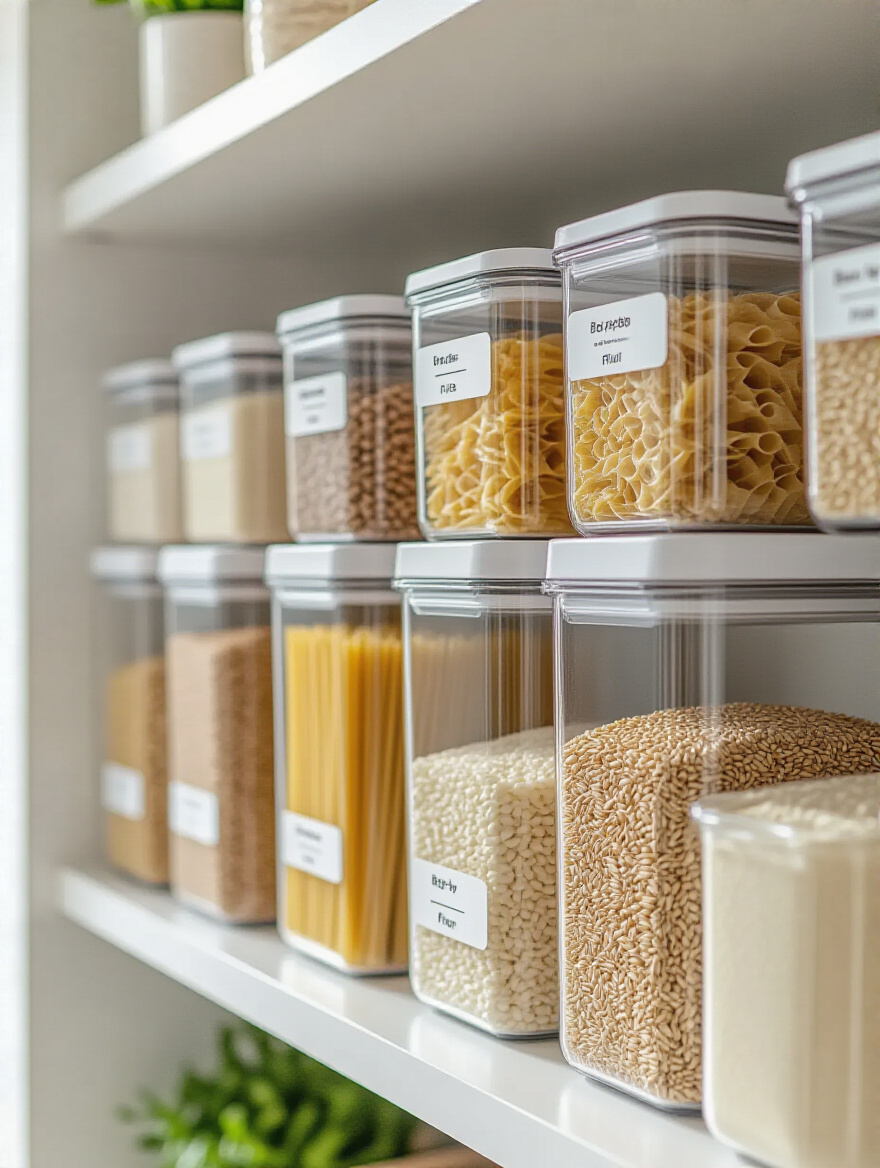
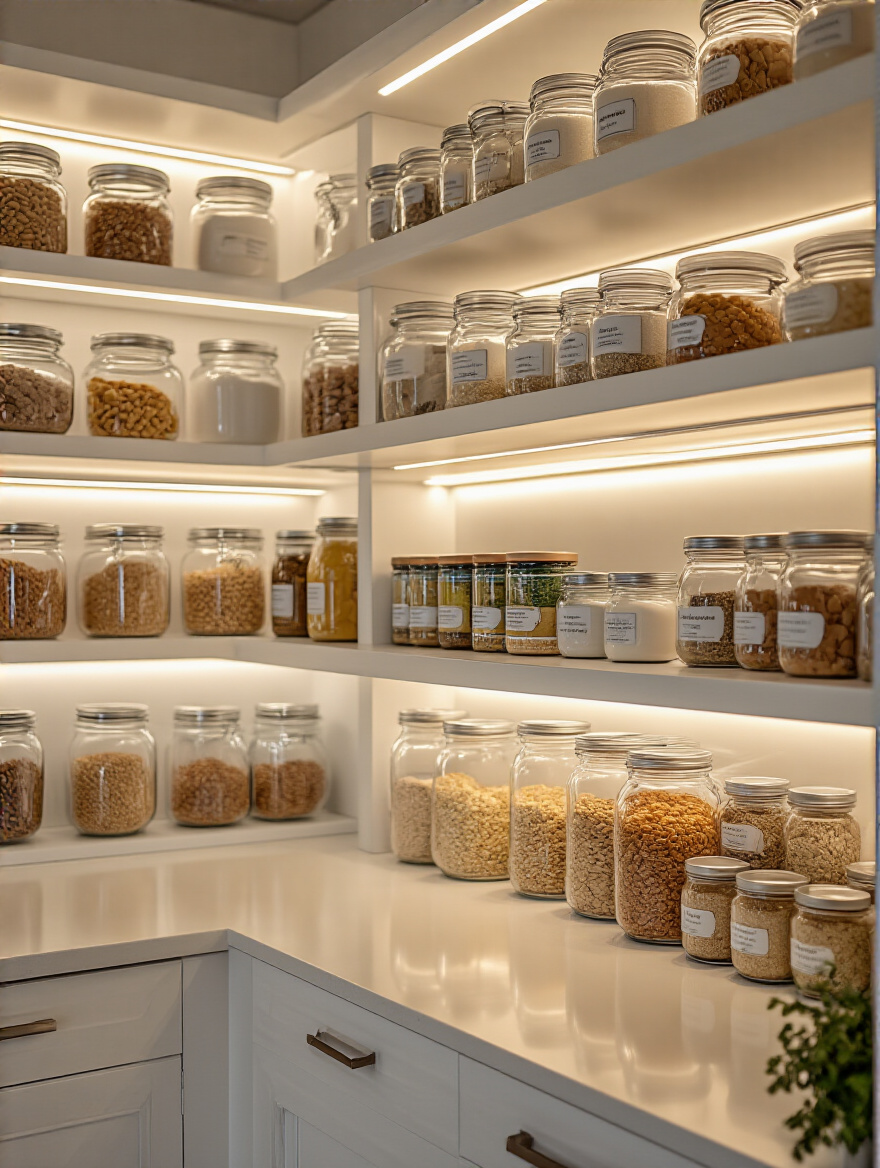
6. Invest in High-Quality, Airtight Food Storage Containers
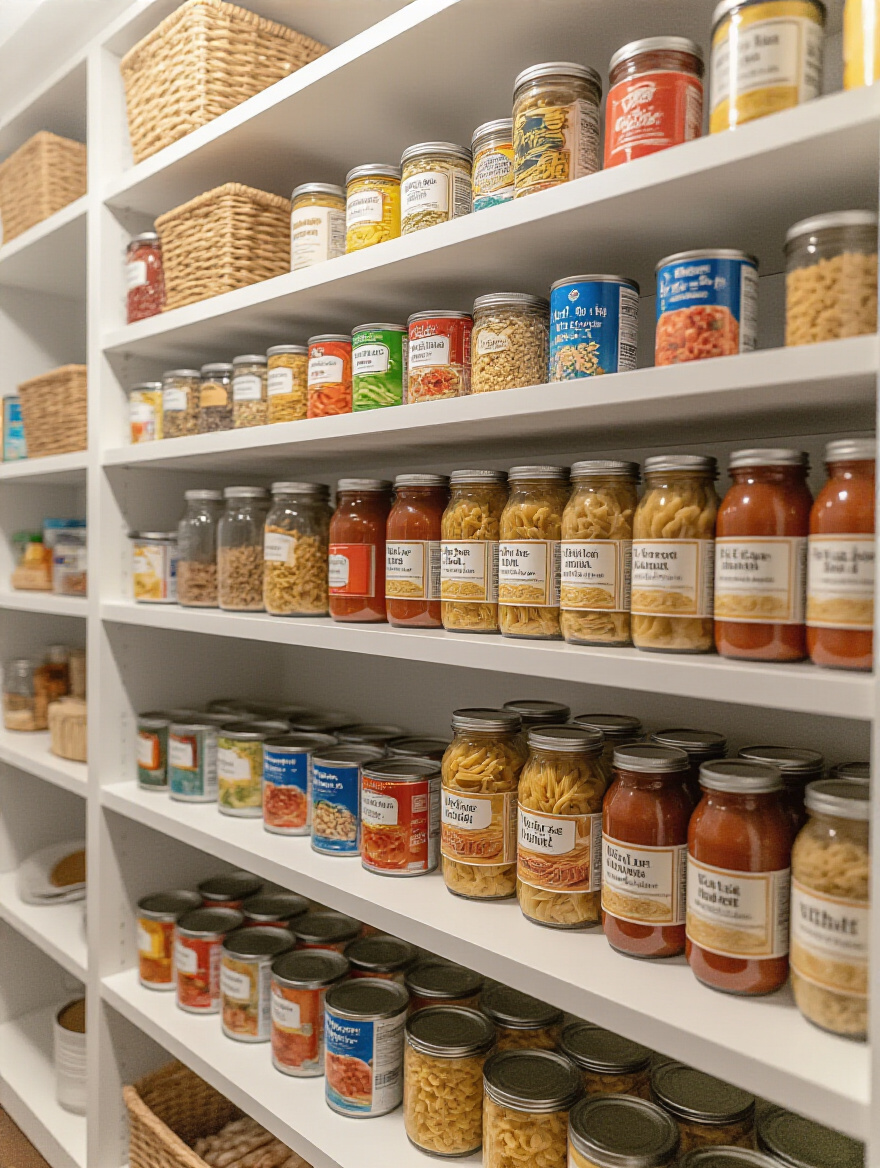
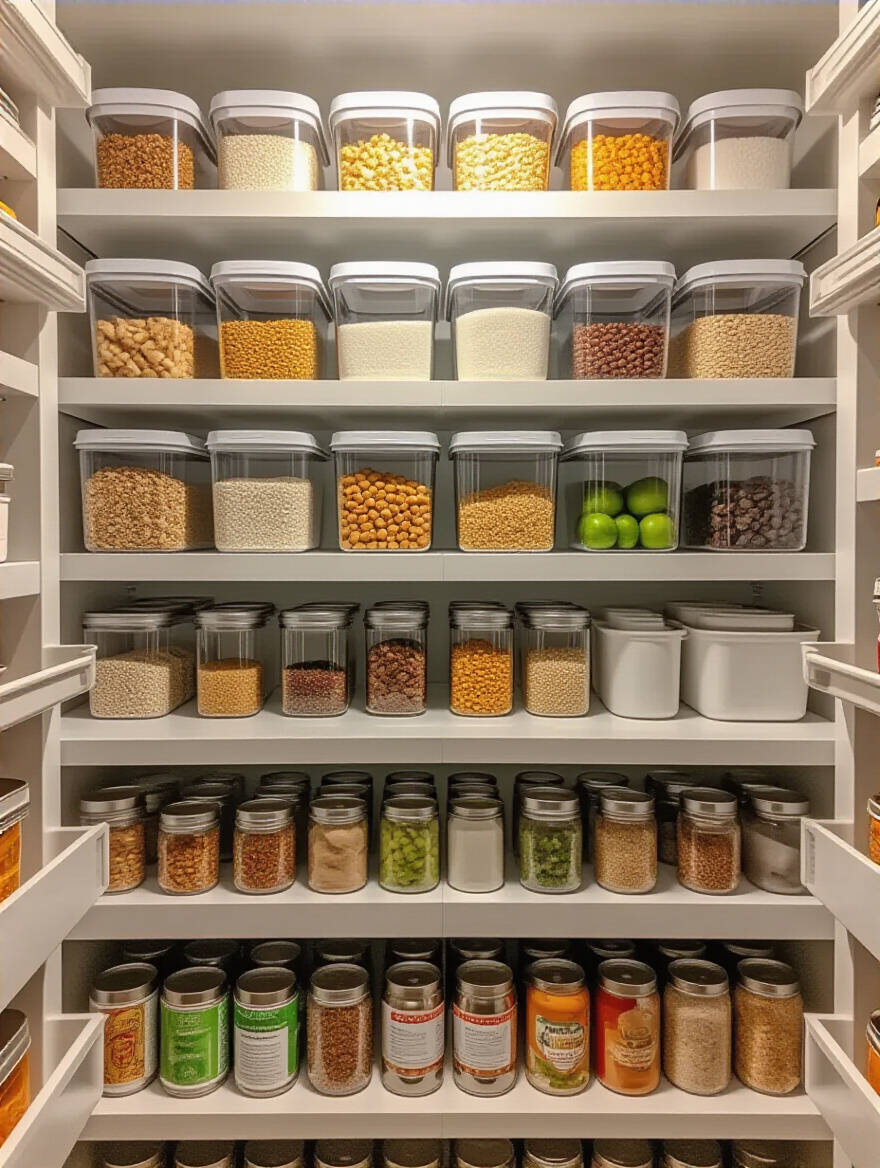
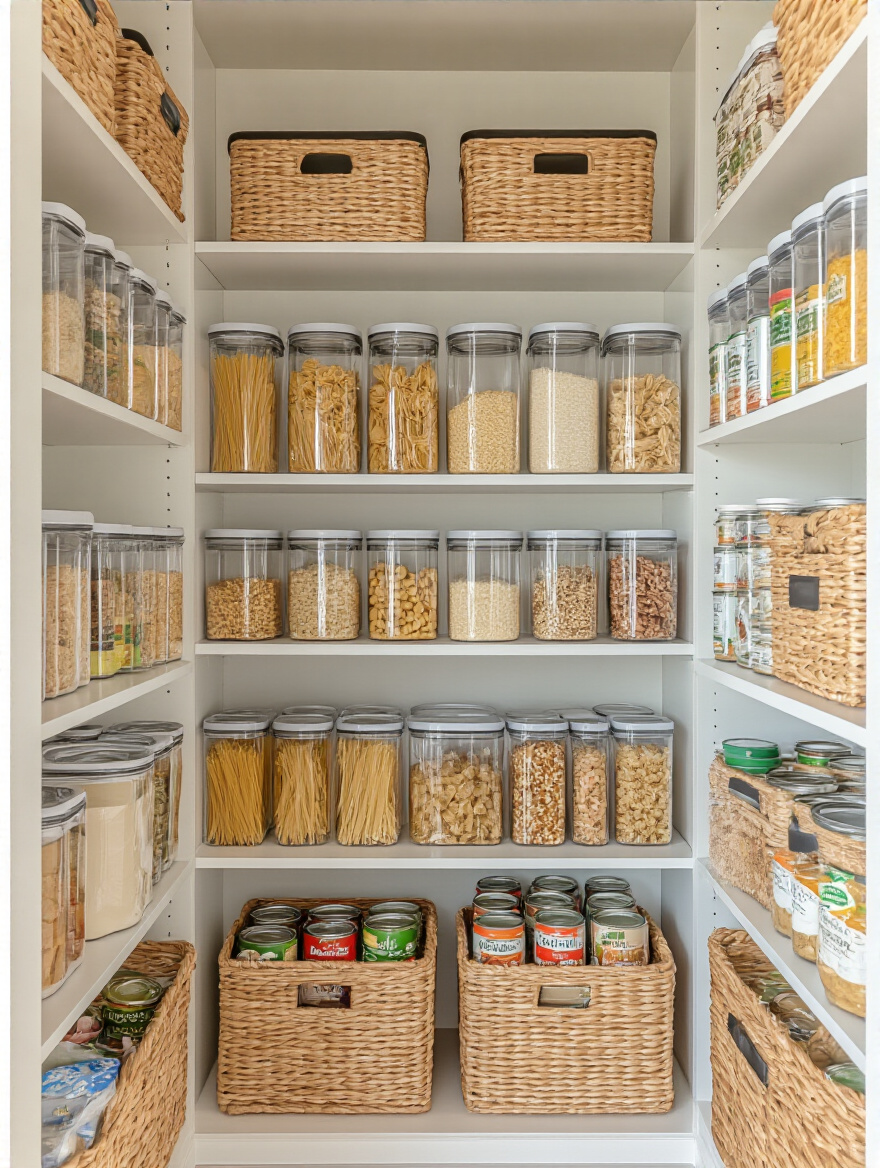
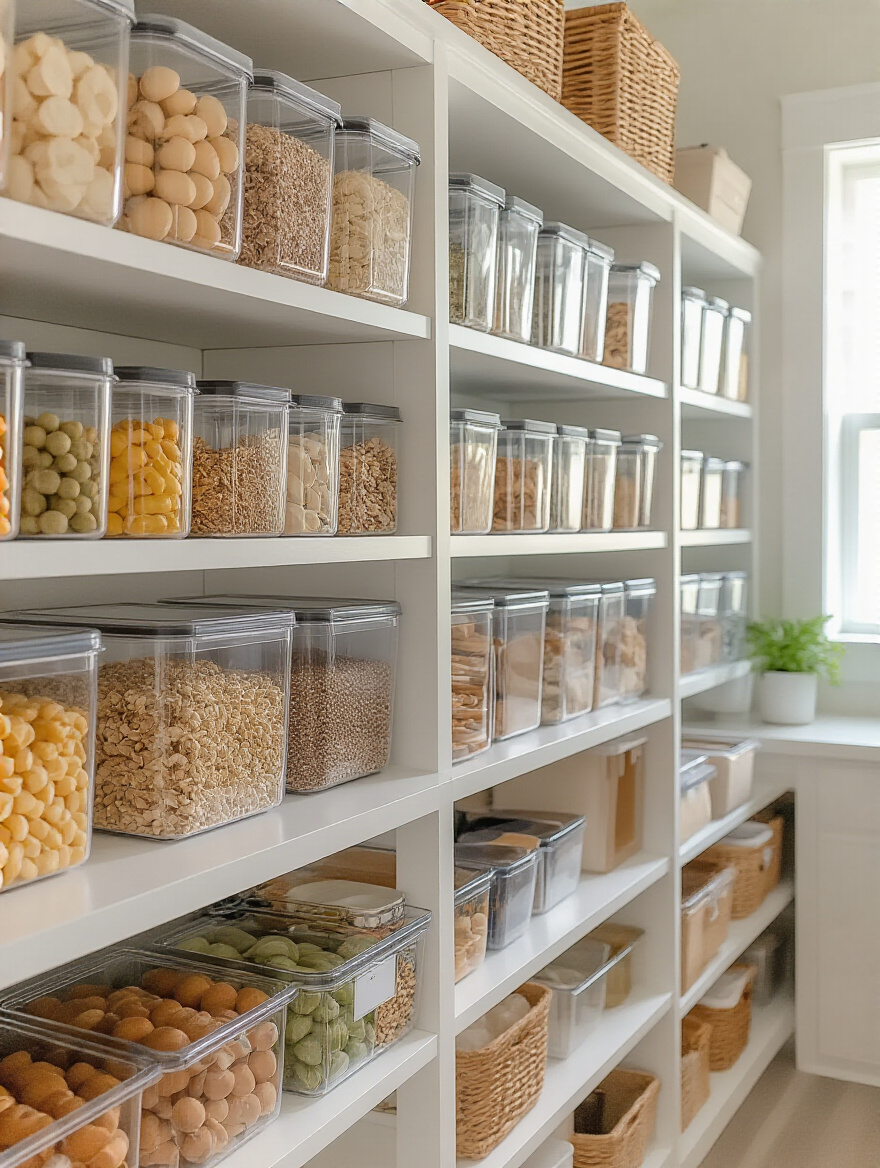
This is where people usually start, but it’s really Step 6 for a reason. You can’t buy the right containers until you know what you need to store (Step 1) and what space you have (Step 2). The BS is that any old matching set will do. What actually matters is that they are airtight, clear, and stackable. Airtightness keeps your food fresh, saving you money. Clarity lets you see your inventory at a glance, saving you time. And a uniform, stackable shape maximizes vertical space, creating order from chaos.
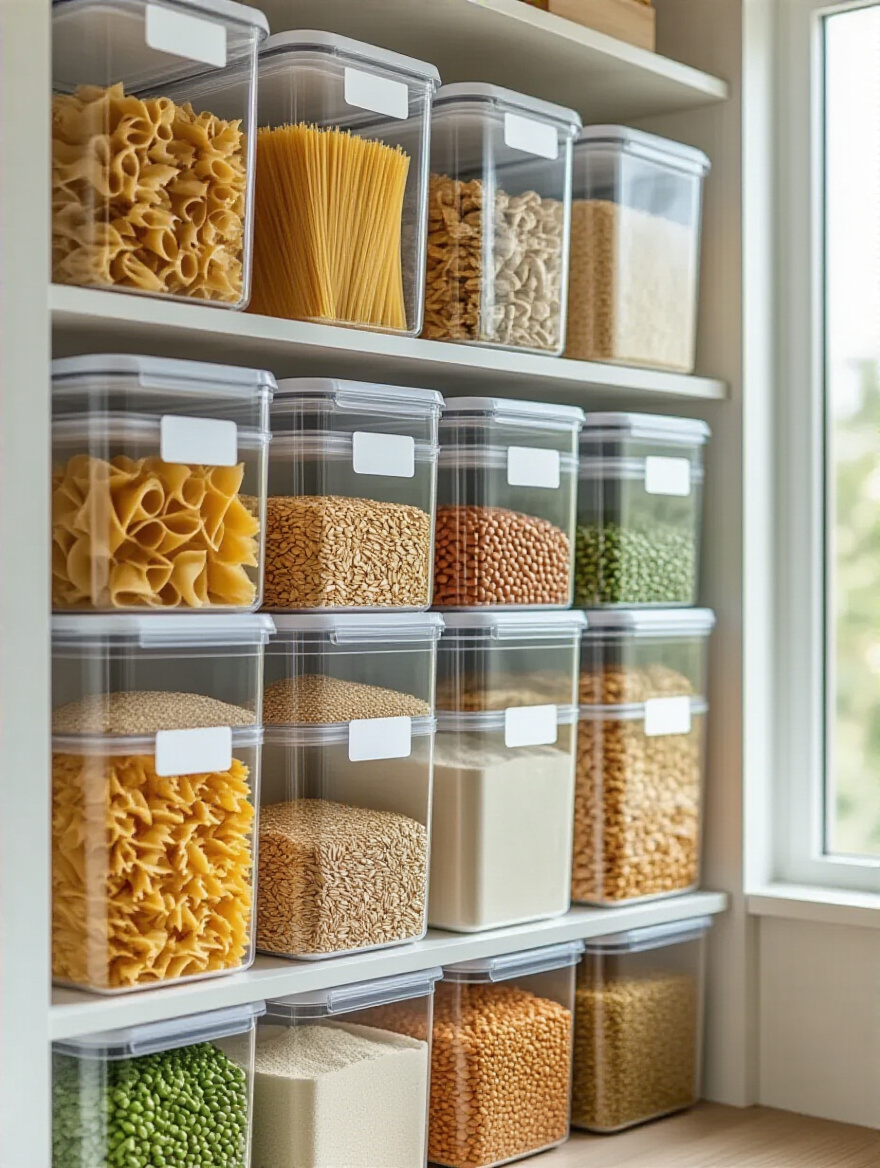
Think of containers as an investment in protecting your food assets. I learned this the hard way when a bag of flour I thought was “sealed” got infested with pantry moths and I had to throw out half my dry goods. Never again. Buy a modular set so that lids and bases are interchangeable. BPA-free plastic is light and durable, while glass is great but heavy. Prioritize function over form, and you’ll create a system that works for years.
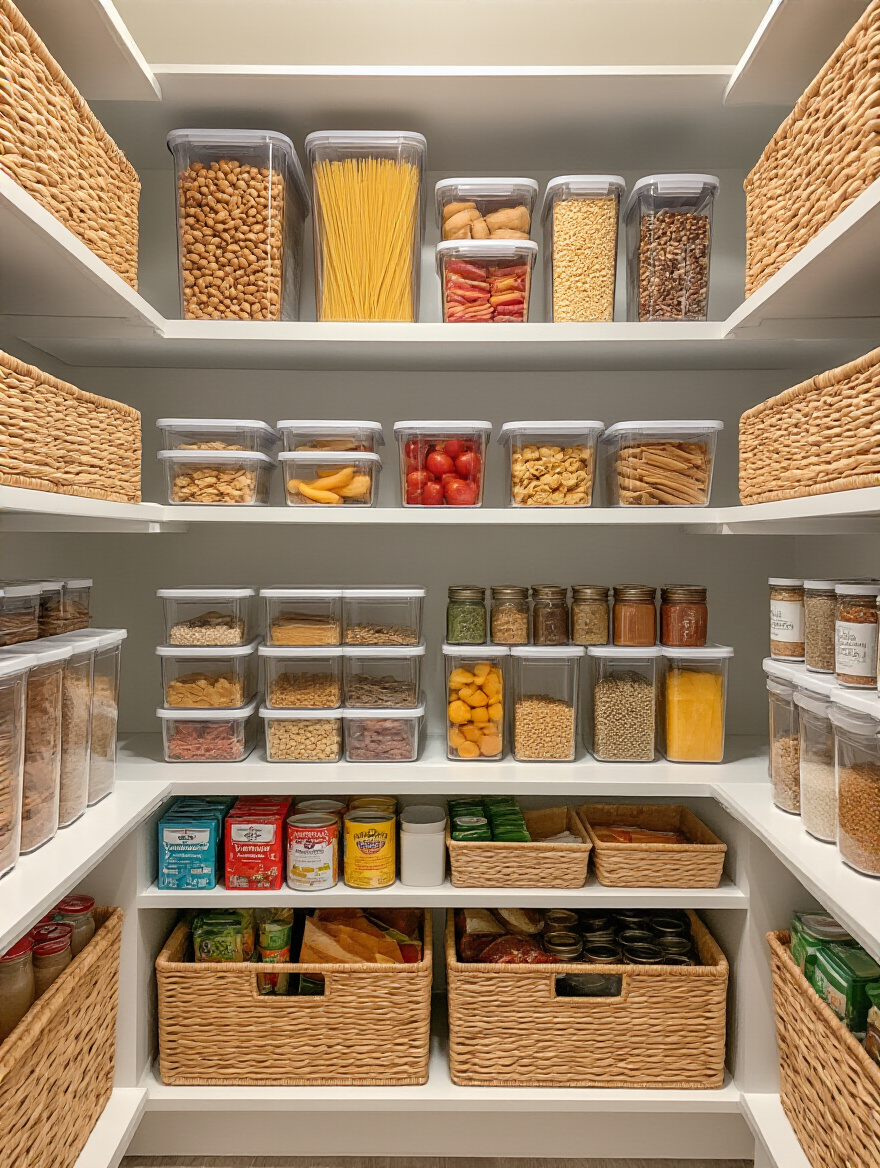
7. Maximize Vertical Space with Tiered Shelf Organizers
Tiered organizers, or risers, are one of the cheapest and most effective tools for solving the “black hole” effect on deep shelves. You know the one—where cans of soup go to die, hidden behind three other rows. A tiered shelf turns a single sightline into three, instantly making everything on that shelf visible. It’s the single best way to manage canned goods, jars, and spices.
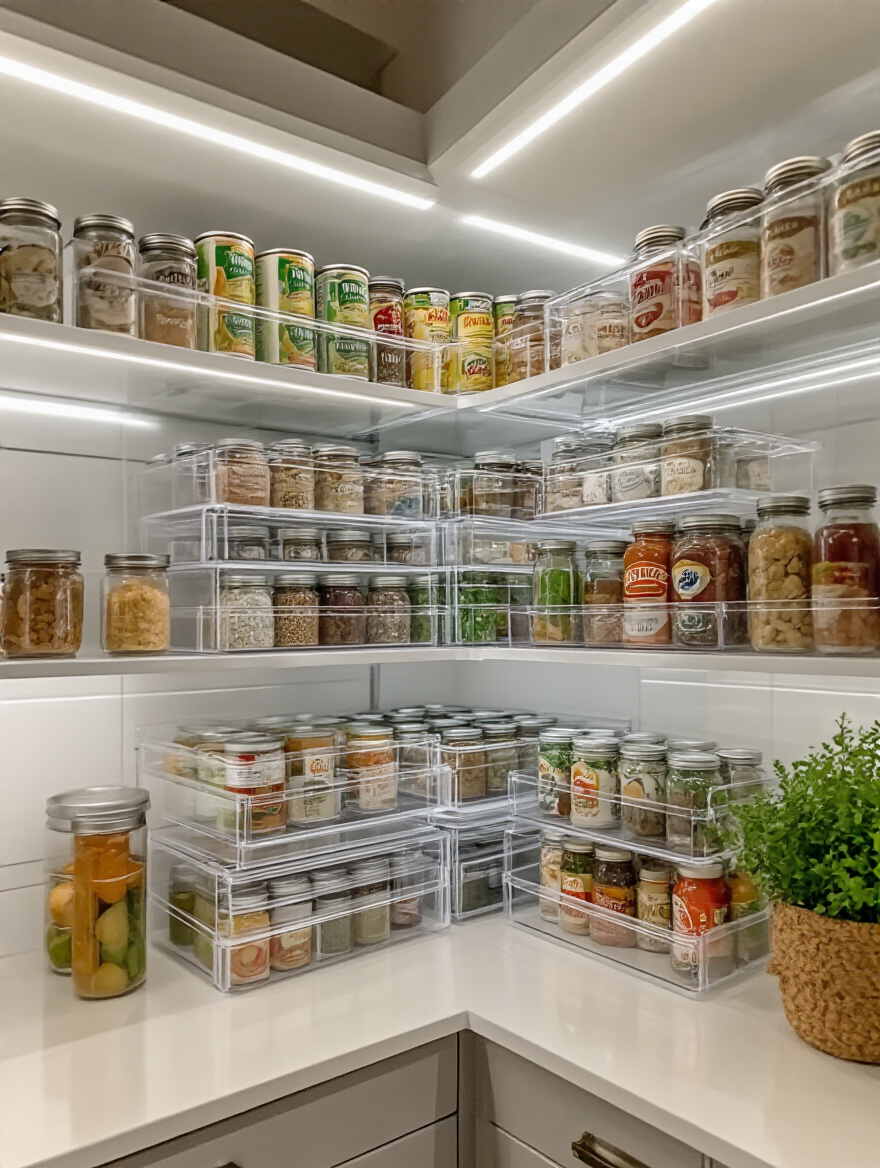
You wouldn’t stack files flat on a desk; you’d use a vertical organizer. Apply that same logic here. An expandable riser is a great choice because it can be customized to the exact width of your shelf, eliminating wasted space on the sides. Suddenly, you can see that you have four cans of black beans and don’t need to buy another one. This simple tool is a direct path to less food waste and more efficient grocery shopping.
8. Utilize Clear Bins and Baskets for Category Grouping
While containers are for decanting individual ingredients, bins and baskets are for corralling categories. This is how you enforce your zones. A clear bin labeled “Snacks” contains all the individually wrapped granola bars, bags of pretzels, and fruit snacks. Another labeled “Baking” can hold your vanilla extract, baking soda, and chocolate chips together. It’s a grab-and-go system that keeps your categories from mingling and creating chaos.
I recommend open-front bins for items you grab frequently, so you don’t even have to pull the whole bin off the shelf. Think of them as drawers you’re adding to your shelves. They create clean, defined boundaries and make it incredibly easy to see when you’re running low on something. When it’s time to make a grocery list, you just pull out the “Pasta & Grains” bin and see exactly what you need in about five seconds.
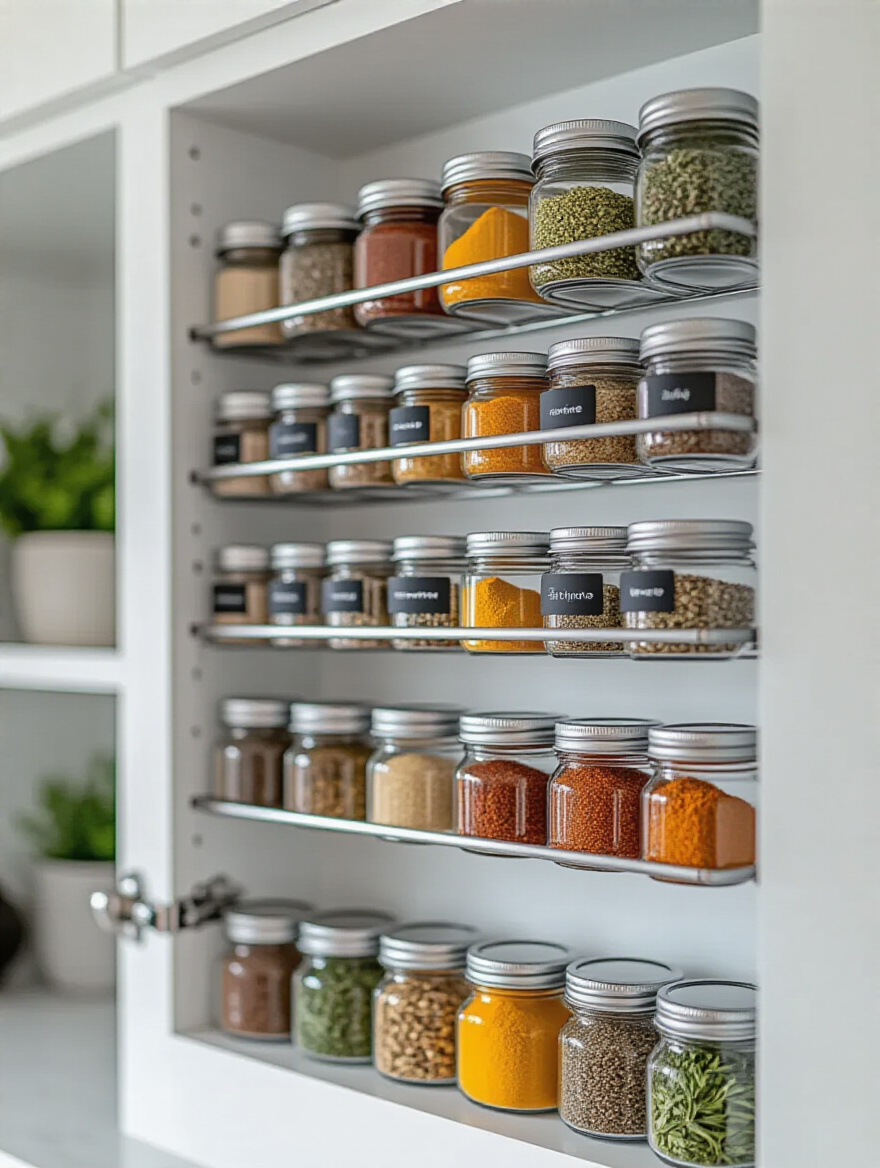
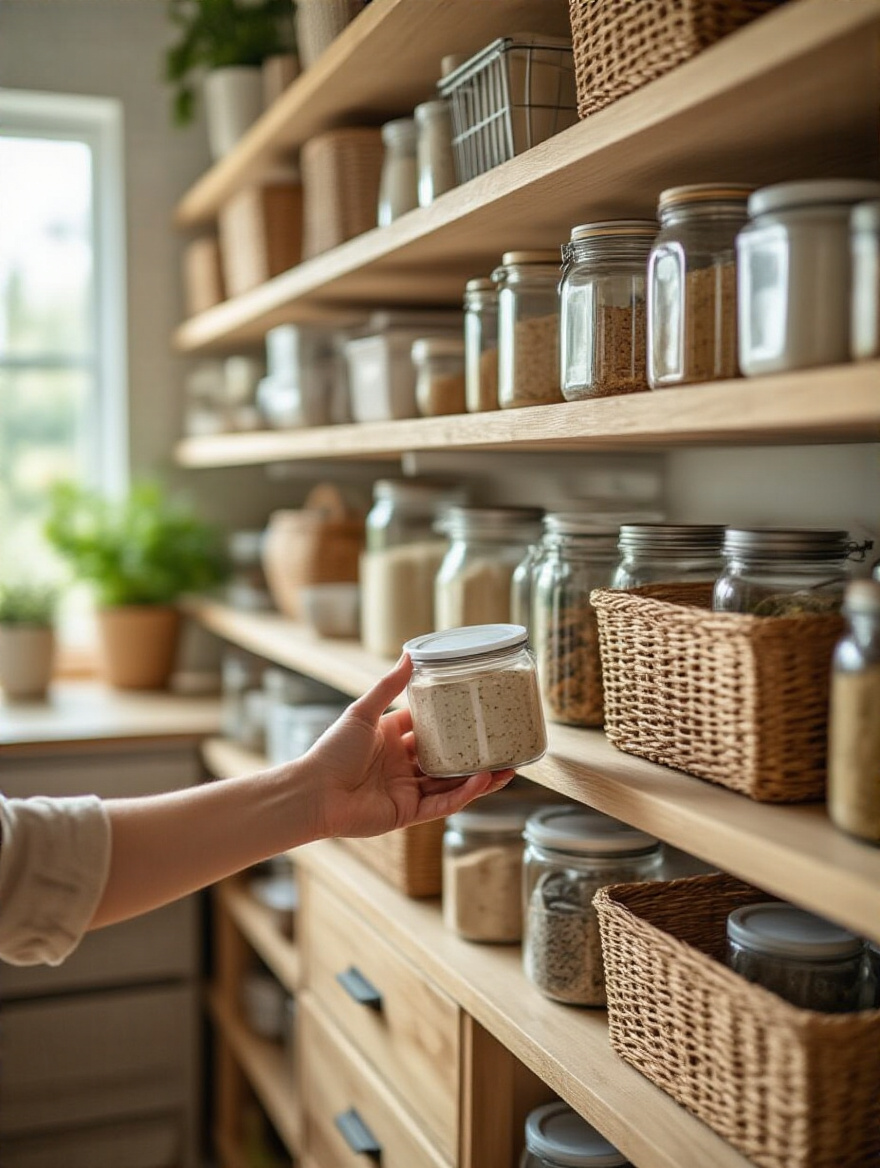
9. Implement Smart Labeling for Every Pantry Item
If you decant something, you must label it. This is non-negotiable. It’s not just so you can tell the all-purpose flour from the cake flour; it’s about food safety and inventory management. Your label should have two things: the name of the item and the expiration date. Use a simple label maker or even just a roll of painter’s tape and a sharpie.
I once made a huge batch of pancakes for my family only to realize I had used baking soda that expired a year earlier. The pancakes were flat, sad disks. It was a waste of time and ingredients, all because I didn’t label the container. Labeling is the final step in creating a system that someone else can use. If your partner or kids can’t find what they need or put things away correctly, the system will fail. Clear, consistent labels make the system foolproof.
Essential Tools & Core Implementation (Part 2)
Now we’re getting into the advanced hardware. This is about making structural and tactical additions to your pantry that address its inherent design flaws. We’re going to solve the two biggest pantry problems once and for all: deep, inaccessible shelves and completely wasted door space.
10. Install Pull-Out Drawers for Deep Pantry Sections
Deep shelves are the worst. They are fundamentally a design flaw, forcing you to get on your hands and knees to find anything in the back. Pull-out drawers are the single best solution. They convert that awkward, useless depth into fully accessible, ergonomic storage. Instead of reaching into a dark cave, you slide the entire contents of the shelf out into the light.
This is a bigger investment, but the return on functionality is massive. A client of mine with a deep pantry “lost” over $100 of specialty ingredients in the back of her shelves. After we installed pull-out drawers, her food waste dropped to nearly zero because she could see and access everything she owned. Look for full-extension slides; they allow the drawer to pull all the way out, giving you access to every last inch.
11. Harness the Power of Pantry Door Storage
The back of your pantry door is the most underutilized real estate in your kitchen. It’s a blank wall just waiting for a job. A slim, over-the-door organizer can add a huge amount of storage for small, narrow items that typically get lost on shelves, like spice jars, foil boxes, and seasoning packets.
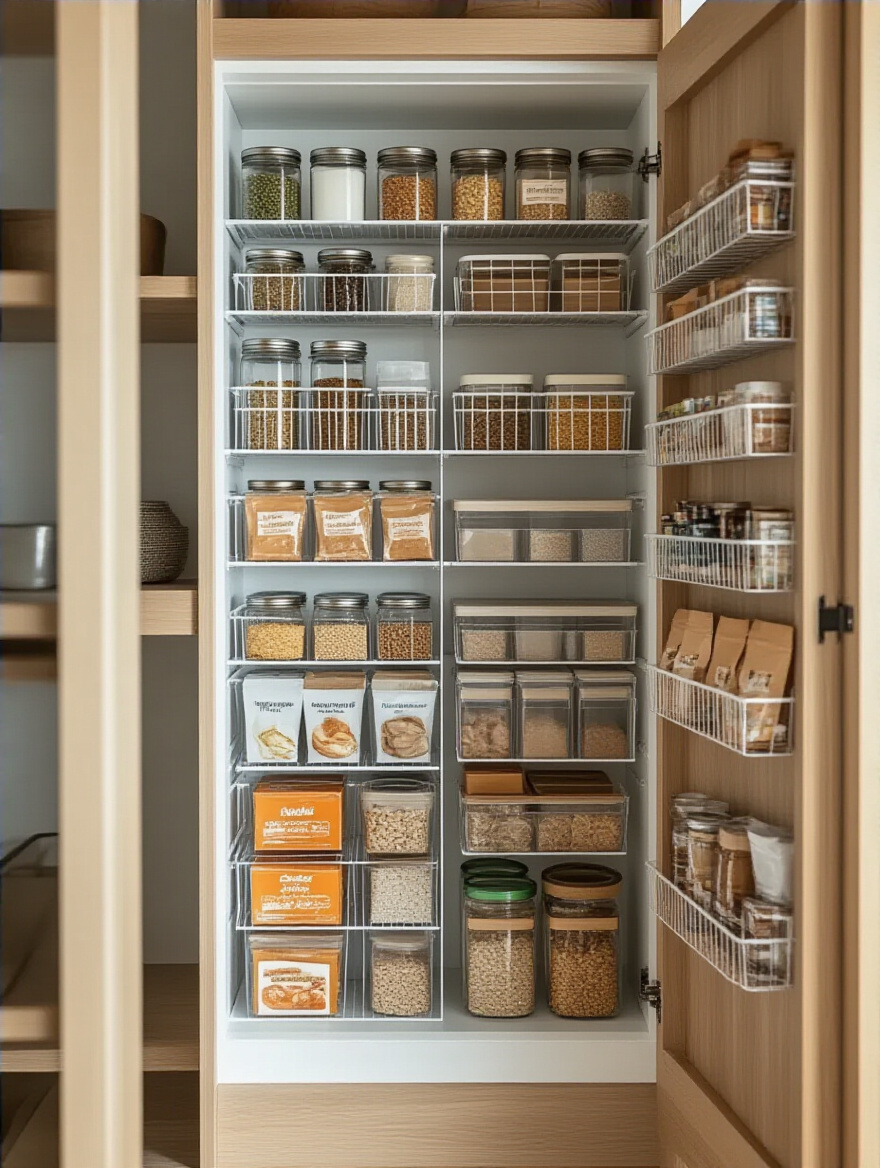
By moving these items to the door, you free up a ton of primary shelf space for bulkier items. This is pure efficiency. Just make sure you measure the clearance between your door and your shelves before you buy anything. You want a rack that’s slim enough to allow the door to close completely without hitting anything inside. It’s a simple, high-impact upgrade that costs very little but delivers a huge functional benefit.
Elevating Efficiency & aesthetic appeal (Part 1)
With the core system in place, we can now focus on refining it. This part is about creating micro-systems within the larger pantry structure that support specific daily habits, like grabbing snacks or prepping meals. It’s also about optimizing the user experience—making sure you can see what you have and find it effortlessly.
12. Integrate Dedicated Snack & Meal Prep Zones
We talked about high-level zoning, but this is about getting more granular to support specific workflows. A dedicated snack zone, especially if you have kids, is a lifesaver. Place a bin on a low, accessible shelf with pre-portioned, healthy snacks. This empowers kids to help themselves and makes your job easier. It also contains the “snack chaos” to one designated area.
Similarly, a meal prep zone can streamline your cooking process. Group together all the things you need to start a meal: cooking oils, vinegars, salt, pepper, and your most-used spices. You can place them on a tray or lazy Susan so you can pull the entire “kit” out at once. It’s like setting up a professional mise en place station in your pantry, saving you from running back and forth ten times while you’re trying to cook.
13. Strategically Store Bulk Items for Easy Refills
Buying in bulk saves money, but only if you have a system to manage it. The big mistake is trying to work out of a giant 20-pound bag of rice every day. It’s clumsy, messy, and takes up prime real estate. The smart solution is a two-part system: have a smaller, countertop-friendly container for daily use, and store the large bulk bag in a less accessible spot (like the floor or a high shelf).

When the small container runs low, you simply “shop your pantry” and refill it from your backstock. This keeps your main shelves clean and functional while still giving you the cost-saving benefits of buying in bulk. Store your bulk items in large, food-grade airtight containers (like bins or buckets with gamma-seal lids) to protect them from pests and moisture.
14. Employ Magnetic Strips for Spice Jar Storage
If you have a lot of spices, they can quickly take over an entire shelf or drawer. Magnetic strips offer a brilliant vertical solution. You can mount them on an empty wall inside your pantry or on the inside of a cabinet door. This gets all your spices off the shelves, freeing up valuable space while making them incredibly visible and accessible.
I love this solution because it turns your spices into a functional piece of art. To make it work, you’ll need uniform spice jars with metal lids (or you can attach small magnets to the bottom of your existing jars). Arrange them alphabetically or by type of cuisine. It’s one of those elegant solutions that is both beautiful and hyper-functional.
15. Add Task Lighting and Under-Shelf Illumination
You can’t organize what you can’t see. Most pantries suffer from poor lighting, with a single overhead bulb that casts shadows on everything below the top shelf. This is an easy fix that makes a world of difference. Adding simple, battery-operated LED puck lights or adhesive strip lights under each shelf illuminates the contents and eliminates dark corners.
For a next-level solution, install motion-activated lights. The lights turn on the moment you open the door and turn off automatically when you close it. It feels incredibly luxe, but it’s a cheap and easy DIY project. Proper lighting isn’t just an aesthetic upgrade; it’s a functional necessity that ensures you can find what you need quickly and see what’s about to expire.
Elevating Efficiency & Aesthetic Appeal (Part 2)
We’ve tackled the big stuff. Now we’re getting into the finer details that separate a “good” pantry from a “great” one. These final touches are about refining your systems, creating visual calm, and making your pantry a genuinely pleasant space to be in.
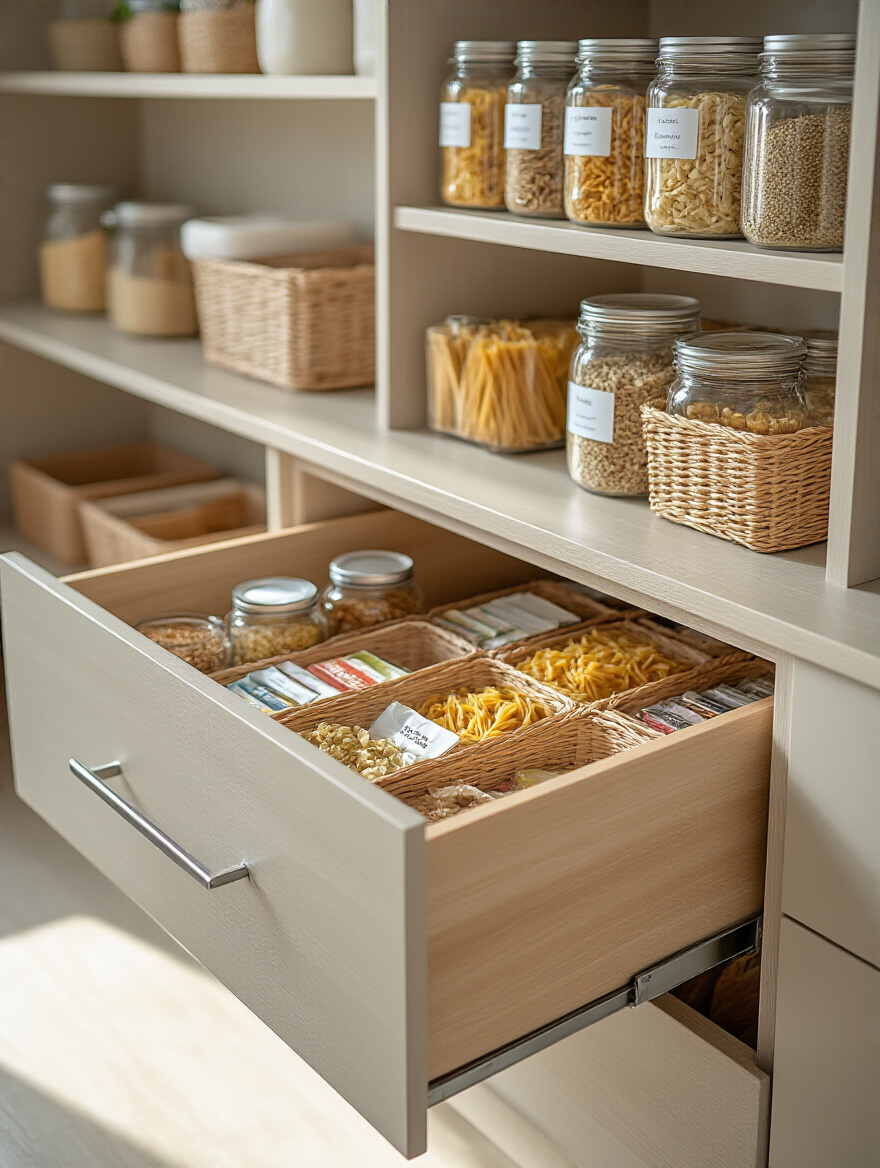
16. Use Dividers and Bins for Drawer Organization
If your pantry has drawers, they are prime candidates for becoming junk drawers. Dividers are the answer. They create rigid boundaries that prevent spatulas, cookie cutters, and bags of random stuff from turning into a chaotic pile. Whether you use adjustable bamboo dividers or a custom-fit insert, the goal is to give every single item a designated slot.
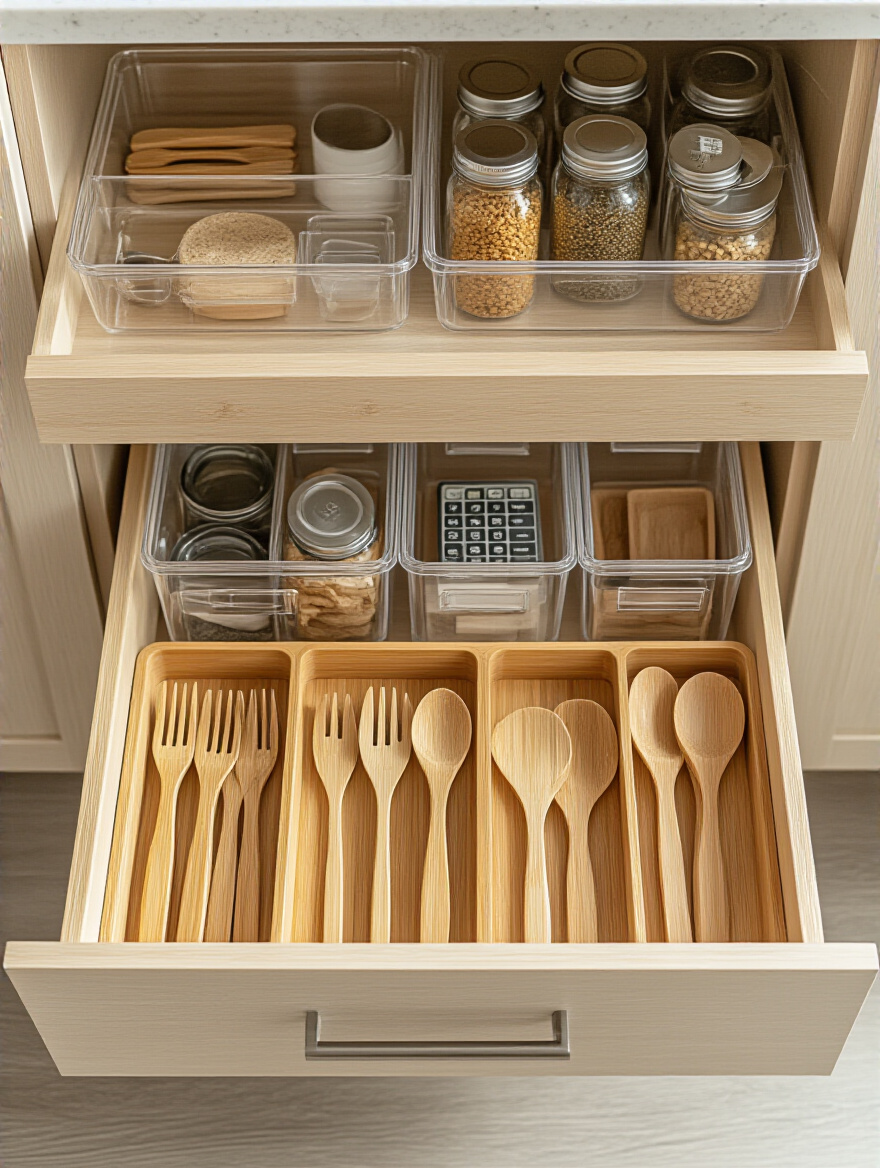
This goes for shallow drawers (for things like foils and wraps) and deep drawers (for bags of chips or extra boxes of cereal). Using dividers in conjunction with small bins inside the drawer is a power move. You can use one small bin for all your cookie cutters and another for your icing tips, creating a perfectly contained system that’s easy to navigate and maintain.
17. Color-Code Your Storage for Visual Consistency
This might sound a little extra, but hear me out. For a visual person, color-coding can be an incredibly powerful organizational shortcut. Our brains process color faster than text. You could assign a color to your main zones: green for snacks, blue for baking, yellow for pasta and grains. This can be achieved with the bins you choose or even just the labels you use.
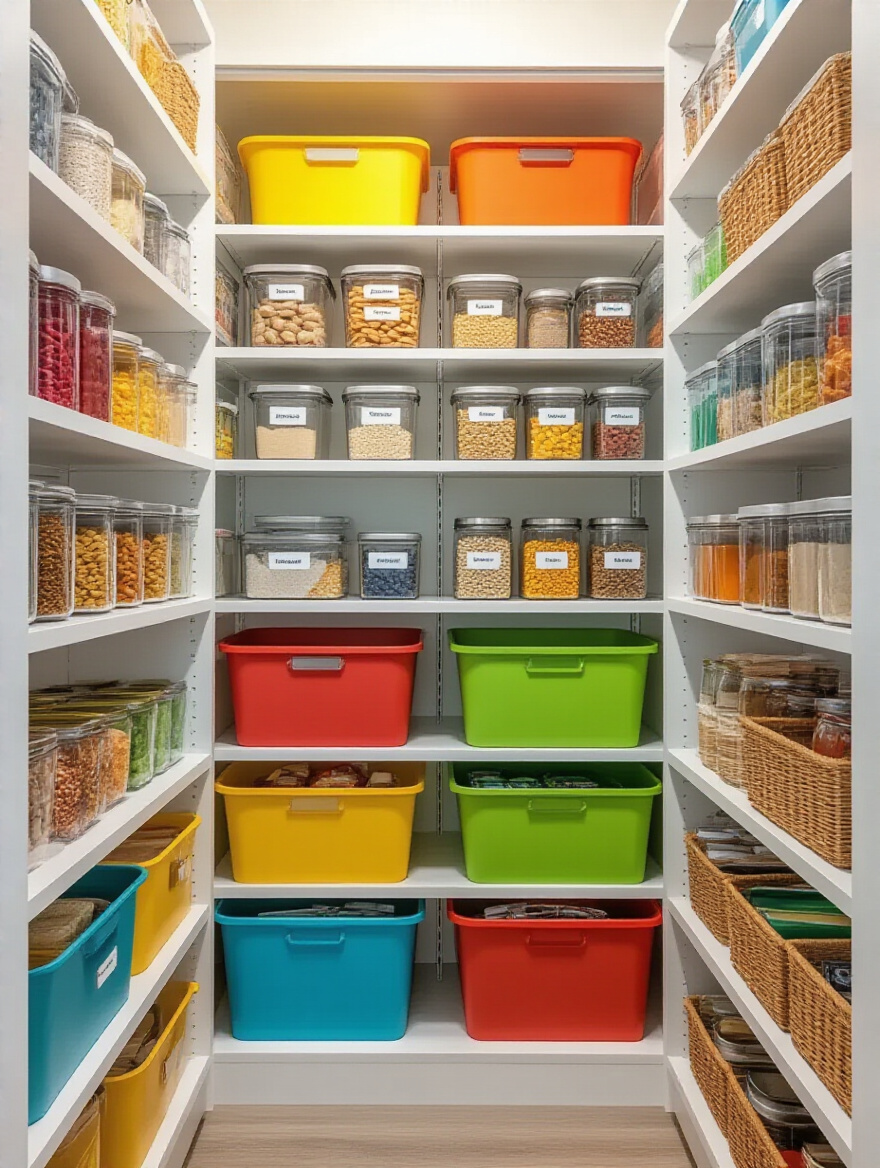
This isn’t just for looks; it helps you and your family members put things away in the right place almost automatically. It creates a cohesive, calming visual language for your pantry that reduces visual stress. It’s that final layer of polish that makes the entire system feel intuitive and intentional. Don’t go crazy with a full rainbow—picking two or three main colors is usually enough to create the desired effect without becoming overwhelming.
Advanced Optimization & Sustainable Maintenance
You’ve built the perfect system. Now, how do you keep it that way? An organized pantry isn’t a one-and-done project; it’s a living system that requires ongoing maintenance. These final steps are about creating the habits and tools that will make maintaining your new, efficient pantry practically effortless.
18. Create a Centralized Digital Inventory System
This is for the person who really wants to level up their efficiency. A digital inventory—whether it’s a simple spreadsheet on Google Sheets or a dedicated app like Pantry Check—is the ultimate tool for preventing food waste and streamlining grocery shopping. You can track quantities and expiration dates, and build your shopping list directly from your inventory.
When you’re at the store wondering if you need more olive oil, you can just check your phone instead of guessing. I’ll admit, this takes discipline to maintain. You have to be diligent about updating it when you use something or buy something new. But for busy families, the 15-20% you can save on your grocery bill by eliminating duplicate purchases and waste can make the effort absolutely worth it.
19. Master Smart Grocery Shopping and Bulk Buying
An organized pantry is maintained at the grocery store. This is where you defend your system against clutter. The two golden rules are: 1. Never shop without a list, and 2. Always “shop your pantry” first. Before you even think about making a list, do a quick scan of your pantry and fridge to see what you already have. This prevents you from buying your fifth jar of mustard.
Your shopping list should be based on a meal plan for the week. This ensures every item you buy has a purpose and a destination. It completely eliminates impulse buys that end up cluttering your perfectly organized shelves. This is less about organization and more about creating a mindful consumption habit that supports your entire system.
20. Establish a Regular Pantry Clean-Out Schedule
Just like any high-performance system, your pantry needs regular tune-ups. Don’t wait until it’s a disaster again. Schedule a quick 10-minute pantry reset once a week. This is when you wipe up any spills, put stray items back in their zones, and update your “Use Me First” bin. Put it in your calendar like any other appointment.
Then, once a quarter, schedule a slightly deeper 30-minute clean-out. This is when you do a quick check of expiration dates in the back, wipe down shelves, and reassess if your zones are still working for you. This proactive, bite-sized approach to maintenance prevents the pantry from ever getting out of control again and makes the task feel manageable instead of monumental.
21. Involve All Family Members in Maintenance Efforts
A system that only one person understands is a system that is destined to fail. The single most important factor for long-term success is getting buy-in from everyone in the household. Hold a quick “pantry orientation” for your family. Show them where the zones are, explain the FIFO rule, and assign everyone a simple, age-appropriate job.
Maybe a younger child’s job is to make sure all the snack bin items are neat. An older child can be in charge of breaking down cardboard boxes for recycling. Your partner can be responsible for putting away groceries in the correct zones. When everyone has a small stake in maintaining the system, it distributes the workload and fosters a sense of shared ownership, ensuring your beautifully organized pantry stays that way.
Conclusion
There you have it. We’ve walked through the entire process, from laying the strategic groundwork to implementing the tools and building the habits for long-term success. The journey to a perfectly organized pantry is about so much more than lining up pretty containers. It’s about designing a system that reduces stress, saves money, and gives you back precious time. It’s an investment in the operational efficiency of your home and, by extension, your own well-being.
Don’t feel like you have to do all 21 steps this weekend. That’s a recipe for burnout. The most powerful transformations start with a single, manageable change. Pick one thing from this guide that resonated with you—maybe it’s just purging the expired food, or maybe it’s setting up a simple “Use Me First” bin. Start there. Build momentum. An organized, efficient, stress-free pantry is completely within your reach. Now go build it.


