Most people inherit their bathroom vanity. It came with the house, or the apartment, or the renovation done by someone else fifteen years ago. It works — technically — but it doesn’t work for *them*. The bathroom vanity is the single surface touched multiple times a day by every person in the household, which means different heights, different needs, and different aesthetics all converge on the same piece of cabinetry.
Choosing bathroom vanity designs intentionally changes the entire feel of the room. Today’s options span a much wider range than the standard builder-grade cabinet-and-mirror combo. You can go for an ADA-accessible floating unit that functions beautifully for wheelchair users and curious toddlers alike, a reclaimed wood vanity with a vessel sink, a coastal beadboard build, or an antique dresser conversion that brings forty years of character into a space that otherwise has none.
What follows are 15 bathroom vanity designs across different budgets, styles, and spatial constraints. Each comes with enough practical detail to make a real decision, not just gather inspiration.
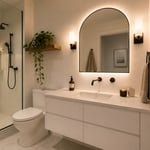
1. Wall-Mounted Floating Bathroom Vanity Designs for a Modern Look
There’s a reason floating vanities have dominated bathroom design for the past decade. The open floor beneath the cabinet does something simple but visually powerful: it makes the room feel bigger. In bathrooms under 60 square feet — which describes most guest baths and many primary baths in older homes — every visual trick that creates the perception of space is worth using. A floating vanity is probably the most effective one available.
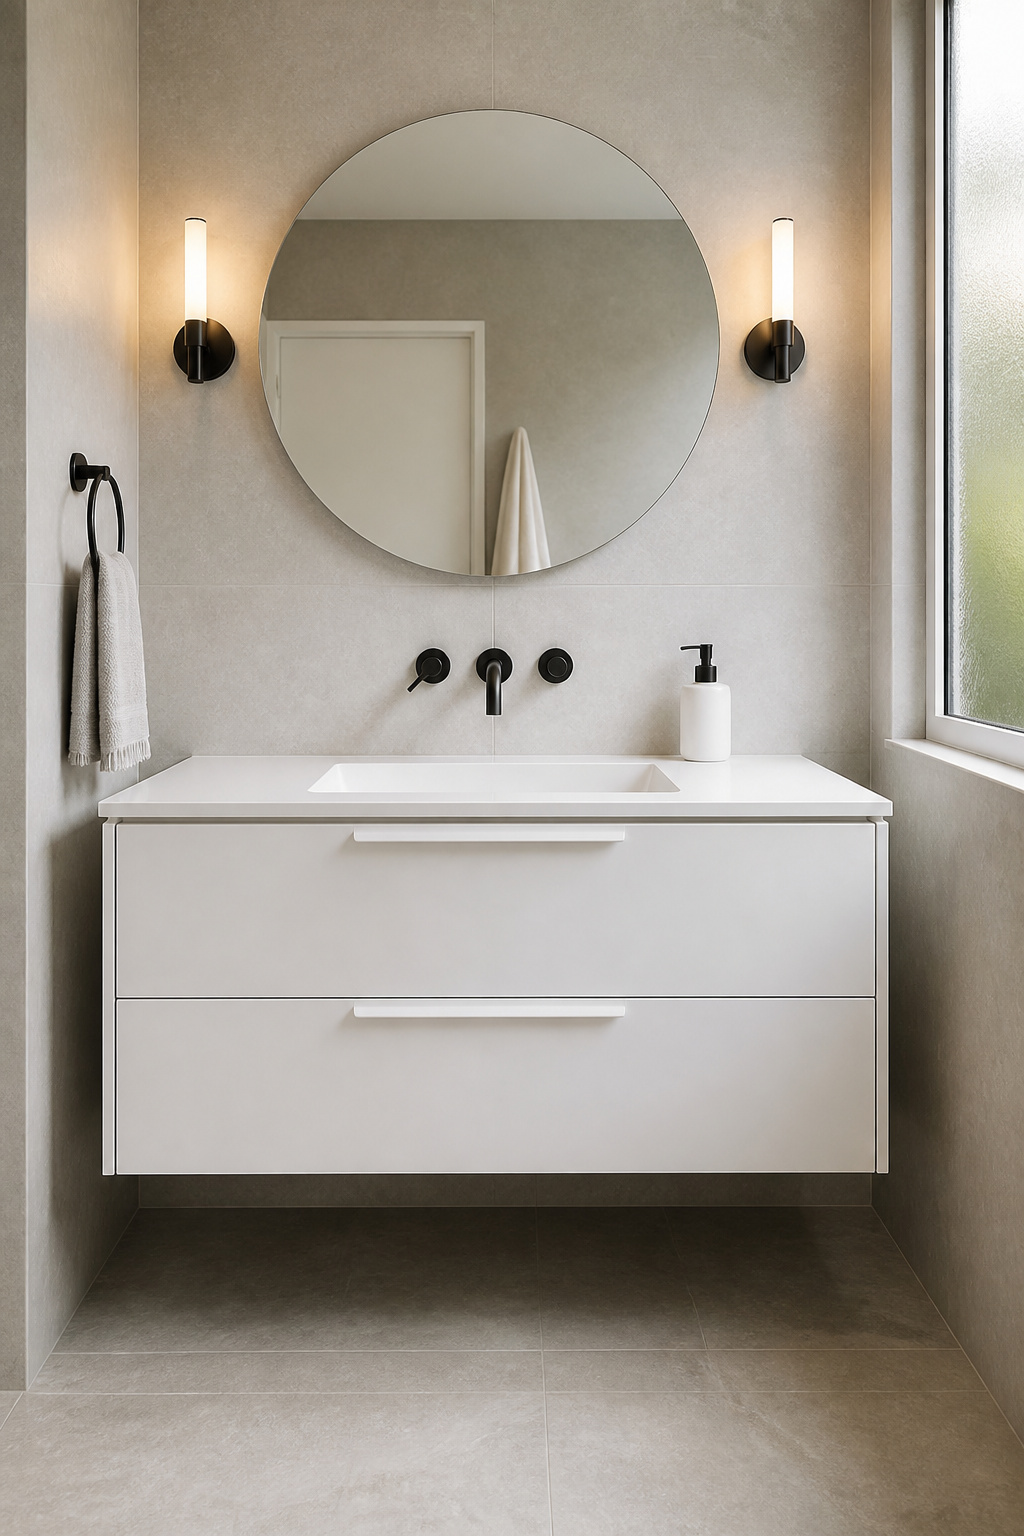
The mechanics are straightforward, though the installation is not something to rush. Wall-mounted vanities need to anchor into studs or into solid blocking installed between studs, and each bracket should be rated for at least 150–200 pounds when loaded with a stone countertop and the full weight of daily toiletries. Lag bolts rated at 250 pounds per fastener are the standard minimum. French cleat systems, which distribute weight across a wider horizontal span, are the better choice when the countertop will be stone.
Getting the Height Right
Installation height is the underrated decision here. Most designers install floating vanities at 34 inches to finished floor — the ADA maximum — because it suits both standard and taller users and looks proportional against most mirror heights. For a child-friendly guest bath, 32 inches is the better call. The beauty of a wall-mounted design is that this is a decision you actually get to make, rather than accepting the 31-inch height that came standard on every production-build vanity in the 1990s. If you’re thinking through the rest of the bathroom layout at the same time, a review of small bathroom interior hacks that maximize space is worth the time before the cabinet order is placed.
2. Single-Sink Vanity With Integrated Storage Tower for Tight Spaces
The single-sink vanity with a side storage tower is the answer to the most common complaint in small bathroom design: there’s nowhere to put anything. A standard 24-to-30-inch vanity typically offers two or three drawers and one under-sink cabinet — adequate for one person’s toiletries, barely. Add a second person, a toddler’s bath supplies, and a collection of cleaning products that have nowhere else to live, and the countertop becomes a permanent staging area.

These bathroom vanity designs work hardest in tight quarters, where a storage tower adds meaningful capacity without claiming more floor. Most towers run 12–18 inches wide and 72–96 inches tall, adding four to six shelves or a combination of drawers and doors that sits directly beside the vanity. The configuration choice matters: deep drawers (3–6 inches) handle folded towels and bulky items; shallow drawers keep smaller toiletries from disappearing into corners. Open shelves look intentional when styled with matching baskets and limited to display-worthy items, but in shared bathrooms they accumulate disorder fast. Door cabinets are more forgiving.
Sizing the Tower to Fit
Sizing the tower to the room requires one key calculation: the tower should be the same width as the vanity or narrower, never wider. A wider tower throws off the proportions and makes the pairing look like two separate pieces of furniture rather than a cohesive unit. For 8-foot ceilings, a 72-inch tower paired with a 24-inch vanity is the most balanced combination. Going floor-to-ceiling at 96 inches works in bathrooms with 9-foot ceilings; use crown molding to bridge any gap at the top for a built-in appearance.
3. Farmhouse-Style Apron Sink Vanity With Shaker Cabinetry
The farmhouse bathroom vanity has been widely replicated since roughly 2016. That’s not a reason to avoid it — it’s a reason to be thoughtful about hardware choices, which are the fastest way to make a well-established style feel current or dated. The fundamental pairing of an apron-front sink with Shaker cabinet doors works precisely because it’s timeless. What shifts it between “classic” and “2018 HGTV” is whether the hardware is oil-rubbed bronze (dated) or brushed brass and champagne bronze (the 2026 update).
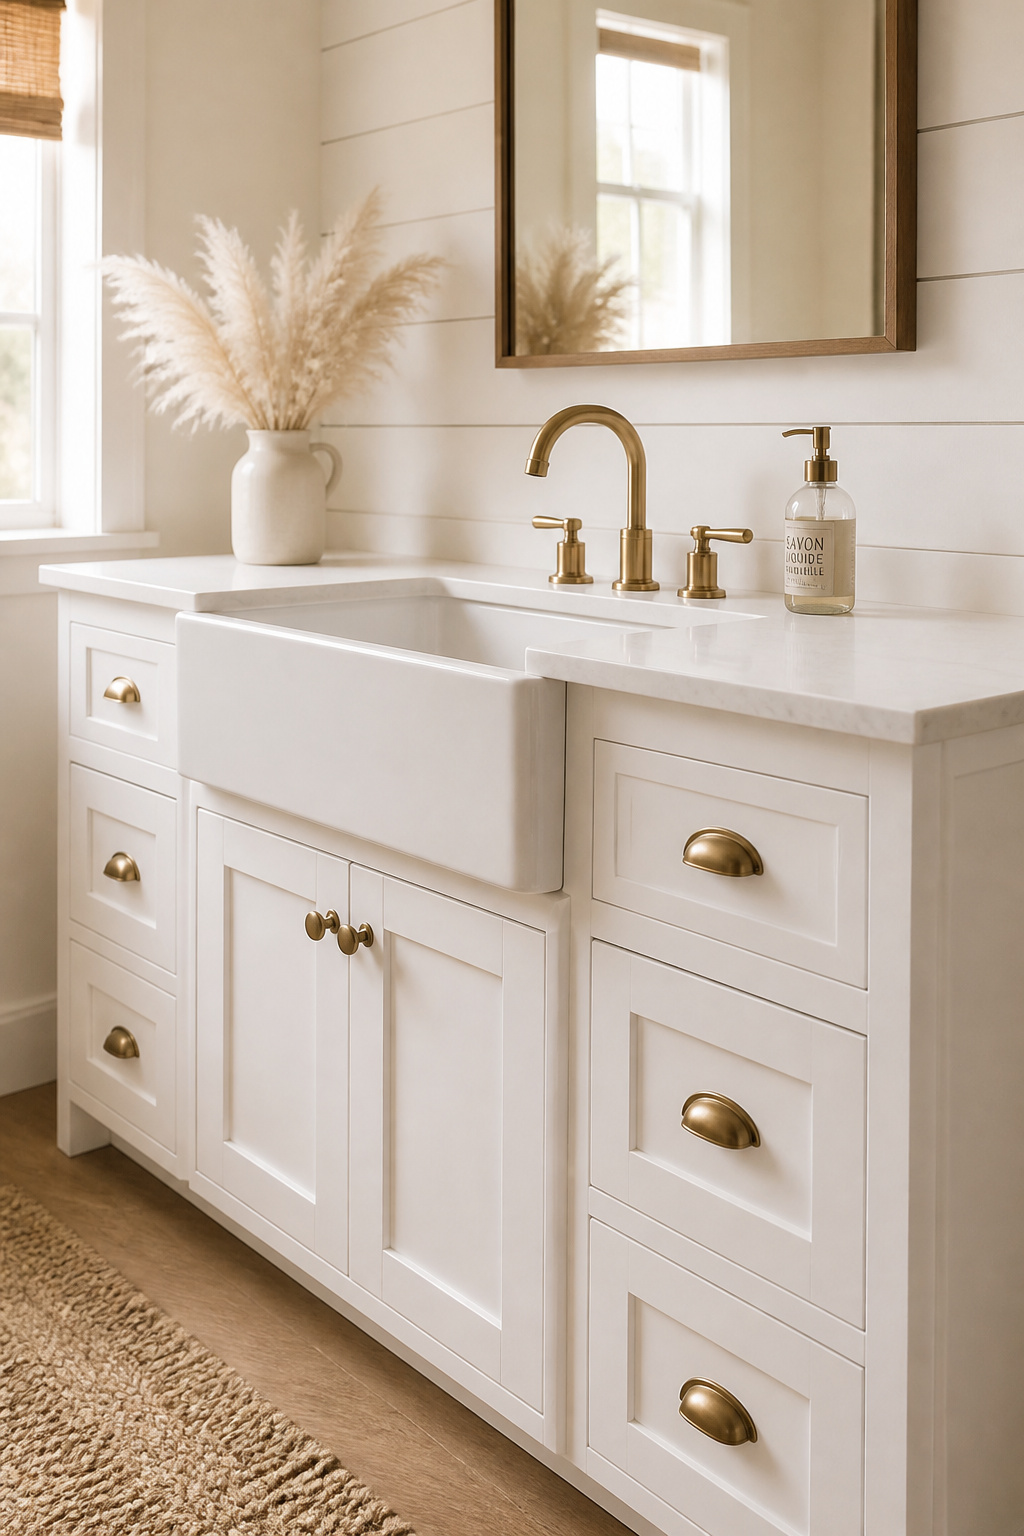
The apron-front or fireclay sink in bathroom contexts runs 22–30 inches wide — narrower than its kitchen counterpart — with the front face sitting flush with or slightly proud of the cabinet frame. The deep bowl (6–8 inches) is genuinely practical beyond aesthetics: it makes handwashing bulky items and bathing small children easier. Shaker door profiles come in inset or overlay configurations; inset doors sit flush inside the face frame for a furniture-quality finish but require precise installation. Full-overlay Shaker doors cover most of the face frame and are more forgiving to fit — they’re the mainstream choice and still look excellent.
Countertop Options
White quartz is the safest and most maintenance-free choice, working with virtually any Shaker paint color at $50–$120 per square foot installed. Butcher block adds warmth at $40–$80 per square foot but needs oiling every 6–12 months in a bathroom environment. Honed marble is beautiful but requires sealing every six months and is vulnerable to etching from toothpaste and acidic cleaners — a trade-off worth knowing before committing. For a deeper look at how the farmhouse aesthetic plays out across the full bathroom, farmhouse bathroom ideas with timeless appeal covers the broader context.
4. Small Bathroom Vanity Designs That Maximize Every Inch
In bathrooms under 50 square feet, the vanity choice is less about style and more about geometry. The wrong size doesn’t just look awkward — it physically blocks movement, prevents the door from opening fully, or crowds the toilet so tightly that the room becomes uncomfortable to use.
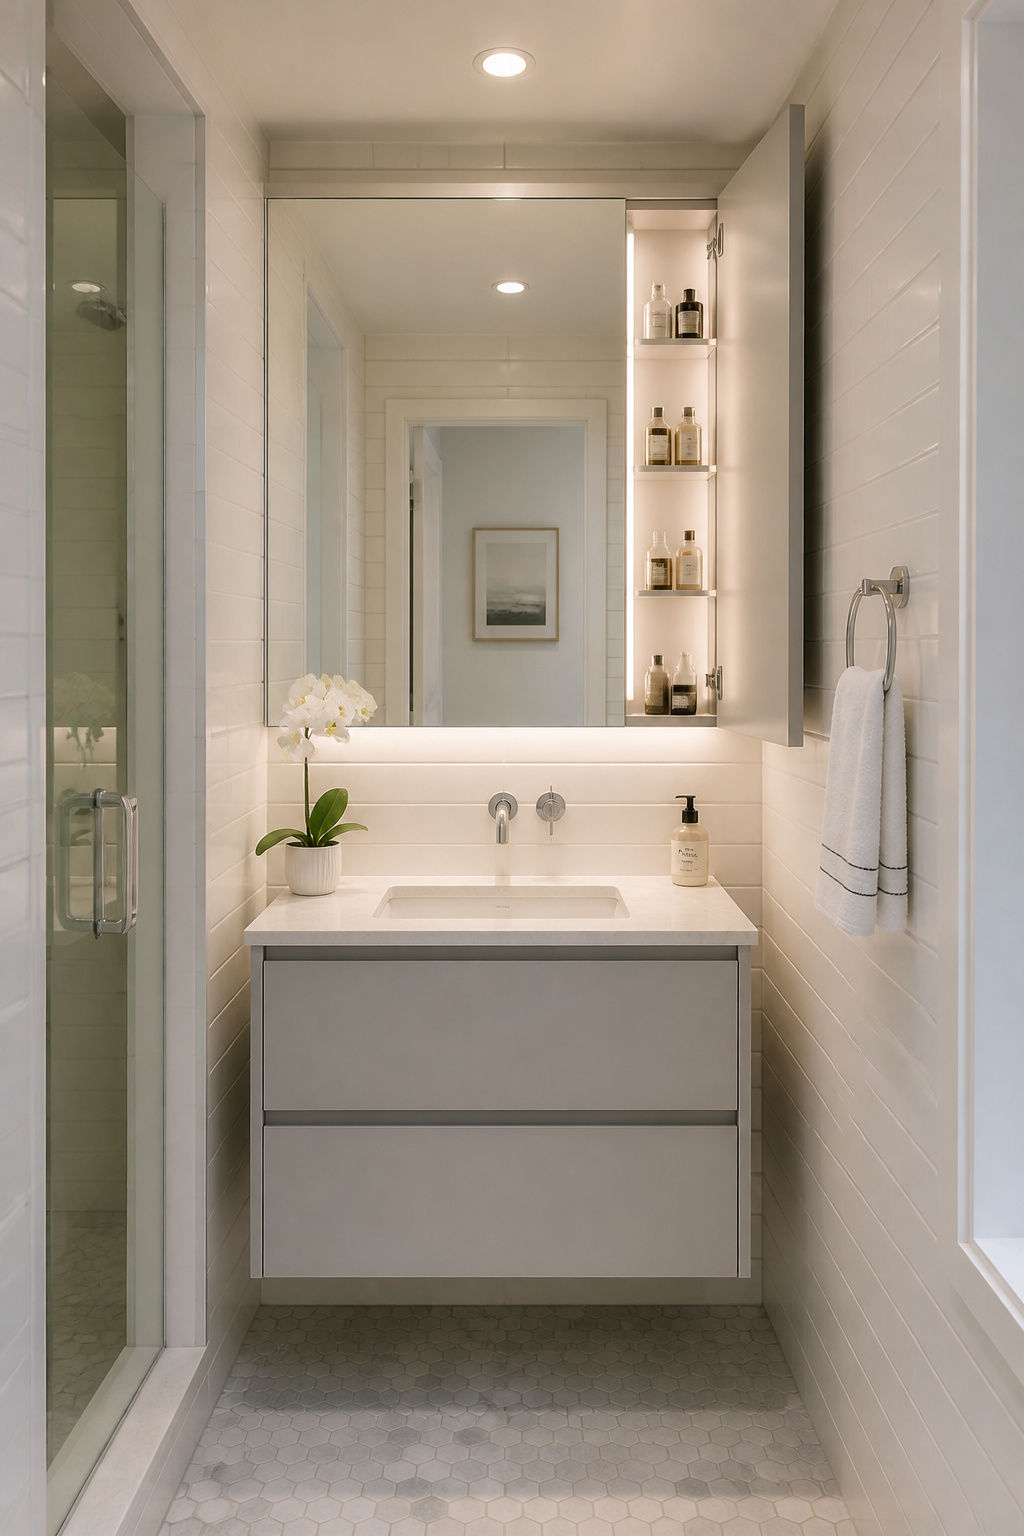
The 24-inch width is the sweet spot for small bathrooms: it accommodates a single undermount sink with enough countertop surface to be functional, while the 18–20-inch depth preserves walking clearance in bathrooms less than 5 feet wide. For genuinely tight powder rooms or bathrooms where a door swings into the vanity zone, corner configurations are worth considering. Wall-mounted corner vanities run 18–24 inches along each wall and work well in square bathrooms; in rectangular layouts, a narrow straight vanity typically provides more usable surface area. The diagonal face of most corner vanities looks good but produces less actual counter space than the spec sheet implies — verify usable surface dimensions before purchasing.
The Medicine Cabinet Advantage
The single most effective move for small bathroom vanity designs is pairing a narrow vanity with a recessed medicine cabinet rather than a surface-mount mirror. A recessed medicine cabinet installs inside the wall cavity, adding zero depth to the room, and can double or triple available storage by using space that was otherwise just drywall. Some recessed models integrate LED lighting strips, eliminating the need for a separate vanity light fixture and keeping the wall around the mirror clean.
5. Roll-Under Bathroom Vanity Designs for Universal Accessibility
The roll-under vanity is the right design choice for a wider range of households than most people realize. Yes, it’s required for ADA compliance in accessible bathrooms. But it’s also the only vanity design that works comfortably for wheelchair users, works for children who aren’t tall enough to use a standard-height vanity standing, and works for anyone who sits while grooming — which, it turns out, is a more comfortable way to do a fifteen-minute makeup routine regardless of ability.
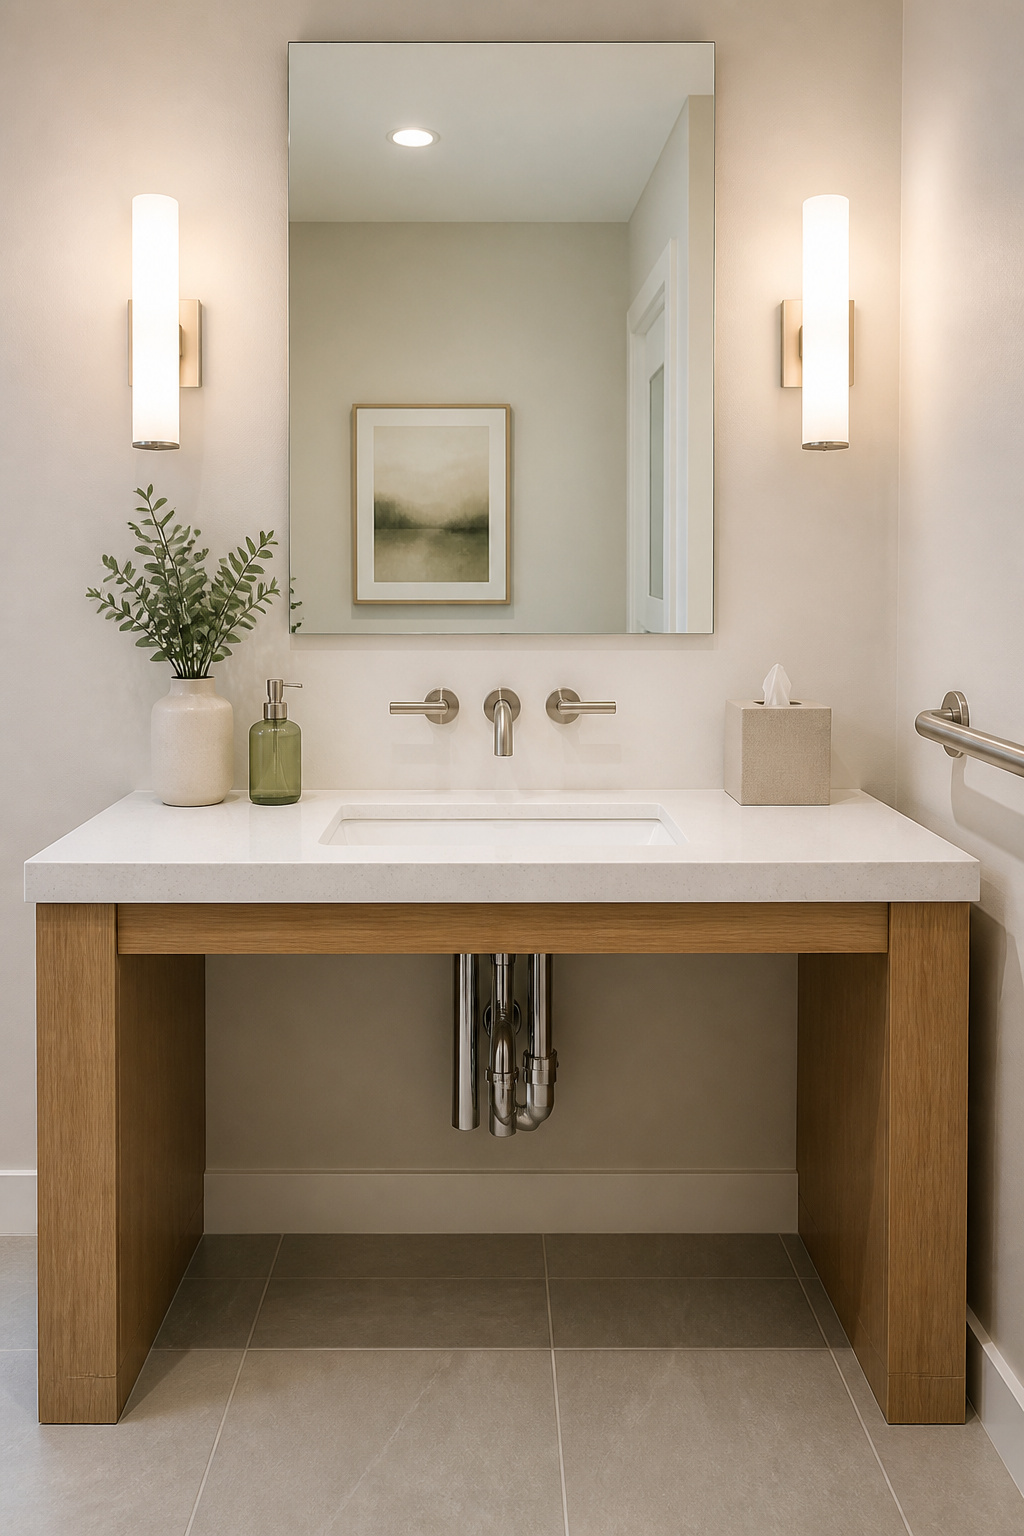
The ADA clearance requirements are specific: at minimum 27 inches of knee clearance height, 30 inches of width, and 17–25 inches of depth to accommodate a standard wheelchair and footrests. Toe clearance at the base needs to be at least 9 inches high and 6 inches deep so the wheelchair footrest slides fully under without obstruction. The countertop cannot exceed 34 inches from finished floor. These measurements are easy to meet with a floating vanity — the wall-mounted format is the natural solution because it eliminates the cabinet base entirely.
Accessible Bathroom Vanity Designs: The Details Most People Miss
Two details are consistently overlooked. First, any hot water supply pipes within the knee clearance zone must be insulated or covered. Bare pipes cause burns for users with reduced sensation, and pipe covers run $30–$80 at most hardware stores. Second, shallow-depth sinks (4–5 inches deep rather than the standard 6–7 inches) dramatically reduce the reaching distance for seated users. Wall-mount faucets, which place the controls at the back of the sink rather than behind the basin, make the whole setup more comfortable and keep supply lines out of the knee space entirely.
6. Reclaimed Wood Vanity With a Vessel Sink for Rustic Charm
The reclaimed wood vanity with a vessel sink is the one bathroom vanity design that cannot be replicated by a manufacturer at any price. The character in reclaimed wood — the nail holes, the grain patterns earned over decades, the color variations from weathering — is genuinely unique. You don’t find it in new-build cabinetry because it can’t be manufactured, only accumulated.
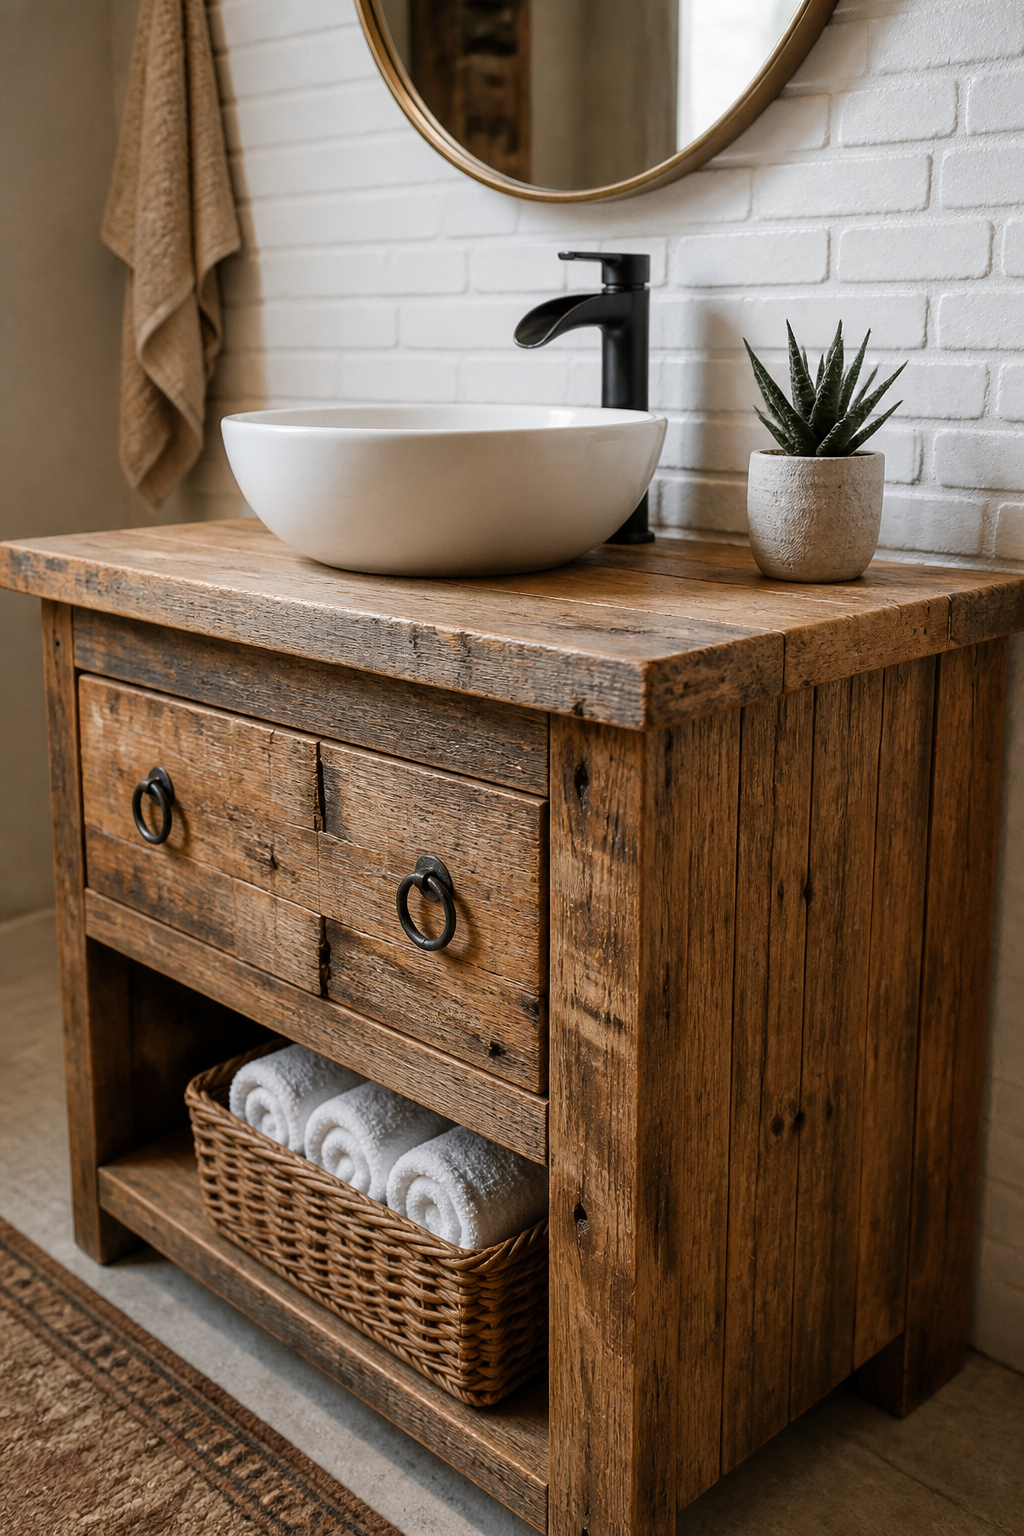
Teak and white oak are the top wood species for bathroom use. Both resist moisture naturally; teak’s internal oils reduce how aggressively it needs to be chemically treated to survive in a humid bathroom environment. Reclaimed pine and fir are widely available and affordable but require more careful sealing. Regardless of species, check moisture content before buying: wood above 19% moisture content will warp after installation as it dries to the ambient humidity of the house. Also check for pest damage — exit holes and frass (wood dust near holes) point to previous beetle activity; keep looking if you spot either.
The vessel sink heights require specific attention. Vessel sinks sit above the countertop rather than dropping below it, typically adding 4–6 inches to the working height. A vanity base at 31 inches with a 5-inch vessel sink puts the rim at 36 inches, which is comfortable for most adults but too high for children. Faucet height must clear the vessel rim — look for vessel-specific faucets 9–14 inches tall, measuring from the countertop surface.
Sealing Against Bathroom Humidity
Marine-grade polyurethane in 3–5 coats on all surfaces — including edges, underside, and back panel — provides the most durable bathroom barrier. Penetrating oil finishes are more beautiful but require reapplication every 6–12 months. More ideas for rustic bathroom decor ideas for a soul-soothing retreat show how this kind of material choice plays across the full bathroom.
7. Minimalist Open-Shelf Vanity for a Light, Airy Bathroom Feel
Open-shelf vanities succeed in bathrooms where the person using them is disciplined about what stays visible. That’s either a feature or a dealbreaker depending on the household. In single-user bathrooms, powder rooms, or spaces where the daily routine is genuinely pared-down, they look exceptional — light, thoughtful, and far less builder-grade than any closed-cabinet alternative at the same price. In shared family bathrooms, they become drug-store shelves within two weeks.
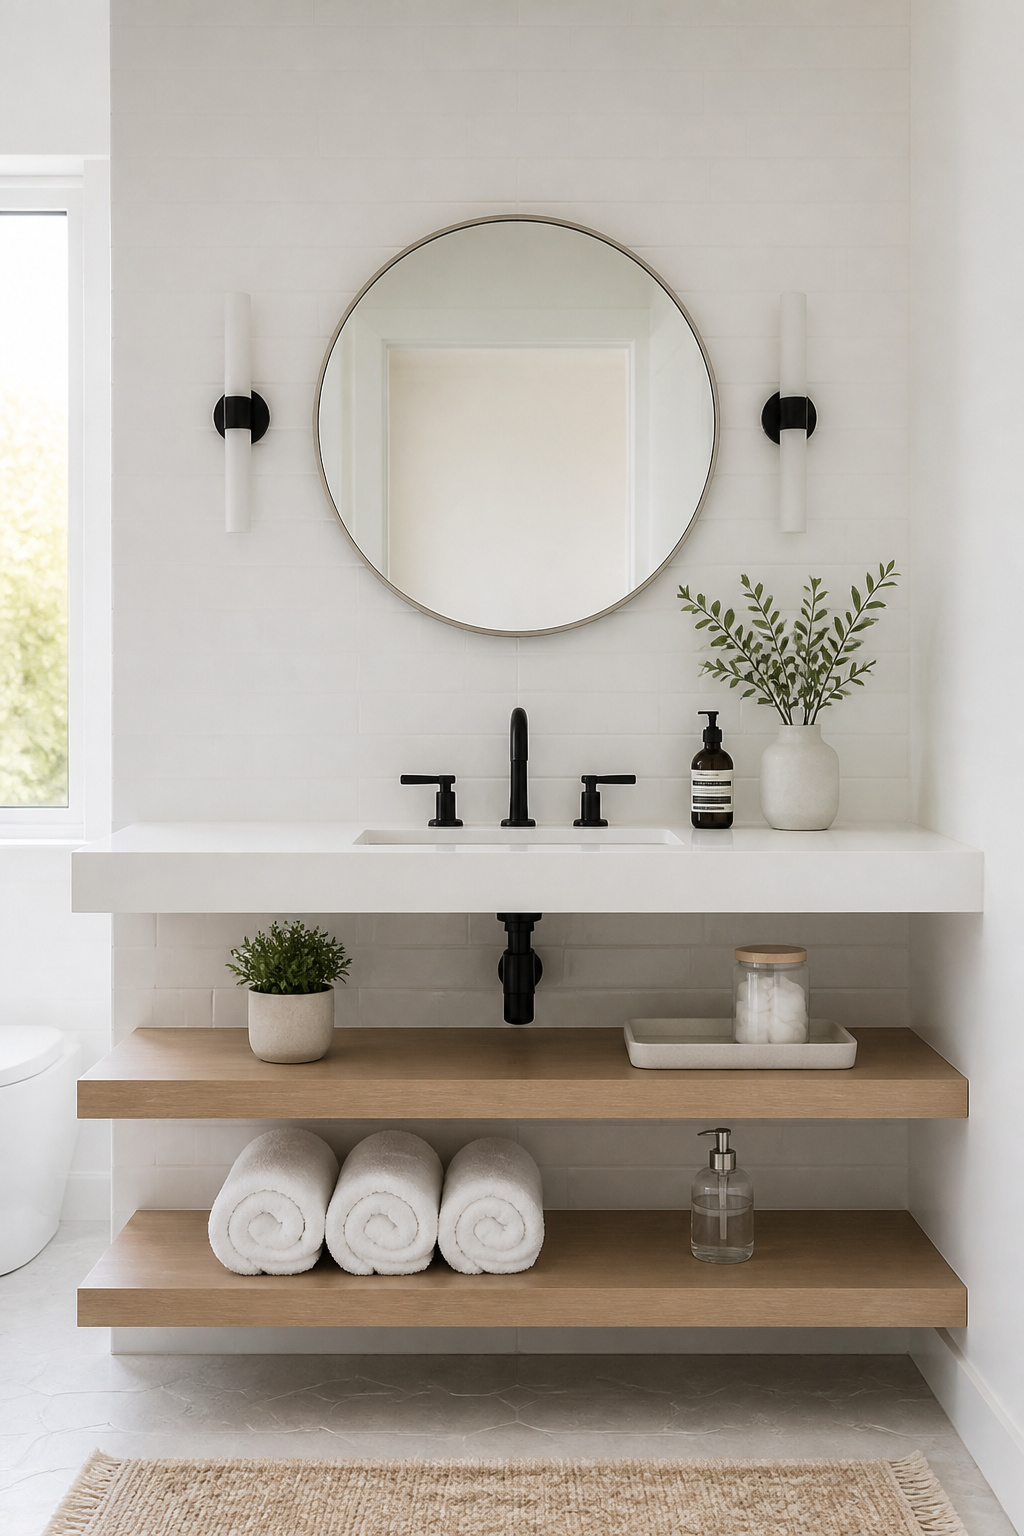
Minimalist open-shelf bathroom vanity designs define the look through material choice. White oak slabs with a water-based satin finish are the most popular option in 2026 — stable, warm, and humidity-resistant when properly sealed. Powder-coated steel shelves in black or white are actually the most practical humidity choice: no swelling, no warping, and the crisp industrial edge pairs well with minimalist chrome or matte-black fixtures. Polished concrete shelves provide visual weight without the bulk of a cabinet; they need sealing every two years and will chip at edges if heavy objects are dropped.
The styling rule for open shelves: group items in odd numbers, mix heights within the grouping (one tall item, one medium, one low), and dedicate each shelf to one category rather than mixing product types. Decanted products — soap, cotton rounds, Q-tips in matching dispensers — replace the clutter of original packaging and are the standard in any open-shelf setup that photographs well. Limit each shelf to 3–5 items total. If the shelf holds more than that and still looks intentional, you have a gift.
8. Industrial-Style Bathroom Vanity Designs With Pipe and Concrete
Industrial bathroom vanity designs are the only style that genuinely look better with age. The concrete develops a patina; the black iron or galvanized steel frame acquires subtle variations as it weathers to the environment. Minor wear that would diminish a painted cabinet’s appearance is simply part of the industrial aesthetic — making it a surprisingly low-maintenance choice over the long term.
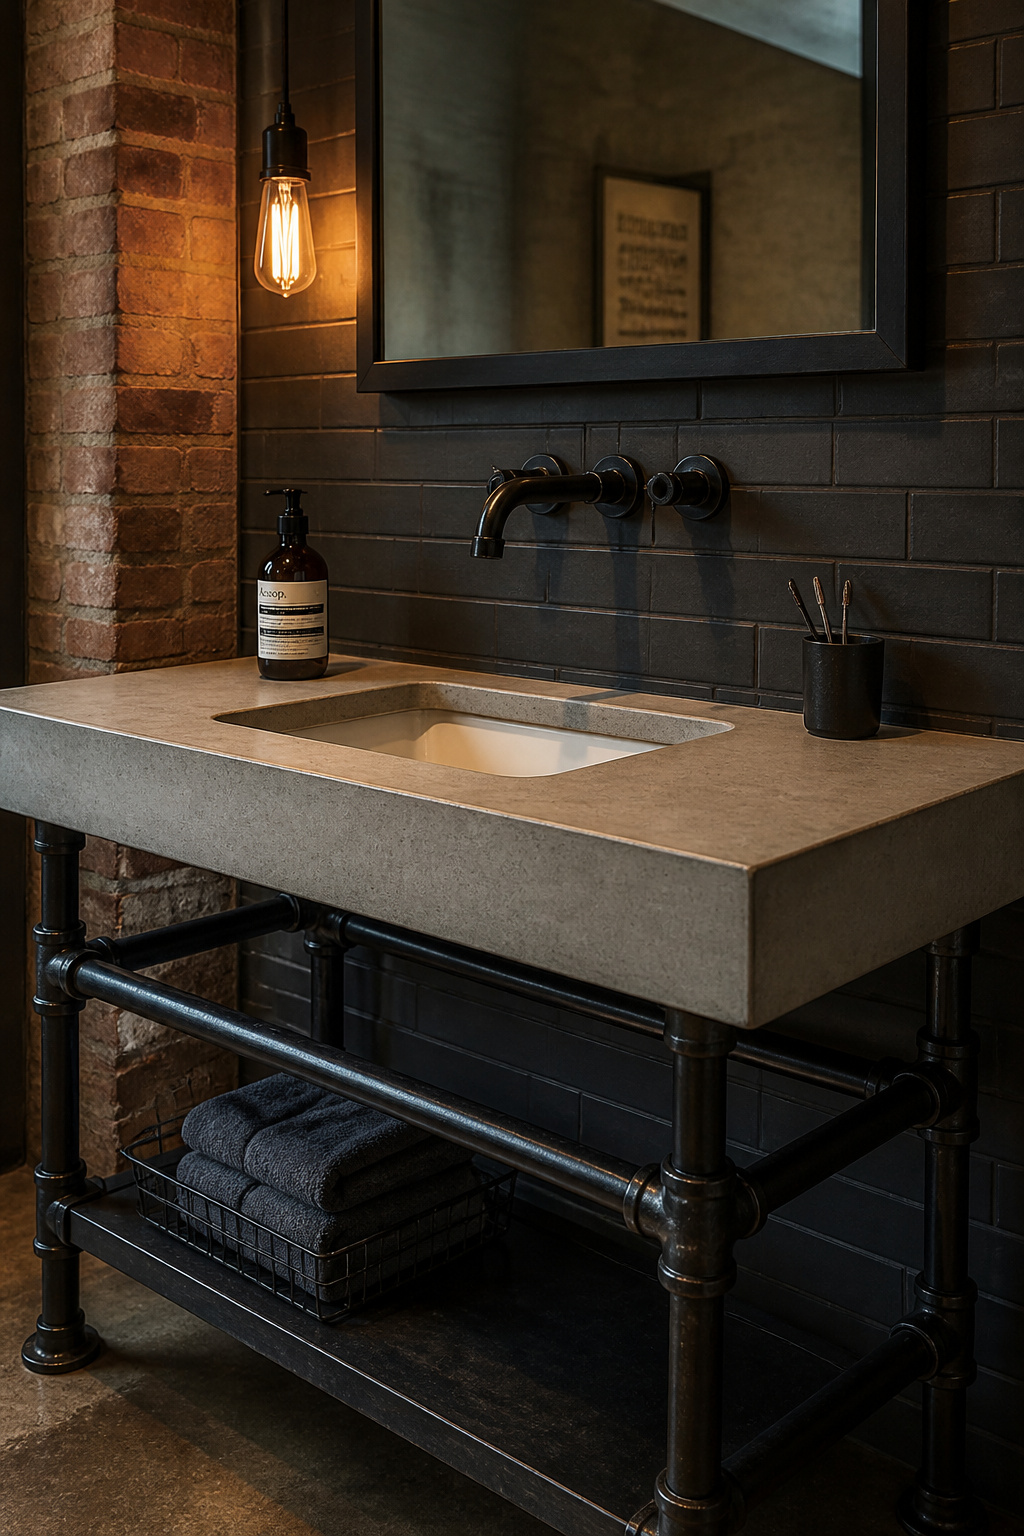
The frame is typically built from 1-inch diameter black iron pipe and fittings, assembled from hardware-store components and cut to dimension. Black iron pipe is the aesthetic choice over galvanized pipe (which reads more utilitarian than industrial), but it rusts in high-humidity bathrooms unless properly sealed before installation. Two coats of clear Rustoleum or metal enamel spray applied before the pipe is assembled protects the finish without altering the dark, matte appearance. The concrete countertop should run 1.5 inches thick for most bathroom spans under 48 inches — enough visual weight to read as architectural without becoming impractical.
Concrete Countertop Basics
For the concrete surface, precast tops ordered to spec are significantly lower-risk than poured-in-place for non-specialists. Concrete shrinks as it cures, and poured spans over 36 inches frequently crack without fiber reinforcement — a frustrating outcome on a weekend project. Precast tops arrive fully cured and pre-sealed. Avoid topcoat epoxy sealers in bathrooms; they can peel in humid environments over time. Penetrating sealers — Cheng Countertop Sealer and Buddy Rhodes are both well-regarded — soak into the concrete and protect without altering the surface appearance.
9. Vintage Dresser Conversion: A Repurposed Piece With Character
A beautifully converted antique dresser is the most talked-about vanity in any bathroom. It’s also the one that requires the most planning upfront to avoid an expensive mistake. The cost of sourcing, converting, and plumbing an antique dresser often exceeds the cost of a comparable ready-made vanity — but the result is something that cannot be bought: a specific piece with a specific history that no manufacturer catalogues.
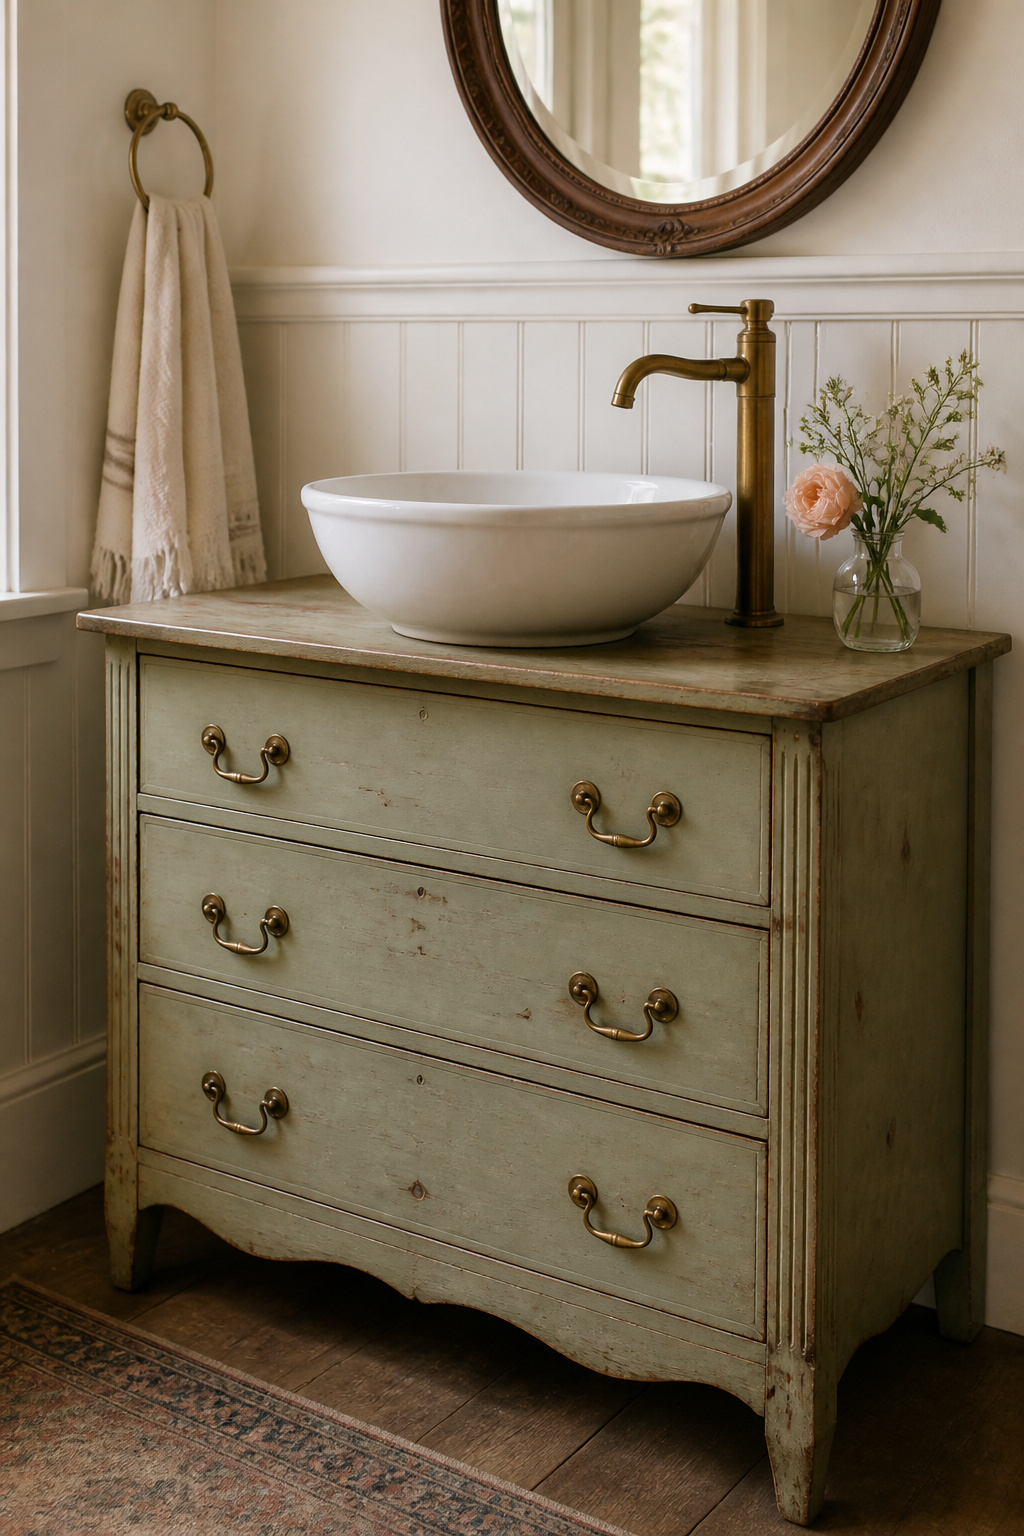
The depth issue is the most common point of failure. Modern vanities run 21–22 inches deep; many antique dressers sit at 18–20 inches, which forces a shallower sink and may require wall-mounted faucets rather than deck-mount. Measure before purchasing. The other structural requirement is solid wood construction — particle board and MDF swell and delaminate in bathroom humidity even with aggressive sealing. Look for drawer joinery that is dovetailed or box-jointed rather than simply stapled, which indicates a quality original build.
The Plumbing Conversion for Your Bathroom Vanity Design
The plumbing conversion requires shortening or removing the top one or two drawers to accommodate the P-trap and drain assembly. Cut supply line and drain holes using a hole saw, working from the back of the dresser, and route braided stainless steel supply lines rather than rigid copper — they’re easier to direct through a modified drawer cavity. Waterproof the interior with 2–3 coats of marine-grade epoxy paint on all interior surfaces near the plumbing. To avoid cutting into the antique surface, place a vessel sink directly on top; for an undermount installation, a custom stone or solid-surface piece cut to the dresser dimensions creates a better water barrier than sealing raw wood around a cutout.
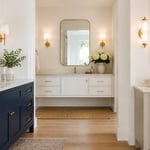
10. Double-Sink Vanity for Shared Bathrooms and Busy Mornings
The double-sink vanity is the bathroom upgrade that most couples wish they’d made sooner and most single-occupant homeowners overlook when they sell. The calculus is simple: if two people share a bathroom and use it simultaneously during morning routines, one sink creates a bottleneck every single day for as long as you live there.
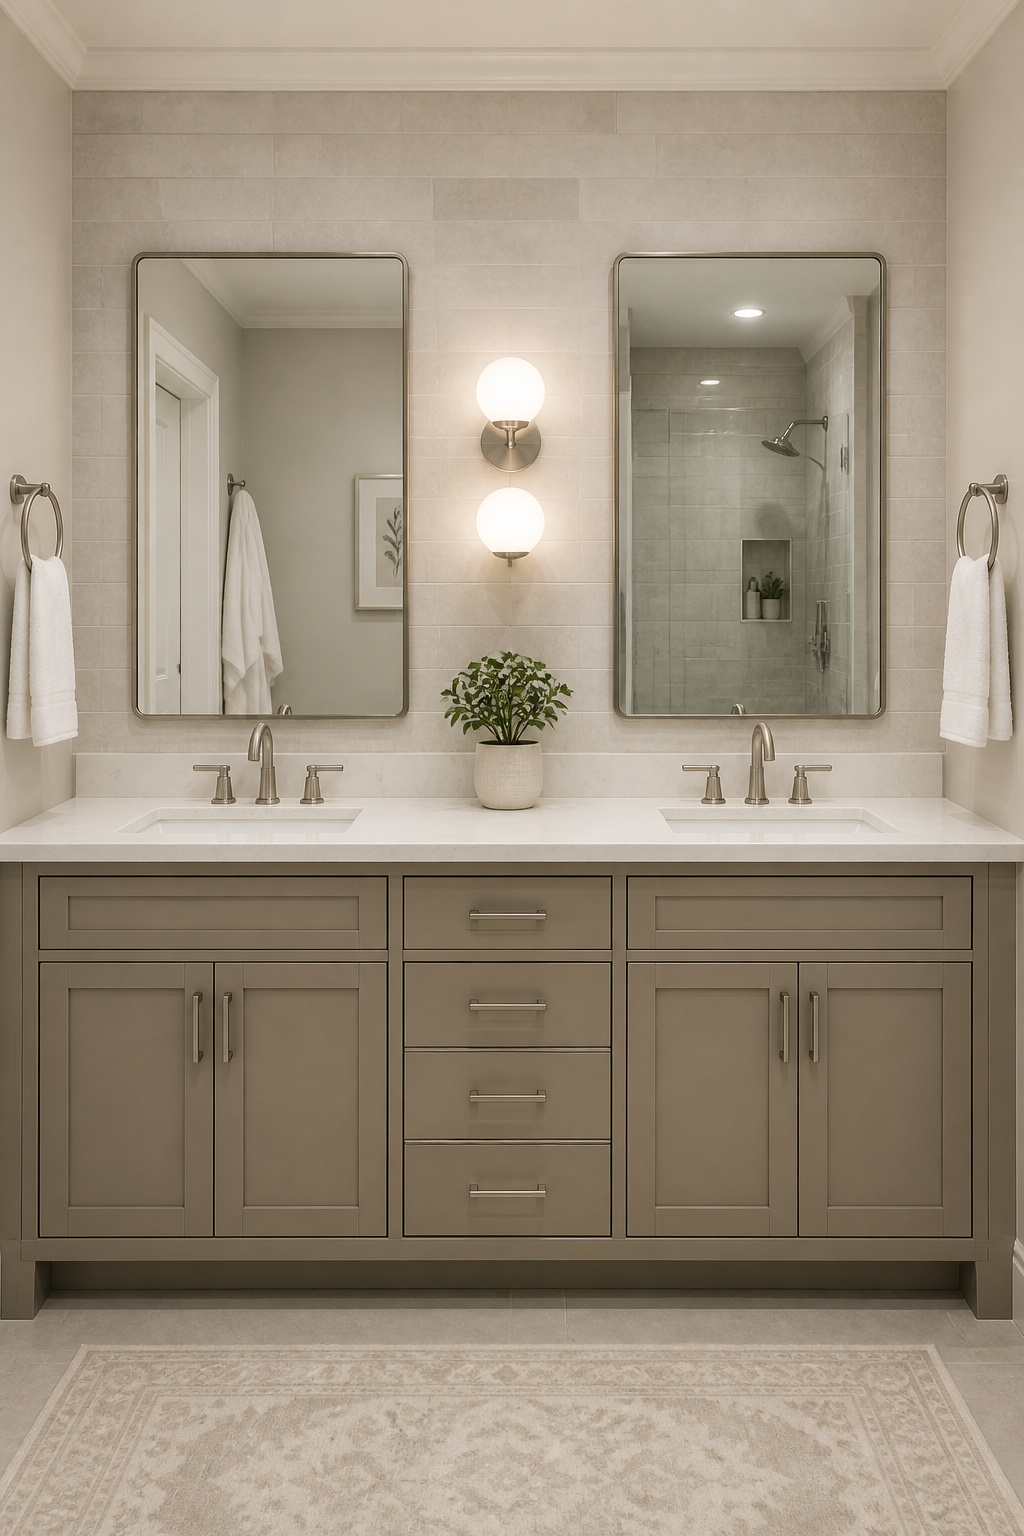
Sixty inches is the functional minimum for two sinks — each person gets 30 inches of personal space, which is workable. But 72 inches is the better choice. The extra 12 inches typically introduces a central drawer stack between the two sink zones, giving each user their own storage territory while providing shared space for items that belong to both. Storage division matters as much as size in shared bathrooms: two side-by-side under-sink cabinets flanking a central stack is the most effective layout — it mirrors the way two people actually use the space, with each claiming one side. Drawer organizers and dividers inside personal drawers prevent the slow entropy of shared storage where everything eventually ends up mixed together.
Choosing the Right Countertop
The countertop material becomes more important over a 72-inch span because it’s bearing the wear of two people. Quartz is the practical choice: non-porous, zero maintenance, and durable at $55–$120 per square foot installed. Granite is similarly hard-wearing, requires annual sealing, and offers more visual variation — a better aesthetic choice for the longer expanse of a 72-inch countertop where the patterning reads as intentional rather than decorative.
11. Built-In Alcove Vanity With Integrated Mirror and Task Lighting
A built-in alcove vanity is how you get a custom-looking bathroom on a semi-custom budget. The alcove — the natural niche formed by two walls and the back wall — eliminates the need for side panels on the cabinet, since the walls themselves become the sides. The result is a vanity that reads as built-in even when the cabinet is modified stock cabinetry.
IKEA’s GODMORGON series and equivalent semi-custom cabinet lines can be sized to fit most alcoves using filler panels for gaps — saving 50–70% over full custom cabinetry at comparable quality. Full custom becomes necessary only when the alcove falls at an unusual dimension that no standard cabinet increment meets, or when specific wood species are required. The alcove also sets up naturally for integrated lighting: sconces mounted on the inside walls at eye level (60 inches center height from floor) provide the most flattering grooming light of any fixture configuration, eliminating the harsh under-chin and under-nose shadows that an overhead bar produces.
Getting the Lighting Right
For grooming, aim for 2,500–3,000 lumens total, with a CRI (Color Rendering Index) of 90 or above to ensure that makeup, skin tones, and clothing colors appear true to life. Color temperature of 2,700K–3,000K (warm white) is the standard for bathroom vanity lighting — cooler temperatures above 4,000K render skin with a bluish cast that distorts color matching. A pair of sconces at 60 inches height, one on each side of the mirror, positioned 28 inches apart, is the configuration that designers reliably return to. For more on the mirror side of this equation, bathroom mirror ideas that transform the space covers the full range of options.
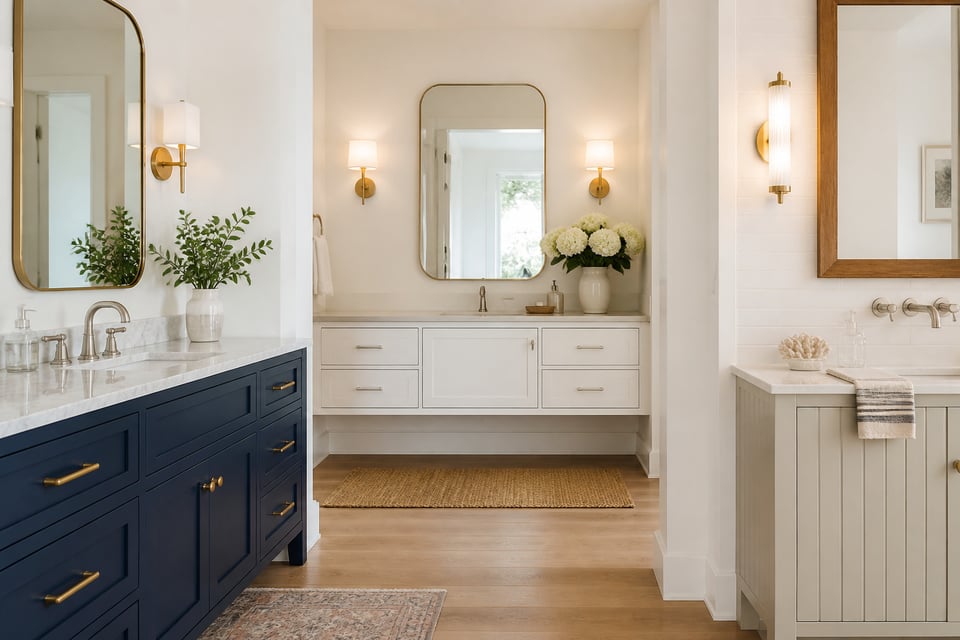
12. Marble-Top Bathroom Vanity Designs for a Luxury Statement
Marble is the countertop material that photographs most beautifully and requires the most consistent attention to maintain. This is worth stating plainly rather than discovering at the two-year mark when the surface shows etch marks and staining. The right marble, properly maintained, looks exceptional for decades. The wrong marble — or the right marble poorly cared for — looks tired within a year.

Carrara — the most widely available white marble — has a soft gray veining against a white-to-light-gray background. It’s more porous than Calacatta and 30–50% less expensive, making it the accessible entry point into marble surfaces. Calacatta marble has a white background with bold, dramatic gray or gold veining; it’s denser than Carrara, less likely to stain, and more visually striking. Nero Marquina (black marble with white veining) is the most dramatic option and porosity varies significantly by slab — test any slab with a few drops of water before purchasing: if the stone absorbs the water rather than beading it, the sealing requirement is aggressive.
Sealing and Daily Care
Seal Carrara every six months; Calacatta every twelve. Daily cleaning means pH-neutral stone cleaner only — standard bathroom cleaners, toothpaste, and lemon-based products etch marble surfaces irreversibly. The water-bead test tells you when resealing is needed: drop water on the surface and watch; if it absorbs rather than beading, seal immediately. For cabinet pairings: Calacatta with brushed gold hardware is the most photographed luxury bathroom combination of the past five years for a reason — the warm tones harmonize naturally. Dark navy or charcoal-painted cabinets under white marble create maximum contrast and prevent the room from feeling washed out.
13. Coastal Beadboard Vanity for a Relaxed, Beach-House Feel
Beadboard vanities deliver texture and coastal warmth that painted flat-panel cabinets simply can’t replicate. The vertical plank-and-bead profile breaks up the visual plane in a way that reads as intentional craftsmanship rather than decorative appliqué. Also, they’re forgiving to execute: beadboard panels apply to existing cabinet doors with adhesive and a few trim nails, making this one of the easier visual upgrades in bathroom renovation.
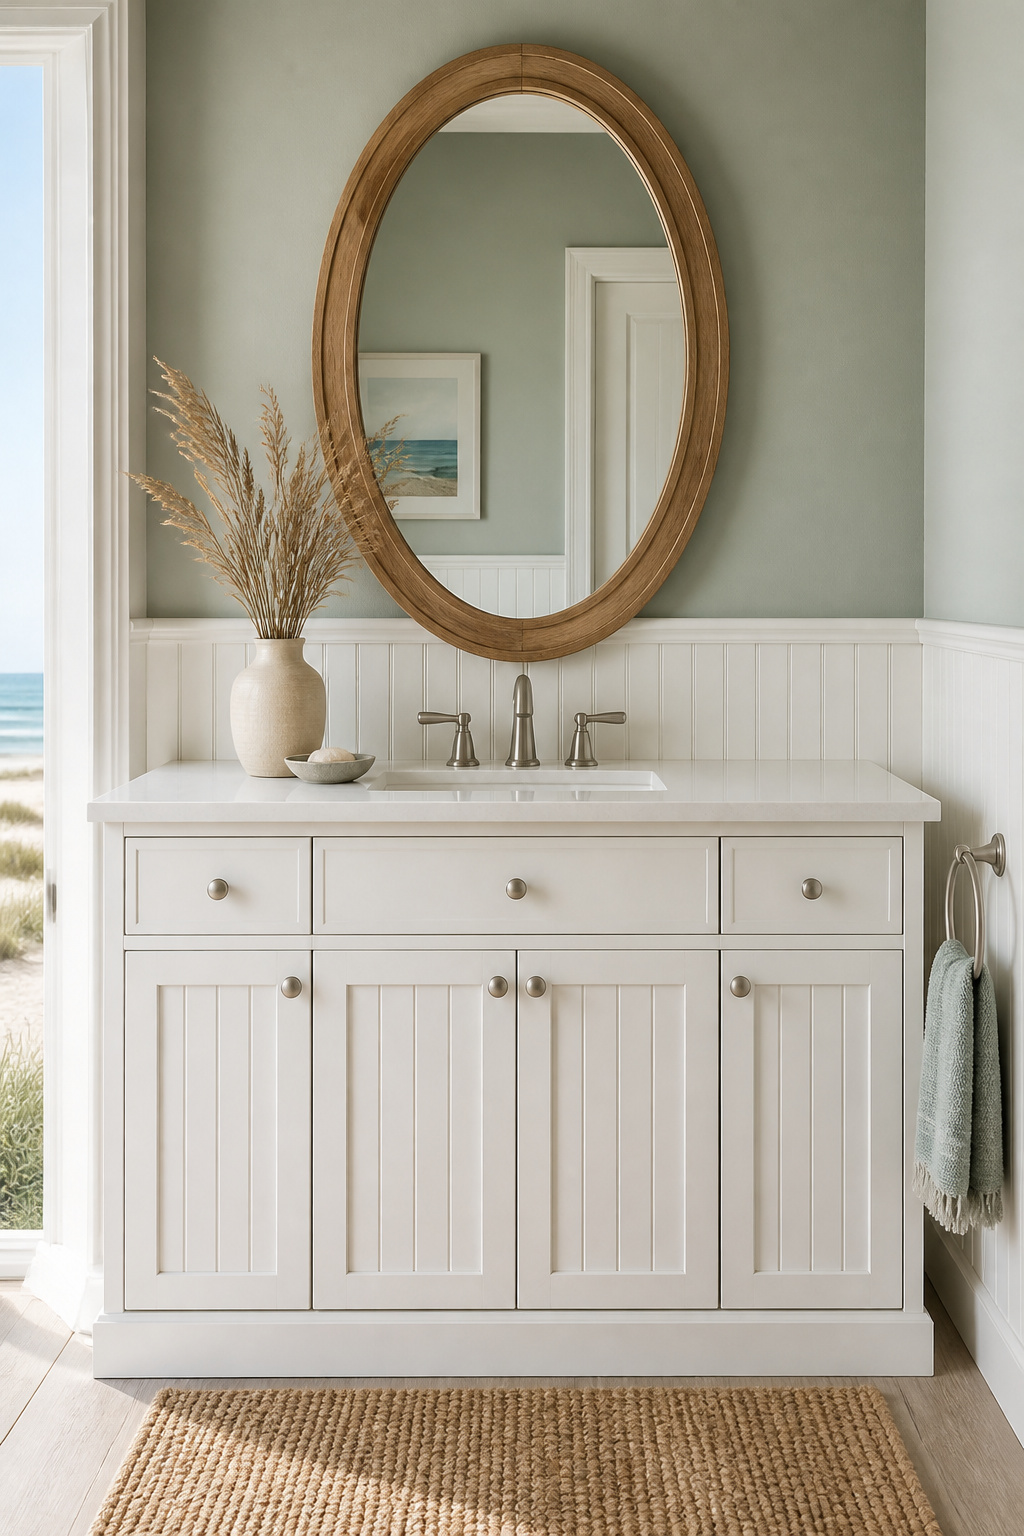
Material choice is the decision that determines whether the result lasts. Standard MDF beadboard panels in a bathroom without adequate ventilation will swell at the seams within 12–18 months. Moisture-resistant MDF — denser than standard, specifically formulated for high-humidity applications — handles bathroom conditions well when sealed with semi-gloss or satin paint. PVC beadboard is the most humidity-proof option: it won’t swell, warp, or absorb moisture at all, making it the right choice for bathrooms that run hot showers without an exhaust fan or for ensuites with poor air circulation.
Paint Finish and Color
Semi-gloss or satin only in bathrooms — they wipe clean and resist humidity far better than eggshell or matte. White (Benjamin Moore White Dove or Simply White) makes the beadboard texture visible through shadow and remains the most versatile base for coastal styling. Sage green, soft navy (Benjamin Moore Hale Navy), and warm aqua all read as coastal palettes; pair with brushed nickel or unlacquered brass hardware and a teak or bamboo-framed mirror to complete the look. For the broader coastal bathroom picture, coastal bathroom design transformation covers fixtures, tiles, and accessories beyond the vanity itself.
14. Painted Cabinet Vanity: A Budget-Friendly Bathroom Refresh
Painting existing bathroom vanity cabinets is the highest return-on-investment bathroom project available. For under $200 in materials — primer, paint, new hardware, painter’s tape — a dated honey-oak or builder-white vanity cabinet becomes something that reads as a considered design choice. The catch is that the preparation work is far more important than the paint.
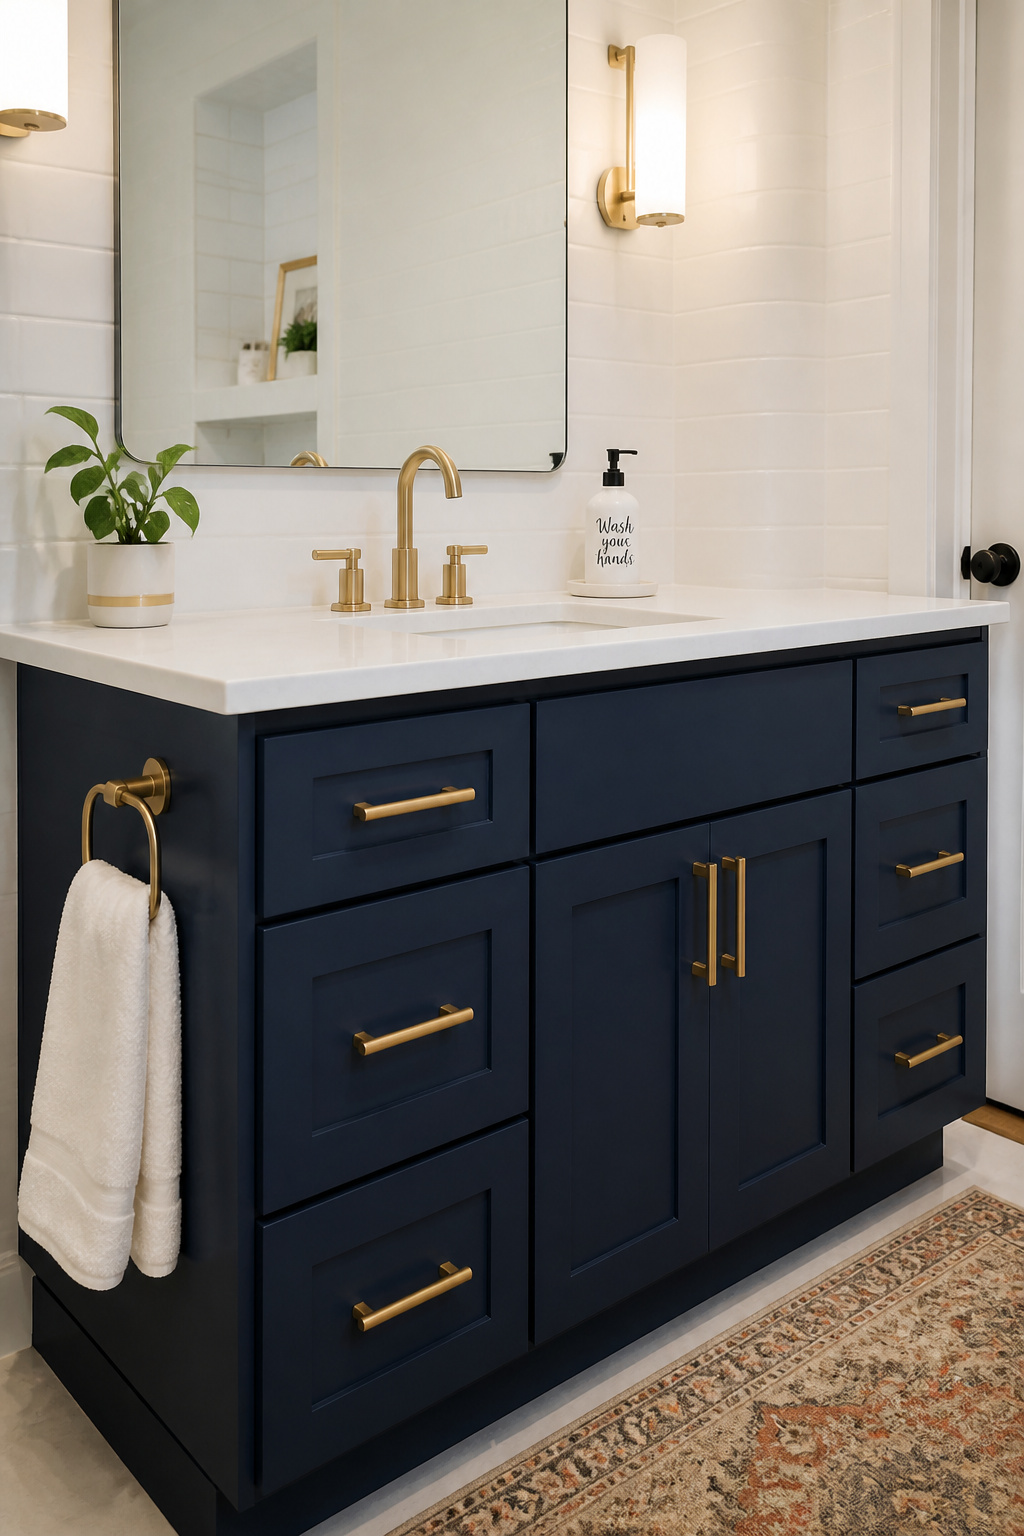
Step one is a TSP (trisodium phosphate) wash of all cabinet surfaces. TSP removes grease, soap film, hairspray residue, and the invisible accumulation of bathroom chemistry that lives on every surface — skipping this step is the reason amateur paint jobs peel. Step two is 120-grit sanding to scuff the surface and give the primer mechanical adhesion. Step three is a bonding primer — Benjamin Moore Stix Waterborne Bonding Primer is the professional’s choice — applied to all surfaces, including inside edges and around hardware holes. On glossy factory finishes, bonding primer is non-negotiable; without it, the topcoat peels at corners and edges within months of daily use regardless of paint quality.
Paint and Color for Bathroom Vanity Designs Under $200
For the topcoat, Benjamin Moore Advance Waterborne Alkyd self-levels to fill small brush marks and imperfections, curing to a durable finish that has survived ten years of daily bathroom use in owner reviews. Sherwin-Williams Emerald Urethane Trim Enamel cures harder and faster but requires cleaner application technique — less forgiving of drips. Both need thin coats (2–3 coats with 24 hours between) and a 30-day cure period before rehinging doors. Color: navy (Benjamin Moore Hale Navy) under a white or marble countertop is the single most transformative paint choice in small-to-medium bathroom design. Sage green with brass hardware reads as spa-level. Warm white refreshes dated wood tones without commitment to a bold color.
15. Pedestal Sink With Concealed Storage Cabinet for Compact Bathrooms
The pedestal sink is the design purist’s choice: elegant, space-efficient, timeless in appearance, and aggressively inconvenient for anyone who needs to store more than a hand soap and a candle. The visual lightness is real — pedestals make small bathrooms feel larger than almost any other fixture choice — but the storage absence is also real, and in a primary bathroom it is felt every single day.
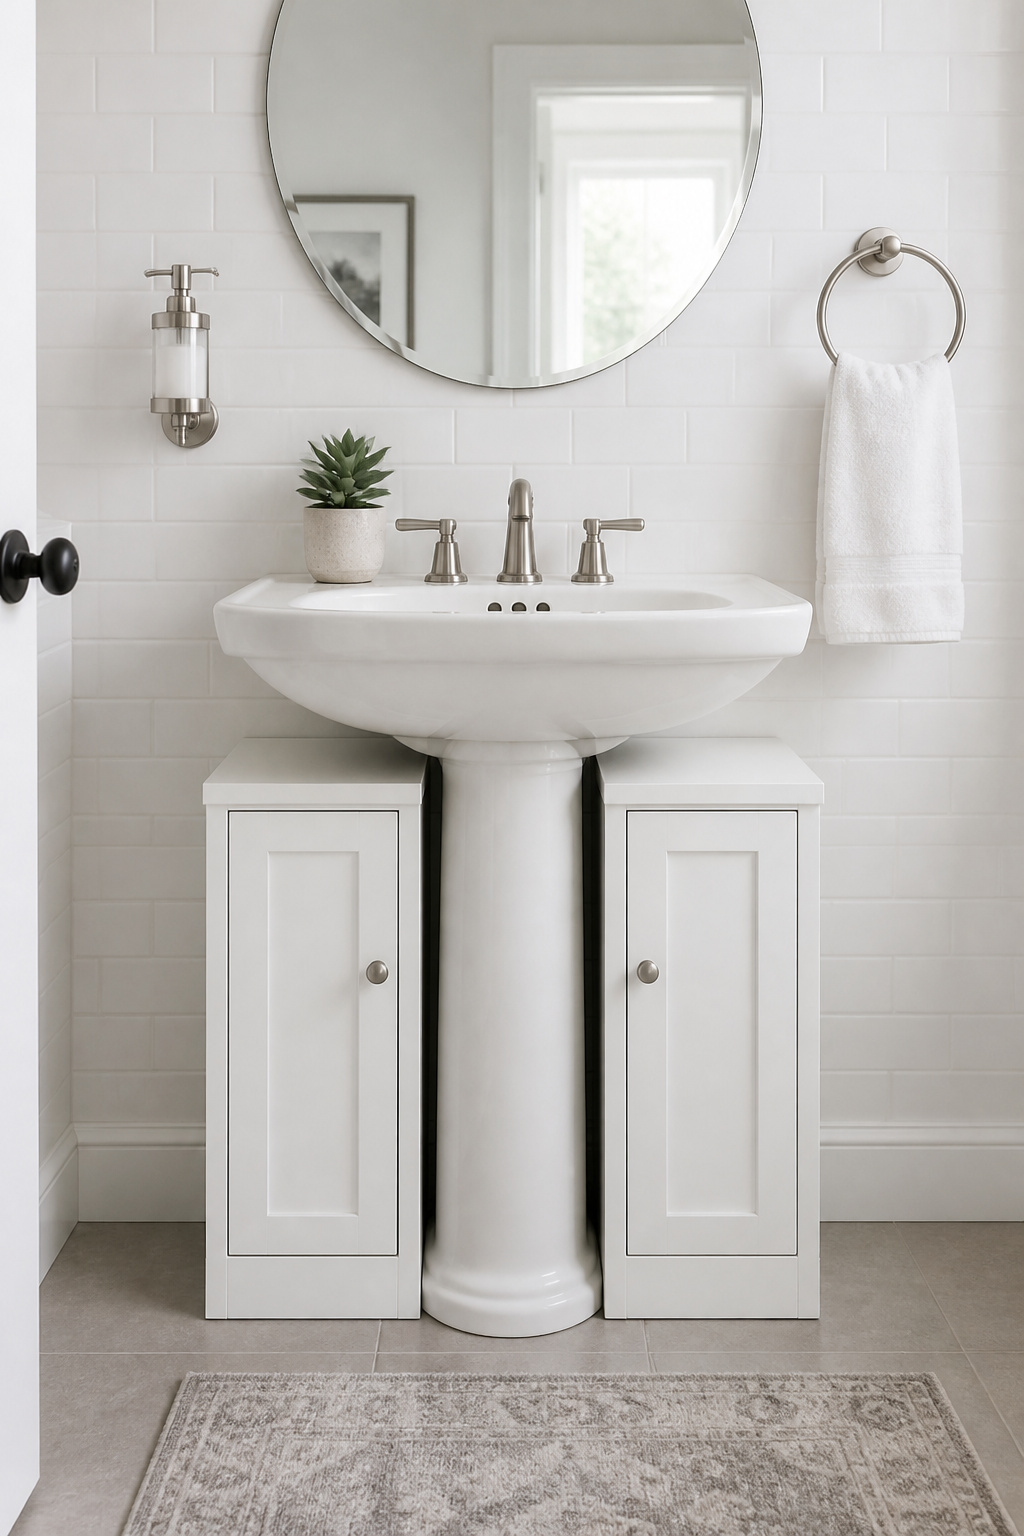
The U-shaped pedestal cabinet is the practical solution. These units are designed specifically to slot around the pedestal base, with a cutout in the back panel that clears the pedestal column. From the front, they look like a standard bathroom cabinet; from the side, you can see they’re wrapping the base rather than sitting beside it. Most run 24 inches wide and 24 inches tall — enough storage for the daily-use products that otherwise end up on the back of the toilet or on the floor. Prices run from $50 to $250 depending on build quality; models with soft-close hinges and adjustable shelves run at the higher end and are worth the premium in shared bathrooms with heavy daily use.
The U-Cabinet Solution
Measure the pedestal base width before purchasing the cabinet — this step gets skipped more often than any other, and the U-cutout must clear the base without leaving an unfinished gap. Material: moisture-resistant laminated MDF for the cabinet itself. Color advice: choose a shade matching or slightly lighter than the wall color, so the cabinet recedes visually and the pedestal remains the focal point. Add a narrow over-toilet shelving unit at 18 inches wide for shared bathroom storage without expanding the floor plan further. More ideas for compact bathrooms, including alternatives to the pedestal setup, are covered in space-saving sink ideas for small bathrooms.
Choosing the Right Bathroom Vanity Design for Your Home
The most common mistake in vanity selection is choosing for style first and discovering the spatial and functional issues second. The reverse approach — dimensions and function first, then style — produces far more satisfying outcomes.
For bathrooms under 40 square feet, the floating vanity or pedestal with a U-cabinet preserves floor space; this is the priority. For bathrooms in the 40–70 square foot range, the full range of single-sink bathroom vanity designs — storage tower, built-in alcove, reclaimed wood, painted cabinet — becomes viable. These are the bathrooms where a design decision actually has room to read properly. For bathrooms over 70 square feet shared by two people, the double-sink vanity at 72 inches is the upgrade that changes the quality of every single morning.
The longer-term consideration is one worth raising regardless of current household composition: universal design features like roll-under knee clearance, lever faucets, and grab-bar-ready blocking in the walls cost exactly the same as non-accessible alternatives during a new installation. Retrofitting them later costs three to five times as much. A bathroom designed to work for a wheelchair user also works for a toddler on a step stool, an adult recovering from surgery, and an elderly parent who moves in unexpectedly. Good design anticipates how a space will be used by real people over time — not just how it looks in a photograph on the day it’s finished.