As a curator, I spend my days thinking about how art lives within a space. How a sculpture holds the corner of a room, how a painting changes with the afternoon light. But honestly, the most important gallery any of us will ever curate is our own home. And the kitchen—that’s the main exhibition hall. Its cabinets command more visual real estate than anything else, setting the entire emotional tone for the space where we start our days and gather with the people we love.
Many people think a kitchen they love requires a gut renovation, complete with dust, drama, and weeks of takeout. But I’m here to tell you that’s a myth. I’ve seen firsthand how thoughtful, focused changes can be just as transformative. It’s not about demolition; it’s about curation. It’s about looking at what you have and seeing the potential waiting just beneath the surface. These ideas aren’t just a to-do list; they’re an invitation to see your kitchen with an artist’s eye.
1. Find a New Narrative with Paint
There is no gesture more powerful or artistically immediate than changing a color. In a gallery, we use paint to define a space, to evoke a mood, to make the art itself sing. In your kitchen, it does the exact same thing. Running your hand over a freshly painted cabinet isn’t just about a new color; it’s about a complete shift in the room’s energy. This is where you can truly make a statement.
Forget what you think you know about house paint. For a finish that can stand up to the beautiful chaos of a kitchen, you need something tougher. I always point clients toward specialty cabinet paints like Benjamin Moore’s ADVANCE, which levels out to a stunning, almost factory-like finish. The prep work—the cleaning, the light scuff-sanding, the primer—is a ritual. It’s the foundational work that ensures your new finish will last. It’s what separates a project that looks great for six months from one that looks beautiful for years.
This is your chance to play with composition. Maybe it’s not just one color. I love a two-tone look, with uppers in a light, airy white and lowers in a deep, grounding charcoal or navy. It’s a classic curatorial trick: create a horizon line that makes the entire space feel both more expansive and more intimate.
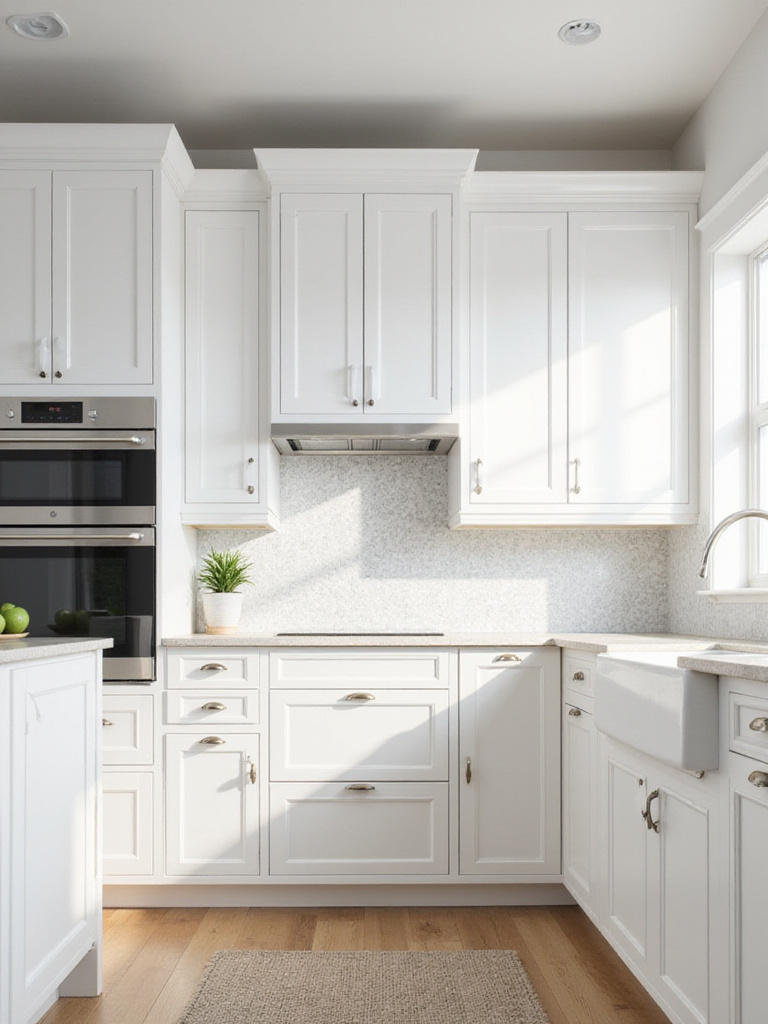
2. Treat Hardware as Functional Sculpture
After you’ve set the canvas with paint, the hardware is the final, essential punctuation. This is, without a doubt, the most satisfying, high-impact update you can make in a single afternoon. So many people overlook it, but I’ve learned to think of hardware as small-scale sculpture. It’s a tactile detail you interact with every single day. Why shouldn’t it be beautiful?
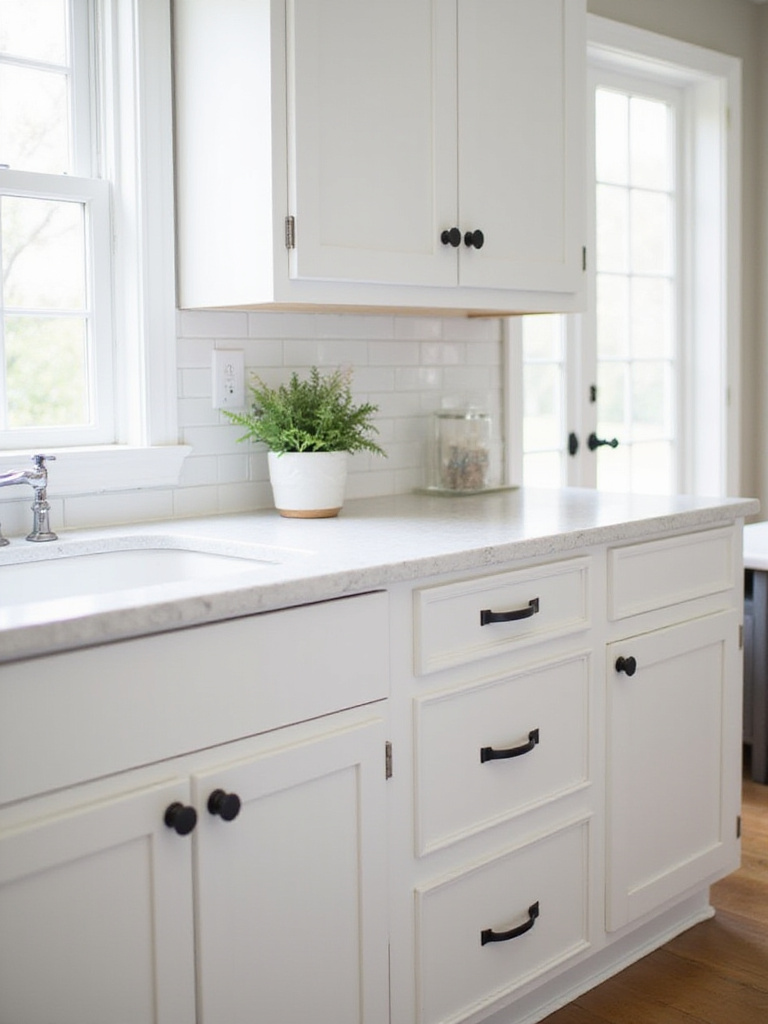
The secret is to think about materiality and contrast. The cool, weighty feel of a solid brass pull against a deep green cabinet feels sophisticated and timeless. Matte black hardware on pale oak, on the other hand, reads as graphic and modern. Don’t be afraid to mix it up. Knobs on doors and pulls on drawers is a classic combination for a reason—it just works, both visually and ergonomically. Before you buy, a word of advice: measure the distance between the screw holes on your existing hardware (“center-to-center”). This will tell you if you’re in for a simple swap or if you’ll be filling old holes and drilling new ones.
It’s these small moments of considered design that elevate a room. When you choose hardware that feels good in your hand, you’ve turned a mundane action—opening a cabinet—into a small moment of pleasure.
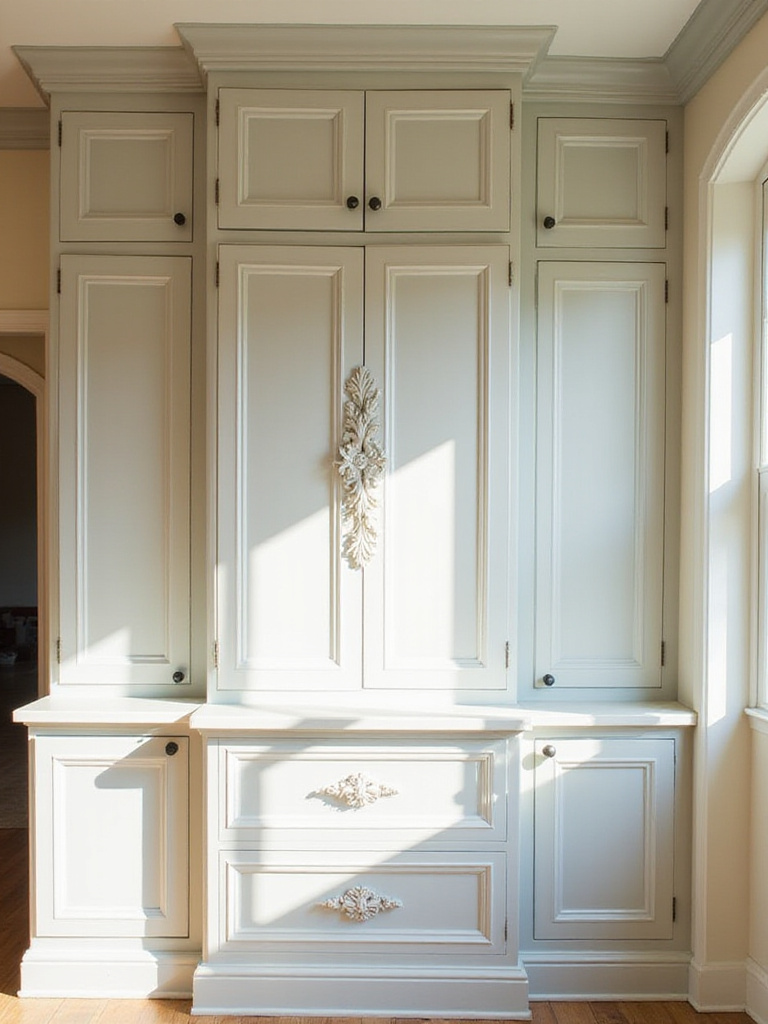
3. Raise the Eye with Crown Molding
Walk into a high-end, custom kitchen and look up. Chances are, you’ll see that the cabinetry reaches all the way to the ceiling, seamlessly integrated into the room’s architecture. Crown molding is how you can achieve that same elevated, intentional look. It’s a simple piece of trim that visually bridges the gap between the top of your cabinets and the ceiling. A purely brilliant move.
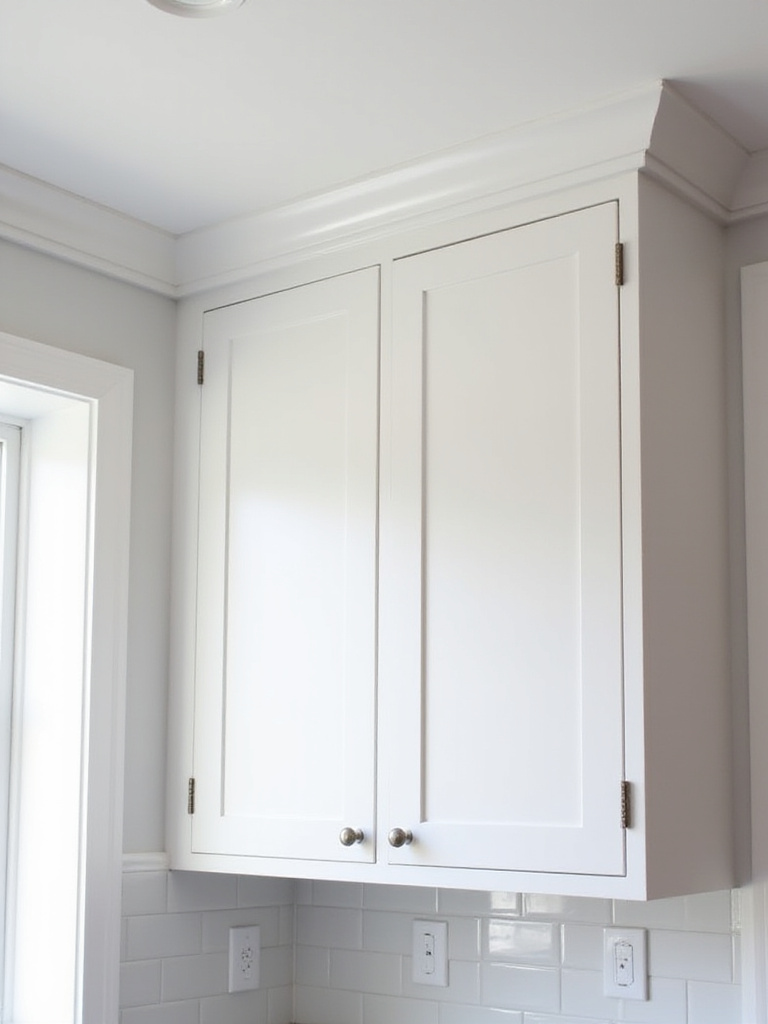
This isn’t just about eliminating that awkward, dust-collecting space. It’s about finishing the composition. Molding gives your standard cabinets a sense of permanence and grandeur, making them feel like they were truly built for the space. The key is to match the profile of the molding to the style of your cabinet doors. A simple, clean-lined trim works wonders with Shaker-style doors, while a more ornate molding can beautifully complement a traditional raised panel.
Getting the corners perfectly mitered is where the craftsmanship shows, so this might be a place to call in a pro if you’re not comfortable with a saw. But the result is a kitchen that feels taller, more cohesive, and undeniably more polished.
4. Layer in Light Like a Pro
In exhibition design, lighting is everything. It directs the eye, creates drama, and establishes mood. The same principles are transformative in a kitchen. Under-cabinet lighting is the single most effective way to add a layer of sophistication and warmth to your space, and honestly, it’s a non-negotiable for me. It’s both beautiful and incredibly practical.
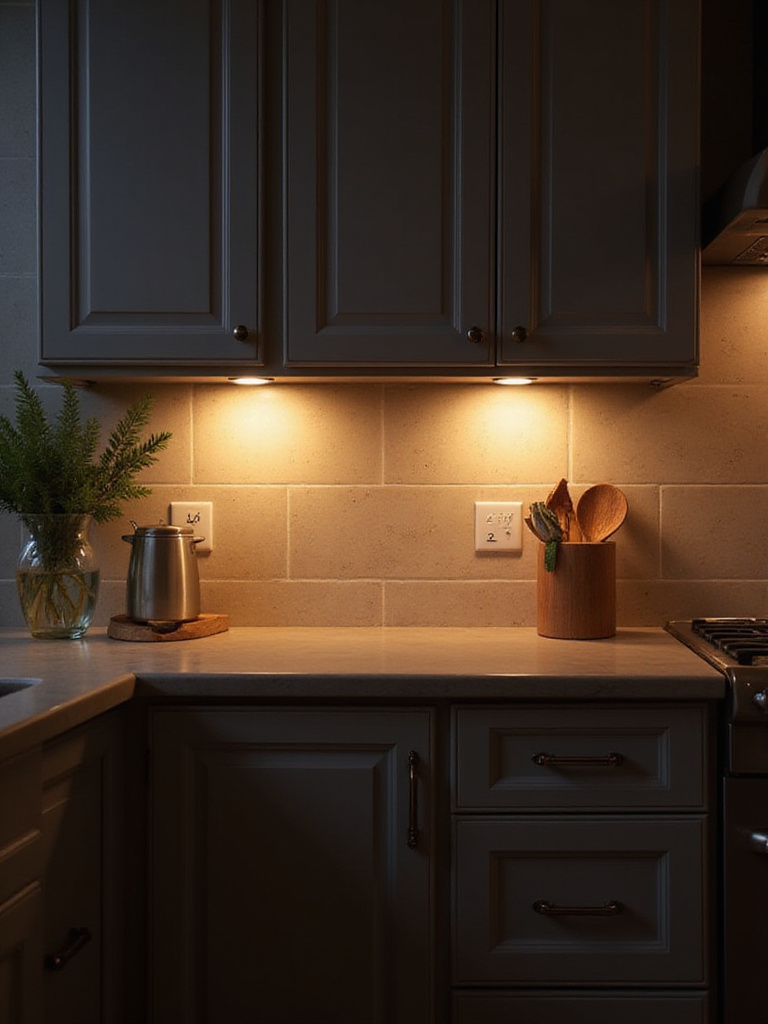
Forget those clunky fluorescent bars of the past. Today’s LED strips are slim, discreet, and offer incredible control. You can choose the color temperature—a warm, golden light (around 2700K) is perfect for creating evening ambiance, while a brighter, neutral light (around 3500K-4000K) is what you need for task-heavy prep work. Look for a high CRI (Color Rendering Index), which ensures the light renders colors accurately. This is important. You want your heirloom tomatoes to actually look red, not a sad shade of orange.
Once the overhead lights are off, this hidden glow is what makes a kitchen feel like a place to linger. It washes over your countertops, picks up the texture in your backsplash, and makes the whole room feel more intimate and inviting. It’s the secret layer that makes a good kitchen great.
5. Consider a New Face with Refacing
Sometimes the “bones” of your kitchen are great—the layout works, the cabinet boxes are solid—but the style just isn’t you anymore. This is where refacing comes in. Think of it as a façade transplant. You keep your existing cabinet infrastructure but replace all the visible elements: the doors, the drawer fronts, and the veneers on the outward-facing frames.
It’s an incredibly smart solution. You get the look and feel of a brand-new kitchen with a fraction of the disruption and waste of a full tear-out. I worked with a client once who had a perfectly functional but dated 90s oak kitchen. We refaced the doors in a simple, flat-panel style, painted them a deep teal, and the transformation was staggering. The project took days, not months.
Your material choices are vast, from solid woods ready for a custom stain to durable thermofoils that offer easy maintenance and color consistency. It’s the perfect middle ground—a major aesthetic upgrade without the structural upheaval.
6. Open Up with Glass Inserts
A solid wall of wood cabinetry can feel heavy and monolithic, especially in a smaller kitchen. By strategically swapping a few solid door panels for glass, you create instant lightness and depth. It’s like adding windows within the room, giving the space a place to breathe.
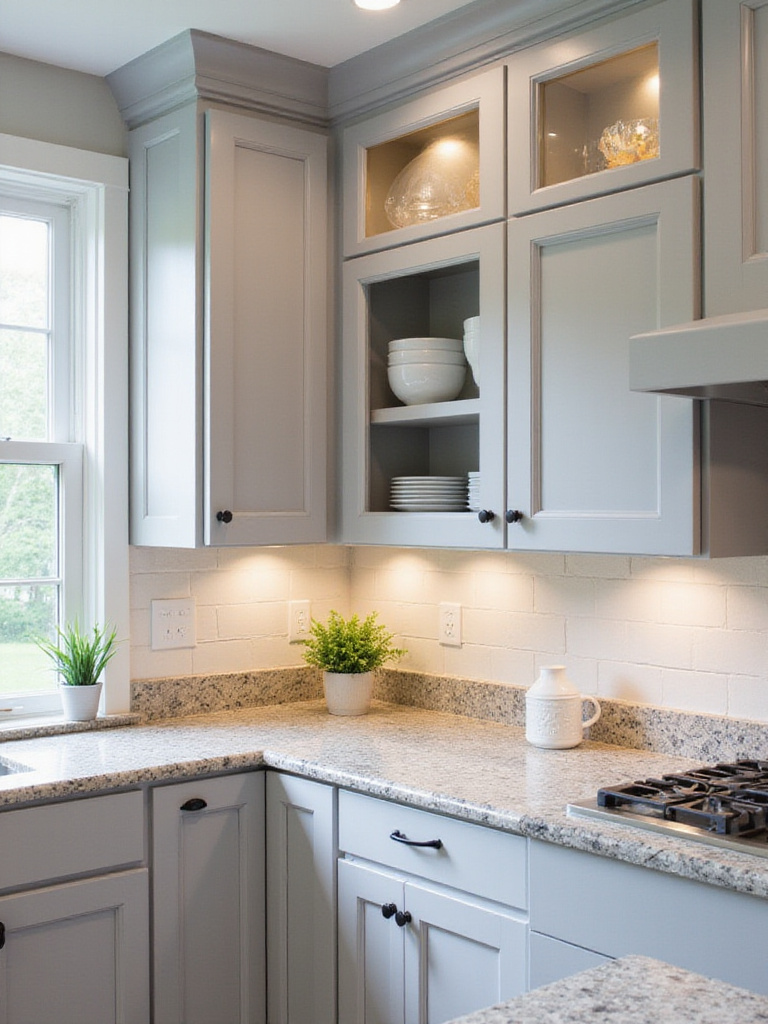
The type of glass you choose completely changes the effect. Clear glass puts your dishes on display—perfect for curated collections of ceramics or everyday white ware. Frosted or seeded glass, on the other hand, offers a sense of what’s inside while beautifully obscuring the details. It adds texture and character while still breaking up the visual weight of the cabinetry. A good carpenter can rout out the center panel of your existing doors and fit them with glass.
I love to see glass-front cabinets backlit with a soft light or the interior painted a contrasting color. It turns your everyday storage into a jewel box, a small, illuminated display that adds a personal touch and a serious dose of charm.
7. Play with Pattern Using Peel-and-Stick Paper
Don’t underestimate the power of a temporary fix. What began as a solution for renters has become a go-to trick for designers who want to inject personality without long-term commitment. High-quality, removable wallpapers and contact papers now come in incredibly sophisticated patterns and textures that look anything but temporary.
You don’t have to cover every door (which, frankly, can be a bit much). Where this technique really shines is in unexpected places. Use a bold pattern to line the back of your glass-front cabinets. It makes your dishes pop and creates a custom, high-design look. Or, for a private little moment of joy, line the inside of your drawers and cabinets. Every time you reach for a spoon, you’ll be greeted by a delightful surprise.
It’s all about the element of discovery. It’s low-risk, high-reward, and lets you experiment with trends—be it a botanical print or a bold geometric—without the fear of commitment. It’s pure, decorative fun.
8. Rediscover What’s Already There with a Deep Clean
Before you decide your cabinets are a lost cause, give them a real, restorative cleaning. I’m not talking about a quick wipe-down. I mean a proper, top-to-bottom degreasing. Kitchens accumulate a fine layer of airborne grease that, over time, can make even the most beautiful wood finish look dull, grimy, and yellowed.
This is a step most people skip, but it can be a revelation. You’ll want a product designed to cut through that grime—a good wood-safe degreaser or even a simple solution of warm water and Dawn dish soap can work wonders. Once the grime is gone, you can properly assess what you have. Often, what you thought was damaged is just dirty. Follow up with a good polish or wax formulated for your cabinet material.
There’s something so satisfying about this process. It’s an act of care that honors the materials you already own, reduces waste, and often reveals that the beauty you were looking for was there all along, just waiting to be uncovered.
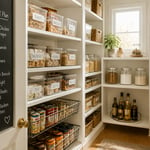
9. Reclaim Your Space with Interior Organizers
A beautiful kitchen that doesn’t function well is just a pretty room. The real luxury is effortless functionality. If you’re tired of getting on your hands and knees to find a pot lid in the back of a deep cabinet, then investing in pull-out shelves and interior organizers will change your life.
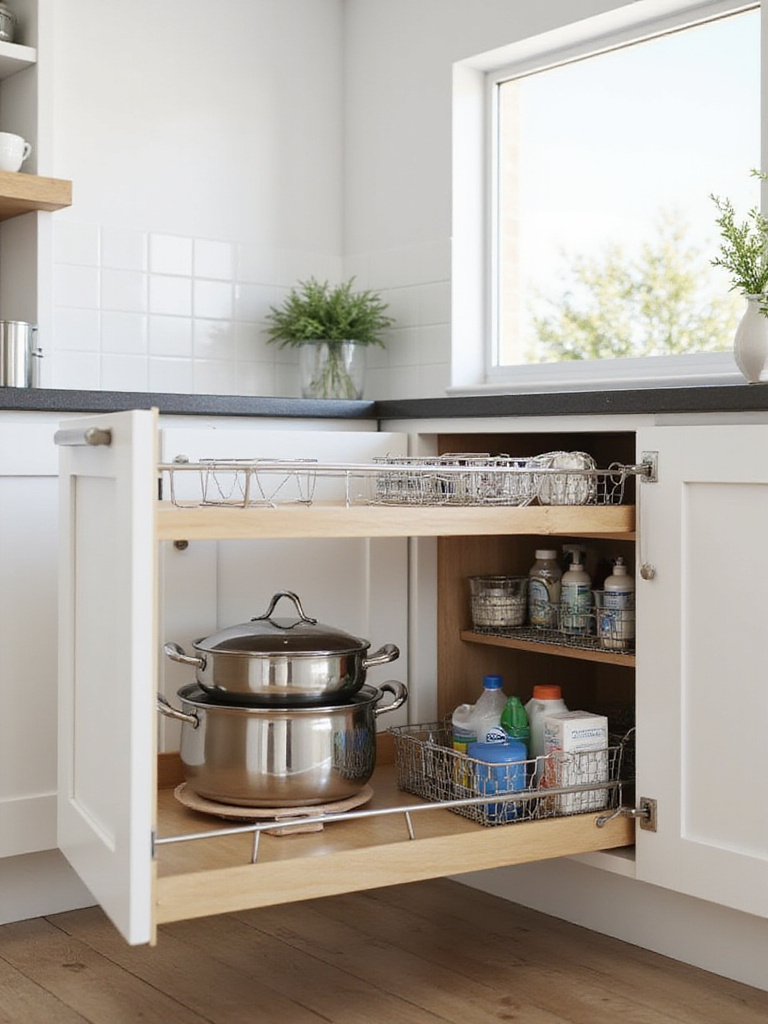
This is about designing from the inside out. Full-extension pull-out shelves for lower cabinets are a game-changer, bringing everything into easy reach. Think about how you use your kitchen and what your pain points are. Are your spices a jumble? Is there a better way to store your pans? There are brilliant solutions for just about everything now, from vertical dividers for baking sheets to multi-tiered spice racks that slide out smoothly.
Making your kitchen work better for you is a profound act of self-care. It streamlines your daily routines and removes those little moments of friction and frustration. It’s the invisible upgrade that you’ll appreciate every single day.
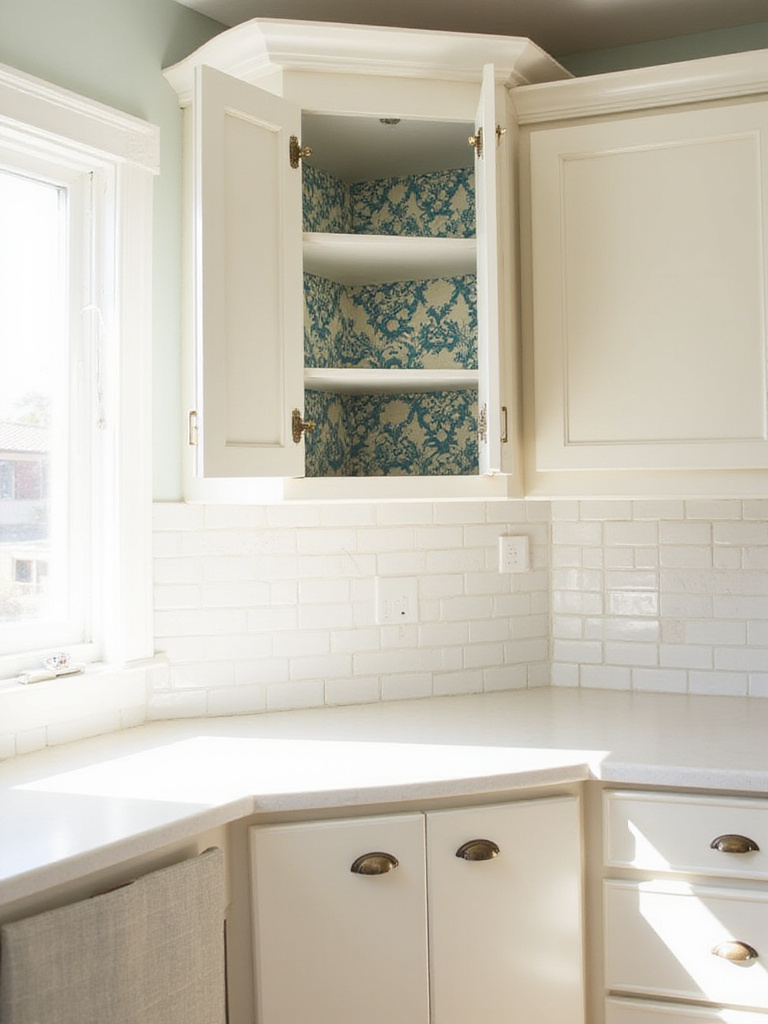
10. Create a Backdrop by Painting Cabinet Interiors
Here’s a detail that separates a nice kitchen from a truly curated one: painting the inside of your cabinets. This is especially impactful for any cabinets with glass fronts. Instead of a standard white or wood interior, imagine a deep, moody charcoal. Suddenly, your white ceramic dishes don’t just sit on a shelf; they pop. They look like art objects against a gallery wall.
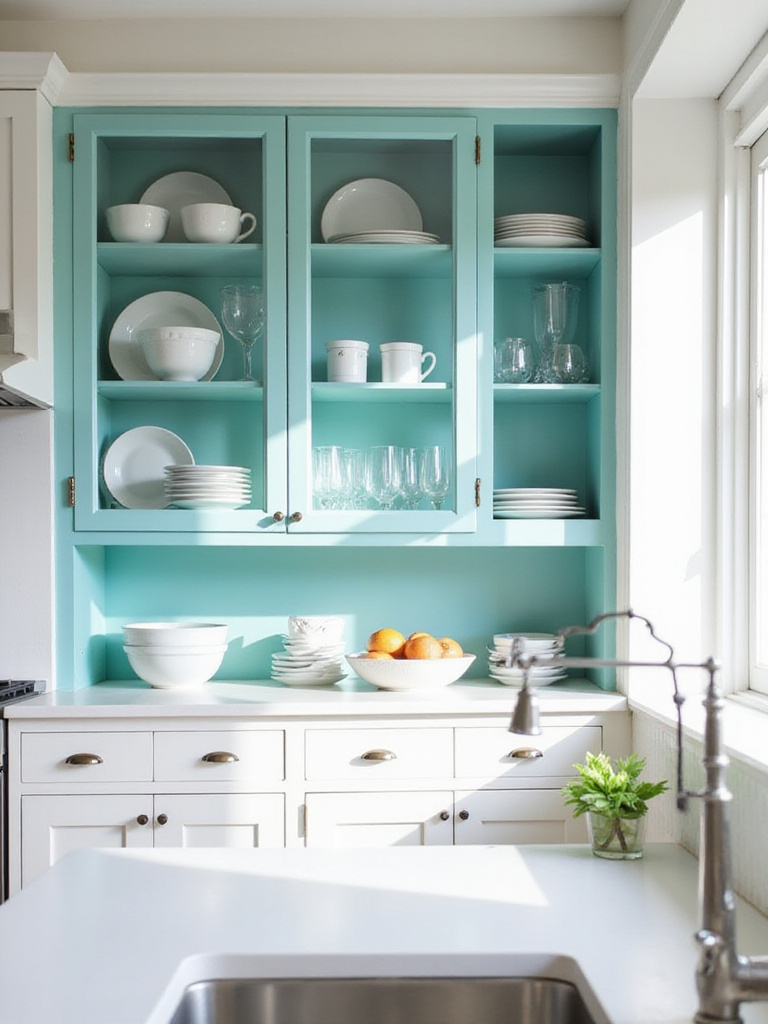
A dark interior adds incredible depth and makes your displayed items the star of the show. Or, go the other way with a soft, surprising color—a pale blush or a dusty blue—for a subtle, personal touch that feels both welcoming and custom. You’re essentially creating a finished display case.
Because the interior is protected from the daily wear and tear of the kitchen, you can have a little more fun here. A satin or semi-gloss finish will give it a nice, wipeable sheen. It’s a small effort that signals a real attention to detail.
11. Embrace Openness by Removing a Few Doors
There’s a reason open shelving is a mainstay in modern kitchen design. It creates a sense of airiness, breaks up a long run of cabinets, and puts your most-used and most-loved items on display. You can get the look without ripping out your uppers—just strategically remove a few of the doors.
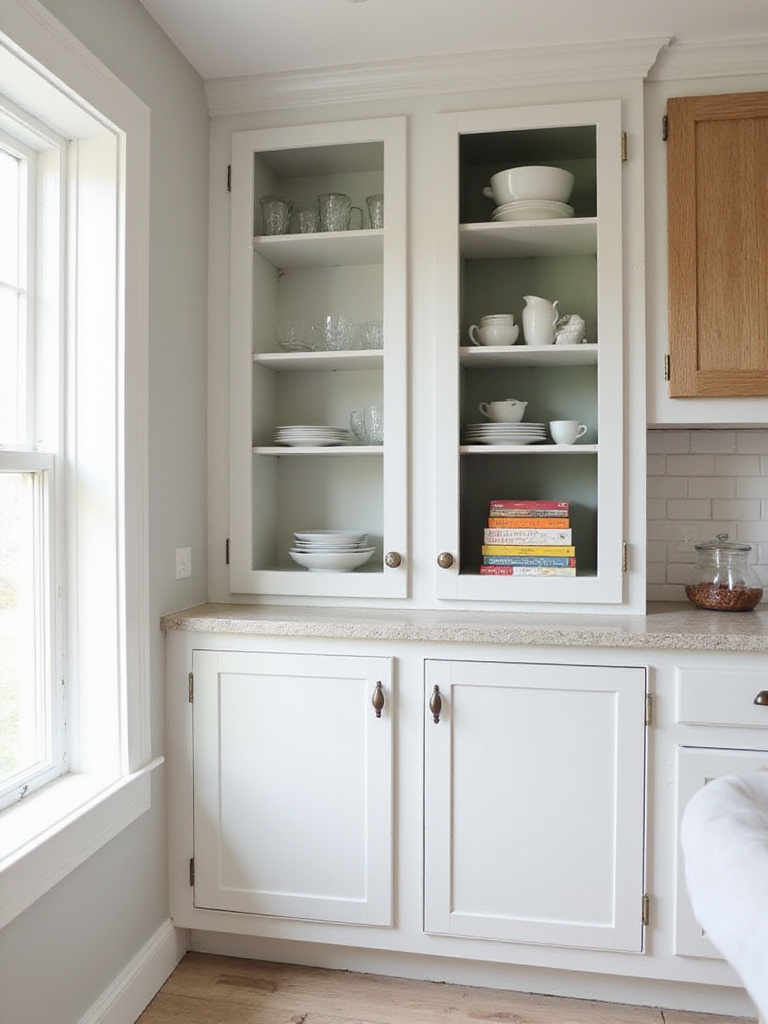
The key here is strategic. You’re not doing this to every cabinet. Choose one or two to convert into display nooks. This works best for the cabinets where you store your everyday dishes, your favorite glassware, or your collection of cookbooks. The things you’re happy to have on view. You’ll need to carefully remove the doors and hinges, fill the screw holes with wood putty, then sand and paint the interior and frame for a clean, finished look.
Yes, it means you have to keep those shelves tidy. But that’s part of the curatorial mindset. You’re intentionally choosing what to display, turning your functional objects into part of the aesthetic story of your home.
12. Add the Patina of Time with Distressing or Glazing
For some styles—think French Country, farmhouse, or shabby chic—a little bit of visible history is a beautiful thing. If you love an aged, time-worn look, you can add that character to your existing cabinets with distressing or glazing techniques. This is a true art form.
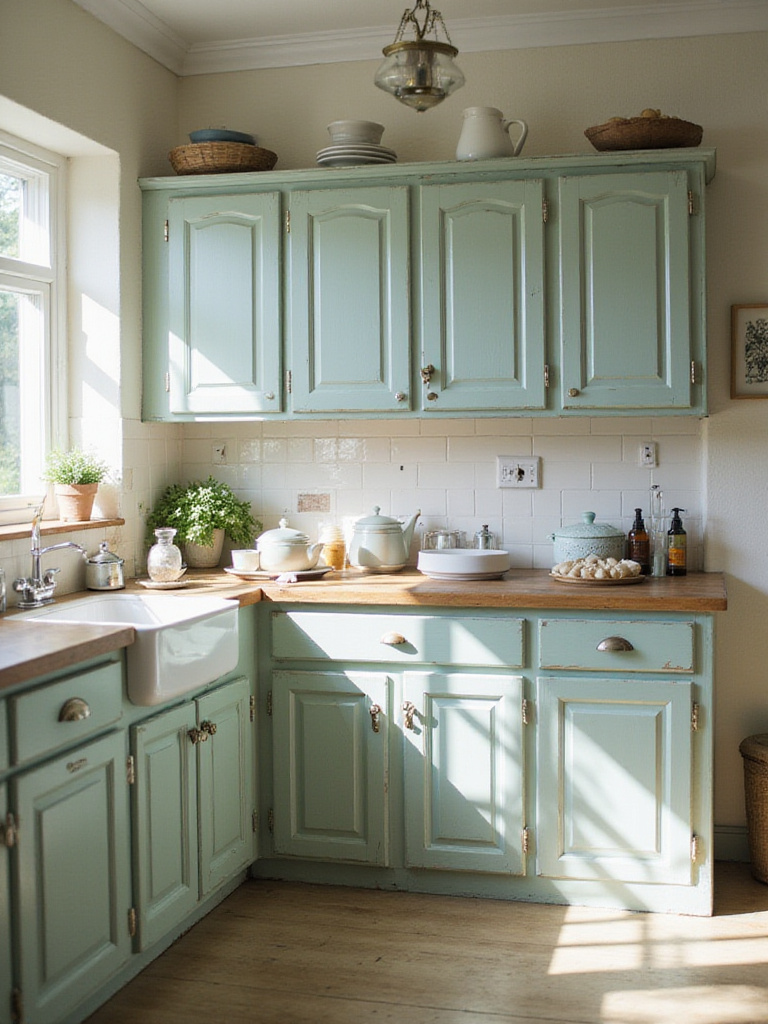
Distressing is the process of strategically sanding away paint on the edges and high points where natural wear would occur over decades. It’s about imagining the life the piece has lived. Glazing involves applying a thin, translucent color over your base coat, then wiping most of it away so the glaze settles into the crevices and details of the door, adding depth and an aged look. I find that chalk paint is a fantastic medium for these techniques because it distresses so beautifully.
The goal is to create a piece that feels like a treasured antique, not something that was artificially aged. It requires a bit of an artist’s touch and some patience, but the result is a finish with a soul and a story. Just be sure to seal your work with a durable topcoat to protect it.
13. Give Cabinets a Proper Foundation with Feet
One subtle architectural detail that can make a kitchen feel instantly more custom is adding feet to the base cabinets. Standard kitchens have a recessed toe-kick, which is practical but can make the cabinets look like a monolithic block. By adding furniture-style feet or decorative corbels, you break up that line and make the cabinets feel more like individual, freestanding pieces of furniture.
It’s a simple change that completely alters the visual weight of your cabinetry. Turned legs can evoke a farmhouse feel, while more squared-off or bracket-style feet can read as transitional or even modern. It lifts the cabinets off the floor, creating shadow and light and lending a bespoke quality to the entire room.
This is a detail that most people wouldn’t be able to put their finger on, but they would feel the difference. It’s that final touch that grounds the entire design.
14. Embrace the Luxury of Quiet with Soft-Close Hardware
True luxury isn’t always about what you see; it’s often about what you feel and hear. Or, in this case, what you don’t hear. Replacing your standard hinges and drawer slides with soft-close mechanisms is one of the most satisfying functional upgrades you can make. The jarring slam of a cabinet door is replaced by a silent, graceful close.
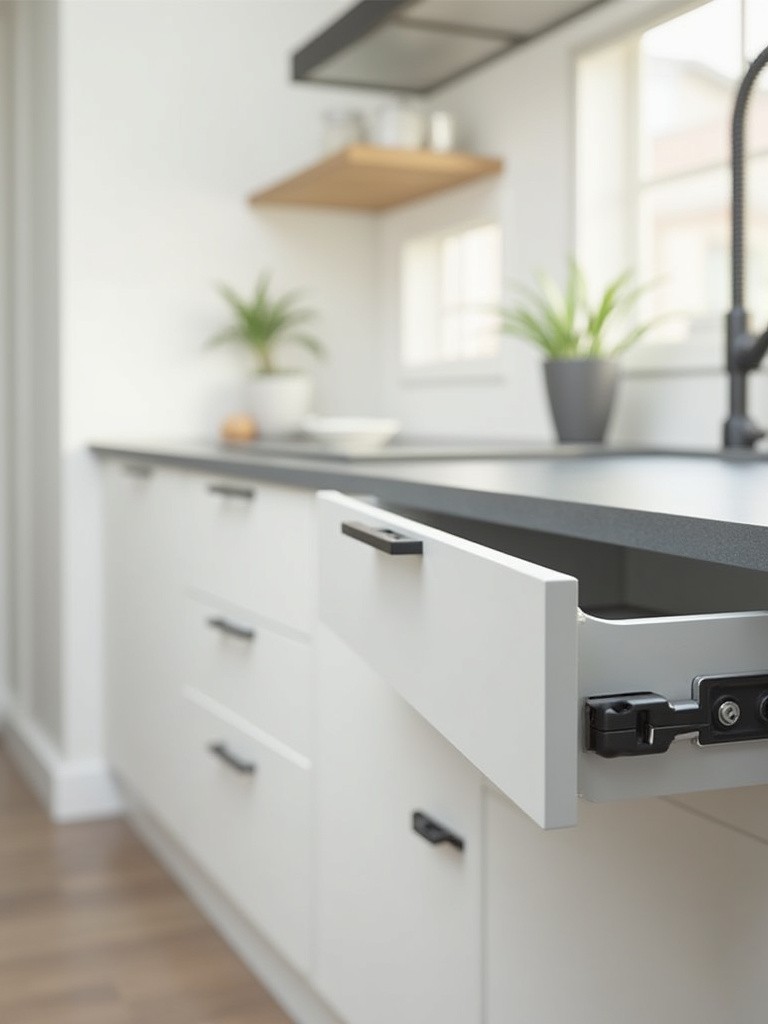
It’s a small change that has a huge impact on the overall atmosphere of your kitchen. It just feels calmer and more refined. Beyond the quiet, it also saves wear and tear on your cabinet frames from the repeated impact of slamming doors. For drawers, upgrading to full-extension, soft-close slides is a bit more involved, but the smooth, controlled glide of a heavy pot-and-pan drawer is worth every bit of effort.
This is an investment in the daily experience of your kitchen. It’s an invisible detail that contributes to a more peaceful, functional, and well-designed home.
15. Add Dimension with Applied Trim or Appliques
If you have plain, flat-front cabinet doors but dream of a more detailed, traditional look, you don’t need new doors. You can add the detail yourself with applied moldings. This is a classic trick for faking the look of a Shaker-style door, which is defined by its simple frame-and-panel construction. By applying thin, flat strips of wood or MDF around the perimeter of a flat door, you can create that same iconic look.
Beyond Shaker style, you can add small, carved wooden details—known as appliques—to create a focal point or add a touch of classic ornamentation. Think rosettes in the corners or a small carving centered on the panel above a sink. The key, as with any artistic endeavor, is proportion and restraint. You want to enhance the door, not overwhelm it.
When painted all one color, these applied pieces look like they were part of the original construction, giving you the character and dimension of custom millwork for a fraction of the cost.
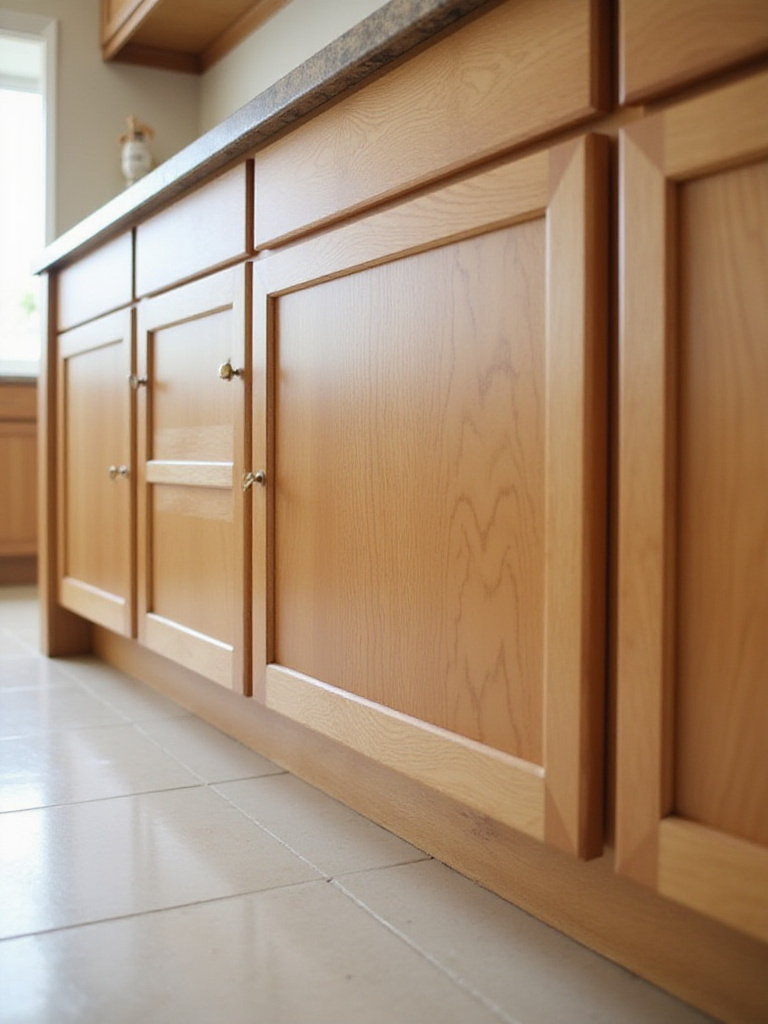
16. Explore the Velvety Finish of Chalk Paint
Chalk-style paints have exploded in popularity for a reason. They offer a gorgeous, ultra-matte finish that feels velvety and soft to the touch, and their formulation often allows you to paint with minimal prep—sometimes just a good cleaning is enough. The finish absorbs light rather than reflecting it, which gives colors a unique depth and richness.
Now, here’s the thing. I love chalk paint for furniture, but in a high-traffic, high-moisture environment like a kitchen, you absolutely must seal it properly. The paint itself is porous. I would skip the traditional soft wax finish here and opt for several coats of a water-based polycrylic in a matte finish. This will give you the durability you need while preserving that signature chalky look.
This is the perfect choice if you’re aiming for a relaxed, slightly rustic, or European-inspired aesthetic. It feels less like a factory finish and more like something handcrafted.
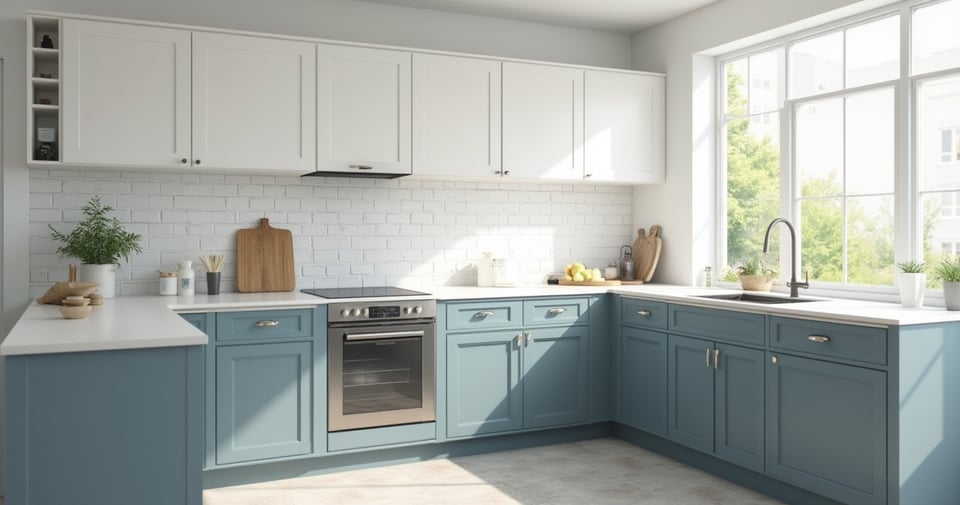
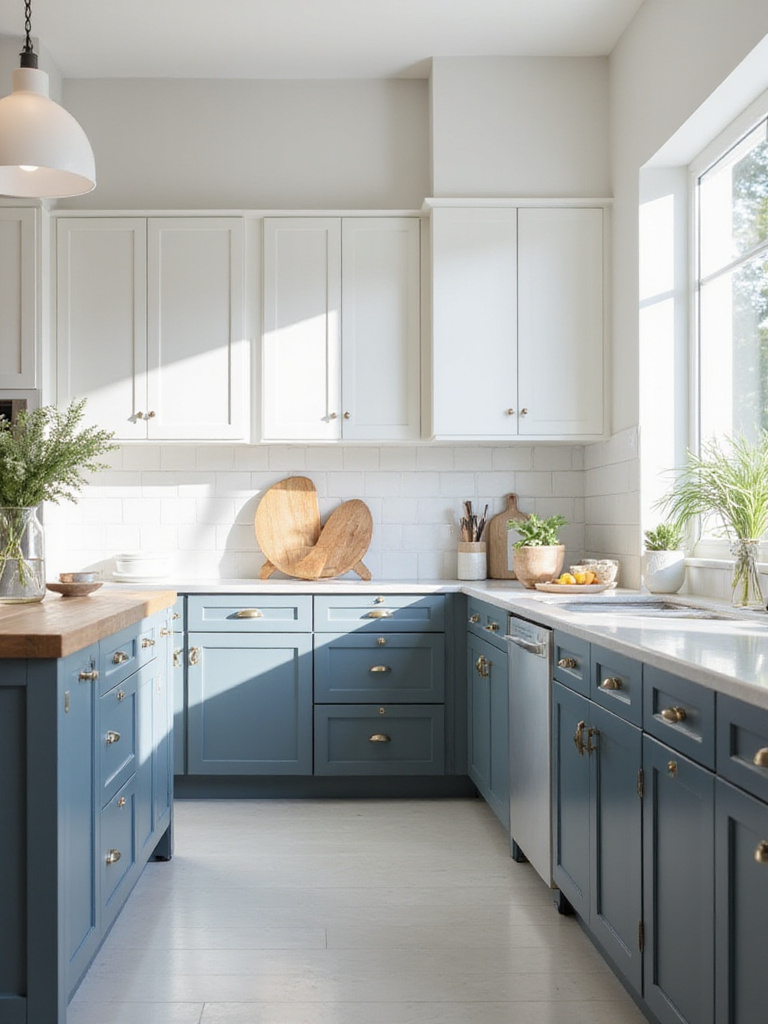
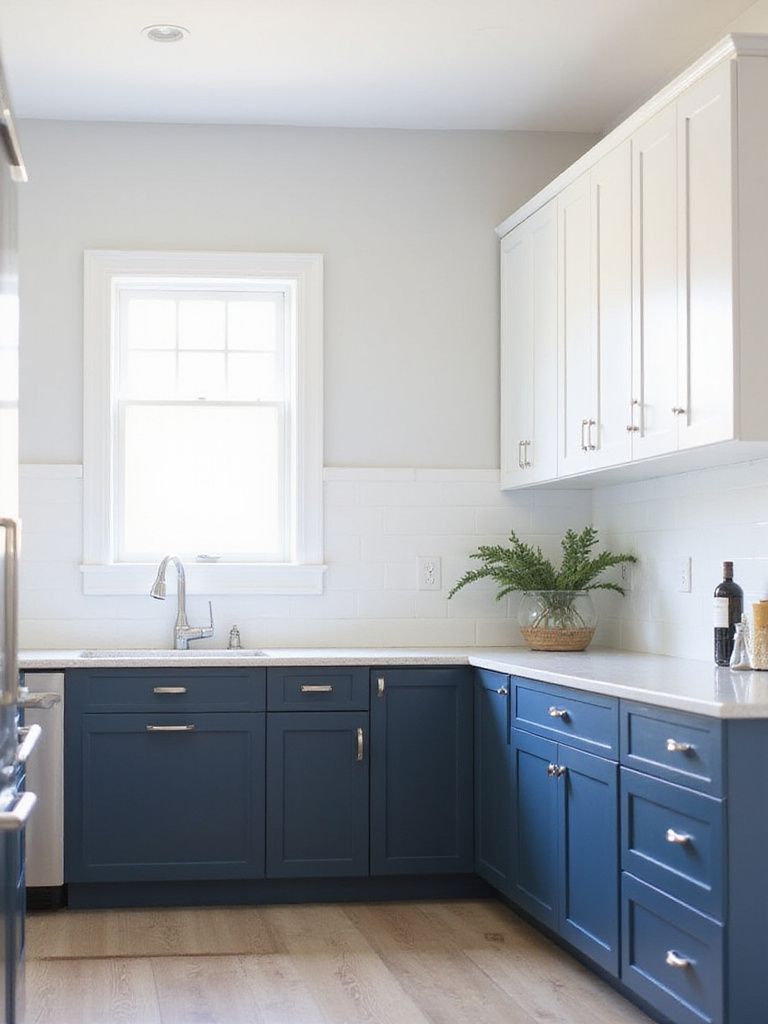
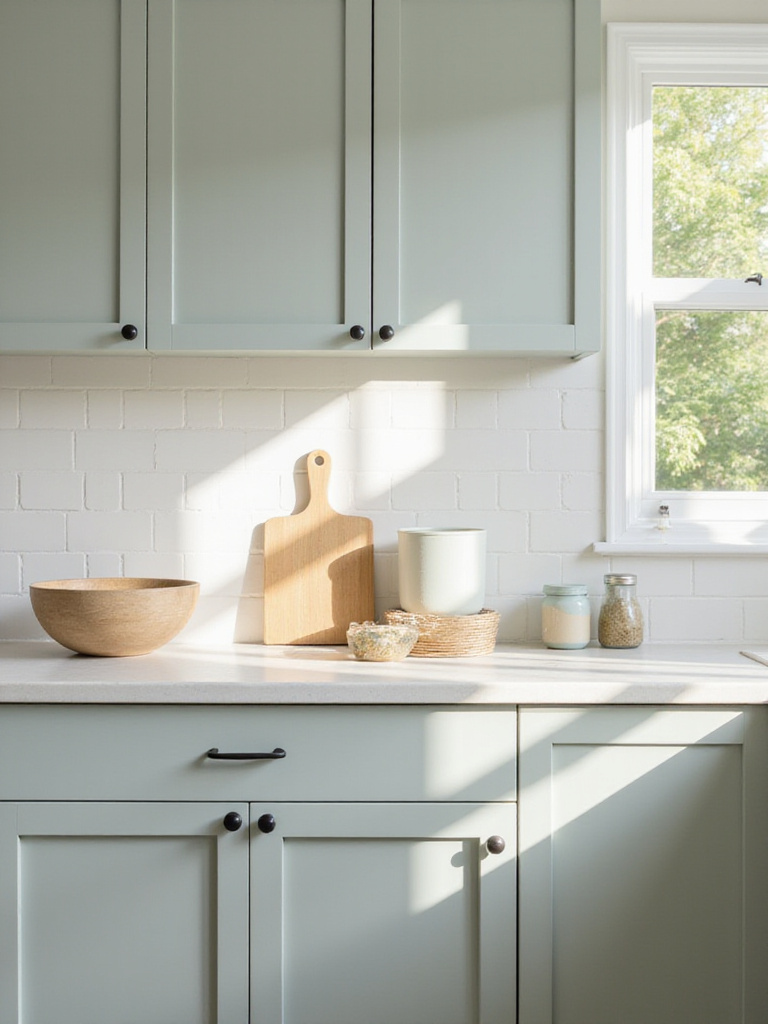
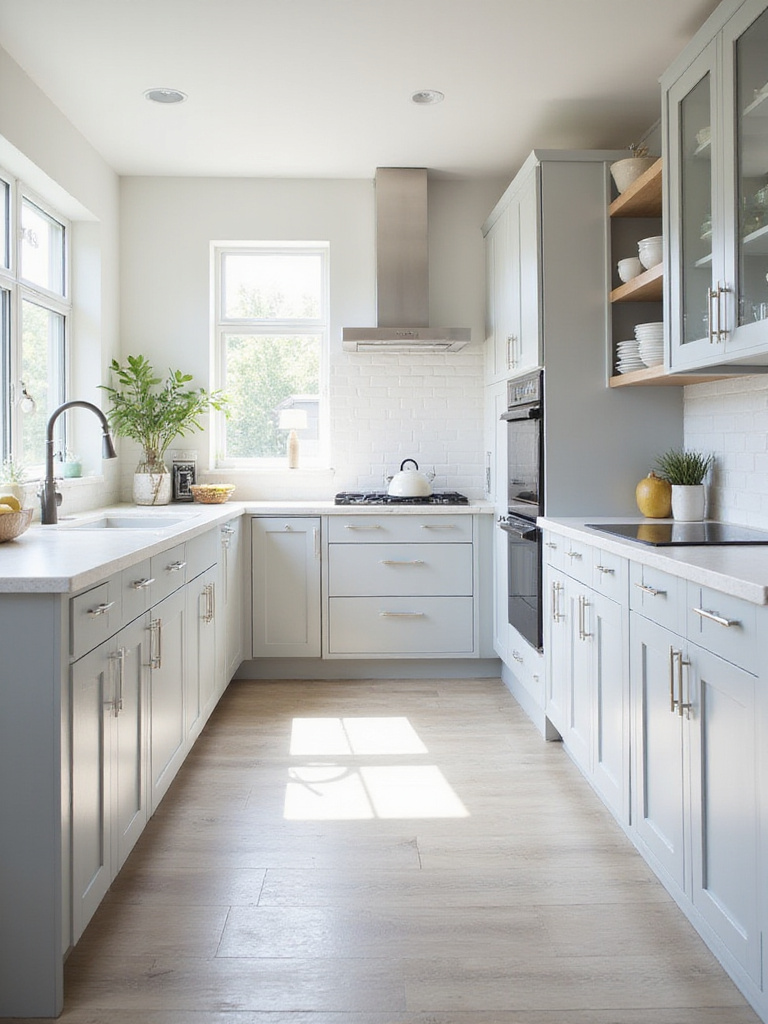
17. Master the Art of the Two-Tone Kitchen
A two-tone cabinet scheme isn’t just a trend; it’s a sophisticated design strategy that has real staying power. The most successful applications feel intentional, using color to define zones and add visual interest. The classic approach is light uppers and dark lowers. This is brilliant because the light color on top makes the room feel taller and more open, while the darker, more durable color on the bottom grounds the space and is more forgiving with scuffs and kicks.
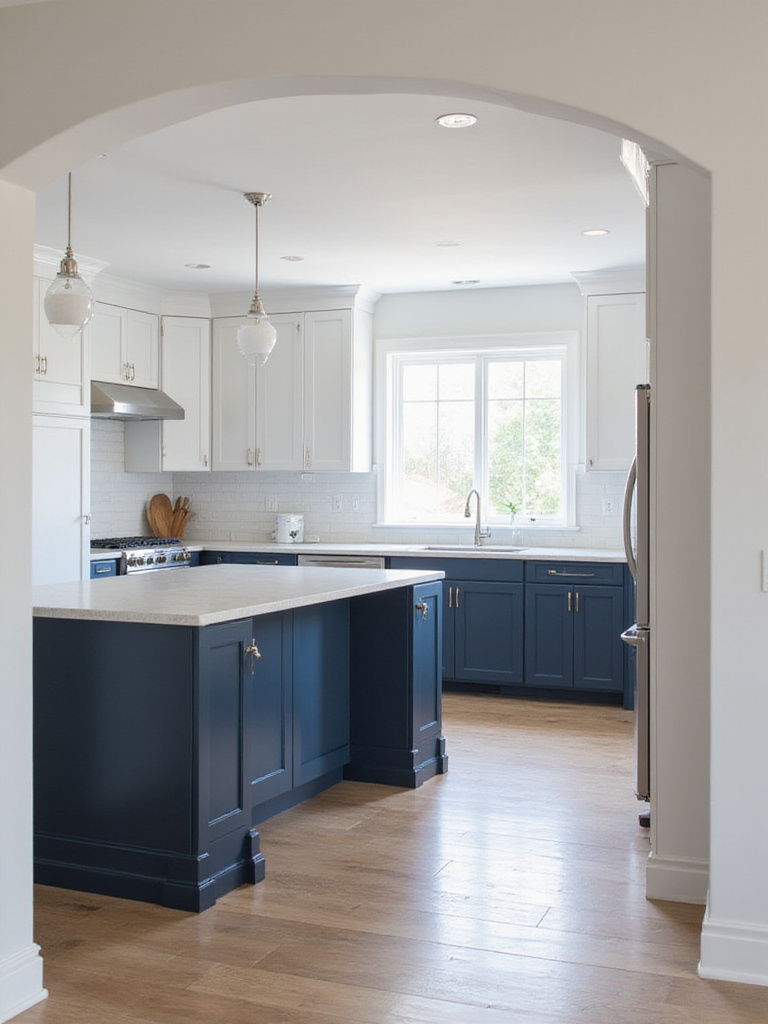
Another great way to play with two-tone is to paint a kitchen island in a standout accent color. It turns the island into a true centerpiece, like a monumental sculpture in the middle of your room. When choosing colors, think about the relationships between them. They should have a connection to each other and to the other fixed elements in your kitchen, like the countertop and backsplash.
This is where you get to be a bit of a color theorist. Are you going for a subtle, low-contrast pairing like a cream and a greige? Or a bold, high-contrast statement like white and black? Both can be stunning when done with a clear vision.
18. Add Personal Marks with a Stencil
For those who crave pattern but aren’t ready to commit to wallpapering an entire room, stenciling cabinet doors offers a wonderfully creative middle ground. This allows you to add a bespoke, almost hand-painted pattern to your kitchen. Imagine a subtle, tone-on-tone Moroccan tile pattern on a few select doors, or a delicate botanical vine stenciled onto the panels.
The key to a professional look is a quality stencil, a light touch with the paint, and patience. A foam pounce or roller is better than a brush to avoid paint bleeding under the stencil’s edges. You can create an effect that’s as subtle or as bold as you like, from a barely-there pattern that only catches the light at certain angles to a graphic statement that becomes the focal point of the kitchen.
This technique is all about adding a layer of personal artistry. It transforms a simple cabinet door into a canvas, making your kitchen feel uniquely and intimately yours. As always in a kitchen, a protective topcoat is your best friend to ensure your beautiful work lasts.
19. Modernize the Base with New Kick Plates
It’s a detail so low to the ground it’s easy to miss, but upgrading your toe-kicks—the recessed panel at the very bottom of your base cabinets—can have a surprisingly modernizing effect. Replacing a standard, scuffed-up wood or vinyl toe-kick with a new material can completely change the feel of your cabinets’ foundation.
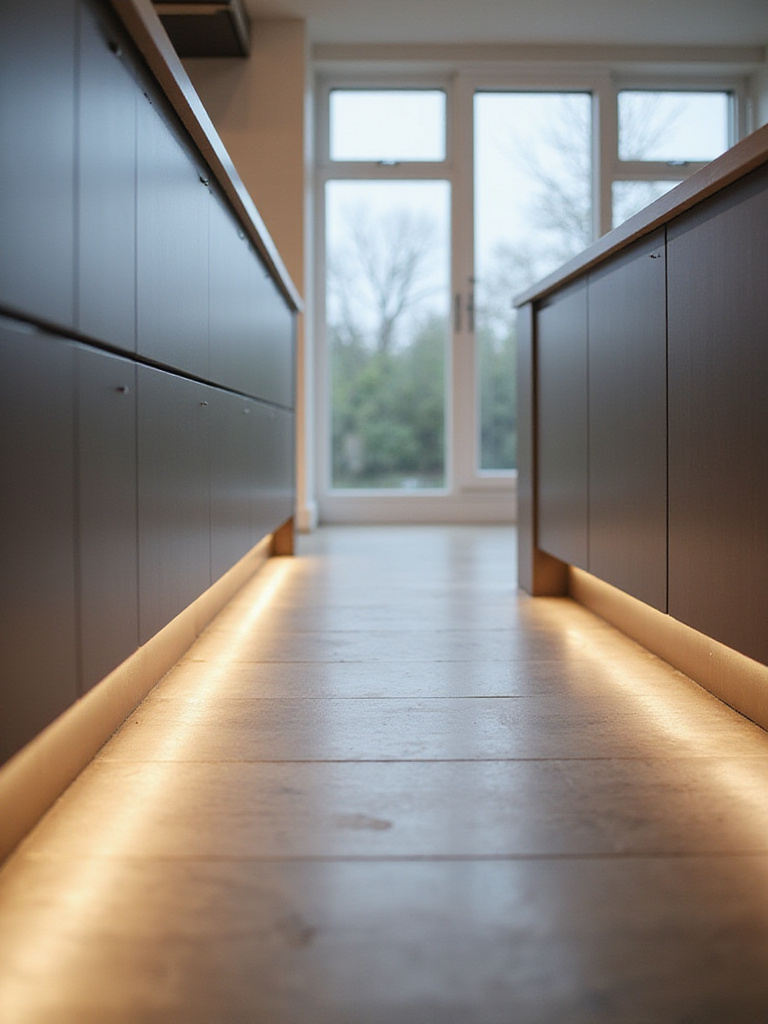
For a sleek, contemporary, or industrial look, a stainless steel or brushed aluminum toe-kick is a fantastic choice. It’s incredibly durable and adds a flash of metallic detail that feels clean and professional. For a more integrated, custom look, you can use a material that matches your flooring or even a piece of mirrored plexiglass to make the cabinets appear to float.
This is also a brilliant place to hide a strip of LED lighting. Washing the floor with a soft glow from under the cabinets adds another layer of ambient light and creates a very cool, modern effect at night. It’s a subtle but powerful finishing touch.
20. Commission an Artisan for a Professional Refinish
There comes a point where DIY reaches its limits. If you’re looking for that flawless, glass-smooth, “like-new” finish, sometimes the best move is to bring in a professional refinisher. I think of this less as hiring a contractor and more as commissioning a craftsperson. They have the specialized equipment and controlled environment to achieve results that are nearly impossible to replicate at home.
Professionals will typically take your doors and drawer fronts to their workshop. There, they can use spray equipment to apply highly durable, industrial-grade finishes like catalyzed lacquers or two-part polyurethanes. These cure to a much harder, more resilient surface than any consumer-grade paint, giving you a finish that will truly stand the test of time in a hardworking kitchen. Plus, the dust-free spray booth environment means no stray hairs or specks marring the final surface.
It’s an investment, for sure. But what you’re paying for is expertise, durability, and a truly perfect finish. When you consider the cost and environmental impact of replacing all your cabinets, a professional refinish is often a much smarter and more sustainable choice.
Conclusion
A kitchen transformation doesn’t have to be an all-or-nothing proposition. Your cabinets hold so much potential. The journey begins the moment you decide to see them not as they are, but as they could be. Pick one idea that excites you—something that feels achievable and inspiring—and start there. You’ll be amazed at how one small, thoughtful change can begin to shift the entire energy of the room you live in most. Your perfect kitchen is already there, just waiting for your curatorial eye to bring it to life.