The backsplash is the element most homeowners underestimate — and the one that ends up doing more design work than almost anything else in the kitchen. These kitchen backsplash ideas cover the full spectrum, from budget-friendly to investment-grade. That four-inch strip between your countertops and cabinets (or, if you’re lucky, the full run up to the ceiling) is the first place visitors notice colour, texture, and personality. It frames the range. It anchors the sink. And it sits at eye level every single time you cook.
After twelve years of designing kitchens, I’ve learned that the backsplash decision is where most renovation budgets either find a shortcut or discover a splurge they didn’t plan for. Some of the best kitchen backsplash ideas cost $3 per square foot. Some cost $150. And the expensive ones aren’t always the wisest choices for a kitchen that actually gets used.
This list of kitchen backsplash ideas covers the full range — from classic white subway tile that genuinely never fails to full-slab stone that eliminates grout lines entirely. For each one, I’ve included what works, what doesn’t, and what the glossy magazine photos leave out.
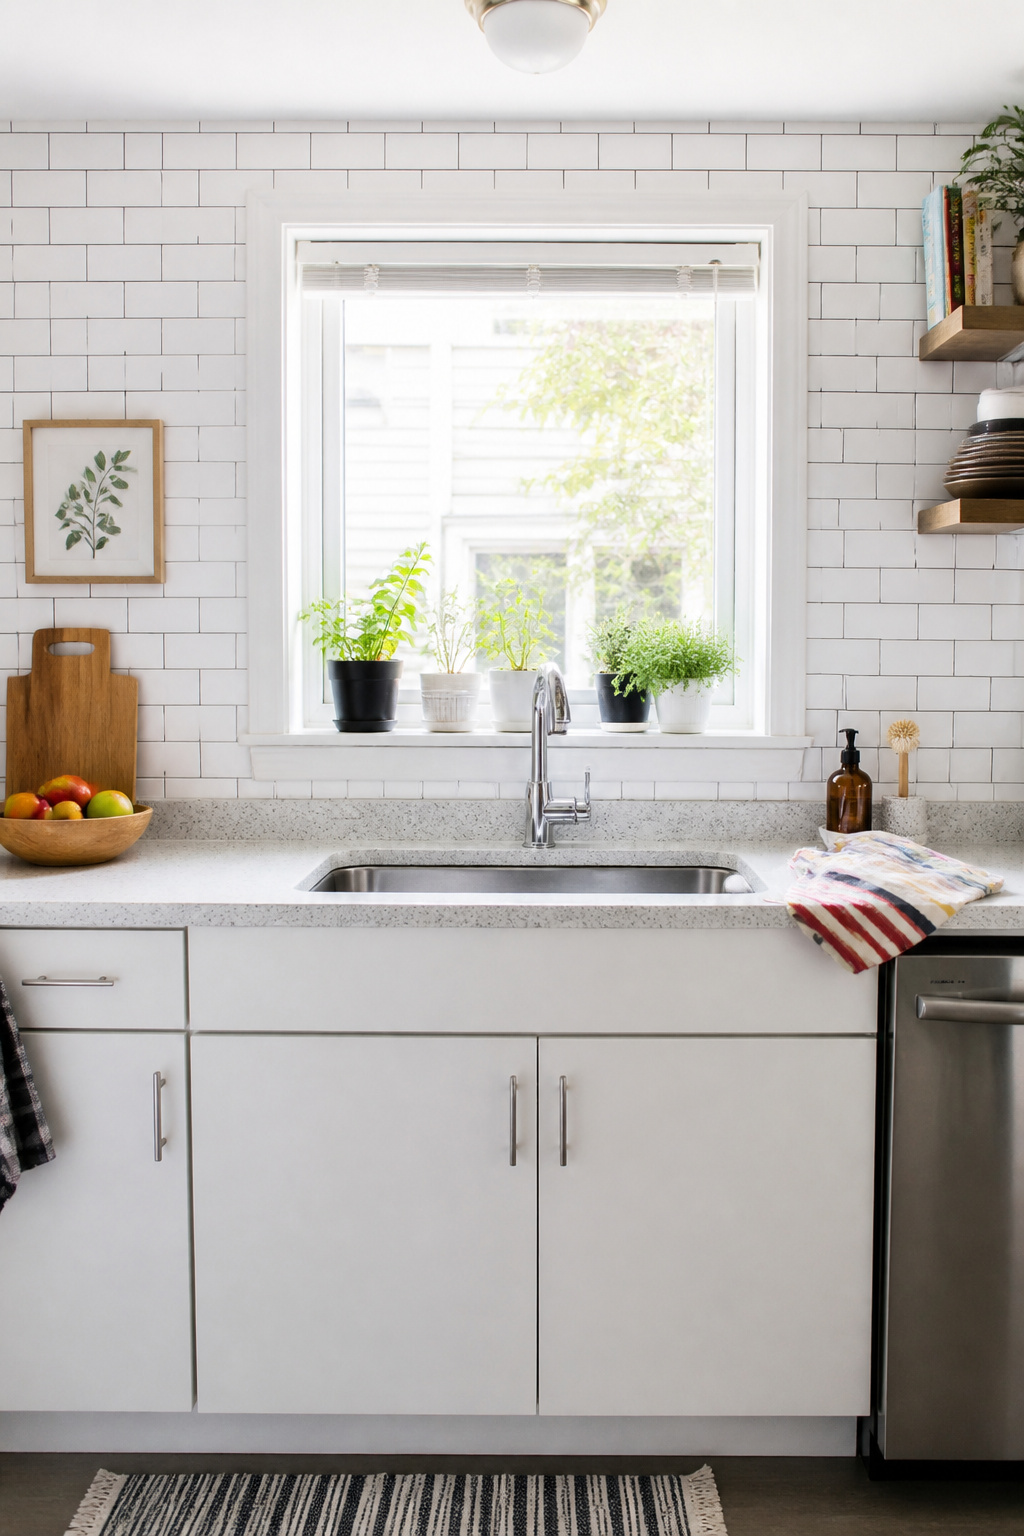
1. Classic White Subway Tile: The Kitchen Backsplash That Never Fails
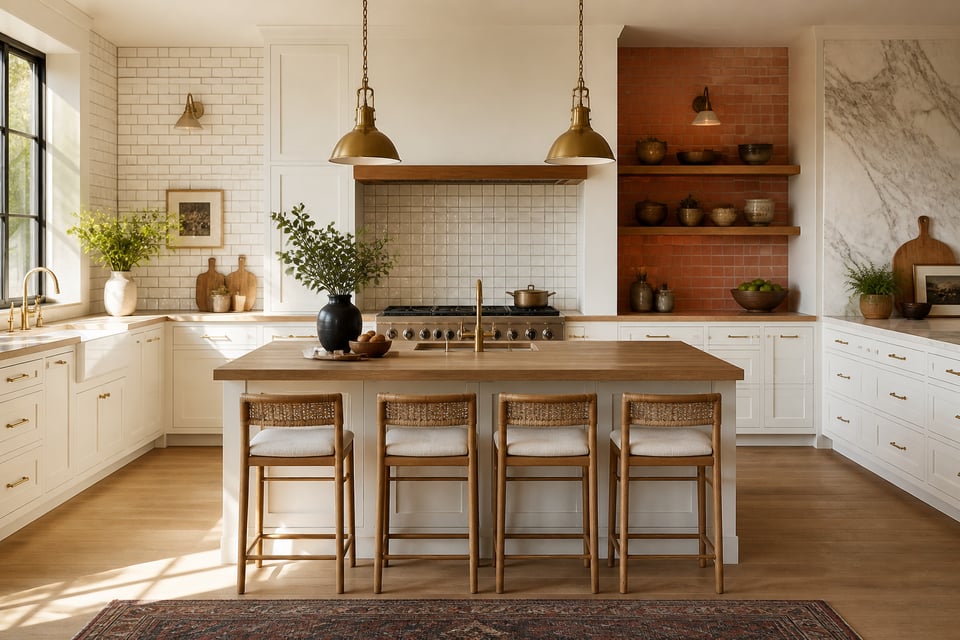
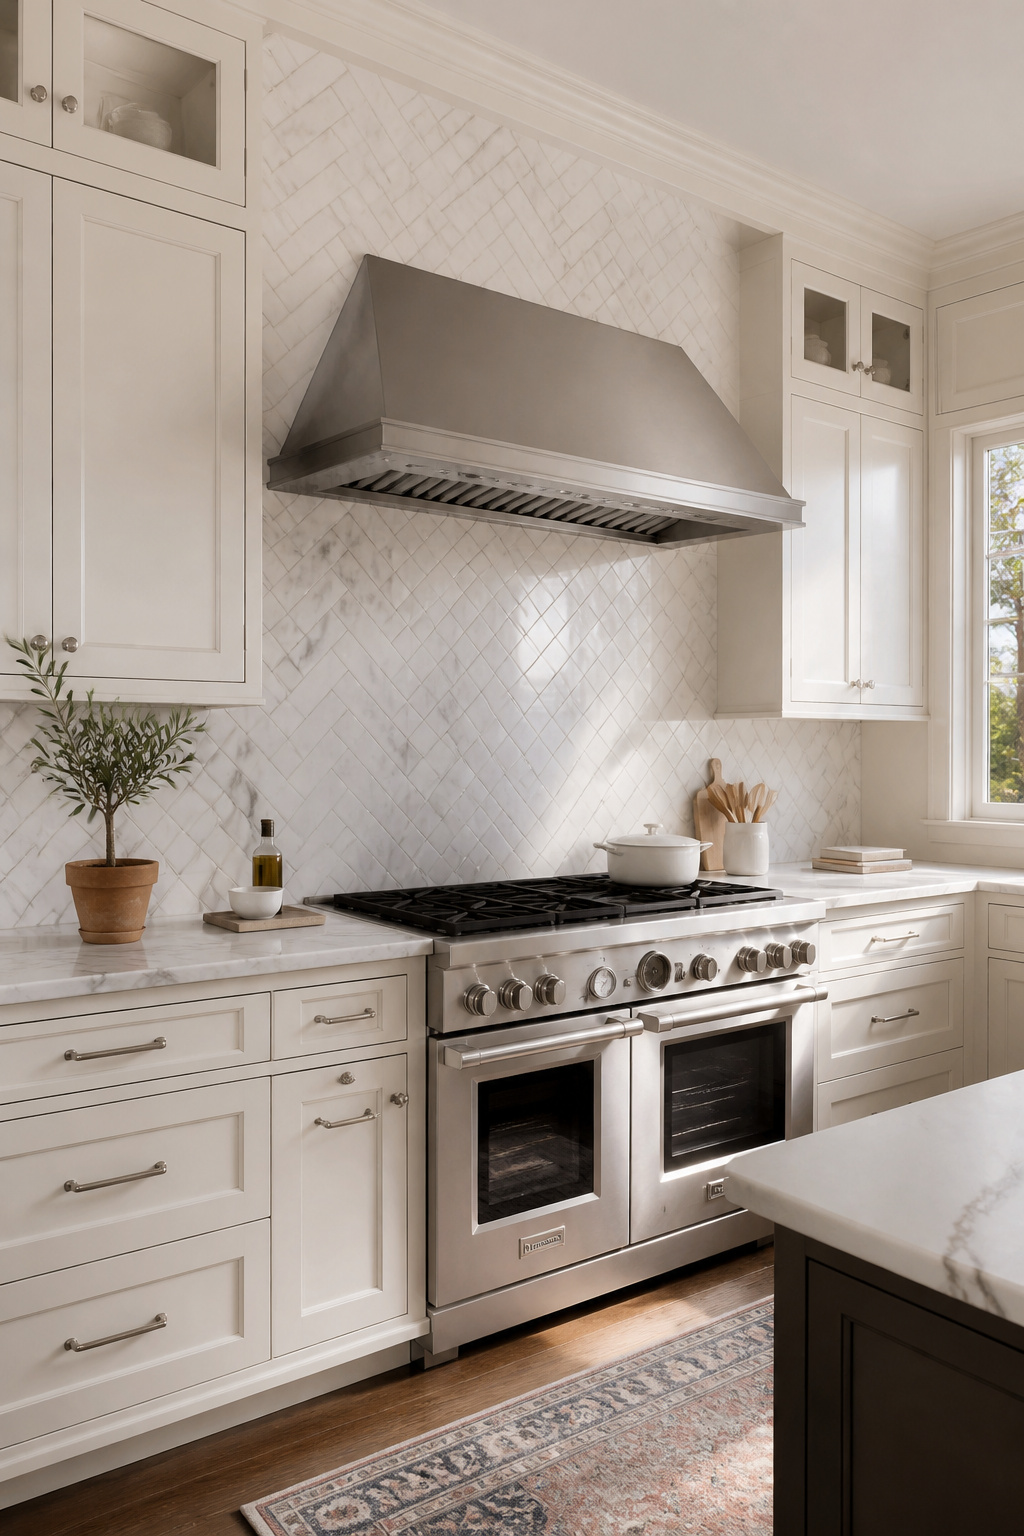
There’s a reason white subway tile has been in kitchens since 1904. When George Heins specified those rectangular white glazed tiles for the IRT subway tunnels in New York, he chose them for hygiene and light — and those same qualities make them perfect for the kitchen wall behind your stove and sink. Bright, reflective, easy to wipe down, and endlessly compatible with almost any cabinet colour, hardware finish, or countertop material.
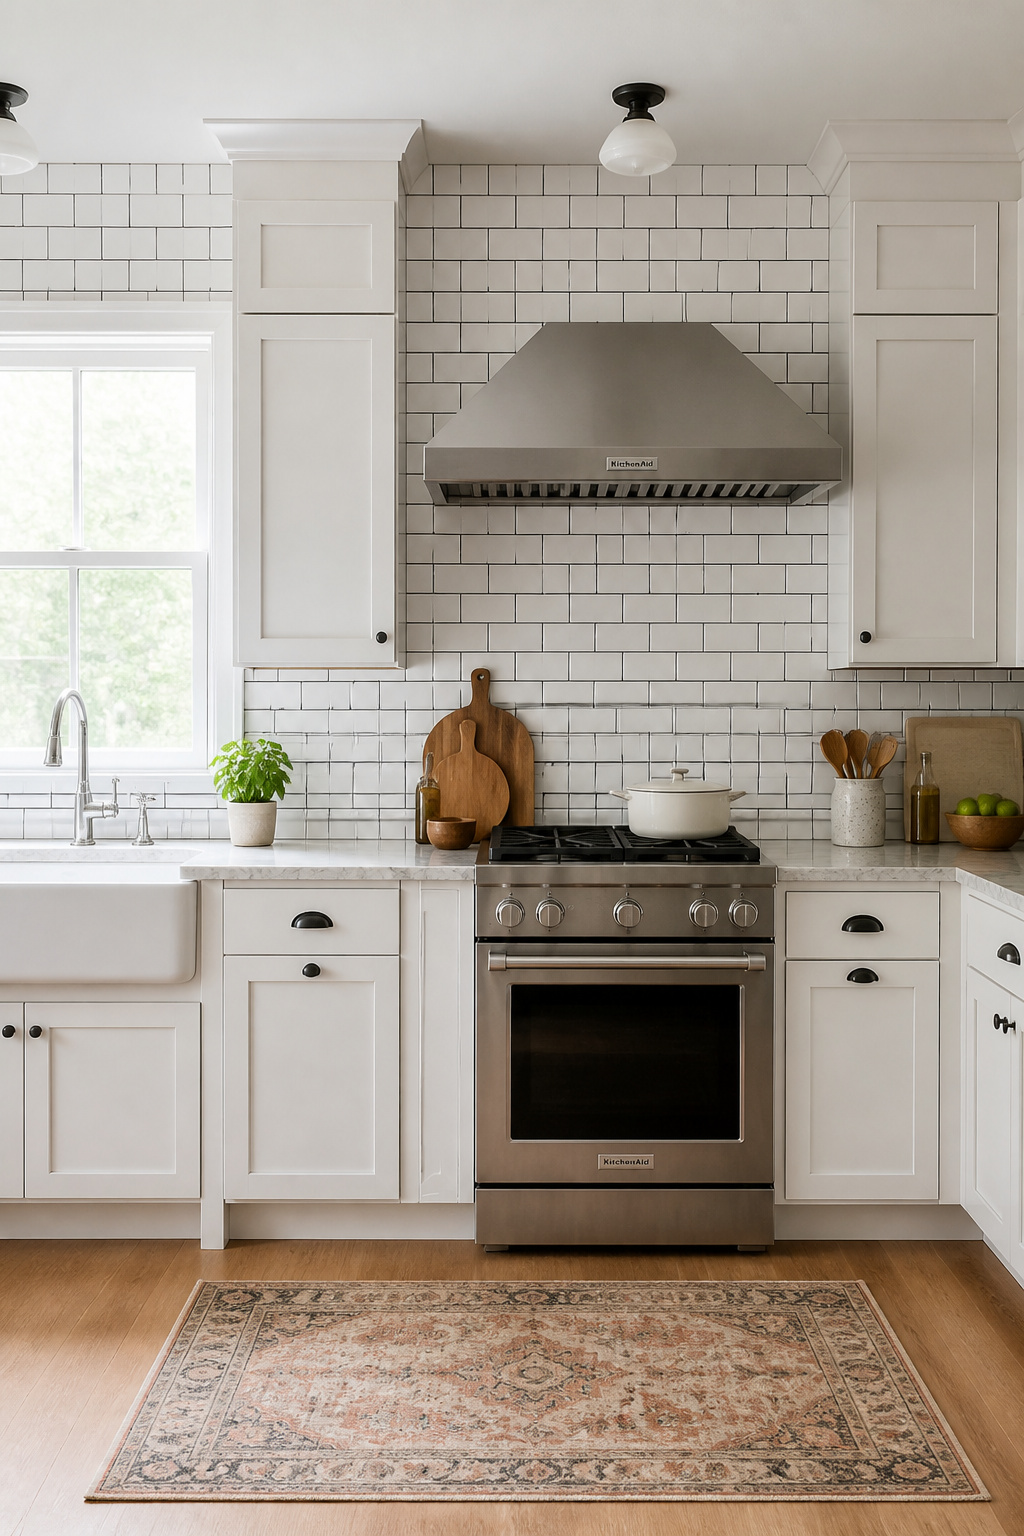
What most people don’t realise is how completely the same tile changes character with a different grout colour. White tile with white grout reads as almost a seamless surface — clean, spa-like, and visually expanding in a small kitchen. The same tile with charcoal grout turns every grout joint into a deliberate graphic line, creating a grid that reads as intentional pattern. Warm beige grout is the practical choice for a working kitchen — it conceals everyday cooking residue better than either white or dark while keeping the palette soft and cohesive.
If budget allows, step up from standard machine-made ceramic ($2-6 per sq ft) to a handmade or glazed artisan tile. The slight surface variation — uneven glaze, gentle undulation — catches light differently in each tile and creates a wall that breathes rather than looking stamped from a mould. The upgrade costs $12-28 per sq ft in material, but on a 30-square-foot backsplash, the difference in visual quality is significant. And for all kitchen backsplash ideas involving natural materials, always order 10-15% more than your calculated square footage — dye lots matter in natural materials, and future repairs without a matching batch are genuinely frustrating.
2. Zellige Tile for a Handcrafted, Luminous Look
Of all the kitchen backsplash ideas trending in 2026, Zellige has moved furthest from specialty design into mainstream kitchen conversation — and once you see it in person, the appeal is immediately obvious. These hand-pressed Moroccan clay tiles get their distinctive quality from a reactive glaze fired in a kiln, where the chemistry creates colour variation tile-by-tile. No two Zellige tiles are identical. Put a hundred of them on a wall and the surface shimmers, shifts, and comes alive with the ambient light in a way no factory tile can replicate.
The luminosity isn’t metaphorical — because each tile surface is slightly concave and each carries a different tonal variation, the way light scatters across a Zellige backsplash changes through the day. Under natural morning light it reads one way; under pendant lights at dinner, something else entirely. For kitchens that feel a bit dead or underdressed, it’s the single most transformative upgrade available.
Authentic Moroccan Zellige costs around $20 per sq ft in tile alone, and installation runs higher than standard ceramic ($30-45 per sq ft) because the thickness varies tile-by-tile and a skilled tiler must adjust the thinset depth on every individual piece. For a 30-sq-ft backsplash, budget $1,500-2,250 all-in. Zellige-look porcelain reproductions at $8-10 per sq ft capture some of the visual quality but lack the true handmade variation. For sourcing authentic material, Zia Tile and Clé Tile are the most reliable US importers — always request a sample batch before ordering the full quantity, since Zellige colour ranges vary between batches.
3. Bold Geometric Patterns in Graphic Black and White
Black and white geometric tile is a kitchen backsplash idea that makes a permanent design statement that shapes the entire kitchen’s character. Used well, it creates a focal point that makes even a simple kitchen feel designed from the ground up. The key is understanding where it works best and what needs to stay calm around it.
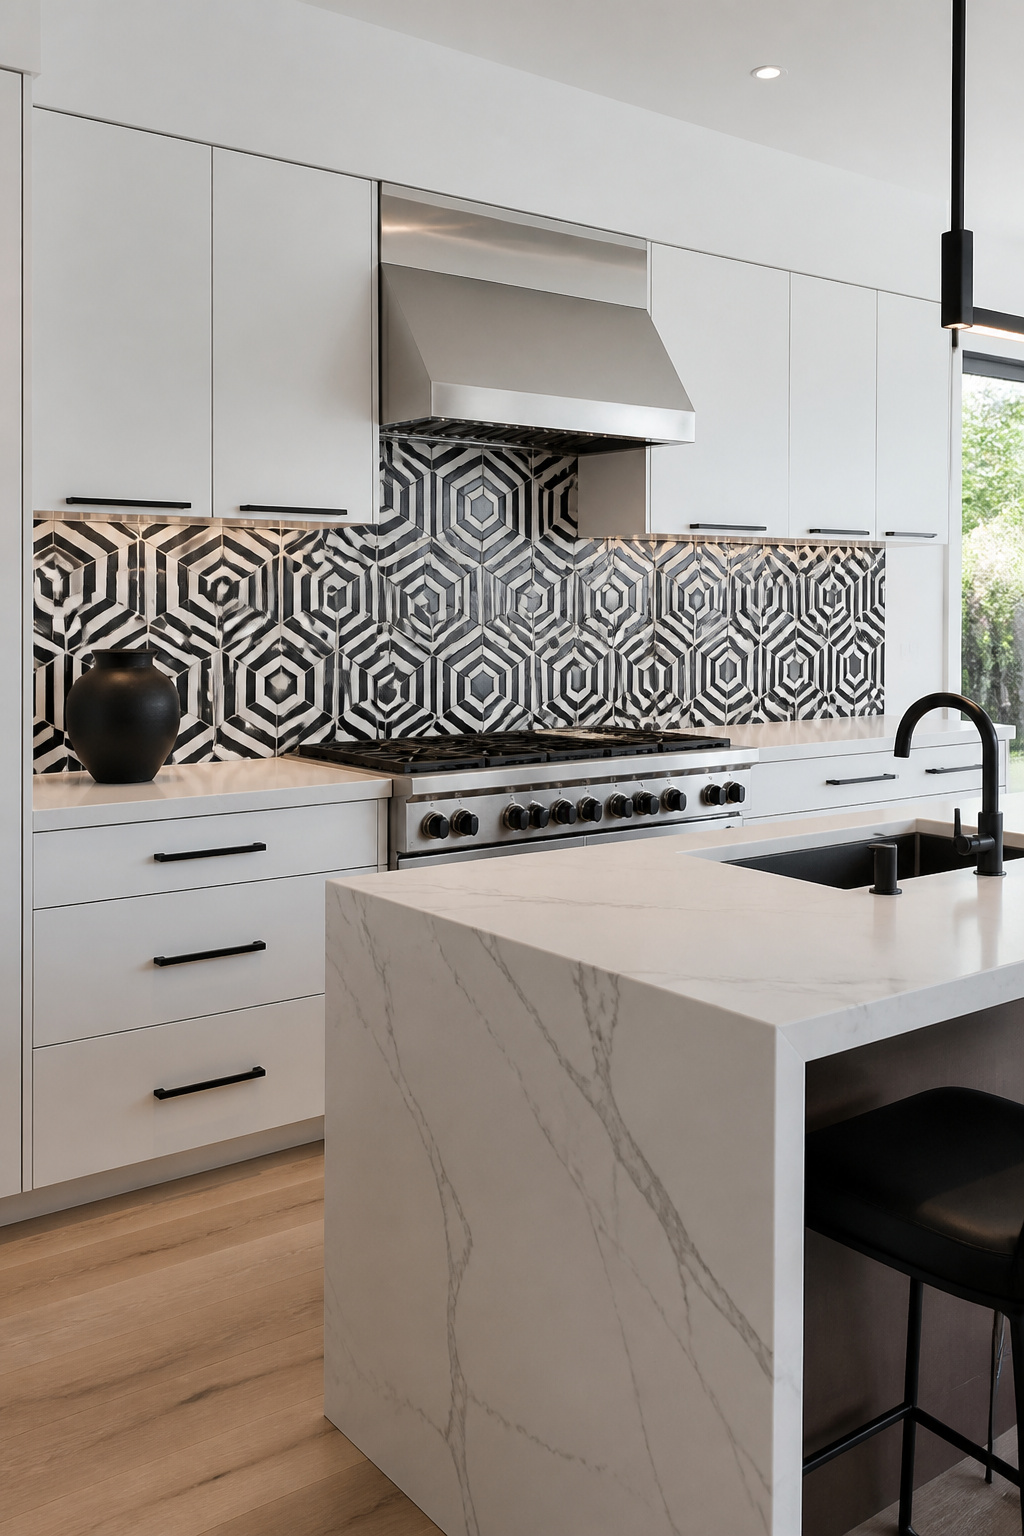
Geometric contrast is most effective behind the range or in a galley kitchen, where it draws the eye to a specific point and prevents the space from feeling like a corridor. Pair it with flat-front cabinets in a single neutral colour — white, greige, or navy — and you’ll want to explore kitchen cabinet colours for small and large spaces to find the combination that balances the bold backsplash without competing with it. The backsplash should lead; everything else plays a supporting role.
Pattern scale relative to kitchen size is the critical decision most buyers get wrong. In a small kitchen, choose tiles under three inches — penny round (one-inch diameter), small hexagon (two-inch), or a classic 4×4 checkerboard — so the pattern repeats enough times to be read as a complete design rather than a truncated fragment. Large-format geometric tiles (six-inch hexagon, eight-inch diamond) belong in bigger kitchens and open-concept spaces where there’s room for the pattern to develop fully. Add black matte hardware across the rest of the kitchen and you’ll find the whole design pulls together without any additional decisions.
4. Butcher Block Panels as a Warm Kitchen Backsplash Idea
Walk into a kitchen with a butcher block backsplash and the first thing you feel is warmth — genuine, material warmth that no ceramic, stone, or glass can quite deliver. The grain of real maple or walnut at eye level brings a living quality to what is otherwise a hard, reflective environment of stainless appliances and stone countertops. It’s the design equivalent of opening a window.
Real end-grain butcher block panels (typically 1.5 inches thick in maple, walnut, or bamboo) deliver the full effect, though wood-look porcelain at large format (24×48 inches) is a solid alternative that asks nothing of you in terms of maintenance. For the real thing, the sealing discipline is non-negotiable. Apply two to four coats of food-safe oil — Waterlox is the go-to because it’s heat-resistant and won’t crack or peel — to all six sides of the panel before installation. Use flexible silicone caulk, not grout, at every joint where wood meets wall and countertop. Wood expands and contracts with humidity, and grout cracks within months; silicone stays flexible.
The placement rule is non-negotiable: keep real wood away from any zone within 12 inches of a gas burner or oven vent. Grease embeds in wood grain near the range and simply cannot be cleaned out completely over time. Wood backsplash belongs behind a coffee station, below floating shelves, behind an island, or on a peripheral wall without cooking appliances. In those locations, it’s one of the most beautiful kitchen backsplash ideas available at any price.
5. Herringbone Marble for a Timeless, Elegant Finish
Marble herringbone is a kitchen backsplash idea that rewards patience — the herringbone pattern does something to marble that straight-set tile doesn’t — it creates directional movement, a gentle V-shaped zigzag that draws the eye along the wall and makes a kitchen feel wider than it is. Combined with marble’s natural veining, which runs through each tile at a different angle, the herringbone layout creates a flowing, organic pattern across the entire surface that’s impossible to replicate with manufactured materials.
The three most-specified marble types in herringbone backsplashes: Carrara (soft blue-grey veining on white ground, entry-level price at $15-25 per sq ft), Calacatta (dramatic thick grey veining, premium price at $35-50 per sq ft), and Statuario (bold grey-gold veining, used in high-specification projects). Most come as mesh-backed mosaic sheets with individual tiles at 1×3 or 2×4 inches, which simplifies installation compared to individual large-format pieces.
The honest reality of natural marble in a cooking kitchen: it’s acid-sensitive, meaning tomato sauce, lemon juice, and wine vinegar will etch an unsealed marble surface within seconds. But here’s what matters — because the backsplash is vertical, gravity is on your side. Liquids run off rather than sitting and penetrating; the risk of etching is significantly lower than on a marble countertop. Seal with a penetrating impregnating sealer at installation, reseal annually (a 15-minute job with a $15-25 bottle of sealer), and use a pH-neutral cleaner only. For kitchen backsplash ideas that balance beauty and practicality, marble-look porcelain from Daltile or MSI at $4-12 per sq ft delivers convincing results with no sealing required.
6. Terracotta Tile for a Rustic Mediterranean Kitchen
Terracotta is one of the most emotionally warm kitchen backsplash ideas available — the earthy, clay-red tones feel ancient and grounded in a way that no printed or glazed tile can fake. Italian Impruneta terracotta tends toward warm orange-red; Mexican Saltillo runs rougher and more rustic. Both bring an unmistakable quality that connects the kitchen to something older than this year’s trend cycle.
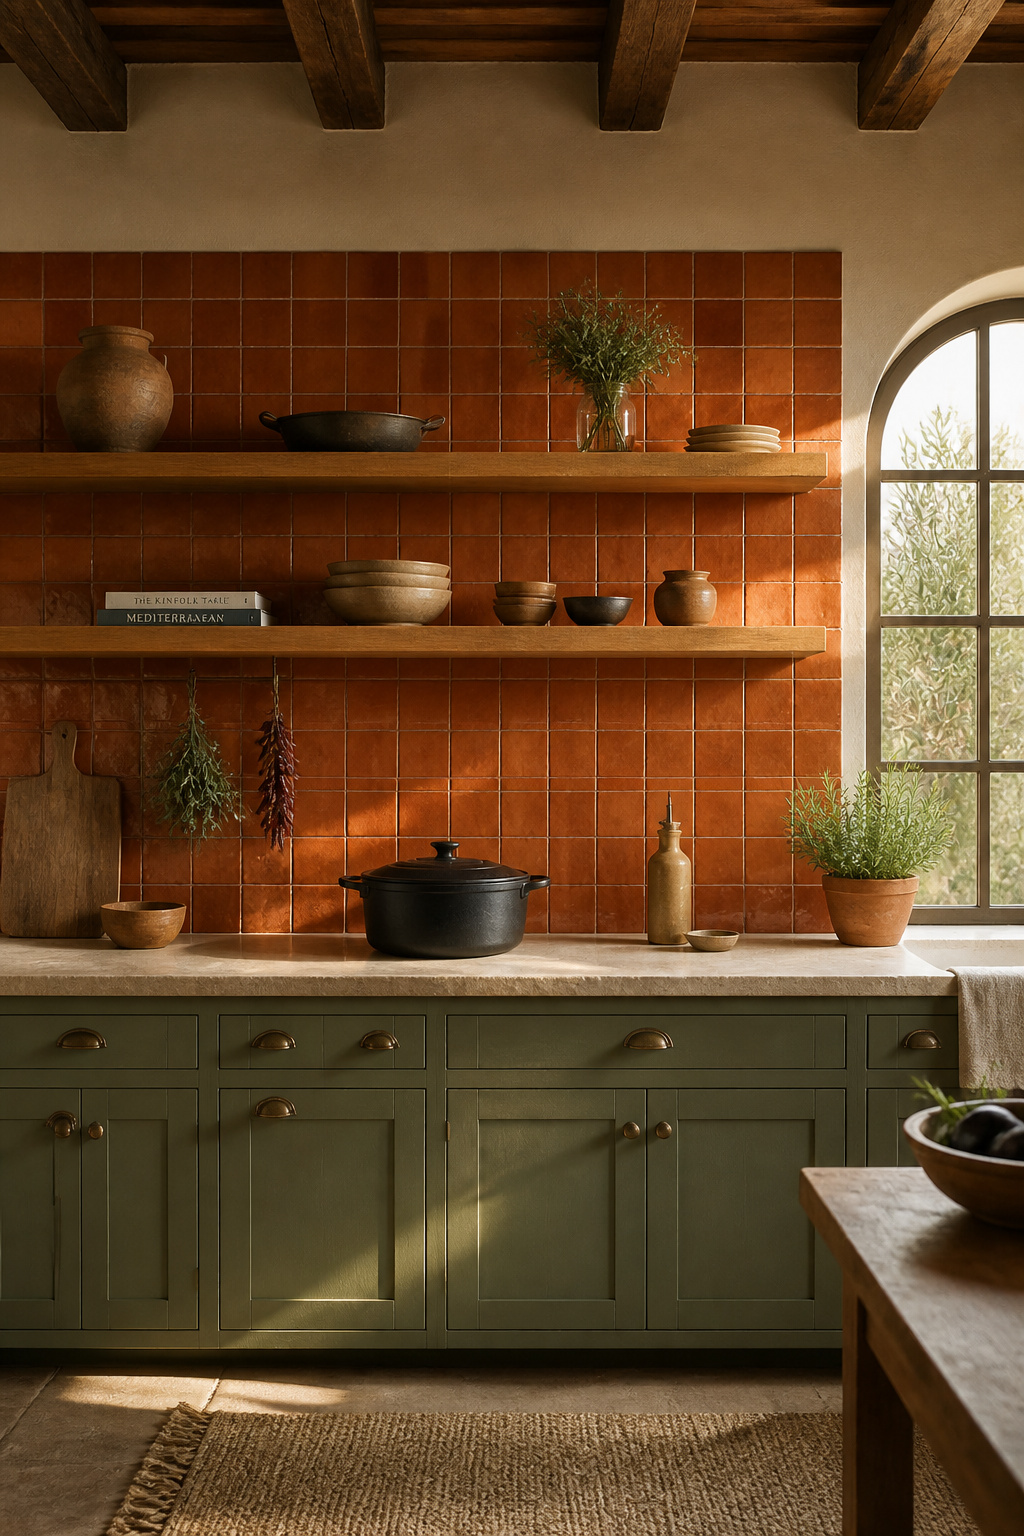
The pairing rule for terracotta is firm: warm cabinets, not cool. White shaker cabinets (Benjamin Moore White Dove, Sherwin-Williams Alabaster) with terracotta tile create the classic Provençal kitchen. Sage green or forest green lower cabinets with terracotta backsplash is one of 2026’s strongest kitchen combinations — deeply warm, plant-forward, and entirely coherent. Cool grey cabinets clash with terracotta’s orange warmth rather than complement it, and no amount of brass hardware fixes the tension. For the full palette picture, finding kitchen paint colours that actually work alongside terracotta tile is worth doing before you commit to cabinetry paint.
Sealing is the non-negotiable condition of terracotta in a kitchen. Apply two coats of penetrating terracotta sealer before installation and grout — without it, cooking oil penetrates the highly porous clay body on the first use and the stain is effectively permanent. Daily cleaning with a pH-balanced mild detergent keeps it in excellent condition; avoid vinegar-based cleaners, bleach, or anything acidic, which strip the sealer. Reseal every one to two years — a simple water bead test tells you when: if water no longer beads on the surface, it’s time.
7. Hand-Painted Talavera Tiles With Artisan Character
Few kitchen backsplash ideas carry a richer story than authentic Talavera tile. Produced in Puebla, Mexico since the 16th century — where Spanish tin-glazing traditions merged with pre-Columbian pottery techniques — these hand-painted tiles are UNESCO-recognized traditional craft. The pattern vocabulary is vivid: cobalt blue, ochre yellow, terracotta orange, and warm white, painted in folkloric botanical and geometric designs that are entirely distinct from any machine-produced material.
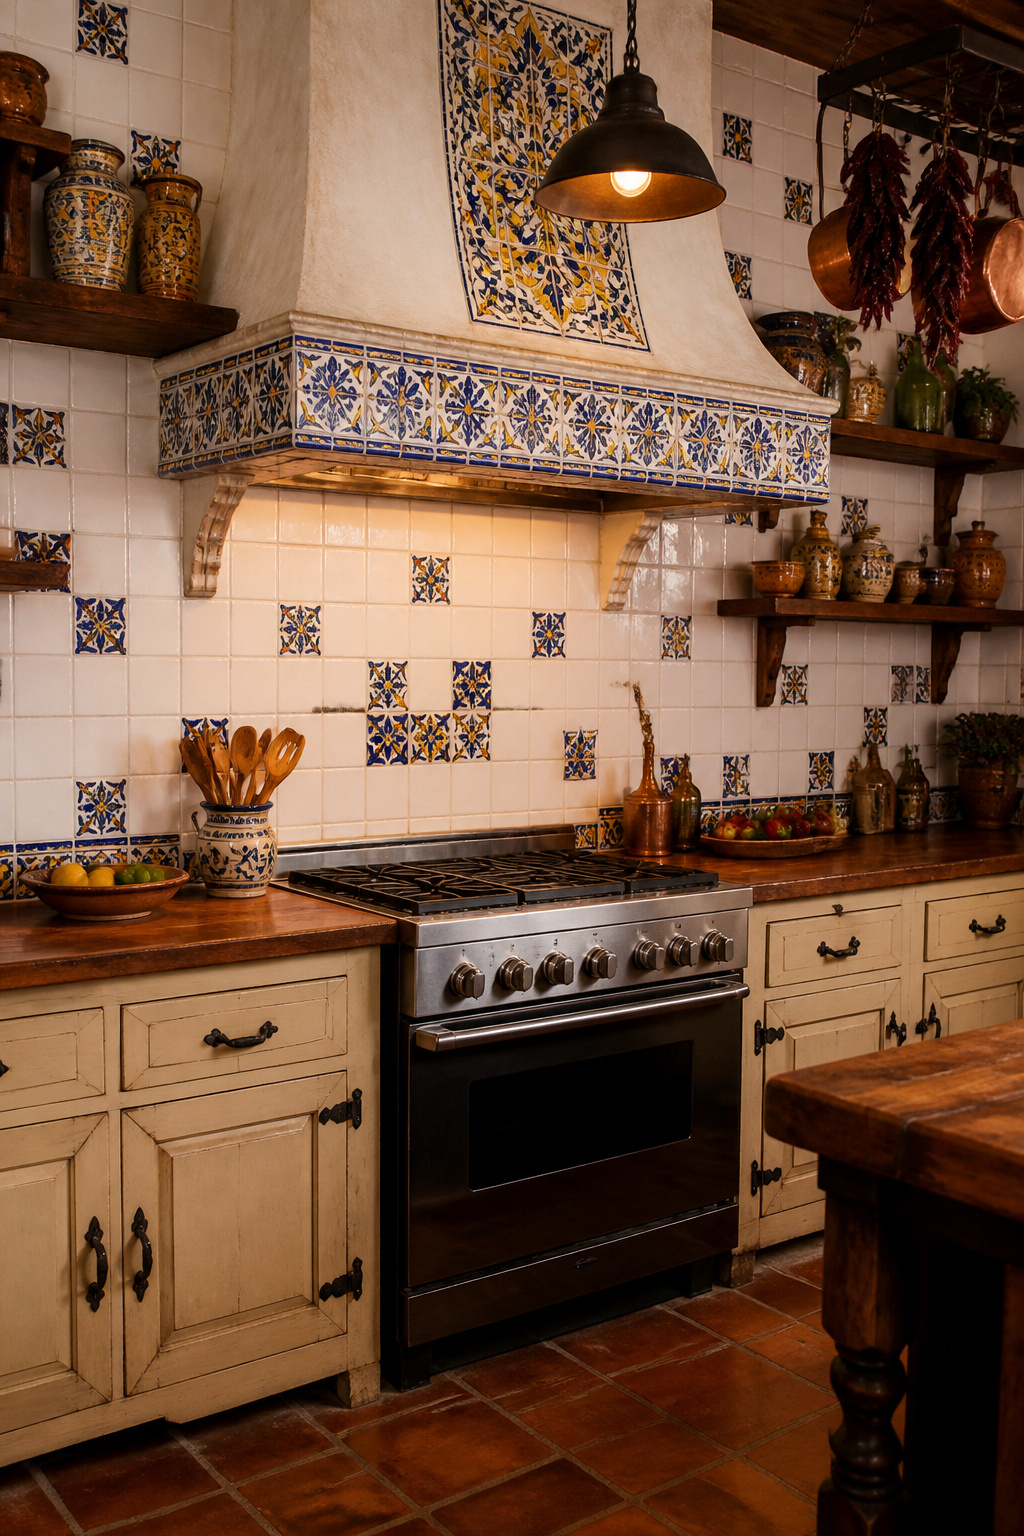
The smartest way to use Talavera is as an accent rather than a full field tile. At $8-25 per individual tile, covering a full 30-sq-ft backsplash in authentic Talavera adds up fast. Instead, use solid white ceramic field tiles throughout and place Talavera pieces at intervals — every fourth or sixth tile, a decorative border row at the top, or concentrated behind the range hood. That focused placement gives the personality without the budget strain, and it looks more collected than wall-to-wall repetition anyway.
The range hood surround is the most visually impactful location: it frames the cooking centre, sits at direct eye level, and transforms every cooking session into something pleasurable to look at. Keep the grout colour consistent across both the field and the accent tiles — white or off-white throughout — and place the Talavera pieces at slightly irregular intervals rather than in a perfect grid. Random placement reads as curated and intentional. A perfect pattern reads as purchased as a set and installed according to instructions.
8. Stacked Stone for a Dramatic Kitchen Backsplash Statement
There is no other kitchen backsplash idea with the physical depth and drama of stacked ledger stone. Where tile sits flat against the wall, stacked stone panels project 0.5-1.5 inches off the surface, creating genuine shadow and texture that change with every shift in ambient light. In the morning with natural light it reads one way; under pendant lights at dinner, the shadows deepen and the kitchen takes on an entirely different character.
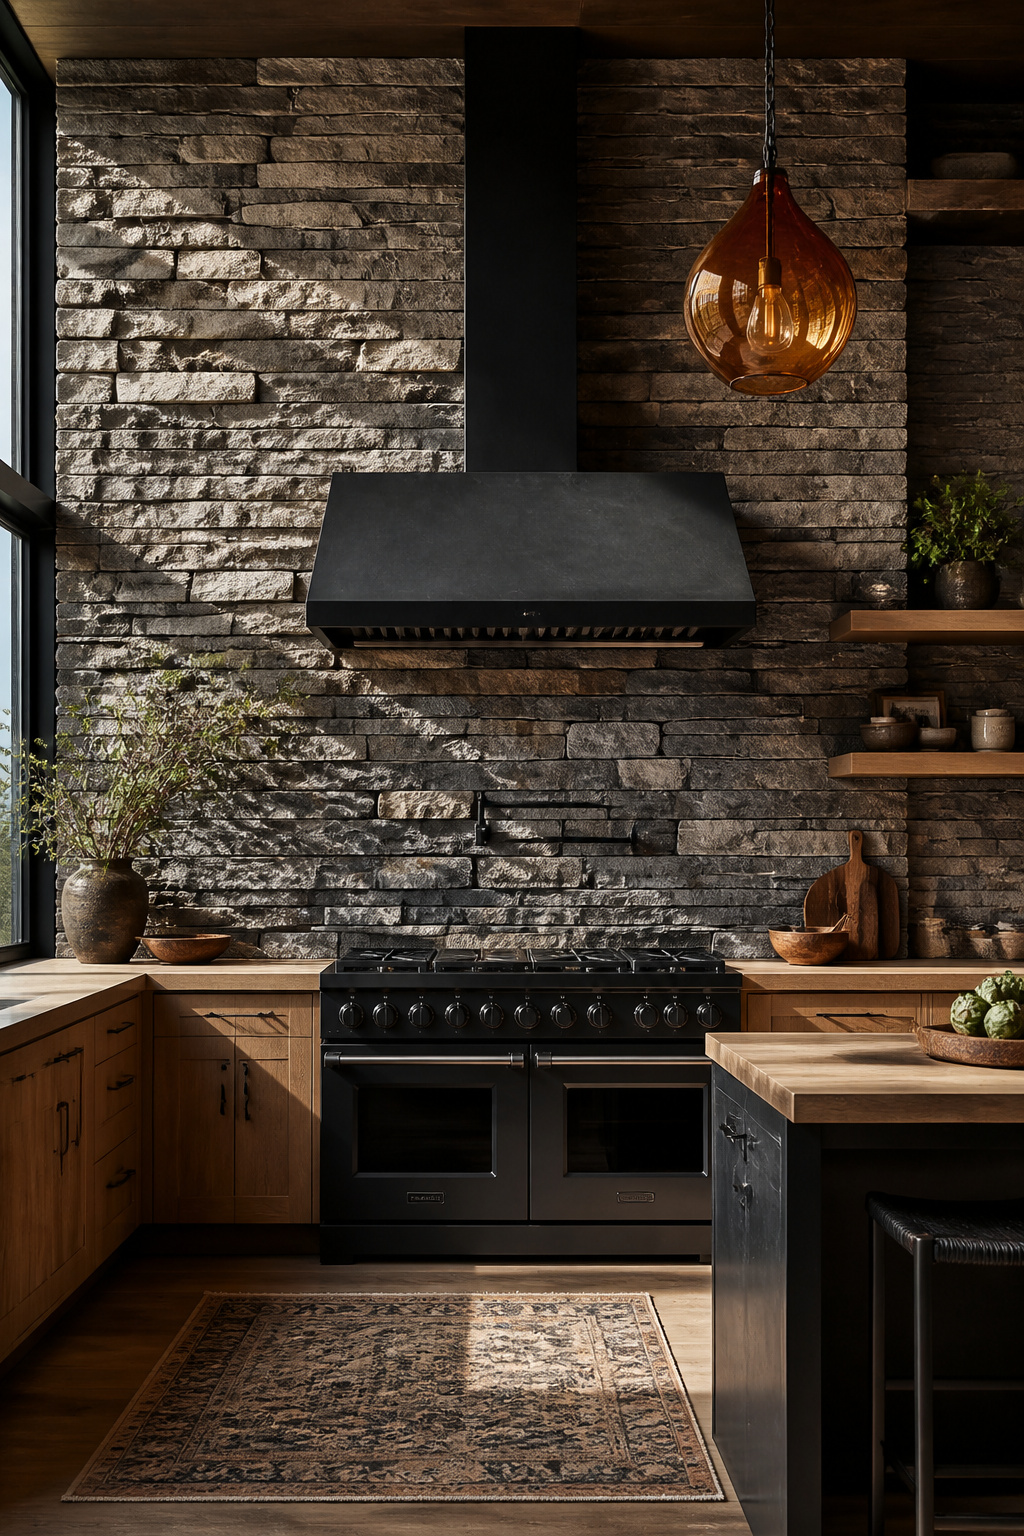
Ledger stone panels consist of thin-cut stone pieces adhered to a 6×24-inch mesh backing — natural options include quartzite, slate, travertine, and basalt, each with a distinct colour range and texture level. Natural stone panels are the more dramatic choice but also heavier at 12-18 lbs per sq ft, which requires cement board or a masonry wall for support — drywall alone won’t hold it. Engineered stone veneer panels (manufactured from concrete aggregate) weigh 8-11 lbs per sq ft, are more dimensionally consistent, and install faster. Material cost runs $15-40 per sq ft for natural panels, $8-18 per sq ft for engineered — add $20-40 per sq ft for installation in both cases.
The placement rule that makes or breaks the look: one statement wall, not four. The range wall or the wall behind an island is the right location. Using stacked stone as the full surround makes the kitchen feel cave-like; concentrating it on a single wall makes it feel like a deliberate architectural feature. Keep it away from the sink area — the texture traps moisture, and stone near a constantly splashing sink is a long-term maintenance problem.
9. Peel-and-Stick Tile for Renters and Quick Kitchen Refreshes
As kitchen backsplash ideas go, peel-and-stick tile has earned its bad reputation from cheap products — the 1mm vinyl panels that peel at the corners in six months and look unconvincing in person. But the category has genuinely improved. In 2026, premium brands like Smart Tiles (patented 3D gel technology), STICKGOO, and Stickwoll are producing products that last five to ten years in normal kitchen conditions, handle daily splatter and steam, and photograph convincingly. If you’re renting or need a quick refresh without a contractor, small kitchen remodelling solutions include peel-and-stick as a legitimate option when the right products are used correctly.
The installation rules that separate success from regret: clean the wall with a degreaser first, without exception. Kitchen walls accumulate cooking oil that degrades adhesive bonding — skip this step and the tiles start lifting within weeks. The wall surface must be smooth (textured walls reduce adhesion dramatically), the room must be above 65°F for the adhesive to activate, and freshly painted walls need a minimum 30-day cure before application. Thickness matters: minimum 2-2.5mm for a product that won’t dent or tear in daily use.
The honest limitations: most products are rated to 140-180°F, which is marginal directly behind a high-heat gas range. Install peel-and-stick at least six inches from active burners. Mirror and metallic finishes look great in photographs but attract fingerprints relentlessly in a working kitchen. Matte finishes — subway and mosaic patterns in white or marble-look — are the most visually convincing and show seam lines less at different angles. Always order samples first: colour accuracy on screens varies widely from what arrives in the box.
10. Glass Mosaic Tile for a Light-Catching Kitchen Backsplash
This kitchen backsplash idea behaves in a fundamentally different way from every other tile material — it doesn’t absorb light, it reflects and refracts it. A glass mosaic backsplash behind under-cabinet lighting can nearly double the perceived brightness of a small or north-facing kitchen in a way no ceramic, stone, or concrete-look tile can replicate. For dark kitchens especially, it’s one of the most effective design interventions available at any budget. The small kitchen decor ideas that deliver the biggest visual return almost always involve reflective surfaces — glass tile belongs in that conversation.
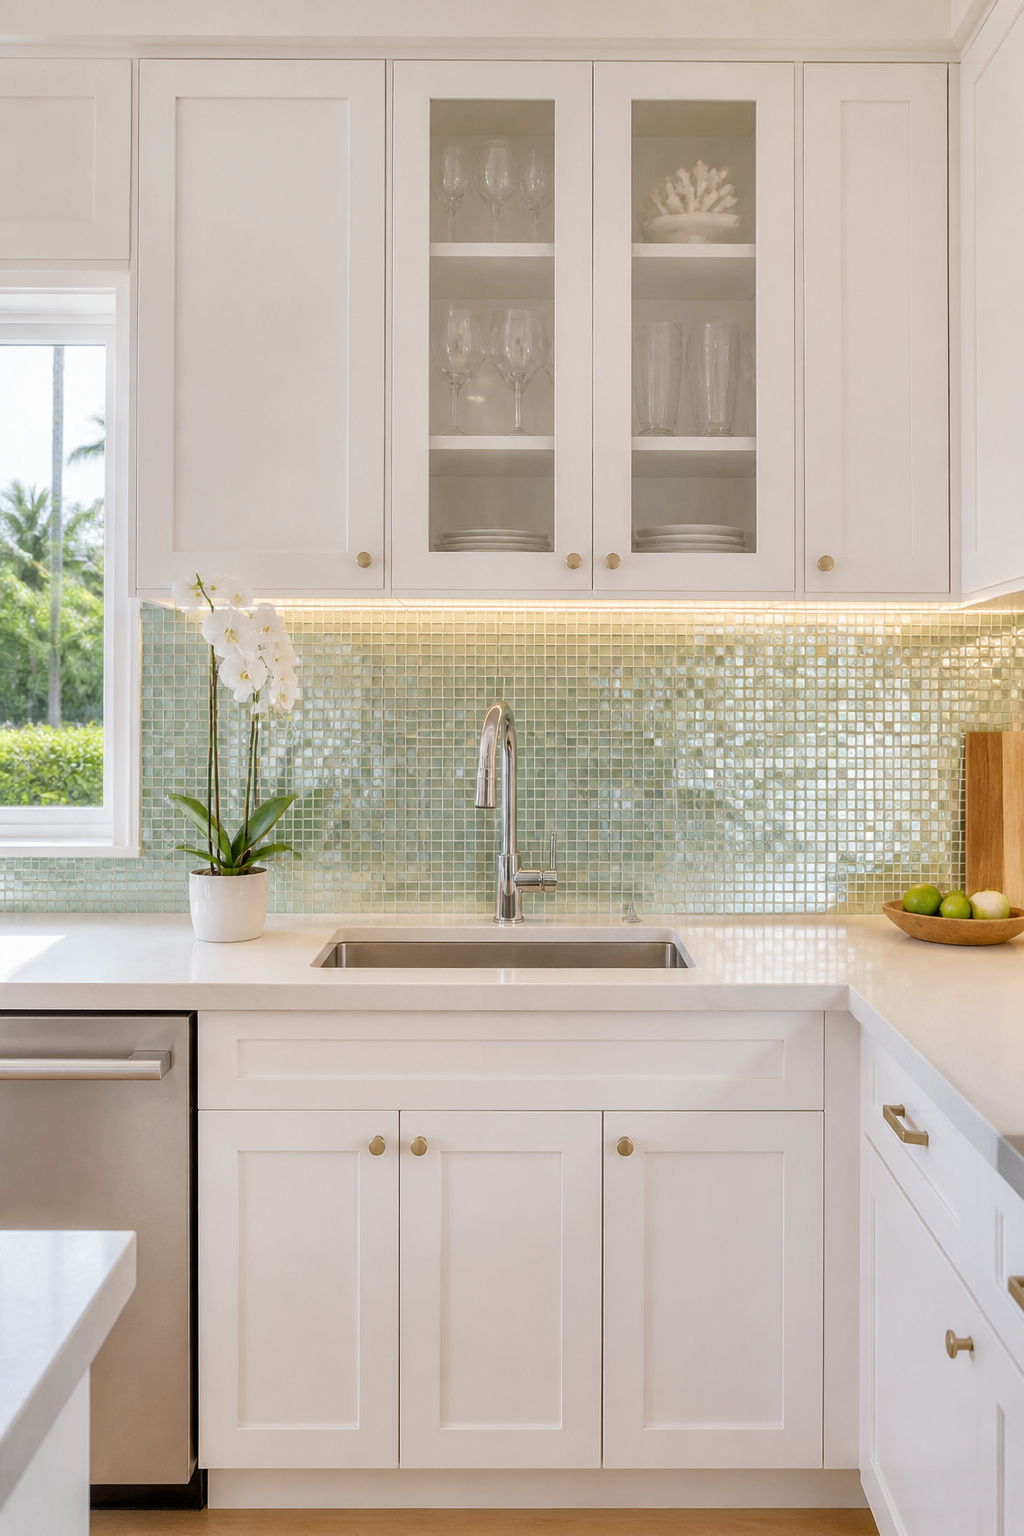
The colour choices span a wide range of effects. Iridescent white shifts between silver and pale gold depending on whether you’re looking at it under LED task lighting or warm ambient pendants. Sea glass greens and blues carry that luminous aquatic quality in any light. Jewel-toned glass (deep cobalt, amber, emerald) makes a strong colour statement — best concentrated at the range surround rather than the full backsplash in smaller kitchens, where the saturation can overwhelm. Frosted glass offers the light-diffusion quality without the mirror-like sparkle — a subtler choice for transitional kitchens.
The installation catch: white polymer-modified thinset is mandatory (ANSI 118.4 compliant) — never use standard grey thinset or organic mastic under light-coloured glass tile. Thinset colour is visible through the transparent tile body, and grey thinset makes white glass look permanently dirty. Apply a grout release agent before grouting and remove all haze within 20-30 minutes; glass surfaces don’t forgive cured grout haze the way ceramic does. The payoff: daily cleaning is actually easier than any grout-heavy tile — a damp cloth removes cooking residue completely, with no scrubbing required.
11. Full-Slab Stone as a Seamless Luxury Backsplash
The kitchen backsplash idea with the highest visual impact and the lowest daily maintenance is one that has no grout lines at all. A full slab backsplash carries the countertop material — or a complementary stone — up the wall in a continuous, uninterrupted surface. No grout to scrub. No seam for cooking residue to lodge in. Just a single wipe of a damp cloth and the whole surface is clean.
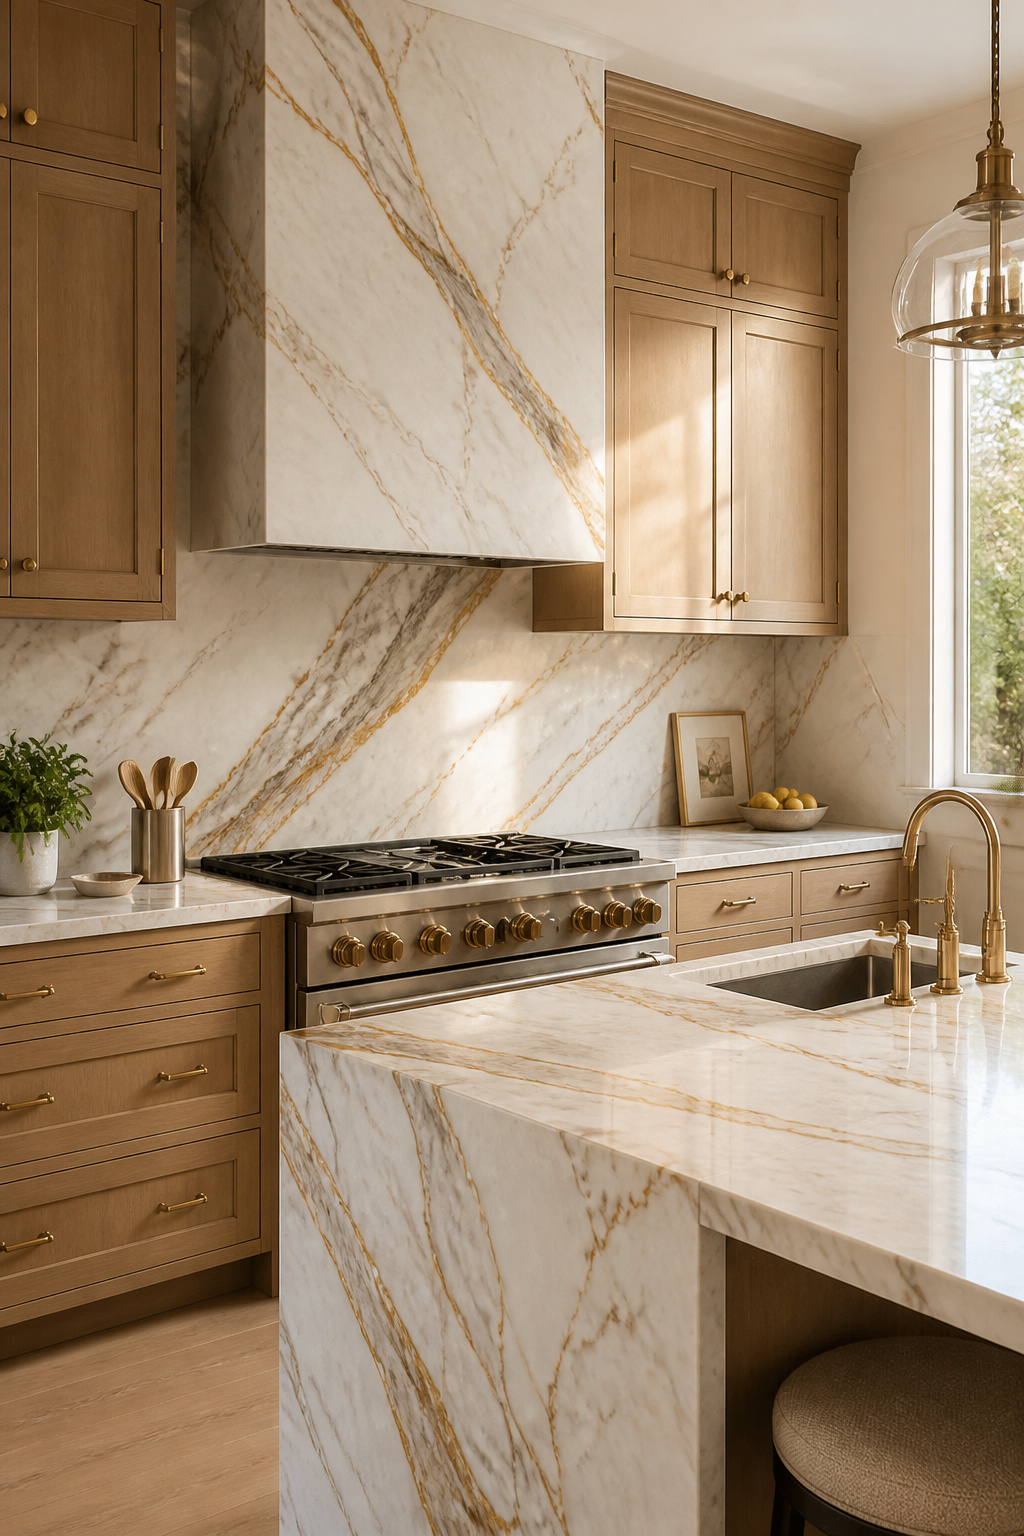
The most compelling version of this kitchen backsplash idea uses booked matched slabs — consecutive slices cut from the same stone block — so the veining mirrors across the countertop-to-backsplash transition. In a dramatic stone like Calacatta Gold or Paonazzo marble, this creates a symmetrical pattern that reads as a deliberate design element rather than just a material extension. You don’t need the identical material on both surfaces, though: a quartzite countertop with a complementary marble slab backsplash works well when the tones are coordinated. The contemporary kitchen decorating ideas that photograph most impressively almost always feature some version of this continuous slab treatment.
The cost is real: $70-180 per sq ft all-in for material and fabrication. A standard 30-sq-ft backsplash runs $2,100-5,400 total installed, depending on stone type and market. Quartz slab averages $90 per sq ft and requires no sealing — the most practical option. Marble averages the same but requires annual sealing. Quartzite runs $60-120 per sq ft and requires sealing once or twice a year. The investment makes most sense in a kitchen that is already high-specification: custom cabinetry, quality countertops, quality appliances. A slab backsplash with stock builder cabinets looks like expensive tile on cheap walls.
12. Concrete-Look Tile for an Industrial Kitchen Edge
Concrete-look tile is one of the kitchen backsplash ideas where the engineered version genuinely outperforms the real material. Real concrete has romantic appeal — the raw material quality, the slightly pitted surface, the industrial credibility. Real concrete in a kitchen has less romantic practical qualities: it needs resealing every one to two years, it can crack with building movement, and cooking grease penetrates micro-pores through the sealer over time. Concrete-look porcelain gives you the aesthetic with none of those issues, and in large format (24×48 or 24×24 inches), it’s nearly convincing.
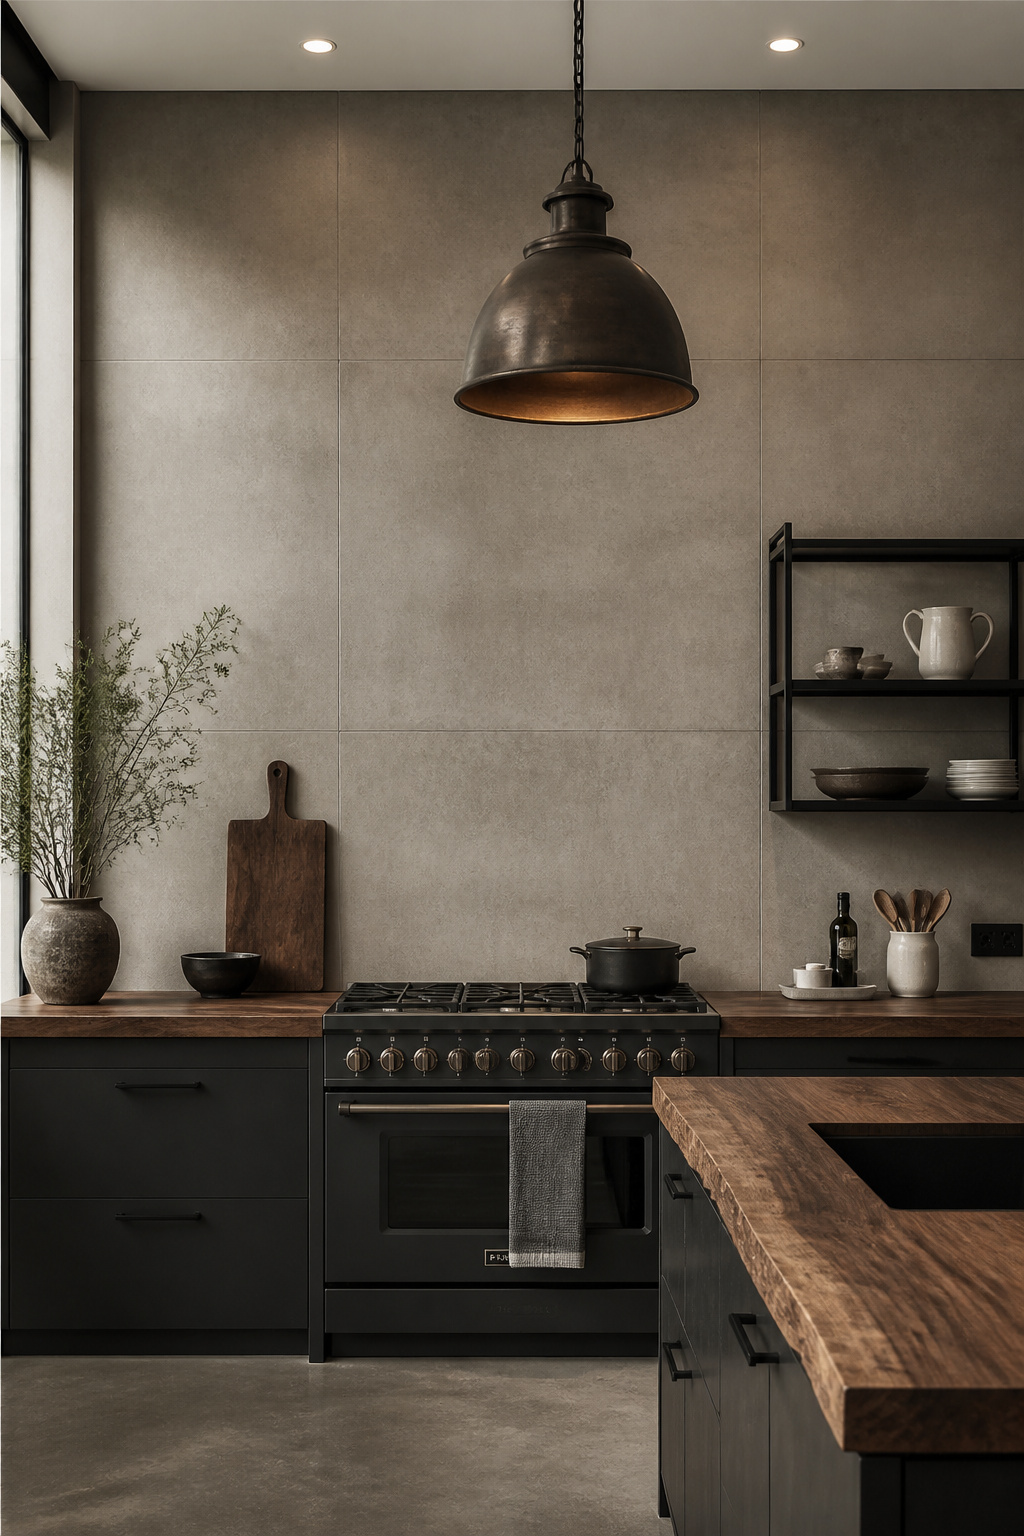
The key is the format. Small concrete-look tiles (4×4, 6×6) read as ceramic tile with a concrete texture. Large-format tiles minimise grout lines to near-invisible, creating what reads from across the kitchen as a continuous concrete surface. The matte finish absorbs rather than reflects light — the opposite of glass tile — giving a quiet, receding quality that suits kitchens where the cabinetry and hardware are doing the visual work. Warm concrete tones (grey-beige, greige, warm taupe) are more livable long-term than stark cold grey, which can make a kitchen feel like a parking structure in winter light. Pairing concrete-look tile with smart kitchen furniture ideas that lean warm — wood stools, leather barstools, a timber dining table — prevents the room from tipping too far into cold minimalism.
Black matte hardware is the most popular companion — pulls, faucet, range hood in matte black reinforces the raw material palette without adding colour. One organic element goes a long way: a live edge floating shelf, a ceramic pendant, or woven bar stools provide the warmth that no hardware choice achieves on its own.
13. Arabesque Tile: A Statement Kitchen Backsplash Idea With Old-World Charm
The arabesque shape — a pointed oval that interlocks on all sides — traces back to medieval Moorish Spain. The Alhambra palace in Granada, built in the 14th century, used the same interlocking geometry across its walls and arches that you’ll see in kitchen backsplashes today. That seven-century pedigree is part of what makes arabesque read as enduring rather than trendy: it sits outside the normal pattern trend cycle because it references something genuinely historical.
The shape itself does what geometric tile achieves through contrast — it creates visual complexity — but through curving form rather than graphic colour difference. Available in ceramic, porcelain, marble, and glass, arabesque works across a wide range from entry-level ($4-8 per sq ft in ceramic) to premium ($20-35 per sq ft in marble or glass). White arabesque on white grout is the understated version: the shape creates gentle shadow and texture without colour contrast, reading as sophisticated and handmade up close but blending into the background at a distance. For a stronger statement, coloured arabesque in Moroccan blue, mint green, or terracotta against white field ceramic delivers vivid pattern-forward energy in eclectic and Mediterranean kitchens. For more on getting kitchen tiles design tips right across the whole kitchen, the combination of arabesque with other surface materials rewards careful planning.
Sizing It Right: Mini, Standard, or Large Arabesque
Scale selection by kitchen size matters here more than with rectangular tile. Mini arabesque (1.5×2.5 inches) suits compact backsplashes — the pattern repeats enough times to be legible in a limited space. Standard arabesque (3×5 or 4×6 inches) belongs in medium to large kitchens where the individual shape is visible at counter height without looking compressed. Large arabesque (6×10 inches) is best limited to a single accent area like the range surround — at full scale across the whole backsplash it becomes graphic rather than decorative.
14. Stainless Steel Panels for a Professional Kitchen Finish
Stainless steel is the kitchen backsplash idea that prioritises cooking performance over aesthetics — commercial kitchens specify it behind ranges for three reasons that apply equally at home: it withstands direct heat from gas flames, it doesn’t absorb grease, and it cleans in seconds. For home cooks who cook hard — searing proteins at high heat, stir-frying regularly, reducing sauces that splatter — stainless steel is the most genuinely practical kitchen backsplash material available. No tile, however well-glazed, matches its heat resistance and cleaning simplicity.
The residential version of this is 304-grade brushed stainless steel (the same alloy used in kitchen appliances: 18% chromium, 8% nickel). The #4 brushed finish is the right choice for a working kitchen — the directional grain hides fingerprints, minor scratches, and the day-to-day evidence of cooking in a way the mirror (#8) polish absolutely does not. Mirror finish shows every fingerprint and requires daily polishing; brushed finish maintains a clean, consistent appearance over years of use with no special care.
Standard pre-cut panels in common sizes (24×36, 30×30, 36×30 inches) run $80-300 per panel and suit standard range widths with minimal cutting. For non-standard widths or commercial-range surrounds, custom fabrication from Cut2Size Metals or Custom Metal Home costs $150-450 per panel in 20-gauge material with one to two weeks lead time. Installation uses silicone adhesive (permanent) or contact cement (repositionable — better for renters). Caulk the joint between steel panel and countertop with clear silicone, not grout — the two materials expand at different rates, and rigid grout cracks at this junction almost without fail.
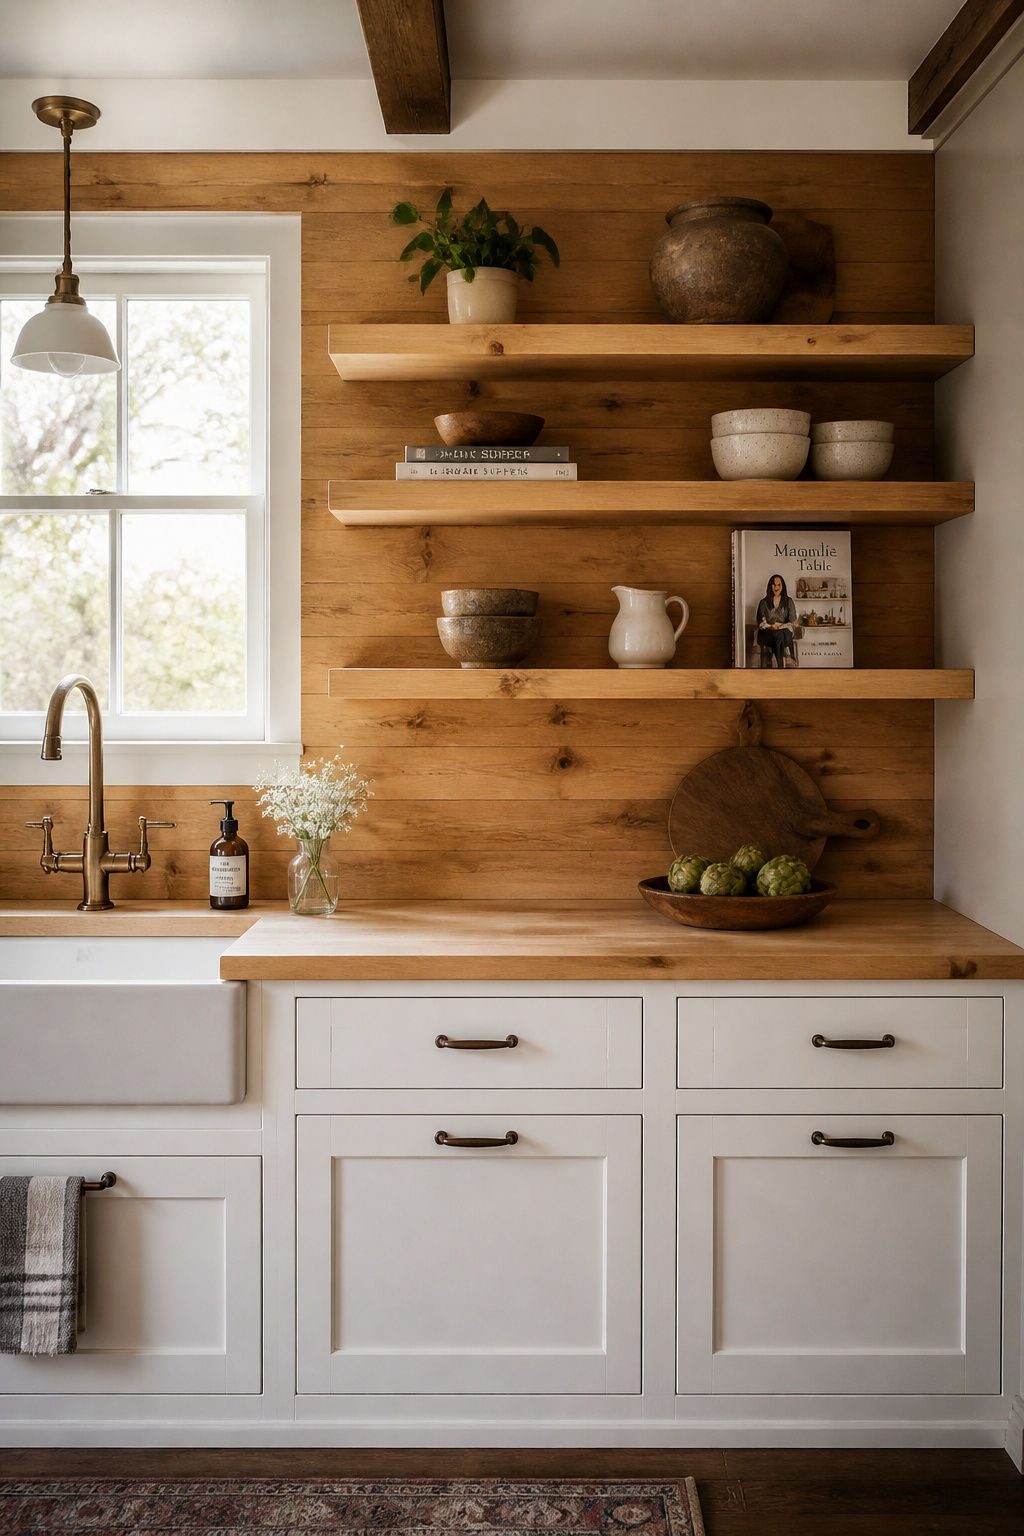
15. Open Shelving With a Tiled Wall Behind for a Layered Kitchen Look
This kitchen backsplash idea changes the relationship between the tile and everything else in the kitchen. With standard upper cabinets, the backsplash is visible only in the narrow strip below the cabinet bottom — maybe four to eighteen inches. Remove those cabinets and replace them with floating shelves, and the backsplash becomes visible from countertop to ceiling, fully integrated into the display of everything you own and choose to show.
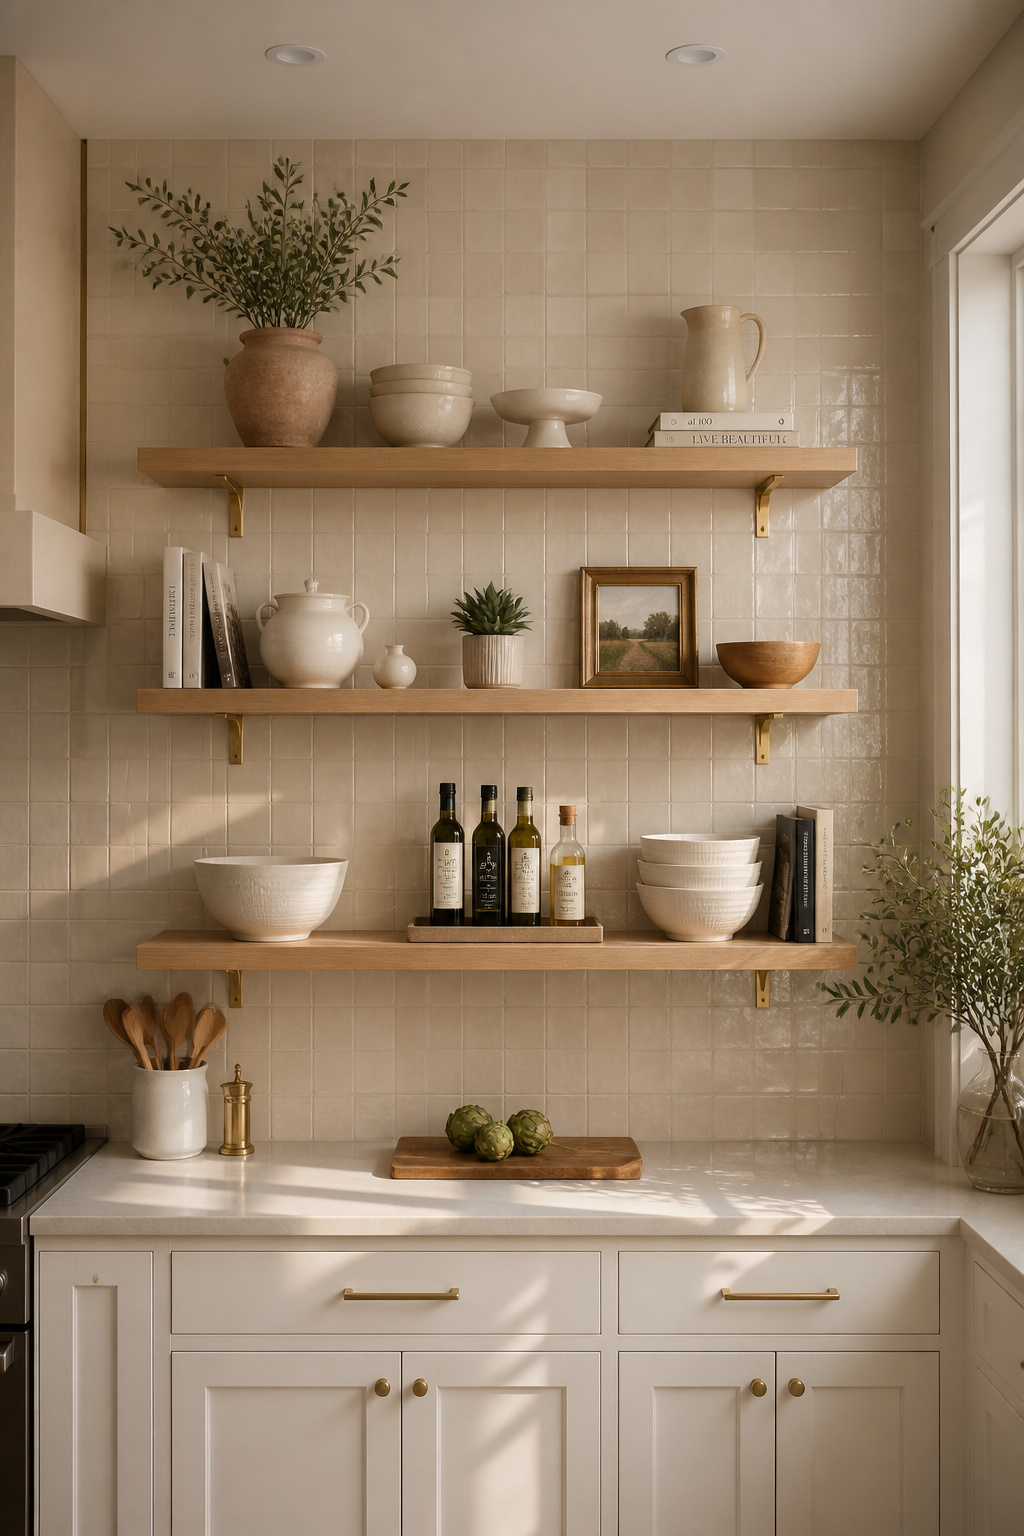
The tile you choose now works as a background for ceramics, glassware, cookbooks, and plants. White subway tile is the universal backdrop that makes everything in front of it look better — it recedes and lets the objects lead. Zellige tile adds warmth and surface variation without introducing pattern that competes with what’s on the shelves. Strong patterned tile (geometric, Talavera, cement tile) competes rather than supports — it works only if the shelves are kept deliberately minimal, two or three carefully chosen objects per shelf at most. The principle: texture not pattern. Surface interest allows the shelf contents to be the focal point; graphic repetition fights them. For shelf styling ideas once the tile is up, creative ways to style open kitchen shelves is worth working through before you start arranging — the relationship between tile backdrop and object display rewards some thought.
The installation sequence matters: always tile the full wall first, then mount the shelves over the tile. This lets you reposition shelves later without leaving a tile-bare gap on the wall. Drilling into tile requires a diamond-tip drill bit at low speed to avoid cracking. Use toggle bolts rather than standard wall anchors — they grip the drywall behind the tile and reliably support 30-50 lbs per bracket.
16. Painted Shiplap as a Charming Budget Kitchen Backsplash Idea
Painted shiplap won’t work in every kitchen and it absolutely won’t work near every appliance — but in the right situation, it delivers a quality of warmth and character that tile genuinely cannot match, at a material cost of $45-120 for a 30-square-foot section (compared to $150-900 in mid-range ceramic). The horizontal board lines create a visual rhythm that subtly widens narrow kitchens, and painted white or soft grey, the material reads as clean and relaxed simultaneously — a combination that suits farmhouse, cottage, and casual kitchen styles with ease.
The paint and primer choices make or break the long-term result. Prime bare wood with a stain-blocking primer (Zinsser BIN or Bulls Eye 1-2-3) before any topcoat — without it, wood tannins bleed through paint within months and create yellowish staining that no second coat fixes. For the finish coat, satin is the practical minimum — it withstands wiping without scuffing and repels light kitchen moisture. Semi-gloss is better for kitchens near sink areas; it’s the same finish used in commercial kitchens and children’s rooms because it handles repeated washing. If the white kitchen remodel ideas you’re considering include shiplap, the paint prep steps are more important than the material itself.
Where It Works and Where It Doesn’t
The placement rules are non-negotiable: no painted shiplap directly behind a gas range. Grease splatter embeds in the wood grain and the shadow gaps between boards — it can’t be cleaned out of those joints without years of accumulated discolouration. The NKBA recommends non-porous surfaces within 18 inches of any burner. Shiplap belongs behind the sink wall (with sealant at the counter edge), below open floating shelves, or in a breakfast nook that’s clear of cooking appliances. In those locations, it’s genuinely one of the warmest, most personal kitchen backsplash ideas on the list.
17. Cement Tile Patterns for Eclectic, Bold Personality
This kitchen backsplash idea occupies territory that no other material reaches — cement tile has a chalky, matte depth with pattern pressed into the tile body rather than glazed onto a surface, giving it a handmade quality that reads as genuinely artisan regardless of how it’s used. The pattern vocabulary is rich: Moroccan star patterns, French encaustic florals, graphic Spanish geometric repeats, and contemporary bold abstracts from brands like Clé, Granada Tile, Cement Tile Shop, and Atchison Home at $10-25 per sq ft.
The sealing requirement isn’t a caveat — it’s the entire condition of this kitchen backsplash idea working long-term. Apply two coats of penetrating sealer after setting but before grouting; the process takes over ten days when done correctly (set, wait 24 hours, seal coat one, wait 24 hours, seal coat two, wait 24 hours, grout, then seal again after grout cures). Unsealed cement tile stains from cooking oil within the first cooking session — not hypothetically, but reliably and usually permanently. Use a penetrating impregnating sealer (StoneTech BulletProof or V-Seal) rather than a topical sealer, which peels over time. Reseal every one to three years depending on cooking intensity.
The one piece of honest advice that owners wish they had before choosing: start with less rather than more. A cement tile pattern concentrated on the range surround wall only, rather than the full backsplash, shows the material’s personality at its best while allowing the rest of the kitchen to breathe. The Otto House, which documented their full-kitchen cement tile installation over several years, consistently recommends an accent approach over full coverage. Full-pattern cement tile is genuinely beautiful, but it takes a very settled, confident kitchen design to carry it without feeling overwhelming.
Choosing the Right Kitchen Backsplash Ideas for Your Home
The kitchen backsplash ideas on this list span the full range from budget to investment — but the right choice is less about price than about how you actually cook. The backsplash decision that looks like a style choice is actually a cooking-habits decision. A kitchen where someone cooks high-heat meals five nights a week needs fundamentally different materials than a kitchen that sees weekend pasta and coffee every morning. Get that matching right and the style almost takes care of itself.
For high-heat, high-grease cooking — stir-fry, searing, deep frying, anything with spattering fat — non-porous and heat-tolerant materials are the starting point: glazed ceramic, porcelain, stainless steel, or stone tile in the range zone. Wood, painted shiplap, and cement tile belong on peripheral walls away from the burners. Low-maintenance preference points clearly toward glass tile, glazed ceramic, and quartz slab — no sealing, no special cleaners, wipe down and done. Marble and terracotta are beautiful and entirely manageable, but they ask you to care for them in a way that glazed porcelain doesn’t.
Budget-to-Impact: Where to Invest and Where to Save
For the budget: white subway tile with dark grout at $3-6 per sq ft in tile delivers a classic, always-photographable result that adds genuine value. Mid-range with designer appeal — Zellige-look porcelain or arabesque tile at $8-15 per sq ft — gets you most of the visual quality of premium materials at a manageable price. The full-slab stone investment ($70-180 per sq ft all-in) pays back in resale value and daily ease, but only in a kitchen that is already high-specification — the slab backsplash with budget cabinetry incongruity is real. And wherever your budget sits, skip the $1-2 per sq ft peel-and-stick products: they look unconvincing and you’ll replace them within 18 months, spending more in the end.
The kitchen is the room most people spend the most time in. Get the backsplash right and you’ll notice it every single day — in the best possible way.